Winter greenhouses: features of structure, heating, lighting and ventilation. How to properly build a winter greenhouse with your own hands: advice from the experts Video: instructions for installing heating in a greenhouse
A winter greenhouse is the dream of many gardeners; it is possible to grow vegetables and herbs, flowers and berries all year round. Construction of a winter greenhouse is not a cheap task; to ensure the required microclimate, it will be necessary not only to build the structure itself, but also to take care of thermal insulation, install microclimate maintenance systems, and resolve issues of electricity and water supply. Read our article about how to build a reliable winter greenhouse suitable even for harsh climates.
How do winter greenhouses differ from summer ones? Why is their construction so much more expensive? To find answers to these questions, you need to consider the processes occurring in the greenhouse in winter.

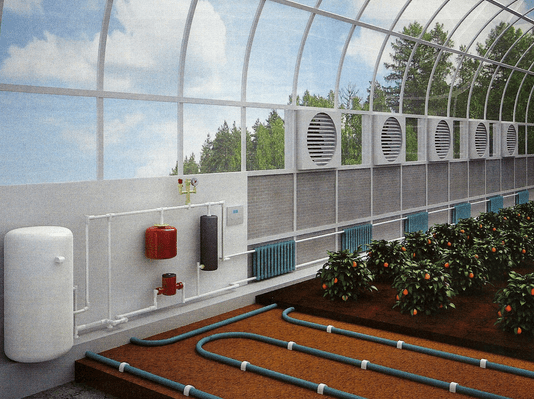
Heating
In a summer greenhouse, the main heating occurs due to the energy of the sun. During the day, the soil and greenhouse structures receive a large amount of solar heat; during the night they gradually release it. Thanks to this, fluctuations in night and day temperatures are insignificant, and the plants feel comfortable. Even in cloudy weather, solar energy is sufficient for heating due to the long daylight hours.
In winter, especially in northern latitudes, the sunny day is short, and the sun itself is low above the horizon most of the day. The sun's rays pass through the soil casually, practically without heating it. During the night the soil has time to cool completely, and in cold weather it freezes. For this reason, the energy of the sun is not enough to warm up winter greenhouses, and they have to be equipped with heating systems.

You can heat winter greenhouses: using stoves, water heating radiators, electric and gas heaters. The choice of method depends on the resources available to you and the area of the greenhouse. The main condition: the power of the heating device must be enough to heat the winter greenhouse in the coldest months.
Insulation
Heating a greenhouse will be effective only if it is well insulated.
Ways to reduce heat loss:
- deepening the greenhouse into the ground;
- construction of blank insulated walls;
- use of double glazing or polycarbonate with a thickness of 10-25 mm;
- maximum sealing of joints and cracks.
Recessed greenhouses have excellent thermal insulation characteristics, but have a number of disadvantages, which are listed below.

- For good thermal insulation, the structure must be buried below the freezing depth of the soil, which for temperate latitudes is about 1.5 m, and for colder regions - up to 2 m. Preparing a pit of such a depth increases the estimate.
- Buried greenhouses cannot be installed in areas with high groundwater levels, otherwise a drainage system will be necessary.
- To construct the walls of a recessed greenhouse, high-quality moisture-proof concrete is required.
All these measures increase the cost of a buried greenhouse and complicate the technology for building it yourself.


Blind insulated walls can be made of foam concrete, thermal blocks or wood. In this case, the insulation is polystyrene foam - it is easy to install on the walls, it is not afraid of moisture and does not rot. To insulate the soil, use an insulated blind area with a width of at least 0.5 m.
Note! Insulation of greenhouse walls is carried out only from the outside!

The covering of the greenhouse also matters. It should transmit light well, but at the same time provide good thermal insulation. When using glass, double or triple glazing is required with a distance between panes of 10-30 mm.

When using polycarbonate, you need to use. They will allow you to insulate the internal honeycombs and create a sealed air layer, the thermal insulation properties of which are quite high. Polycarbonate with a thickness of 10, 16 or 25 mm can be laid in one layer. With a polycarbonate thickness of 4 or 6 mm, double skinning is required.
Note! Film for winter greenhouses can only be used in regions with rare snowfalls. With a heavy snow load, it stretches and breaks.
Prices for foam plastic
Styrofoam
Watering and humidification
Water is necessary for the successful growth and fruiting of any greenhouse crop. With a large greenhouse area, the volumes of water used will also be impressive, so the source of water supply must be selected at the stage of laying the foundation.
If you plan to draw pipes from a water supply system or a well, they need to be laid at a considerable depth (at least 1 m for the southern regions and at least 1.8 m for the northern regions). For large greenhouses intended for growing products for sale, it is advisable to make a well right next to the structure or in the vestibule.

To heat water, you can use containers with a volume of 0.2 to 1 m 3. They are usually installed at some elevation - this creates the necessary pressure in the irrigation system. It is better to place the containers in the northern part of the greenhouse so as not to shade the plants. The water in them is heated under the influence of sunlight; it is also possible to equip the containers with heating elements for artificial heating.

Note! A container of water is a good heat accumulator. Heating up during the day, it gradually cools down at night and gives off heat to the air, which helps reduce temperature fluctuations.
Ventilation
A ventilation system is a prerequisite for the successful growth of most crops. Due to ventilation, excess heat and moisture are removed from the greenhouse, oxygen and carbon dioxide are exchanged. Air exchange in greenhouses is ensured using forced or natural ventilation systems.
Most often, vents are installed in greenhouses for ventilation. They are installed at the top of the walls or on the roof. The higher the window is located, the more effective the ventilation will be: warm air itself rises, giving way to cooler air. You can open and close them manually or using .

Lighting
In summer, daylight natural light is sufficient for most crops. In winter, plants need additional lighting. For this purpose, gas-discharge lamps DNaT and DNaZ are used in winter greenhouses.

The minimum illumination rate, and therefore the number of lamps, depends on the plants being grown. In most cases, the total power of the lamps can be calculated based on the area of the greenhouse - 100 W of electrical power is sufficient for 1 m2. For example, for a greenhouse with an area of 20 m2, you need 2000 W or 5 HPS lamps of 400 W each, as well as starting equipment for them.
 Sodium mirror phytolamps
Note! HPS and HPS lamps become very hot. They need to be placed under the ceiling in special lamps with reflectors.
Prices for phytolamps
phytolamps
Video - DIY winter greenhouse construction (part 1)
Video - DIY winter greenhouse construction (part 2)
Video - DIY winter greenhouse construction (part 3)
How to build a winter greenhouse with your own hands
It is better to order a greenhouse with an area of more than 100 m2 for growing vegetables or flowers for sale from a company. Greenhouse manufacturers offer ready-made turnkey solutions - hangar or block structures with automatic heating, watering and ventilation systems. Greenhouses made according to a standard design are cheaper in this case, and they are also adapted for mechanized maintenance.

You can build a small winter greenhouse for home use yourself.
Before construction begins you must:
- choose the installation location, shape and size of the greenhouse;
- draw a sketch taking into account the location of the beds, heating, irrigation and ventilation systems;
- calculate the required materials.
The winter greenhouse is located in a lighted place, sheltered from cold winds. It can also be attached to a garage, utility room or residential building on the sunny side. A free-standing winter greenhouse is oriented from north to south, while the northern wall is made blank (from insulated materials) or in the form of a vestibule.

The simplest and most reliable design that provides good thermal insulation is a gable greenhouse with solid walls made of foam concrete with insulation. The southern end wall is covered with polycarbonate in two layers. The vestibule on the north side is designed to protect against cold winds and at the same time serves as a boiler room and a storage room for equipment, boxes and shelving. The slopes of the greenhouse are covered with reinforced polycarbonate. The wooden rafter system eliminates the appearance of cold bridges. A sketch of the greenhouse is shown in the figure.

For a greenhouse of the indicated sizes you will need:
- concrete grade M200 for the foundation - 3.6 m 3;
- reinforcement Ø10 mm – 100 m;
- reinforcement Ø6 mm – 130 m;
- edged board for formwork, 25 mm – 1 m 3;
- foam concrete block 200x300x600 mm – 170 pcs.;
- masonry glue (25 kg) – 9 bags;
- polystyrene S 100 mm – 3.3 m 3;
- board for rafters 40x150 mm - 0.5 m 3;
- polycarbonate 10 or 16 mm thick – 5 sheets;
- end profile L=2.1 m – 15 pcs.;
- ridge profile L=6 m – 2 pcs.;
- connecting profile L=6 m – 12 pcs.;
- self-tapping screws with thermal washer – 200 pcs.
Note! The construction of such a greenhouse takes on average 1.5-2 months. Of these, 3-4 weeks are spent on building and drying the foundation. The air temperature should be above zero, optimally from 15 to 23 degrees.
Foundation for a greenhouse
Foam concrete structures require a solid foundation. The best option is a shallow strip foundation made of concrete with reinforcement. The foundation is required not only around the perimeter of the greenhouse, but also at the site of the main partition separating the vestibule and the greenhouse.

Step 1. Clearing and marking the site. The area for the greenhouse is cleared of debris and vegetation and leveled if necessary. Using pegs and twine, the dimensions of the building are marked.

Step 2. Marking the foundation. Install cast-offs from bars and boards in the corners of the future building. A string is attached to them and stretched along the perimeter of the foundation. Check the perpendicularity of the corners and the equality of the diagonals. Using twine, mark the outer and inner contours of the foundation.

Step 3. Soil sampling and sand filling. Using the resulting markings, they dig a trench 50 cm deep. The bottom of the trench is covered with a mixture of sand and crushed stone or just sand, compacted, and periodically watered.
![]()
Step 4. Installation of formwork. The formwork is made from 25 mm edged boards. If the soil is dense, the formwork can only be placed above ground level; on soft soils it is installed at the bottom of the trench. The formwork fastening diagram is shown in the figure.

Step 5. Reinforcement. The foundation is made with mandatory reinforcement, otherwise, during seasonal soil movements, the foam concrete masonry may crack. For longitudinal reinforcement of the tape, reinforcement grade 10-A-III (A400) GOST 5781-82 is used, for transverse ties - 6-A-I (A240) GOST 5781-82. The reinforcement at the intersections is knitted with annealed wire. Particular attention is paid to the reinforcement of corners.

Step 6. Pouring concrete. For a foundation of the specified dimensions, 3.6 m 3 of concrete will be required. It is quite difficult to knead it yourself - the process will be lengthy and labor-intensive, and besides, when pouring layer-by-layer, the strength of the foundation is reduced. Builders recommend not saving money and ordering ready-mixed concrete grade M200. Concrete is poured into the prepared formwork, pierced with a rod or vibrating hose and the surface is leveled.

Step 7 Maturing of concrete. The maturation period of concrete depends on temperature. Optimal conditions are 18-22°C, in which case the concrete will gain sufficient strength for construction in 14-21 days. At other temperatures, it is recommended to withstand the foundation for at least 4 weeks. While drying, it is better to cover the concrete with plastic film to maintain constant humidity. When the top layer dries out, the concrete is moistened with water.

Note! The formwork can be removed after 5-7 days. Formwork boards can be reused.
Prices for concrete mix
concrete mixture
Foam concrete walls
It is recommended to use special glue for laying foam concrete blocks. It allows you to obtain seams of minimal thickness, and therefore reduce heat loss. The blocks can also be laid on cement mortar, but in this case additional insulation and plastering of the walls will be required.
Step 1. Waterproofing. It is performed using rolled materials (such as roofing felt, stekloizol, bikrost or their analogues). A thin layer of cement-sand mortar is spread on a completely dried foundation (ratio of cement to sand 1:4). Lay rolled waterproofing with an overlap at the joints and level the surface using a lath and level.

Step 2. Laying the first row. The first row of foam blocks is placed on a cement-sand mortar on top of the waterproofing. The solution is applied with a trowel with a reserve, blocks are installed and excess mixture is removed.

Step 3. Laying subsequent rows. All subsequent rows are placed on special glue. It is applied with a notched trowel to all joining surfaces - both horizontal and vertical. The blocks are tightly adjusted to each other by lightly tapping with a rubber hammer. Rows are placed with dressing on 1/2 block.

Step 4. Reinforcement. The masonry is reinforced with welded masonry mesh every 2-3 rows. With a block height of 30 cm and a calculated wall height of 150 cm, 5 rows of masonry are obtained, so you can lay a reinforcing mesh between the third and fourth row. Glue is applied over the mesh, and a block is placed on top. You can also reinforce the masonry using reinforcement rods placed in the grooves selected in the blocks.

Step 5. Doorways. Blocks for doorways must be cut to size. This can be done with a special hacksaw using a template - the blocks are cut quite easily.

Step 6. Insulation of walls. The walls are insulated from the outside with polystyrene sheets. The thickness of the insulation depends on the region and ranges from 30 to 150 mm.

Table 1. Insulation thickness for foam concrete walls of a greenhouse.
| Region | Polystyrene thickness, mm |
|---|---|
| South (Krasnodar, Astrakhan) | 30-40 |
| Volga region (Volgograd, Saratov) | 40-50 |
| Volga region (Ulyanovsk, Kazan, Nizhny Novgorod, Izhevsk) | 50-60 |
| Center (Moscow, Yaroslavl, Voronezh) | 60-70 |
| Northwestern Federal District (St. Petersburg) | 60-70 |
| Far East (Khabarovsk, Vladivostok) | 70-80 |
| Ural (Orenburg, Ufa, Ekaterinburg, Perm) | 70-90 |
| Siberian Federal District (Irkutsk, Novosibirsk, Krasnoyarsk, Tyumen) | 80-100 |
Step 7 Wall decoration. The walls of the greenhouse can be finished with any moisture-resistant material, for example, decorative brick, siding or facade plaster. The finishing will not only improve the appearance, but will also provide additional thermal insulation and wind protection.
 Decorating greenhouse walls with decorative bricks
Note! Polystyrene can be replaced with polystyrene foam or polyurethane. The use of mineral wool is not recommended due to high room humidity.
Greenhouse roof
The posts, frames and rafters are made from 40x100 mm wooden boards. The rafters are installed in increments of 50-70 cm (depending on the expected snow load).
Step 1. South wall. A bottom trim board is laid on top of the waterproofing on the foundation and secured to the foundation with anchor bolts. The side posts made of boards are attached to the foam concrete masonry with anchors. The intermediate posts and the top trim are secured with corners and self-tapping screws.

Step 2. Top harness. A top trim board is laid along the perimeter of the block masonry and secured to anchors. The fastening step is 60 cm. The top trim is needed to distribute the weight of the roof over the entire wall; if you place the rafters directly on the blocks, point loads are formed, which is why the foam concrete begins to crumble.

Step 3. Posts and ridge beams. To secure the rafters, it is necessary to secure the ridge beam. To attach it to the upper trim of the transverse walls, install the racks strictly in the center, secure them with an angle and self-tapping screws, and then additionally install struts. The ridge beam is assembled from two 40x100 mm boards, securing them on both sides of the racks.

Step 4. Rafters. The rafters are made from boards 40x100 mm. Place the board on the ridge beam and the top trim of the longitudinal wall, and mark the cut location with a pencil. They cut down, try on the rafter leg in place and saw off the excess. The rafter legs are connected in pairs using metal plates in the ridge, and are also secured using corners and screws to the ridge beam and the top trim.

Step 5. Wall cladding with polycarbonate. Polycarbonate with a thickness of 10-25 mm can be attached in one layer, this is enough for good thermal insulation. The cladding begins from the end southern wall. Polycarbonate is cut to the size of the wall so that the stiffeners are directed vertically.

The upper sections of polycarbonate are insulated with special aluminum adhesive tape. For lower cuts use. Cover the cuts with an end profile. The polycarbonate is secured using self-tapping screws with a thermal washer. The top of the northern wall and the wall between the vestibule and the greenhouse are sheathed in the same way.

Step 6. Covering the slopes with polycarbonate. To connect sheets on greenhouse slopes, connecting profiles are used. For 10 mm polycarbonate, a one-piece profile is suitable; for 16 mm and 25 mm, an aluminum split profile with a seal is required. The coating is attached through the profile so as not to violate the integrity of the polycarbonate.

The lower ends of the sheets are treated with perforated tape and an end profile. The slopes are connected from above using a ridge profile.
Winter greenhouses are not just a place for growing vegetables, berries or flowers. This is the very milestone in the personal history of any homestead farmer, after which you can deservedly consider yourself not just an amateur gardener, but a gardener with a mark of quality. However, construction is by no means a simple task, requiring a capital approach, certain skills and careful preparation. Therefore, we have prepared two interesting projects for you to help you as much as possible in this difficult but very interesting matter.
Without any exaggeration, we can say the following - today there are so many different options for constructing a winter structure for growing crops that for a detailed acquaintance with each of them, a separate book or, at least, a brochure should be written. As a result, we will not test your patience with opuses from the classical typology, but will simply pay attention to the main types of differences between them.
Greenhouse buildings for the cold period differ from each other in the following parameters.
By functionality
They can grow not only traditional garden crops, flowers, mushrooms (champignons, oyster mushrooms, etc.), exotic fruits and citrus fruits. The entire further process of its construction and internal arrangement depends on what exactly you are going to cultivate.
The adjoining structure is warm and reliable
By location relative to ground level
Heated greenhouse structures are usually divided into three types: deep into the ground, built on the surface of the ground, equipped on the top floor of an existing building (garage, barn, house).
According to architectural solution
There are many options - one, two or three slopes, horizontal, arched, combined, wall. The choice depends on your taste, financial capabilities, and the size of the future structure.

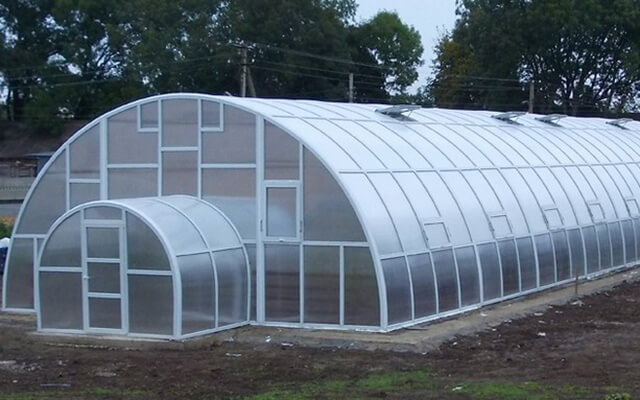
Arched winter garden
By type of building materials
Buildings are conventionally divided into brick, wooden, with a metal or PVC frame, glazed or with a polycarbonate coating, etc. In addition, combined designs are often found.

Capital structure with a brick base
By heating type
There are solar greenhouses with technical heating (water, gas, stove, electric), buildings using biofuel;
By planting method
They can be planted in a garden bed or in special containers mounted on racks.
Choosing a place
When choosing a location, you must first take into account three main factors. Firstly, the light mode. The greenhouse should receive the maximum amount of sunlight in winter. Therefore, it is best to orient the building along its length from west to east. This is especially important for solar greenhouses.

Correct orientation
Secondly, it is necessary to take into account the directions of the “prevailing” winds. If gusty cold winds are not uncommon, be sure to consider wind protection. With the right approach, you will save significantly on heating.
Thirdly, position the building in such a way that the passage to it is wide enough and optimally comfortable. This will make it easier for you to build the greenhouse and subsequent operation..
Advice from a meteorologist
If, to protect against cold winds, you decide to build an additional fence or organize a hedge, remember that the fence should not be adjacent to the structure. For example, with a ridge height of 2.5 meters, the distance between the wall and the fence should be no less than 7-8 meters. This is due to the fact that the wind flow, having encountered a “monumental” obstacle, has the habit of rushing upward and going around the obstacle. This means that “for dessert” you will get a turbulence zone, which will actively remove heat from the walls of the structure. The narrower the distance between the building and the fence, the stronger the turbulence. The ideal protection option is a hedge 15-20 meters from the greenhouse.
We build a gable in-depth greenhouse made of brick

Scheme of gable construction
Now that we are already sufficiently armed with the necessary knowledge, we can get down to business. The greenhouse structure built according to this project is distinguished by its versatility. This structure is perfect for both central Russia and regions with a more severe climate. Here you can grow not only garden crops, but also some garden crops. Construction of this type will certainly be expensive. But believe me, it's worth it. Such structures are durable, convenient, and economical.
What does a greenhouse look like?
The building consists of two rooms: a working vestibule and a greenhouse. A heating boiler and a control unit for automated processes (watering, ventilation, lighting) are installed in the vestibule. This room must have a length of at least 1.5 m (optimally from 2 to 2.5 m). Among other things, the vestibule is used for preparing earthen mixtures and storing equipment. The walls of the vestibule are made of brick. Polystyrene foam or mineral wool are suitable as thermal insulation. The vestibule roof is covered with an opaque material (tar paper, corrugated iron roofing, etc.). The partition between the vestibule and the greenhouse can be permanent (with a door, of course) or made of a plastic or metal-plastic profile with double-glazed windows.
Sound advice from a digger
If you are building an in-depth greenhouse, you should adhere to the basic rule - the soil in the pit should be removed to the depth of the freezing layer. On average, this is 80-90 cm. The same rule applies when pouring foundations for non-deepened structures.
- Foundation
On dense natural soils, the strip foundation is poured to a depth of 45-50 cm.
- Walls
For the construction of main walls in this project, single brick masonry is used (wall thickness 25 cm). Window openings for installing greenhouse frames should be located 50-60 centimeters above ground level. The width of the spaces between the windows is approximately 50 or 75 cm (two or three bricks). Thanks to this, the plants will receive additional natural light.

Winter structure design diagram
Important advice from the builder
Here is another very interesting wall solution:
- remove the brick or monolithic base (height - from 90 to 120 cm);
- mount a metal, wooden or metal-plastic frame on it;
- cover the frame with cellular polycarbonate.
Greenhouse frames must be equipped with transoms for ventilation. An alternative option is to equip the frames with supply ventilation valves.
- Roof
The gable roof shape will ensure free flow of atmospheric waters. The angle of inclination of the roof planes is 20-25°. The lower strapping beams (2 pieces) are laid along the side walls on roofing felt. The ridge beam is attached to the strapping beams using paired rafters.
- harness and ridge - timber (section 120x150 mm);
- rafters - timber (section 70x100 mm);
For the light-transmitting roof covering, double glass with a thickness of at least 4 mm is traditionally used. The roof is glazed using grooves (40x75mm) with gutters for condensate drainage. But today, polycarbonate honeycombs are increasingly used to cover the roof of winter greenhouses. This material has a number of clear advantages over ordinary glass. A winter greenhouse made of polycarbonate will serve you faithfully for at least 12 – 15 years.

Capital structure made of polycarbonate
Helpful advice from a glazier
When glazing the roof of a greenhouse, the glass is laid along the folds on putty (layer - from 1.5 to 2 mm.). It is best to start laying glass from the bottom trim beam and move up to the ridge. It is recommended to use natural drying oil compositions or modern plastic mixtures as putty. The glass is attached to the glass beads with a wooden or plastic bead using metal pins (20-25 mm). A layer of putty should also be applied between the glass and the bead.
To protect the walls from water leakage, a canopy made of galvanized profile is installed. The canopy should deviate from the plane of the wall by 6-8 cm. A drainage chute is laid along the inside of the canopy to collect and remove condensate coming from the grooves of the sprockets.
Selecting the heating type

Heating with electromats
Before building, you also need to decide on heating. The choice of heating depends on the usable area of your greenhouse. For small rooms with an area of no more than 15-20 m², stove heating is quite suitable. For more extensive forms of land tenure, we recommend looking at three possible options:
- water heating;
- electric heating;
- heating with biofuel.

- Horse manure – provides a temperature of 33-38°C (70-90 days).
- Cow manure – up to 20°C (100 days)
- Rotten bark – up to 25°C (120 days)
- Sawdust – up to 20°C (14 days)
- Straw – up to 45°C (10 days)
Biofuel is laid directly under the fertile soil layer. For proper heating of organic matter, it is important to ensure good aeration (air access) and maintain the required level of air humidity (65-70%).
Advice from an agronomist
When using biofuel, it is necessary to take into account its acidity level, as this affects the quality of the soil. The optimal acidity level for cow manure is 6-7 pH. Bark and sawdust form an acidic environment (5 pH), horse manure forms an alkaline environment (8-9 pH). In addition to the heating function, biofuel serves as a source of mineral nutrition for greenhouse plants. Spent biofuel is used as humus.
How to make an economical version of a greenhouse for winter
If finances do not allow you to build a permanent greenhouse, do not despair. With the right amount of ingenuity, you can achieve excellent results at minimal cost. We invite you to see for yourself. A video from the “Four Hundreds” program will tell you how to build a winter greenhouse simply and inexpensively with your own hands:
Sound advice from a businessman
If you plan to use your future greenhouse not only for growing fresh vegetables and herbs for the dinner table, but also for commercial purposes, you will need a building with a usable area of at least 50-60 m². Then the harvest will quickly recoup your costs. According to experts from the Ontario Farmers Association (Canada), the ideal size of a commercial greenhouse for a small farm is 100 m².
The construction of a winter greenhouse on a personal plot is a definite milestone in the practice of a gardener, when knowledge and experience in growing a variety of crops allows harvesting not only in the summer. However, you need to understand that the construction of a winter greenhouse is an event that requires knowledge, work skills, careful preparation of materials and a place for the future structure. Therefore, it would be a good idea to familiarize yourself with some options for winter greenhouse projects and useful tips from experts to make such a difficult but very exciting task as easy as possible.
Deciding on the type of structure
Today, there are so many different options for constructing winter greenhouses that in order to carefully describe the features and advantages of each of them, one would have to write a multi-volume essay. Therefore, to make it easier for the average person to understand the features of the construction of winter greenhouses, we note the most important differences between the main types of these structures.
The classic version of the construction of winter greenhouses has the following differences.
Functional Features
A wide variety of crops are grown in winter greenhouses. It can be not only traditional vegetables, fruits, flowers and mushrooms. It will be quite interesting to harvest exotic fruits and citrus crops in winter. The sequence in the construction and arrangement of the internal space of the greenhouse will depend on what is planned to be grown in the greenhouse.

Location of the building
The construction of winter heated greenhouses is divided into three types: built into the soil, built at ground level, mounted on specially equipped elevations (for example, the roof of a garage or barn).

Selection of building materials
Depending on the type of building materials used. All winter greenhouses can be divided into several groups:
- built of brick;
- built from wood;
- mounted from metal or polyvinyl chloride profile;
- glazed or covered with polycarbonate;
- combined options.

Features of planting
The construction of a winter greenhouse should take place in such a place that the future building will be in direct sunlight for most of the day. After all, they are so necessary for the normal growth and development of plants. Also, a good location for building a greenhouse will help save a fairly large amount of money that would have to be spent on additional lighting. The best location for building a greenhouse is from west to east. It is this approach that will allow you to make the most of the beneficial properties of such a meager bright light of the winter sun.
Advice ! Future greenhouses should not be located in lowlands with a sufficiently high groundwater level. Such greenhouses typically maintain high levels of humidity, which can be detrimental to a large number of plants.

Choosing the type of heating
Properly selected and properly installed heating in a winter greenhouse is the key to creating a favorable microclimate for the successful growth and development of plants. Installation of a heating system is a rather labor-intensive and complex procedure, so its implementation must be approached with skill.
There are quite a large number of methods for heating a winter greenhouse. Each has both positive and negative characteristics. When choosing a heating system method for your greenhouse, you must take into account the technological features of a particular structure, the climatic conditions of the area in which the greenhouse is located, as well as the amount of money available.
Let's take a closer look at the most common heating options in greenhouses:

Choosing material for building a winter greenhouse
Materials for greenhouse covering are selected according to the following criteria:
- individual design features of a winter greenhouse;
- good sunlight transmission;
- weather resistance;
- the ability to maintain structure and integrity even with frequent temperature changes;
- ease and simplicity of installation;
- low cost;
- duration of operation.

Let's take a closer look at the most common options for building winter greenhouses.
Glass
This material was previously used as the main type of greenhouse covering. Glass goes well with wood and metal. Glass surfaces have good light transmission and thermal insulation properties. However, today, glass as a covering for greenhouses is losing its relevance. A large number of more modern, lightweight, resistant to mechanical damage and, most importantly, inexpensive materials have appeared.

Polymer materials
This material is lightweight and has good transmittance for sunlight. However, polymer panels very quickly lose their original appearance and in the absence of ventilation indoors, excess moisture forms on the surface of the greenhouse.

Cellular polycarbonate
This material is the best today for cladding the structure of a winter greenhouse. He managed to combine the best qualities of glass and film.
We design a greenhouse
Once the materials for construction have been selected and the dimensions of the structure have been indicated, you can begin to develop a project for the future greenhouse. The easiest way to resolve the issue is to use a ready-made plan and adjust it according to personal preferences and construction conditions.
If you decide to draw up a plan for the future greenhouse yourself, you should adhere to a certain algorithm of actions:
- We schematically designate the site plan and determine the location of the future building;
- We calculate the size of the winter greenhouse.
- We develop a scheme for laying utility lines;
- separately indicate on the plan the type and dimensions of the foundation;
- We calculate the required amount of materials for constructing the roof of a winter greenhouse;
- We are thinking about ways to attach all structural elements to each other.

We are building a polycarbonate greenhouse
Polycarbonate is the best material for the construction of winter greenhouses.
The list of advantages is quite wide:
- provides good transmission and dispersion of sunlight;
- has high levels of heat retention indoors;
- the lightness, flexibility and strength of the material allows you to very quickly build a greenhouse that can perform its main functions for a long time.
It is quite possible to build a winter greenhouse from polycarbonate with your own hands. The location of the future building is determined according to the basic rules for arranging greenhouses.

Laying the foundation
In order to lay the foundation of a future greenhouse, you can use a wide variety of building materials: timber, stone, brick. As practice shows, the best type of foundation for winter greenhouses is a strip foundation.

Sequence of foundation laying work:
- It is necessary to mark on the ground the parameters of the future construction.
- Dig a trench according to the markings. The depth of the ditch should not exceed 50 cm and the width -20 cm.
- Formwork made of wooden panels is mounted along the side walls of the trench.
- The bottom of the trench is lined with sand, the layer of which does not exceed 30 cm.
- The prepared concrete mixture is poured.
Advice ! To strengthen the structure, it is necessary to reinforce the concrete screed.

We build the frame
After the foundation has completely hardened, the frame construction phase begins.
Along the perimeter of the foundation, profiles are vertically attached, which are connected by reinforcement ribs to strengthen the structure.

The finished frame of the winter greenhouse is sheathed with polycarbonate sheets. They are very easy to trim with a saw or jigsaw. The panels are attached to the profile using self-tapping screws.
Important ! In order not to compromise the thermal insulation and tightness of the structure, all connections and joints of materials must be treated with perforated self-adhesive tape.
To create a healthy microclimate inside the greenhouse and prevent the formation of condensation, do not forget about installing vents, windows and doors.

Conclusion
Building a winter greenhouse with your own hands is a difficult task, but quite realistic for those who approach the matter responsibly and seriously. It is enough to make some effort and spend a certain amount of time to have fresh vegetables and fruits on your table all year round.
How to build a stove for heating a winter greenhouse, we will find out in the next video
Probably, every gardener who has an ordinary greenhouse at his disposal would like such a structure to be able to provide him with a harvest not only in the warm season, but also in the frosty period. Fortunately, today there are many ways to realize this ambitious idea.


Peculiarities
Naturally, a winter greenhouse will have many aspects that distinguish it from a regular one. Here, alas, you won’t be able to get by with just one set of wooden beams and PVC film. Much more capital solutions will be needed.
The main differences between a winter greenhouse and a simple one.
- Foundation. The features of the foundation being built depend on the type of greenhouse, but one thing remains unchanged - it will not be possible to do without a solid foundation.
- Walls. Everything here is natural - as the operating temperature of the greenhouse decreases, it is necessary to increase the thickness of the walls.
- Heating. To a greater or lesser extent, the structure must be heated. There is good news for those for whom it is important to save resources spent on heating. There are types of greenhouses that will minimize the cost of maintaining optimal internal temperatures.
- Lighting. It's no secret that the days are shorter in winter. This means that the plants will not have enough of the small amount of light coming from the sun. The solution is to artificially replace the heavenly body. Fortunately, among the variety of options, you can easily select high-quality lighting for a specific type of greenhouse.
- Frame. Of course, a winter greenhouse is like a heavy, warm jacket, which significantly increases the load on the supporting element. And if it’s still covered with snow on top, then the simple aluminum frame will have no chance at all to cope with the load.


Purpose
Without exaggeration, we can say that literally any crop can be grown in a year-round greenhouse. It all depends on how independent the structure will be from external conditions. With a strong desire and proper investment, it will be possible to serve even pineapple to the winter table. What can we say about growing familiar crops?
Such a greenhouse will perform well from a commercial point of view. Agree, it’s tempting to create a flower greenhouse when there are still snowdrifts around. And, for example, by March 8th, collect bouquets of roses and make good money on it.
Flowers are undoubtedly beautiful plants, but for some it is better to enjoy their splendor when they are left in their original form, that is, uncut. If this way of thinking does not leave you indifferent, then, as mentioned earlier, there is no limit to the crops grown. Any type of vegetables, be it cucumbers or tomatoes, herbs and even strawberries, will be available all year round. And the red berry, ripe on the same March 8th, will be no less interesting for the buyer.


Types of structures
A winter greenhouse is not an easy structure to construct. And the degree of its complexity, depending on the type chosen, differs significantly. Today there are so many interesting projects that you could spend more than one article on it. Let us dwell on the main types and their distinctive features.
Thermos
Probably the most effective design, which allows for optimal use of natural resources, thereby reducing the gardener’s costs for its operation. The principle of operation of such a greenhouse comes down to the following: a foundation buried in the ground significantly reduces heat loss, while the loss of light is so minimal that it can be neglected. And the correct installation of reflective panels can even play up the design feature, receiving even more light than a regular greenhouse.
This type of structure is also great for setting up its operation in offline mode.
If somewhere you were able to see lemons growing in a greenhouse, then they were probably located in just such an underground greenhouse. And here everything is natural, because it is this design that will make it easier to recreate the conditions familiar to this subtropical fruit. And despite the fact that the greenhouse project was relatively recently patented by Anatoly Patiy, it cannot be said that this is entirely his development. After all, there is information about the fairly active use of such a design already in the 18th century. Then the construction technology was, of course, simpler, but the greenhouse still provided the opportunity to grow coffee, lemons and pineapples.


Attached to the house
Another profitable project in many aspects. Firstly, these are lower construction costs, since materials for building at least one wall will not be needed. Secondly, the wall, which was replaced by an entire house, will become a powerful thermal insulation element, which will reduce heating costs.
And thirdly, not only does the greenhouse become heated by the house, but also the house becomes a greenhouse, which again reduces heating costs. Also, such an extension will be part of the home, which will serve as a pleasant addition on especially cold days, when you can get inside the greenhouse directly from a warm room.


Arched
A good option for regions with strong winds, as the arched shape has good aerodynamics. In addition, it is worth noting a number of pleasant features. The condensation formed at the top will not fall directly on the plants, but will simply flow down the wall. This small advantage will be of great help when running high-power lamps, which will cause many small burns on the foliage if there is water on it.
Speaking about lamps, one cannot help but notice that they are quite convenient to install in such a greenhouse.


With a gable roof
Finally, the classic greenhouse shape. It has significant advantages that have been proven over the years. The first thing you can pay attention to is the space used. It is used more rationally compared to the same arched greenhouse, in which it is difficult to plant tall plants along the walls. The second advantage, especially important when constructing a winter structure, is that snow does not linger on the roof. This, as you might guess, significantly reduces the risk of sagging or breakage of the covering material. Also, additional strength is provided due to the structural features of the frame, which makes it more reliable. Well, the ease of construction, which attracts attention to the design of those people who intend to build a greenhouse on their own.


Manufacturing materials
The amount of materials used for it also depends on the type of structure being constructed.
In order not to be scattered about all sorts of options, let's consider a typical list of things that will be needed to build a homemade thermos greenhouse.
- Instead of a brick base, like above-ground greenhouses, experienced gardeners and builders advise using thermal blocks. They retain heat much better than brick, and are also quite easy to handle.
- To create a roof frame you will need wooden slats or a metal profile. It is worth noting here that working with wood will generally be less labor-intensive. And when choosing a metal profile, you will also need the skills of a welder or a master himself. But if the metal is properly protected from oxidative processes, it will be a more reliable choice and will last longer.
- Mineral wool or expanded polystyrene (also known as polystyrene foam) is used as insulation. Both materials have approximately the same thermal conductivity, but there are many differences in installation, durability, environmental friendliness and other aspects, based on which only you can decide which material is better.


- Of course, such a structure cannot do without a foundation. Its production includes a number of familiar components: cement, sand, crushed stone, reinforcement. A strip foundation is well suited for this design.
- To increase the amount of light received by plants and at the same time create additional thermal insulation, a dense reflective film is installed on the walls.
- For making a roof, double polycarbonate or regular polycarbonate, but in two layers, is perfect. Glass is also used as an analogue, but its thermal insulation properties will be lower.
- And what no construction can do without is fastening materials. In our case, these are screws, washers, nails and other products that allow connecting structural elements.


DIY installation subtleties
Before talking directly about installation, it is worth saying a few words about choosing a location for future construction. As with any greenhouse, it should be open without shade. To distribute sunlight evenly, the structure is positioned from east to west. And if the groundwater in the area is close to the surface, then to prevent problems it is better to choose the highest place.
The first stage of construction involves digging a pit. For a small greenhouse (10-15 sq. m.), all the work can be done manually, but for more ambitious plans it is worth thinking about using technology. Maybe 20 sq. m at first will not seem like a large area, but the problem is in the depth of the pit. It must be no less than the level of soil freezing, which on average is about 1.5 m for the southern regions and 2 m for the northern ones.
Also at this stage it is necessary to have an idea about future communications, how the heating system will run, whether you need sewerage, etc.


Next comes the production of wooden formwork, into which a layer of roofing felt is placed. It will protect the future foundation and the greenhouse itself from the effects of destructive moisture. A 10 cm layer of sand cushion is poured on top. This is a 1:1 mixture of crushed stone and sand. A metal frame is installed on the pillow itself, including at least 4-6 rods.
Then a solution is prepared from sand, crushed stone and cement in a ratio of 5: 3: 1. It is used to fill the formwork with the frame. This concludes this stage. It is better to proceed to the next one no earlier than the expiration of the 30-day period. This measure allows the foundation to dry out and become stronger.
At the next stage, the first step is to remove the formwork, after which the walls can be erected. If your choice fell on a thermoblock, then the principle of laying it is the same as that of brick. You just need to make sure that the voids inside the block overlap each other. As a result, the walls should be 50 cm higher relative to ground level.


Upon completion, cement is poured into the voids of the thermoblocks and reinforcement is inserted at the rate of 2 pieces per block. A better solution would be to fill in stages to a height of no more than three blocks at a time.
In this case, you need to attach pieces of reinforcement alternately to each layer. But how to manage your labor and time resources is up to you to decide.
When building a roof, consider an option that most people can handle. Namely, building a frame made of wood. Based on the drawings in the picture, you need to prepare wooden beams. And before you start working with them, they must be coated with a protective agent. The prepared elements are connected to each other by means of jumpers, and when the frame is ready, you can paint it.


Polycarbonate is attached to the wooden frame using washers and wood screws. Among the installation features, it is worth noting that the self-tapping screw is not directly screwed into the polycarbonate sheet, but through a wooden plank, as shown in the figure. After this, it is checked whether there are any cracks in the structure. If any, the problem is eliminated with polyurethane foam. All joints are glued with transparent material; in extreme cases, this can be done with tape.
In terms of the size of the greenhouse, everything is limited only by the area of available land, financial capabilities and the very purpose of construction. It is clear that for personal use there is no need to build a structure of 200 square meters. m. But continuing to consider the features of the thermos greenhouse, it must be said that according to the standards for proper energy efficiency, it should not exceed 5 m in width, and there are no longer any restrictions on the length. Also, for better light penetration, one wall is erected higher than the other, but this is not a prerequisite for design.


Ventilation and heating
We have come to the fundamental element without which a winter greenhouse cannot function - the heating system. And today every gardener is able to choose the optimal heating method based on his capabilities.
Pechnoe
An excellent option for small greenhouses with an average area of 20 square meters. m. The obvious advantage is ease of installation and use. But if we take into account a classic type oven, then a noticeable difficulty arises. Throughout the entire cold period, you will have to stay near the greenhouse all the time so that the combustion continues continuously. This problem is partially solved by installing a long-burning stove.
Its basic principle is that the fuel does not burn, but rather smolders due to a reduced supply of oxygen to the combustion chamber.


Vodyanoye
A more complex option. The design feature allows for a wider range of applications. The system is a water heating element (boiler) with a pipe line connected to it. For large areas, a pump is also connected here, which will ensure even distribution of water. In small greenhouses, you can save on this, since the water has time to fully circulate only due to the difference in water temperature. This system isn't cheap, but if you value autonomy, it's a good option to consider.


Electrical
There are several options for what kind of heating this will be, but when considering the classic one (heat fan and analogues), it’s worth saying right away that this method will not be budget-friendly in operation. But it has no equal in ease of installation. If the greenhouse is well isolated from the external environment and requires prompt heating, then you can safely choose equipment like a fan heater, heat gun or electric convector. Indeed, it is enough to stretch the extension cord and plug in the heater so that the greenhouse heats up in a short period of time.
But this is probably where the advantages end. Among the characteristic disadvantages, you need to take into account that to install the heater you need to allocate a place for it without plants in the immediate vicinity.
This is especially true for powerful installations, for example, a heat gun. Another disadvantage is the uneven distribution of heat. It will not be easy to provide all the plants in the greenhouse with the same temperature conditions. And finally, high electricity costs will not allow you to use this option conveniently as a constant source of heat for the long term. Of course, provided that you care about the size of your electricity bill.


Infrared
This method takes the concept of electric heating to another level. The disadvantages that were described above when using classic installations do not apply to the infrared heater. It, unlike them, is significantly more economical in operation and is capable of distributing heat more efficiently.


Passive
And finally, we will consider the 2 most interesting, although not so common, self-heating options for a greenhouse.
The first of them is heating based on the remains of various organic materials. Its essence lies in the fact that substances release heat during their natural decay. Our goal is to channel this energy in the right direction. Here you can act in different ways. For example, lay prepared organic matter directly into the beds under a layer of soil. One of the best materials for this is horse manure, which can warm up to 38°C and maintain this temperature for 3 months.
In addition to directly adding organic matter, there is the option of placing it under the greenhouse. To do this, a hole is dug into which the material is placed, after which the hole is closed. Warm air, rising, will warm the floor, and with it the structure itself.
And after the organic matter has generated all the heat, it’s time to use it as fertilizer.


The second, perhaps the most interesting method, which many have hardly heard of, is based on the “preservation” of the sun. It is much more complicated than the option in which a barrel of water placed in a greenhouse will heat up during the day and release heat at night. But they definitely have similarities.
The viability of such an idea may seem doubtful, but farmers from Canada are able to destroy this skepticism, because they actually have at their disposal a solar greenhouse that works in winter. And this is not Greece with its relatively mild temperature changes between seasons. In the area where the greenhouse operates, winter frosts average 20-25°C degrees, when in the structure itself the temperature remains above 0°C.


For the so-called solar conservation, a large pipe is used that runs under the ceiling along the entire length of the greenhouse. When the summer air heats up, a fan turns on, pushing the warm air through the pipes into the ground. With the arrival of cold weather, warm air is released from the ground, acting as heating for the entire greenhouse. This is what it looks like if we describe it very briefly. Of course, this method requires careful technological preparation of the structure itself where it is planned to grow plants. And if this does not allow you to completely get rid of the active heating system, then at least it will reduce costs many times over, which will quickly pay for itself.
An important condition for the high-quality operation of a winter greenhouse, or any other greenhouse, is constant air exchange. In small structures, it is enough to arrange the presence of several hermetically sealed openings and carry out ventilation manually or using automatic pistons.
For large greenhouses (more than 30 sq. m), an active ventilation system is installed. This is done in such a way that the supply fan is at the bottom, and the exhaust fan is at the top at the other end of the greenhouse. Thus, fresh air entering inside passes through all levels of the structure and, having worked, is removed. It is worth noting that some active ventilation systems are equipped with software that makes it possible to automate the air exchange process.


Lighting
Another integral component of a winter greenhouse is additional lighting. As already mentioned, for plants to fully grow, they need more than 12 hours of daylight, which becomes impossible in winter conditions. And hence the need to purchase lighting equipment. Let's look at the most current options.
Fluorescent lamps
This is not a suitable option for getting a good harvest, but for growing seedlings, it is perhaps the optimal one. Such light bulbs are inexpensive, easy to install, last a long time and consume little electricity.
But their relatively weak light flux will no longer be able to ensure the full growth of a growing plant.

High pressure discharge lamps
If you choose this type of lighting, you will not go wrong. The lamps have high luminous efficiency, and their combustion is accompanied by abundant heat production. This will clearly have a positive effect on a room that requires heating.
Only here you need to take into account that each stage of plant development requires its own light spectrum. So, for the growing season, a metal halide lamp (MHL) is ideal, which emits light in the desired blue spectrum. And for flowering and fruit development - sodium (DNAT). A negative feature of these lamps is that they are more complex to assemble due to the need for additional equipment and are not durable in use.


LED lights
Relatively new to the market, they increasingly deserve respect among gardeners. Such a lamp is able to provide plants with both the required luminous flux and the required spectrum for each stage of development. You can even call it the best option for a greenhouse. Speaking about the negative aspects, it is necessary to note the decent cost of such a light source.
But given that LEDs have a long service life and low electricity consumption, you can quickly recoup your investment.


Construction of a winter greenhouse is a large-scale project, very different from its spring counterpart.
There are a few tips to take into account to help you cope with the structure.
- Calculate your financial capabilities from the very beginning so that the winter greenhouse does not turn into a long-term construction project.
- A good solution would be to arrange a small vestibule in front of the entrance to the greenhouse. This will provide an additional air layer for thermal insulation and will not allow cold air to penetrate inside with you.
- It will be useful to install not only a thermometer, but also a hygrometer to monitor the effectiveness of the ventilation system and prevent the development of mold.
- The presence of a large number of technical devices in the greenhouse requires daily monitoring of all systems, which will help identify and eliminate possible breakdowns at an early stage.
Do you think that in our time, when all vegetables and fruits are available in stores all year round, the greenhouse is a relic of the past?
This means that you have never tried truly fresh, environmentally friendly vegetables, filled with the warmth of kind, hardworking hands.
A winter greenhouse is a simple but very useful structure that will allow you to enjoy fresh sources of vitamins all year round.
Distinctive qualities of a winter greenhouse
A winter greenhouse is a more durable and reliable structure compared to. Its mandatory elements are a foundation and the presence of heating.
The type of foundation depends on the type of greenhouse. For a wooden frame, a simple tie may be sufficient. For a permanent brick building, you will have to build a monolithic foundation.

The roof of the greenhouse should have a streamlined shape so that large amounts of snow do not accumulate on it.
If you plan to grow several types of plants in one building, then the right solution would be to provide internal partitions.
Building options
Today, there are many different options for building winter greenhouses with your own hands. Which one is better to choose is determined by a number of factors.
Functionality
In winter greenhouses you can grow not only the usual vegetable crops, but also flowers, mushrooms, and even exotic trees.
The construction process and internal arrangement of the future greenhouse directly depends on what crops you intend it for.

Location relative to ground level
The greenhouse can be deepened into the ground, it can be located on the surface of the ground, and in the third option, these are greenhouses located on existing buildings: garages, verandas, sheds, etc.
According to architectural solution
Greenhouses can be: arched, horizontal, single-, double- or triple-sloped, as well as combined, wall-mounted, etc. Here everything depends on the imagination and material capabilities of the master.
By type of building materials
These can be buildings made of brick or wood, with a frame made of metal or PVC materials. They can be glazed or covered with polycarbonate.
By heating type
Types of heating in a winter greenhouse can be very diverse:
- oven;
- gas;
- water;
- electric heating.

The photo shows water heating in a do-it-yourself winter greenhouse
By planting method
Plants can be planted in regular beds or in containers, which are usually placed on special racks.
Selecting a location and preparing for construction
The greenhouse must be positioned in such a way that as much sunlight as possible penetrates through its covering and provides sufficient illumination to the plants.
In this case, it becomes possible to save money by avoiding the need to install additional lighting.
The orientation of the building from west to east will make the most of the scarce rays of the winter sun.
It is no secret that cold winds contribute to large heat losses. Therefore, by placing the greenhouse in a place protected from the wind, you can save money spent on heating.
If there is such a possibility, then a very rational solution would be to place the greenhouse near the wall of a house or some other structure. A south, south-east or south-west wall is suitable for this.
The building should not be located near trees. Their root system can destroy the foundation, and snow and fruits falling from the branches can damage the coating.
Try not to install the greenhouse in lowlands with high groundwater levels. This can cause the humidity to be too high and harm the plants.

Choosing the type of heating
Heating a greenhouse is perhaps the most difficult, costly and time-consuming issue. But the productivity of the future structure directly depends on how correctly the type of heating is selected.
There are many heating options. Each of them has both its positive aspects and disadvantages.
It is worth choosing the type of heating individually in each specific case, taking into account a number of individual characteristics: climate zone, financial capabilities, type of plants grown, etc.
- Solar heating- the simplest and cheapest way. However, in buildings intended for growing plants all year round, such heating can only be used as an additional heat source in combination with the main heating.
- Biological heating. This type of heating can also only be additional in winter buildings. Heat is released as a result of the decomposition of biologically active substances, or, to put it simply, due to the decomposition of manure. When manure is broken down, carbon dioxide is also released, which is very necessary for plants, and evaporation occurs, which helps moisten the soil.
- Electric heating. This is the most popular and effective heating method. When installing it, you can use various electrical appliances: air heaters, convectors, cable heating, infrared heating, heat pump heating, water heating. The latter type is also classified as electric types of heating. Since the water in the system is heated by electricity.
- Air heating. This is a professional type of heating, which is installed immediately when laying the foundation and supporting structures. Warm air is supplied to the middle and upper parts of the greenhouse using heating and ventilation units.
- Gas heating. Heating occurs by burning gas in gas heaters directly in the greenhouse. This method requires the installation of a ventilation system to avoid oxygen burnout.
- Stove heating. This is a fairly economical heating method that allows you to use various materials as fuel: wood, coal, gas, etc. Its disadvantage is the strong heating of the furnace walls.
You can find out how it is built in our material. Detailed instructions for implementing the project, photos and video materials.
Lavender is often used in landscape design: planting and care, propagation features and species composition of the plant, you can read our article.
Selecting material for tightening the greenhouse
The material for tightening the greenhouse is selected depending on the chosen design.
However, there are general requirements for all materials:
- good light transmission;
- resistance to various types of deformations (snow, wind, unexpected ground movements);
- ability to withstand sudden temperature fluctuations;
- ability to withstand the load of its own weight;
- ease of operation and installation;
- price;
- service life;
Let's look at the most common types of coatings.
Glass - a tribute to traditions
This is a traditional material that is ideal for glazing frames made of wood or metal corners. Glass should be colorless with a thickness of at least 4 mm.

Glass greenhouse
The advantages of glass include: high light transmittance, good thermal insulation properties, long service life.
The disadvantage is that for glazing you will need to build a fairly strong frame. In addition, glass has a high cost.
Polymer films
This coating is lightweight and does not require the construction of bulky structures. They diffuse sunlight quite well.
The downside is rapid wear and formation of condensation inside the room.
Cellular polycarbonate
This is the most modern material, combining all the positive qualities of glass and film, and even surpassing them in some respects.
In the video, a winter greenhouse made of polycarbonate is the most popular option for building it yourself.
Polycarbonate building
Do-it-yourself winter greenhouses made of polycarbonate have the following advantages:
- allows for high light transparency and dispersion of sunlight, which allows plants to make maximum use of solar energy;
- thermal insulation properties exceed those of glass;
- provides structures with both lightness, flexibility and high strength;
- has a long service life.
It is quite possible to build a winter greenhouse from polycarbonate. The choice of location for construction is made according to the general rules for greenhouses.
Construction begins with laying the foundation. It can be built from timber, stone, brick or other materials. But the strip foundation is considered the most reliable and durable.

The main stages of its construction:
- a trench 50 cm deep and 20 cm wide is dug around the perimeter;
- wooden formwork is installed;
- the bottom of the trench is lined with a cushion of sand 30 cm high;
- concrete is poured.
To add strength, concrete can be reinforced.
After 3-4 weeks, when the foundation has acquired sufficient strength, you can begin directly building the frame.
A frame made of wooden beams is cheaper than a metal one. However, metal is considered more practical.
The metal profile is attached with self-tapping screws to pre-prepared fastenings on the foundation. Stiffening ribs are attached.

Polycarbonate panels are attached to the finished frame. Polycarbonate is cut with a regular saw or jigsaw. The mounting holes are drilled with a drill. Fastening is done with special self-tapping screws with thermal washers.
The final step will be to cover the joints with perforated self-adhesive tape for additional thermal insulation and sealing.
When building the frame, do not forget about doors and windows.

Be sure to consider the heating, irrigation and lighting systems before construction.
As you can see, building a winter greenhouse is not such a difficult matter. It is quite feasible for a person who knows how to hold a drill, hammer and saw in his hands, but he will still have to work hard.
But later, your labors will be fully rewarded when in winter you will have fresh vegetables and fruits grown with your own hands on your table.