Install the alarm on the UAZ patriot. Alarm for UAZ
And now everything is ready, the doors are closed, a faintly noticeable Alligator inscription can be seen on the fortogan, with a sinking heart I press the red button on the key fob and ... from under the hood I hear a characteristic short siren signal coupled with an emergency warning flash. But that's not all, a small kick on the spare wheel floods the entire yard with the pleasant sound of a 20-watt autonomous siren ... Agree, for this moment it was worth spending three days in the garage and turning the installation instructions into your handbook. So if you have a UAZ and you want to equip it with an alarm, you have the opportunity to first learn about other people's experiences and mistakes, that is, about mine.
I Introduction
It is better to discuss the issue of finances right away, so that later a surprise does not happen ... It took me five thousand rubles for everything. Note that the alarm itself cost 3500r. The rest one and a half pieces went to all sorts of shnyaga (see the table at the end). During the installation, I regularly had to run to the store. Fortunately, the saleswoman came across pretty and competently, which is important because at first it is difficult to figure it out ... I'm talking about the choice of alarm systems and accessories, of course.
II Model selection
I personally chose the Alligator S200. Model of 2003, which is important because I don't see any sense in buying something that will soon turn out of date into obsolete. Therefore, it is necessary to pay attention to the year of production. By the way, the Alligator 990, being a rather old model, cost more than the S200: Girl, I mean, the seller explained this by the fact that the delivery is long-standing, the price is also long-standing. Therefore, sometimes more expensive does not mean better.
They also advised me Mongus, which is also not bad in terms of functions. Signals like Panther, Leopard are considered a class lower than Aligator with Mongus. Well, the things of the KGB tepa scare me personally with the name and seem to be some kind of joke.
Having decided on the brand, it is time to choose a model. This is a strictly individual matter, and you may not need what I needed. Therefore, I will simply list the main functions that need to be checked by asking the seller for installation instructions. Everything is there on the first pages. Or in the internet, on the website of any astomag, this infa is also available.
- Output for a pager (or he himself, as in the S200) A pager is a necessary thing. You don’t twitch because of every siren sound outside the window + it shows why it worked ... It’s better that it was right away, otherwise they stand apart from a thousand and more ...
- Protection against scanning and interception of the transmitter signal
- Starter lock
- Anti-HiJack If a car is stolen in front of your eyes, you block the starter with this function, and only then behind a crowbar or something next to it ...
- Connector for connecting additional. sensor For example, a volumetric for 700r., but this is optional
- Trunk lock control output (can be used for other)
- Exit for add. devices (headlights, interior light, etc.) The more outputs the better
- Unlocking doors in two steps Convenient when driving alone
- Panic function If you get wet next to the car or you just need to attract attention ... Press the button and the system is triggered.
- Automatic door locking when the ignition is turned on
- Security of a car with a running engine (shock sensor is disabled)
III Surprises
One of the pleasant surprises came up during the installation. Several functions had an output on one wire. That is, since there is only one wire, then only one function can be selected. So I had to choose between:
- Engine operation without a key in the ignition lock
- Interior lighting control
- Unlocking in 2 steps
- Automatic closing of windows (we really need it on the Oise). But you can, for example, use the transmitter button to turn on the headlights ...
Fortunately, after carefully studying the instructions, it became clear that two of them can be connected in a different way. Therefore, the choice came down to Working without a key and Opening in 2 stages, of which I chose to work without a key, forgetting about the step-by-step opening during the connection of electric drives. Below I will tell you about this so that no one else will forget.
And lastly, for each function related to electric power (interior lighting, engine operation without a key), you need an additional one. relay. I only had one in the box, to block the starter. How much more you need will become clear during the installation. They cost 60 rubles each with us, in Siberia + socket. This is how they cleverly call the nozzle on the relay with built-in brands and wiring, so that you can not mess around yourself and buy (15-30r).
The central lock on the Oise cannot be done since closing the door with a key from the outside to the internal latches and, accordingly, email. drives are not affected. Therefore, we just buy 4 e-mail. drive (600 rub.)
They are also easy to install. Sleight of hand and a little drilling ...
- We tear off the upholstery
- Unscrew the lock mechanism
- It hangs on a wire ...
- With the thought of the subsequent bending, we unbend it and disconnect the lock.
- We find a "die" about a centimeter wide that goes up and down when opening and closing (photo)
- We drill a hole in it a little wider than the e-stick. drive. Here it is necessary postoraytsya, and then the drill slides all the time his mother.
- We insert a stick into this hole, not forgetting to put the drive on it first ... Then we bend it so that it can pull and push. We put everything back and fasten the drives to the door so that it works normally ... Otherwise, it will either not close or open until the end. It is important not to forget to lubricate the locks wherever possible while they are disassembled! Otherwise, the drive force will simply not be enough to close. Even after lubrication, two did not work for me ... it turned out that I tightened the handle securing bolt in the cabin too much.
- We pass the wires through tubes of 50 rubles each. So they are protected from damage ...
If you need the door opening mode in two steps, then it is done like this (on Alligatore)
- All door opening wires coming from the unit (2 pcs) are connected only to the driver's door.
- In the other 3 doors, we use a green wire with a black stripe for opening. It will only supply voltage when the open button is pressed again.
- We usually connect the closing wires to all doors, including the driver's door.
Having dealt with the drives, we put the limit switches (buttons that are pressed when the door, trunk, hood are closed). You can use it from a vase. They are 16 rubles. together with gaskets. Well, the hood is included. We put it, connect it to each other and bring the wire from the front door to the dashboard. I also brought the wire from them to the plafond on the ceiling and replaced it with the minus of the plafond. Now you can see when the door is open. And finally you can popontovatsya ... Opened the door, the light came on. The bonnet and luggage wires are connected to a different wire. I screwed the hood one next to the hood lock, only there the piece of iron must be screwed on top so that she would press it when you close the hood ...
 With the back door I had to smash my head. But on the other hand, in my opinion, I came up with the ideal option by sticking it into the tailgate. Thus, the system works if you only open the spare wheel! The main thing is to screw one more nut onto the spare wheel mounting axle from the inside (that one is welded on). Thus, make it impossible to remove the wheel without opening it. It seems to me that such a decision nullifies all the talk about the lack of a shock sensor at the back and about the theft of the spare wheel. Well, what kind of pioneer would bother with her with a screaming siren? Moreover, the crowbar is already on the way!
V System unit and its connection.
 The main thing is to choose a place. I have it behind the panel. There is such a convenient wall ... The shock sensor can also be screwed there and even the starter blocking relay. Now the question is how to make this panel removable. So far there are no ideas, if you know, share pliz. If there is no speedometer seal, the LED in that hole is the best place. (Photo)
 The connection of all the wiring is described in the instructions, but the most important thing is to correctly supply current to the system unit and to the siren (I have it autonomous 600r, if you disconnect the wires it will work for a long time from its battery.)
So it means:
- We connect the plus of the unit and plus the sirens to the plus of the accumulator and "isolate" it to the thick battery wire so that they do not dangle ...
- The minus of the block and minus of the siren are not hooked to the first piece of iron, but to the minus of the battery.
Thus, the siren (autonomous) will not work if you turn the toggle switch for disconnecting the mass.
It will work if:
- Disconnect the "-" or "+" battery
- Pull the wires out of the block
- And finally, I could not find a case when it would not work with such a connection ...
But I emphasize this only with an autonomous one ... It's easy to guess that the usual one (150r or immediately included) will be neutralized by disconnecting most of the wires. By the way, you can ask the store to change the usual siren from the kit to an autonomous one with a surcharge. I don’t know how they will react to this in the capital, etc. stores, but they even suggested to me to do so.
I put the siren itself in the gap between the battery and the wing. There she is dry, she can be heard well, and in a hurry, hitting it with a brick is also not so easy (for the hijackers, not for you, of course).
VI Conclusion
Well, that would be all. We figured out everything, connected everything. Where it is not clear yet again they turned to the instructions. On it, additional programs are programmed. functions. Now, provided that the work is done correctly, you can throw the UAZ for an unlimited time in the most criminal areas of the city ... Nothing will happen to him! But you won't do this, will you?)))
Cost Table.
Connection diagram for the UAZ Patriot from 2017 - an updated model
Install Starline A93 Eco with engine start
Remove the plastic trim under the steering column. To do this, you must first remove the left side trim of the front panel (latches), then remove the trim under the steering column (latches).

Remove the steering shaft cover to access the ignition switch connector. To do this, unscrew the three self-tapping screws for the casing and remove it (latches).
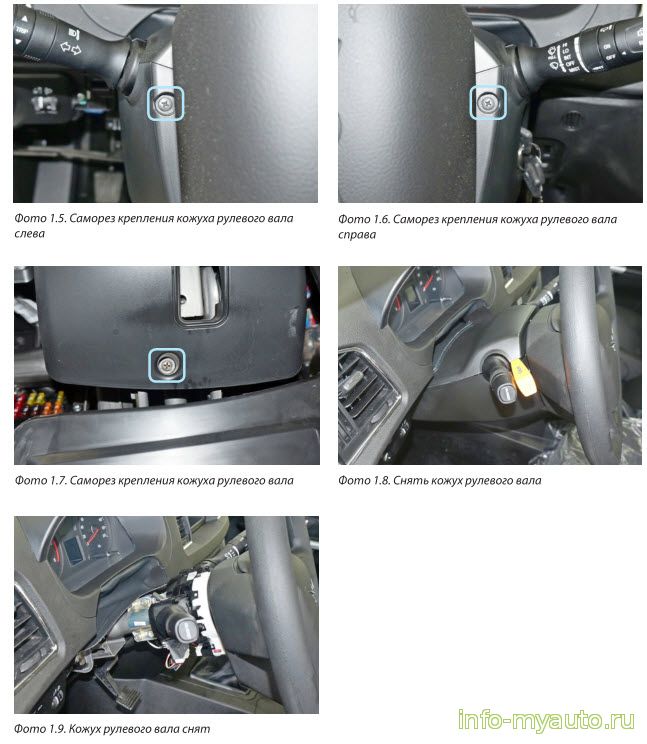
Remove the instrument panel. To do this, you must first unscrew the two self-tapping screws decorative overlays dashboard and remove it (latches). Then unscrew the four self-tapping screws for securing the instrument panel and remove the panel by disconnecting the connector.

To access the BCM unit, remove the plastic overlay of the right kick-panel. To do this, unscrew the two self-tapping screws of the lining and remove it.
Install the antenna module with the built-in shock and tilt sensor on the windshield, the LED on the left pillar. The service button can be hidden in any convenient place.

Install a siren under the hood (fasten to the standard stud with an M6 nut) and the engine temperature sensor (using plastic ties). Route the wires to the passenger compartment through the standard seal on the left side of the engine panel.
Alarm connection points Patriot
Connect the StarLine mass to the left of the steering column to its original location.

Connect the CAN-A StarLine bus in the dashboard connector harness.

Connect the parking brake control in the instrument panel connector harness according to Diagram 1.

Connect power management StarLine light signals in the dashboard connector harness
Connect the StarLine LIN-bus in the BCM unit connector harness according to Diagram 2.

In the harness of the same connector of the BCM unit, connect the trunk limit switch control.
In the harness of the BCM unit connector, connect the hood end switch control.
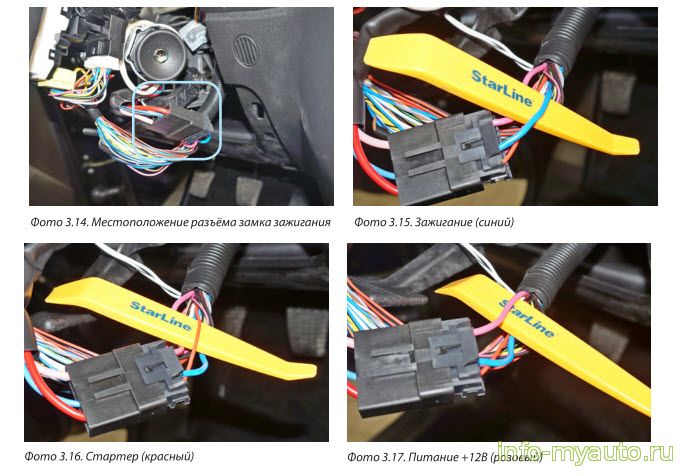
In the harness of the ignition switch connector, connect the power circuits of the engine autostart, power supply and the autostart power module. These connections are recommended to be made by soldering.
Did you like the material? We would be grateful for your rating and comment.
Article rating

Connect to the twisted pair CAN bus of the vehicle in the 40-pin connector of the instrument panel.

orange-white system wire (CAN-H) - to gray;
orange-black system wire (CAN-L) - to brown-white
The handbrake sensor can be connected in the blue connector block of the instrument panel. This is pin 18 of the blue connector - yellow wire. (-) "ground" appears on it when the handbrake is turned on

If there is a standard hood sensor on the car, you can connect to it at the connector of the TsBKE unit, which is on the right front behind the right kick-panel at the passenger's feet.

In the Pandora DX-50 system, the door and trunk opening sensors are connected analog way.
Connections are made behind the left kick-panel at the feet of the front passenger in the wires of the CBKE unit connector.
brown wire - trunk opening sensor (-);
Yellow wire - door opening sensor (-).
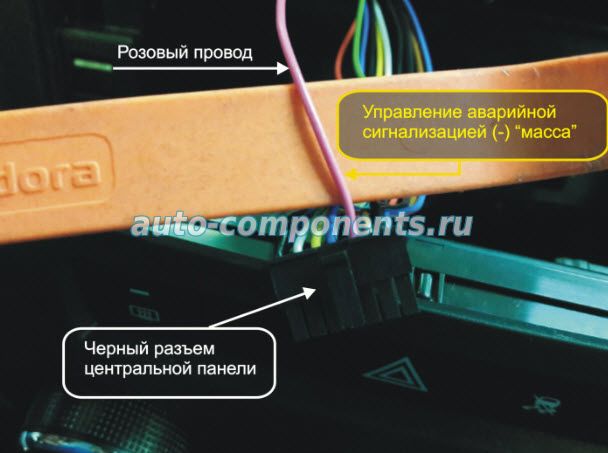
To control the alarms, you must connect to the pink wire, which is located in the black connector on the center panel. Control (-) "mass".
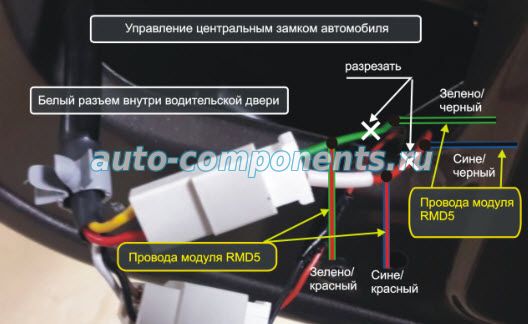
The central lock can be controlled in an analogous way. To operate the central locking, you must connect to the white connector inside the front driver's door.
A "gap" connection scheme is used. The power wires for controlling the drives of the door locks are cut.
White door connector red wire - locking; White door connector green wire - unlocking. For implementation, 2 relays of the RMD5 module are used.
The common contacts of the built-in relays of the RMD5 modules are connected to the wires of the door lock drives from the side of the white door connector.
The red wire of the white door connector (latching) is connected to the green / red wire of the RMD5 module;
The green wire of the white door connector (unlock) connects to the blue / red wire of the RMD5 module.
The normally closed contacts of the built-in relays of the RMD5 module are connected to the UAZ Patriot wiring
The red wire (latching) is connected to the green / black wire of the RMD5 module;
The green wire (trigger) connects to the blue / black wire of the RMD5 module. The normally open contacts of the built-in relays of the RMD5 module are connected to + 12V via 10A fuses. Green wire is connected to + 12V via a 10A relay; The blue wire connects to + 12V via a 10A relay.

The + 12V supply of the system can be connected to the pink wire of the ignition switch. "Ground" (-) can be connected to the right of the fuse and relay box under the standard bolt or in another convenient place.
To implement the automatic start function on this car, you must:
- connect the ignition control (+ 12V),
- connect the starter switch control (+ 12V),
- bypass the standard immobilizer
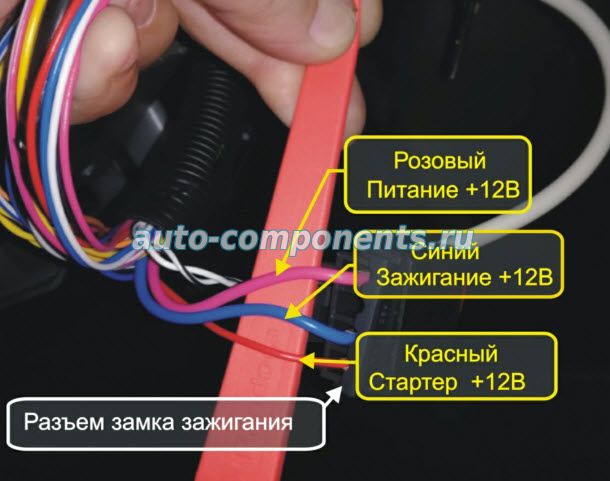
To control the ignition, it is necessary to connect (+ 12V) to the blue wire of the ignition switch connector.
To control the starter, you need to connect (+ 12V) to the red wire of the ignition switch connector.
Pandora DX50 systems use the built-in algorithmic immobilizer crawler to implement the automatic start function.
To bypass the standard immobilizer of this car, you must:
1. Connect the system to the wires of the standard UAZ Patriot immobilizer.
2. Train the system with the signals of the standard immobilizer.
3. Clone the standard immobilizer key.

The control unit for the standard vehicle immobilizer is located above the pedal assembly, to the right of the steering column shaft cover
It is necessary to connect the black and white wires of the "LIN" connector "to the gap" of the green / white wires of the connector of the UAZ Patriot standard immobilizer unit.
"LIN" connector wires: white wire - connected at the break point on the side of the vehicle wiring; black wire - connected at the break point from the side of the vehicle's standard immobilizer unit.
Article rating

It is in vain to think that malefactors do not attempt to attack UAZ vehicles. And, unfortunately, they steal them and rob the salon. And with the advent of diesel Hunter, cases of theft of batteries have already been recorded, once they even tried to remove the turbine and the injection pump ...

The choice of an anti-theft device for our Hunter with a ZMZ-5143 diesel engine was short-lived. In terms of the combination of characteristics, the Partisan RX-5 security complex of the Mega-F company ideally suited us. What we wanted: an alarm with a simple installation, a waterproof remote control with a large communication range, the ability to program the system for remote and automatic engine start, the presence of a turbo timer, a high degree of security, reliability and a low price. Our choice fully corresponds to all this. The Partisan RX-5 complex was supplemented with a set of door lock activators, microwave sensors, door and hood end switches, pipes for wires, and, well, everything you need for installation - self-tapping screws, electrical tape, on which it is better not to save money, glue, plastic clamps, double-sided scotch tape, solder. Of the tools, except for keys and screwdrivers, we needed a drill with a set of drills from 3 to 10 mm, a soldering iron, an impact screwdriver, special assembly nippers, a tester, a knife - in general, everything that should be in the garage of the owner of "UAZ".

Looking ahead, I note that in the installation manual for the security complex, the order of work is described in great detail and accurately. Offhand it seemed that in half a day even one could do it. However, the volume of plumbing and electrical work turned out to be such that the work should be planned for the whole day, or even two, if we take into account the need for programming the unit and adjusting the sensors. In addition, the peculiarity of the UAZ design - for example, the configuration of the door locks, the architecture of the front panel of the passenger compartment - set us tasks that we have successfully dealt with and can recommend our solutions for action. So, let's begin!

Where we installed the block, I will not say, let it remain a kind of secret of our security system... The shock sensor can be attached wherever you like, and the microwave can be conveniently glued with the included Velcro to the stove body. If you have a custom dashboard, look around the driver's seat yourself.

Carefully remove the pull of the inner door opening handle. Do not lose the fixing rubber band!
Having completely removed the lock, it is necessary to check how clearly and freely its mechanism operates. If there are any problems, it is advisable to eliminate them at this stage, and at the same time to lubricate all connections

The connection of drives for door locks, limit switches, sirens and others is carried out according to the attached wiring diagram. From the subtleties, I can note that the signal indicating that the engine has already started, we took ... from the oil pressure sensor. Let's see if our solution is correct.
We talked about installing a security complex using the example of one door, the rest, except for the fifth, can be equipped with electric locks in the same way. It was decided not to bother with the fifth door, to put only a limit switch. How to program the device is clear from the instruction manual, you just need to read it carefully. Several times ... As for the electrical work, I myself would never undertake to do it in a day, and I was kindly helped by one of the leading specialists of Mega-F, a consulting engineer Alexei Makarikhin, to whom I am very grateful. We plan to install a hood lock and, possibly, a rear door opening drive.

Things absolutely necessary in our business:
1) drives of door locks with rods and fasteners;
2) door limit switches;
3) tubes for wiring;
4) a pair of plates for the hood end switches and the actual end switches;
5) wires and contacts

To the shock recorder supplied with the anti-theft device, we
added a pair of microwave sensors, which in our case are more
a better choice than ultrasound

- Reinforce the activator in the door pocket in place
- When installing the lock in place, first fasten the activator with
pull, and then replace the pull of the inner handle. You will probably need a few native Russian words at this stage. When fixing the activator with self-tapping screws, be sure to move the rod - in both positions of the petal-blocker there should be free movement of the activator body

Drill three holes in the front edge of the doorway: for the end switch (6 mm), its fasteners (3 mm) and a tube (10 mm) through which the wires will pass to the activator. The place for the limit switch is about a dozen centimeters from the floor, where on the inner side panel there is a small penny hole through which it is convenient to pass wires. Drill another hole with a diameter of 10 mm from the front plane of the door adjacent to the opening. It is important that it is slightly higher than what is in the opening, so the wires will not fray. It is also necessary not to overdo it with the length of the screws for attaching the limit switches, otherwise the contact will not close. 4–5 mm is enough. Before the final installation of the limit switches, they must be adjusted to the width of the gap between the door and the opening. The easiest way is to mold a plasticine column two centimeters high and stick it to the contact point, where the hole is, and slam the door. The height of the flattened column serves as a template. For example, we had to bite off only one segment of the limit switch with pliers. Having screwed the limit switch into place, be sure to close the door and check through the hole in the panel of the passenger compartment sidewall if the contact opens. A couple of millimeters of travel are needed at least!
photos from the magazine "Master 12 Volt"
I have been professionally installing car alarms for over 5 years.
In addition, I am the proud owner of a UAZ-31519.
Who, if not me, should write about this?
Is it necessary?
Experience tells us yes! Only on the basis of the materials of the conference, five people were identified as victims of attempts to steal / rob a car, and how many more are not covered by the Internet? Objections of the type - "And who needs it, there, the neighbor has a Mercedes under the windows" - are untenable! UAZs are now sold more expensive than many Zhiguli models, while remaining the least protected from theft of cars - there is no steering lock, the ignition lock is removed in a few seconds without any tool, the hood opens from the inside and outside of the car with almost the same ease (and for many it opens at all only outside), the primitive ignition scheme allows even the dumbest hijacker to start the car with a pair of wires. The "secrecy" of door locks will also stop only the lazy. In addition, law enforcement officers do not pay attention to UAZ vehicles at all, the likelihood that the thief will be stopped after the hijacking is negligible. When they tried to steal my car, I drove with the broken rear window at 4 am from home to work past the police patrols - no one bothered to check my documents.
There are more and more UAZ cars on Moscow roads (and there were always a lot of them outside the city), which means that the demand for spare parts should increase, which means it is easier to sell a stolen car. And the well-known advantages of the UAZ (carrying capacity and cross-country ability) make it possible to use it to perform all sorts of malicious tasks - from transporting hexogen by secondary roads to moving as part of a Chechen tank column.
Car alarm selection
In Moscow, a huge number of various Sino-Taiwanese alarms are now being sold, it is impossible to survey them all, their prices are approximately similar, I will only talk about those that I installed myself and about the work of which some statistics have been collected. I did not like (in terms of the number of failures, ease of use) how the Excalibur, Fortress, Excellent, Stealth, FBI alarms work. For UAZ, I would recommend the cheap Alligator and Prestige models that are now widely used. It is desirable that the alarm has an output for connecting an open (nolmal opened) blocking, then when the power is disconnected from the signaling, the car will not start.
Choice of configuration
Almost all alarms are equipped with a shock-sensor, it triggers when a body is hit - if the car is touched by another car or the glass is broken with a stone. But glass can be broken accurately and without triggering the shock sensor - for example, with a sharpened drill and hammer. To protect against such effects, there are glass-sensor sensors, they are a microphone tuned to the appropriate sound frequencies, and a box for converting - matching this microphone with the main unit. There are sensors where all this is "in one bottle" - shock and glass. Volume sensors are used to protect the interior of the vehicle. They are triggered if the villain entered the salon - for example, through a cut awning or through a door with an inoperative or missing limit switch. Volume sensors are of two types - ultrasound and microwave, or radar (microwave). Ultrasonic ones are worse, they give more false alarms, they are two "microphones" - an emitter and a receiver (they are usually mounted on the front pillars) and a box where they are stuck. The radar sensor is a block 3-5 x 5-7 cm, it can be installed hidden under non-metallic surfaces. There is one-zone (triggered by movement inside the cabin) and two-zone (the same, plus gives warning signals if someone rubs around the car).
Sirens are non-autonomous and self-powered, the latter have a built-in battery that allows them to yell for another twenty minutes after turning off the power (the owner can turn them off with a special key). It makes sense to connect the positive (usually red) wire of these sirens to the wire through which the alarm is powered, then if the hijacker tries to disconnect power from the signal, the siren will run on built-in batteries. It is even better (but more expensive) to put an additional battery (12 V, 1.3 - 2.5 Ah) to power the alarm itself when the main car battery is short-circuited / broken / sagged.
Some users require a pager. In fact, it is a siren that you carry in your pocket. It connects to almost any alarm system. Protects nervous system: many sirens now shout with the same voices, and the pager only responds to your car, and it has a greater range of action - read what is written on the box, and divide by three, you get 100 - 400 meters.
There are also service devices - for example, electric drives ("motors", activators) for door locks, solenoids for opening the trunk, etc. There are also anti-theft devices - hood locks on the hood, various locks on the gearshift lever - bear lock, mul- t-lock, defendlock, Krabbe, blockers of electrical circuits - immobilizers (for a UAZ a completely ineffective thing), "secrets" (but this is better - cheap and cheerful). In principle, the more to hang on the car, the better, it all depends on the capabilities of the wallet.
In my opinion, UAZ needs an alarm with a pair of sensors (for example, impact and volume), a lock with a lock in the hood and a hood lock from Saturn. Installing a lock at a checkpoint is an expensive thing ($ 100-400) and requires certain skills, and its effectiveness is ambiguous and highly dependent on the quality of the installation.
The prices for alarms are as follows: the signaling itself is $ 60-100, an autonomous siren $ 10-20, sensors $ 15-20, a hood lock $ 20-25, a door drive $ 2-3, a relay with a block $ 2-2.5 ( will be required for additional blocking, for connecting door drives - if there are no built-in relays in the central unit), limit switches $ 0.5-1 (they need 6 for 3151 *, 1-2 can be supplied with the central unit). It is better to install it yourself, there is nothing complicated about it. The price level in Moscow now is such that the salary of installers is $ 10-30 per alarm, installation on a UAZ is a laborious business, for this money hardly anyone will do well.
Alarm installation
Usually they start with plumbing work - inserting the limit switches for doors, hood and trunk, installing a siren, hood lock, an additional battery, door drives. Now there is a fairly large selection of door limit switches, when choosing a type, they are guided by their size. The door and trunk limit switches are connected in parallel. It is advisable to connect the limit switches to the interior lighting plafond so that the light comes on when the doors and trunk are opened (as is done in other cars) - this will reduce the likelihood of false alarms from moisture / condensation hitting the limit switch. for example, it switches the fuel gauge to the left-right tank) and assembled into a circuit according to the following scheme (by the way, it's nice to see if the positive power wire of the plafond is protected by a fuse - it went directly to me):
When installing the siren, they are guided by two considerations: so that dirt-water does not fly and that it is difficult to get it, tear it off from the bottom or from the front. If the siren is autonomous, then you also need to get to its lock with a key. Naturally, you shouldn't put a siren on the exhaust manifold in order not to get a lump of shriveled plastic.
Hood lock from Saturn is a kind of a window bolt controlled by a cable. There are four standard sizes (in length): 3.5; 5; 6 and 7 feet. For UAZ, a 5-foot one is suitable. The locking part is fixed in a convenient place, it is desirable that it is not very conspicuous. I have it on the pedal bracket to the left of the clutch. To pull the cable into the hood, a hole is drilled, the cable is fixed to the braid from the hood side using a ring (included in the kit) - photo. After installing the device, the possibility of crawling to the cable with screwdrivers / hooks is checked; upon detection, such places are closed with plates (I could crawl from below, through the radiator grill). Hood lock needs periodic lubrication, otherwise one day the hood may not be opened, this often happens (photo).
If there is a hood lock, it makes sense to install an additional battery under the hood, if not, in a hidden place (if you can find one in the UAZ). ", it" blinks "with light, sometimes opens and closes locks, etc. So, an additional battery must be put into the circuit of the first input, this will increase its service life when triggered. It is installed parallel to the main battery through a threshold device that does not allow it discharge through the standard circuits of the car and providing recharging.In the simplest case, this is a diode with an operating current of 3-5 A. alarms (Prestige, Alligator), these inputs are combined in a standard harness, in this case, when installing an additional battery, they must be disconnected. their signaling "hang" directly near the central unit, it is fire hazardous, they must be installed as close as possible to the connection point of the "positive" wires. If you take power directly from the battery, then this will reduce problems with a weak battery, with voltage dips, etc. Therefore, the recommended scheme is as follows:
What is for sale
What needs to be done
Installing door drives on a UAZ is a non-trivial task, it is difficult to find a less suitable car for this. I succeeded, they have been working on 4 doors for six months (pah-pah-pah), but it's difficult to describe and draw. In short: the door lock is removed, it has a plate that goes up and down when you lock the door from the inside. A hole is drilled in this plate, a drive rod is inserted there (it must be bent so that it pushes the plate and does not jump out of the hole) - photo. The drive itself is attached with self-tapping screws to the door pocket (see also diagram)... A separate story is the laying of wires to the drives. Doors in UAZs are hinged in such a way that it is very inconvenient to pull the wires - they work to break. I laid them at different levels - it comes out of the door lower, it enters the body 20 cm higher, so they break less (photo). Installation of door drives on UAZ makes it difficult for a car thief to open the car. The locks are designed in such a way that if they are closed from the inside (and the drives simulate exactly the internal closing of the doors), then they cannot be opened from the outside - unlike other cars that can be opened with a ruler, master key, etc.
After completing the locksmith work, they begin electrical work. In accordance with the diagram, the wires are divided into several bundles, the largest is the bonnet (power wires, siren control, blocking, hood end switch, 1-2 wires are required to control the "secret"). A closed, dry place is selected for installing the central unit. There are not many such places in UAZ; to install the unit, I had to remove the dashboard and shove the unit under the instruments. In cars with a lower arrangement of wipers there are traction rods, you need to be careful when laying wires (by the way, it is also advisable to "refine" the native wiring in this place so that it does not wrap around the mechanism). The harnesses are wrapped with black PVC insulating tape and, when laid, are, if possible, disguised as standard wiring. In the cabin, they connect door switches, door lock drives, sensors, an LED, a Valet (Override) button or toggle switch, light signaling control wires, an ignition lock wire. The radar volume sensor can be installed on the floor between the front seats, on the ceiling in the middle of the passenger compartment, vertically on the stove cover. It is desirable to install the shock sensor on a stationary metal surface, I have it on the casing of the stove. The glass sensor microphone is installed in the middle of the dashboard for uniform acoustic sensitivity. Light signaling control wires can be connected to side lights or turn signals. It is impractical to connect them to the low beam or high beam because of the high power consumption; after a series of such operations, you may not start. When connected to the dimensions, the light signaling can be easily neutralized - for this, you just need to turn on the dimensions, and it will stop "blinking". Better to connect to the turn signals: cars with the emergency lights on get more attention. If there is only one light signaling output in the unit, the left and right sides are decoupled with 3-5 A diodes:

The ignition lock wire can be connected directly to the lock, the voltage on it should appear when the ignition is turned on and not disappear in the starter mode.
The alarm and "secret" block the starting of the engine. When choosing the place of blocking, I was guided by the following considerations.
Locking the starter on a car is ineffective because the crank is usually in the trunk. Blocking the wire connecting the electromagnetic sensor of the distributor to the switch is also meaningless, since there is an emergency vibrator in the cabin, you just need to throw the wire from the switch to the vibrator, and the motor will start. There are only two wires left - the one that connects the ignition coil to the lock (terminal +15) and the wire that supplies the interrupt to the coil from the switch. Moreover, the latter can not only be cut off, but also grounded through a powerful ~ 10 ohm resistor and a fuse (they are provided with a hood lock, but it is inconvenient to connect them to it - you will have to open the hood lock every time to start the engine, it is better to use them for You can place the blocking relay next to the starter relay and the fuse box. Schemes of regular blocking are in the instructions for installing car alarms, I will give only a couple of lock diagrams.
"Secret" blocks the coil-commutator wire. Management is carried out by a secretly installed toggle switch, ON - the car starts, OFF - no

"Secret" blocks any chain. The control is carried out by a "secret" button: turn on the ignition, press the button - the car starts; did not press - it will not start.
As if the conclusion
I have already said that it is better to install the alarm yourself. If you have common sense and distinguish volts from amperes, then this procedure is unlikely to take you more than 5-12 hours. But you can, of course, contact the installation point, then you will be like everyone else - quickly, cheaply and badly. But no labor costs.
I am happy to answer the questions of those who dared. To the madness of the brave ... and so on!