Do-it-yourself table from boxes. DIY furniture from wooden boxes - the imagination is limitless What to make from wooden boxes
Wooden boxes for fruits and vegetables, various containers and plywood boxes are good for creating furniture. Why? Yes, because the boxes are made of environmentally friendly material, they have a natural appearance, make it possible to assemble a wardrobe, a wall or a rack from drawers with your own hands as a designer, and also serve as perfectly organized and voluminous storage spaces.

Cabinets, racks and shelves from wooden boxes will fit perfectly into the interior with elements of country or rustic styles, which are characterized by simplicity, deliberate rudeness, rustic naivety, use natural materials unprocessed. Wood is the main material for these styles.

But if the boxes are painted in bright colors and varnished, then the shelves from them will organically look in more modern interiors.


But, in my opinion, it is more interesting to make a rack from natural unpainted boxes, moreover, already used earlier. Obvious disadvantages of wood - scratches, irregularities, cracks, traces of time or various damages will only become an advantage and give the furniture a special charm.

How to make a rack of boxes with your own hands
Everything is very simple. Place the boxes on top of each other. It can be a wall in the form of a rectangle or a ladder, boxes can be placed horizontally or vertically. Then fasten the boxes together with nails or screws. Another option is to hang each drawer on the wall separately. Then you can create a whole composition from separate shelves - boxes.


To make it, it is enough to connect 4 ordinary wooden boxes. They can be painted, simply varnished or impregnated for wood to emphasize the natural color and texture. By the way, the table will also come out with shelves for storage, and if you attach wheels to it, you can move it around the apartment.
2 Shelving unit with storage boxes
Such a rack can be placed in any room: living room, hallway, nursery. It will fit perfectly into, especially in the Scandinavian and loft. To replicate this experience, you need different sized drawers and countertops for the base and top of the rack. You can paint it in any color, and inside it is not necessary to put the same wooden boxes, you can use any boxes or baskets.

3
This shelf can be used simultaneously as a bench. It is enough to connect 3 drawers, put them on the legs and attach the table top. And choose the color according to your taste and desire.

4 Shelf for books and storage
Another example of a pretty shelving for, only this time, the owners decided to fold the boxes like a puzzle: one horizontally, the other vertically. The rack can be painted with colored paint or varnished.
5 Bedside table
One wooden box made such a cute little bedside table with storage space. The box needs to be painted while the inside. In principle, the design of such a bedside table can be anything: depending on whether you will paint the box and use prints.

6 Poof
A pouf from a wooden box? Easily! It is enough to reinforce the corners with metal plates and reinforce the top of the box before making a soft seat - this will increase its strength and you can sit without fear of being on the floor or breaking the structure.

7 Shelves for storage in the hallway
This idea is easy to implement - take a few ordinary boxes, paint them and attach them to the wall in random order. Ready! On such shelves, you can also have the necessary accessories in the hallway.

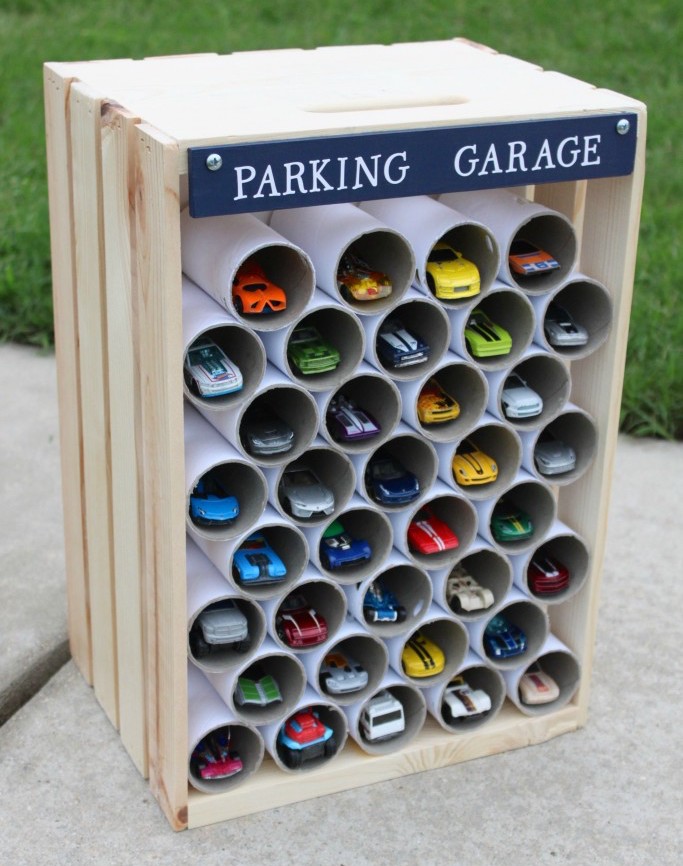
8 Children's "garage" for toy cars
Inventive parents can make such a garage for children's toy cars. To do this, you need one wooden box and cardboard sleeves - you can use paper towels. Divide them into several parts and fold them like a checkerboard inside the box. Can be sealed with glue. The child will surely like it.
9 Pet couch
One drawer, 4 wheels and a soft blanket are all you need for your pet's personal couch. Suitable for a cat or small dog.

10
There is nothing complicated in this idea either. The main thing is to come up with a design for the box and attach wheels to it for convenience.
11
A mini-shelf for important little things and keys will come in handy in the hallway. And it can be made from a wooden box. Attach nails or hooks inside that you can hang a bunch of keys on, and experiment with the design: paint, varnish or sign the box.

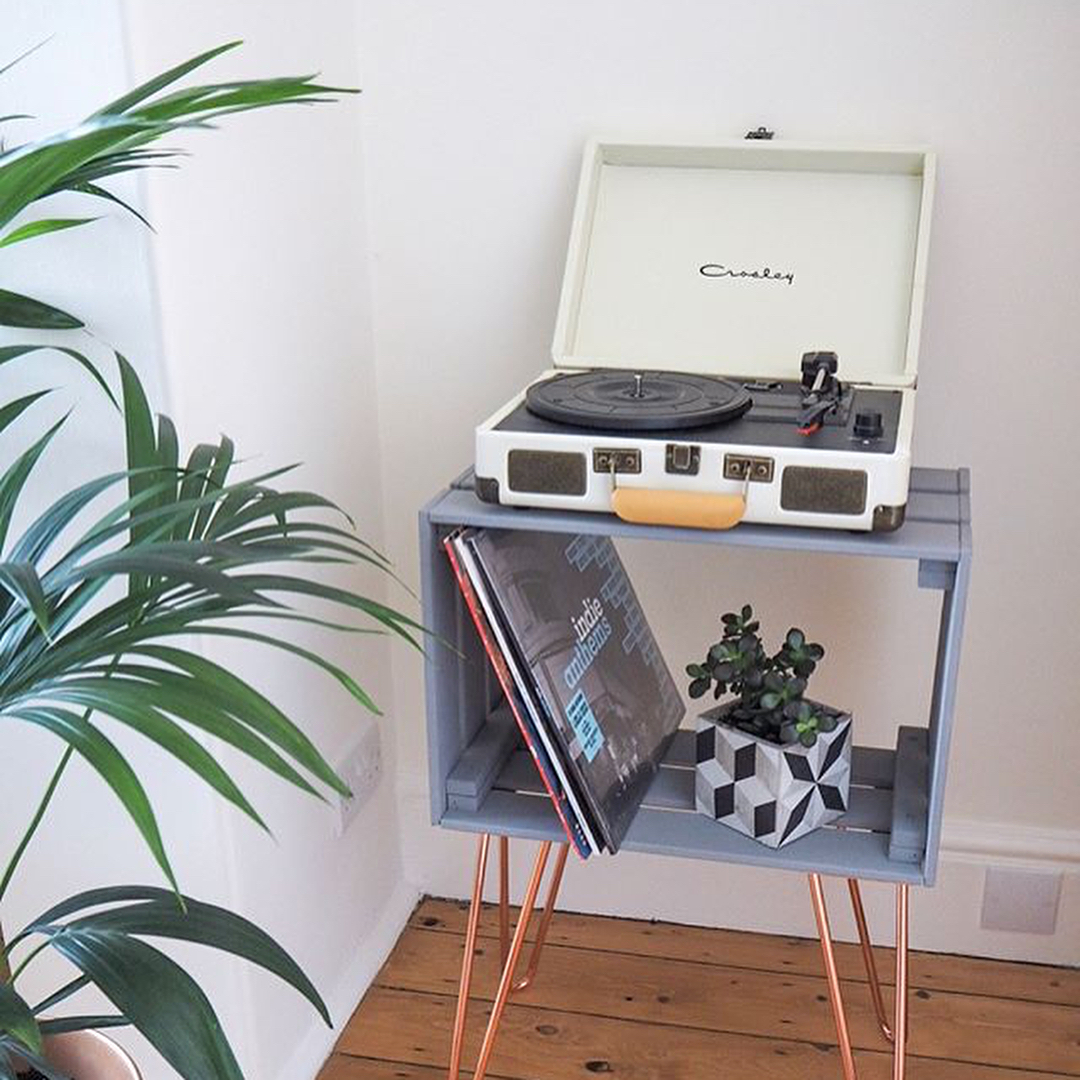
12 Turntable table
Take a look at this wonderful table at. Of course, it is not at all necessary to use it for a turntable and records, but in this design it looks very stylish. But everything is much simpler than it seems: an ordinary box was painted and attached to metal legs.
13 Wine cabinet
From a wooden box and a beam, which was sawn, painted and attached to the box crosswise, it turned out to be a very stylish wine cabinet. He really will decorate any kitchen in modern style as well as in country or provence aesthetics. Take note.
A box for storing various small things and products is considered an indispensable attribute in a modern economy. Thanks to this design, all things are in their place, while not forming a mess. For example, vegetables and fruits should be stored in a ventilated facility where fresh air can flow freely.
Monolithic products without any holes are suitable for tools. For various little things, constructions with additional doors and a folding mechanism are suitable.

We offer original hand-made storage boxes. Here you will find out what materials and tools you need to make these products.

What materials are used for the construction of structures?
Most often, boxes are made of wood and other materials. For tools, it is better to choose solid pine or maple. Alder or aspen are suitable for products. These tree species are distinguished by their durability and strength. They do not emit tarry secretions and do not dry out over time.

Plywood is suitable for making decorative items. Any little thing can be placed here. A special adhesive is used to fix the parts.

DIY master class on creating a box
We offer step by step instructions how to make a box at home. To do this, you will need the following tools and materials:
- tape measure;
- simple pencil;
- board 25 mm thick;
- wood trims 15 mm thick;
- thin plywood;
- metal corners;
- nails and screws;
- hacksaw;
- screwdriver;
- metal hinges for opening the cover structure;
- hammer.

The first step is to familiarize yourself with the diagrams and drawings of how to make a box. This will allow you to correctly match the dimensions of the finished product. Do not make too large structures, as they will take up a lot of free space.

When all the components are ready, you can proceed to making a storage system for vegetables and fruits. The process includes several stages:


On the surface of the boards, mark the size of the side parts of the product. Next, we move on to the bottom of the box. Mark the size on the wood trim. After that, using a hacksaw, we begin to cut the blanks.

We fix the boards with each other with small nails. We fix the bottom details using the same technique.

The product cover consists of plywood sheet... It is installed on special hinges that allow you to control the closing process.


The do-it-yourself box photo shows the whole workflow.

Tool storage box
This type of design is considered the best idea box with your own hands. This product will allow you to keep all the working tools in one place. Here you can make additional sections for storing screws, nails and nuts.

To do this, you need to prepare:
- thin board;
- thick plywood;
- hacksaw;
- electric jigsaw;
- hammer;
- screwdriver;
- tape measure;
- drawing of the finished product;
- metal corners.


On sheets of thick plywood we make markings for the details of the box. After that, we drill holes for fastening metal hinges. Next, we connect the side parts to each other.

We are starting to manufacture the bottom for the storage system. To do this, we attach a thin board to the side parts of the box. To prevent it from collapsing under the weight of tools, it must be strengthened with thin boards. For this, several wooden elements are stuffed on the bottom surface.


In the side parts of the plywood we draw the markings for the handles. They will be cut inside the main body of the product. You will need an electric jigsaw here. The cutting base is installed at the beginning of the marking.


In the process of cutting out parts, you should not make sudden movements. They can provoke the appearance of cracks on the surface of the product.

Now we start installing the partitions. To do this, cut out a small square from thin plywood. It is fixed with metal corners in the middle of the structure.

The diagram shows a detailed view of the tool box. The drawing shows the exact number of parts:
- side parts - 4 pcs.;
- bottom - 1 piece;
- partition wall;
- handles - 2 pcs.

DIY photo of boxes


New or old wooden boxes are a great find for lovers of handicrafts. If desired and with a little imagination, you can build many non-standard furniture options from ordinary boxes.
site collected a few for you interesting ideas that will help you create functional and original furniture for your home.
Coffee table
Drawers will help you organize extra storage space in your living room.
Bedside table

Practical drawer unit on wheels made of a pair of old wooden boxes painted in bright color... Ideal for a girl's bedroom.
Shelf for shoes

Wonderful soft bench with shelves for shoes in the hallway. Your guests will certainly be surprised!
Colorful shelf in the nursery
For your child's convenience, arrange storage by purpose, color or function.
Pet bed
The original version of furniture for dogs and cats, will perfectly fit into your interior!
Stylish pouf

Great project for the weekend! Add a little more functionality and comfort to your living room.
Bookshelves
Saw a wooden box in half and you have two original wall shelves.
Another simple project for your home! Ideal for storing blankets and pillows.
Shelving in the hallway

Such a rack with wicker baskets will adorn any hallway.
Storage in the bathroom

An ingenious idea for storing towels, personal care items, cosmetics and more.
Ladder shelf

How to instill in a child a love of reading? Use wooden crates to create an adorable ladder for books and games.
Boxes, you should not get rid of them right away - perhaps you can make something interesting and useful out of them.
Using some tools and paint, you can make various pieces of furniture from the boxes that will be useful in the garage, in the country, and even in your home.
Old boxes are very easy to paint, because they are made from untreated wood. They are also easy to connect together.
Here are some ideas that can be brought to life from regular old boxes:
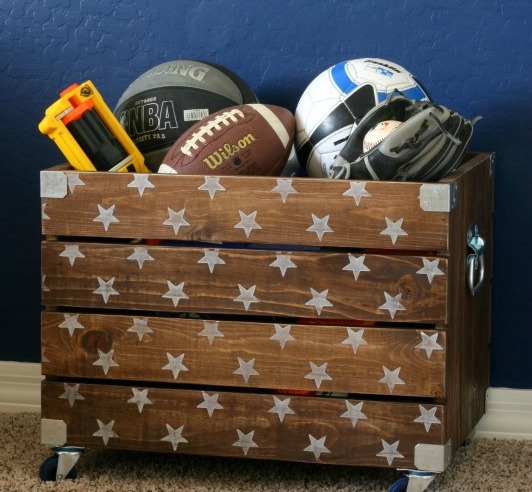
Toy storage box
If you convert an old box, paint it and add wheels, you can get such an interesting and convenient storage for toys.
You will need:
Sandpaper (if wood needs to be processed)
Acrylic paint and brushes
Wheels (4 for 1 box)
Screwdriver and bolts (to attach the wheels)
Wood glue (if necessary)
Chalk board (optional)

1. Sand the boxes.
2. Paint the boxes in any color (you can attract children to color them as they like).

* On the side, you can attach a chalk board or make such a board with your own hands from a piece of plywood and special paint, which, after drying, turns into a cool chalk board on which you can draw with chalk. On such a board, you can write what or whose (if there are several children in the house) toys are stored in one or another box.
The board can be glued to the drawer.
Bench with boxes
From several boxes you can make just such a bench.

Treat the boards and paint them if necessary.


Shoe box (with seat)

You will need:
Sandpaper (if needed)
Screwdriver and bolts
Acrylic or spray paint
Wheels (optional)
A small piece of plywood (for seating)
Filler
Thick fabric
Construction stapler.
* The padded seat can be omitted, but it still adds charm to your product.
1. To make a seat, prepare plywood, attach thick fabric to it on several sides along the edges, leaving room for filler. Insert the filler and secure the fabric all the way.


2. The box can be processed and painted.

3. Attach the seat to the box with a screwdriver and bolts.
4. You can attach wheels to make it easier to move the seat.

* If you have extra plywood, you can make a shelf for a drawer out of it, which can be attached using corners.

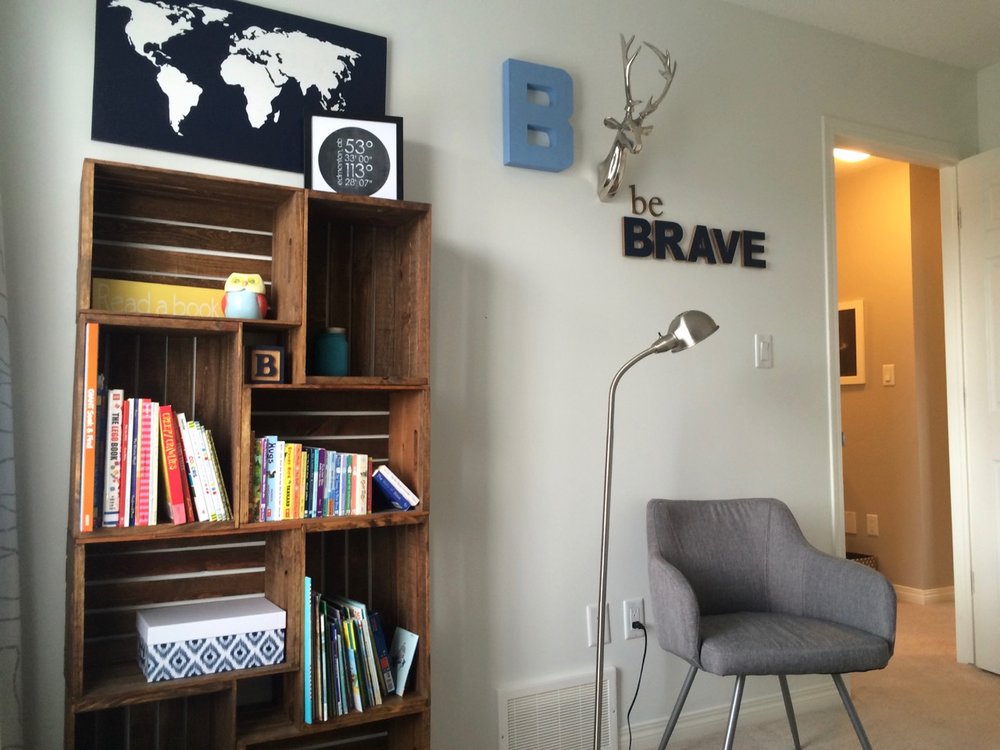
What Can Be Made From Drawers: Bookshelves
In the images you can see bookshelves from boxes. All of them occupy an entire wall in the bedroom, but at the same time everything looks very cute.

The boxes can be processed and painted. They are bolted together, and if necessary, they can be attached to the wall so that they do not fall.

DIY compact garden from boxes
Wooden pallets and boxes can be used to create a multi-level garden where you can grow flowers and greenery, for example.

To do this, you need to fix a dense plastic wrap inside each box. To make this easier, use a construction stapler.
Shelves for small flowers, books and other small items from plywood boxes
Small drawers can be turned into such pretty small shelves. If necessary, the boxes can be treated with sandpaper, and if they are painted, they become even more beautiful.

Please note that the outside of the boxes have been painted in one color and the inside in a different color, which gives them a very nice look.
These shelves are attached to the wall, but they can also be stored on the floor, in a closet, on a balcony, window sill, etc.
Kitchen table made of wooden boxes
If you have several large boxes lying around or wooden pallets, you can make a kitchen table from them.

Sand the boxes and paint them in a suitable color for the interior.
Secure everything with bolts so that the structure is strong and not wobbly.
It is not necessary to make a table for the kitchen, it can be made for a summer residence, in order to sit outside with a cup of tea.
Drawer coffee table
If you connect 4 drawers in a certain order, you can make a pretty coffee table.
Pay attention to how the boxes are connected.

It is also worth noting that it is advisable to process and paint the boxes with varnish or brown paint, so that they look even more like a coffee table.
Castors can be attached if desired, although this may require attach several plywood boards (which will better secure the entire structure)to the bottom of the table and only then attach the wheels.