How to make an arch instead of doors - options and instructions for the construction of plasterboard. Arch from drywall do it yourself: Step-by-step instructions How to make an arch profile
Arches for the doorway are used for a long time. The arch is very aesthetic, today it is not only beautiful, but also allows you to save space, complement the interior and work on your own, with your own hands.
As a rule, drywall is used, it is not expensive, it is easy to work with it and you can make any arched opening. The framing of the archer can be any, you can put a platband and a variety of finishing materials.
Select form
The species of the arch can be any, even from several levels, with different near and functionality, initially the correct measurement of the doorway is made. The main types of Arches are presented in Table:
| Art type: | Description: |
|---|---|
| Parabolic arch: | Beautiful and simple in the manufacture of the arch. Made from flexible plastic, for example, threshold. On the middle there is a mark, which will be the upper point of the arch. Next, the material bends in the form of an arc. The arc is applied to a plaster or other sheet and the template is made, the arch will be ready on this. |
| Circular arch: | IN wooden Material (bar) It is necessary to fasten the self-tapping screw and tie the twine to get a circulation. They can make the arch pattern. Next, the circle made is needed on the sheet to draw the circle of arches. |
When the contours of the arch will be drawn, you should cut the form using a jigsaw or a regular knife. All sections are made exactly along the lines, the quality of the arched opening is dependent. The classic version of the Arch is made on the following principle:
- It is necessary to measure the doorway and calculate the material.
- Prepared tool.
- The arches pattern is cut, semicircular view, round, oval and others.
- Mounted frame in the opening, using a metal profile or tree.
- Polyurethane, drywall, plywood, fiberboard, chipboard, foam or other selected material are installed.
- Cuts the bottom of the arches and is screwed to the side parts.
- Putty and finishing, decoration arches.
Important! Determining with the type of arches, you need to pay attention to the height of the africa and the width of the doorway. Some types are suitable for a wide, but low opening, the second on the contrary.
The main forms are as follows:
- The portal is a P-shaped arch, on the device can be in the form of waves or with a variety of angles, one of the most popular types of opening.
- Classical Arch - It is recommended to use for the ceiling from 3 m, with a width of a passage of 90 cm.
- Romance - it is recommended to put it if the width of the opening is big, but the height to the ceiling is small.
- Modern - an alternative to any kind of arches, can be used in Khrushchev, where every centimeter of space is important. Arch corners are made sharp or rounded.
- A half and a half - an ideal arch for the zoning of the premises.
- Direct Arch - suitable for Loft style, High-tech, modern.
The photo contains ready-made false arches from the company Lerua Merlene, who do not need to fraward:
Knowing what kinds of finished arches for door openings There are, you need to decide on the materials and start working with your own hands.
Arch from plasterboard with your own hands (video)
Materials for work
You just can not build the arch, you need to choose the material and prepare the entire inventory. A plasterboard sheet is often used, it is easy to work, if desired, you can redo the arch, the cost is low. Therefore, the example of working with GLCs will be described below. Arched interroom opening requires:
- GLC 9.5 mm.
- Profiles 27x28 mm and 60x27 mm.
- Self-tapping screws to secure 3,5х25 mm plasterboard.
- Dowel to secure the frame in the opening of 6x60 mm. Used, for brick or concrete.
- Self-tapping screws with a press washer 4.2x12 mm.
- If the doorway from the bar is needed, then the vehicle screws are needed.
- Putchals for GLK.
- Needle roller.
- Perforated corners.
- Spatula.
- Pencil and roulette to measure and make a drawing.
- Screwdriver.
Prepare material, you need to place everything and measure.
Measures

Before , how to make the arc from drywall in the doorways are measured. The size of the outlook itself is taken at height and width. When there is a width, it is divided into two to create an ideal semicircle Arch. The form of the arch is determined, for the classic option, it will be necessary to additionally align the walls using putty and lighthouses. Naturally, the opening needs to be fully disassembled, prepare, removing dirt and dust from it, if necessary, close the gaps and emptiness with a solution. When the opening is ready, you can move to the following actions.
Installation of interroom arch
The design of the arch for a private house or apartment is being made to GLC, the desired picture is drawn, after which it is cut with a knife, strictly along the lines. When one piece is cut out correctly, the new side is drawn along its circuits and another piece is cut out. After preparing both pieces, you can mount them on the frame, but it is built before it is to build a correct framework. The work will look like this:
- At the top of the opening, the profile fastening is carried out using a dowel if the opening is brick. After that, the profile must be installed on the walls of the opening. The frame is mounted at two points of the doorway.
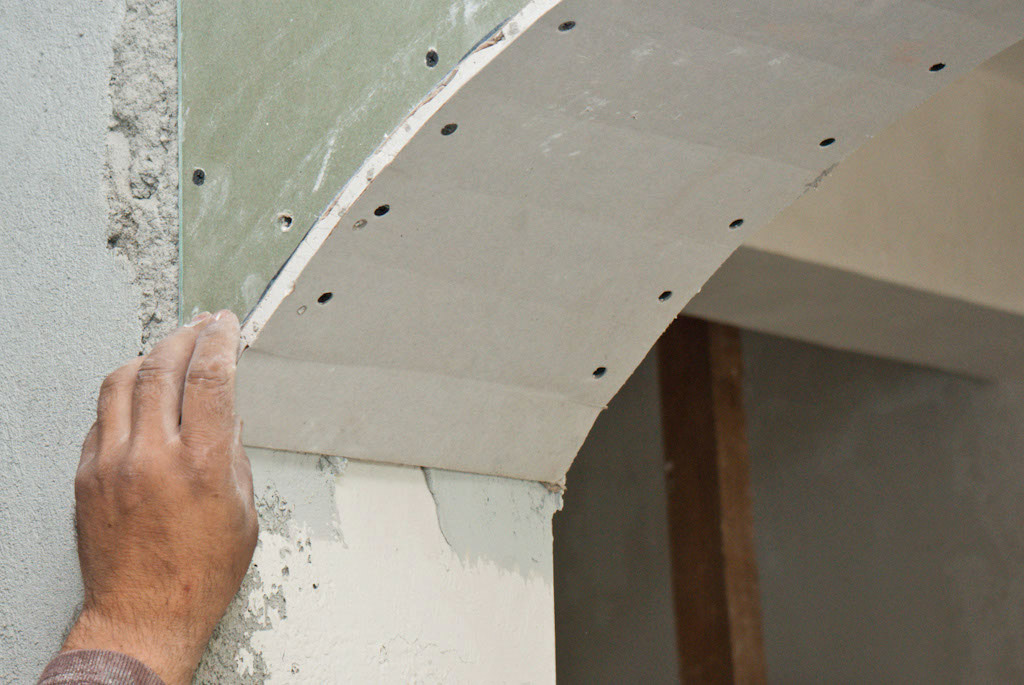
- Next, a profile is made in the form of an arc. Scissors need to cut the metal every 5-10 cm, after which the metal is bent along the desired form. For the template, previously cut slices of drywall are used. Installation is carried out by dowels, and the frame is to enjoy plasterboard using self-tapping screws. For arches you need 2 arcs.

- In order to the frame turned out to be durable, Brucks or pieces of profile are carried out between arcs.
- The frame is ready, but the Arch itself has not yet been done. It will be necessary to bend the plasterboard for mounting at the bottom of the arch or make a set element, the precast bottom is carried out of pieces of drywall, and when flexing, you need to cut off a piece by adding 10 cm from the sides. So that the material did not crack, it will uroat a little water, pass with a needle roller and leave for a couple of hours so that it is flexible. After that, it is possible to bend material and fasten to the frame, applying the scotch initially, and then the screws.
- After 12 hours, the beautiful arched opening will be ready and remains to be arranged and decorate the arch.
That's how to just install the arch in the doorway with your own hands. Using these tips, the production of the arches will be rapidly. All empties in the arc can be left unchanged, and you can use mounting foam, pouring her inside, according to the instructions. Next, you need to bore your creation.
Registration of the doorway
What makes the arches in the doorway are known, but how to separate the arch in doorways? Changing the finished design by different materials. Often, the design is done using MDF, can be separated by modern material, for example, artificial stone, wood, wallpaper, paint and apply an array. When entering the arch on the kitchen it is recommended to fix the speed by installing the fastener in the arc. Before writing the finish and draw up the arch, you need to make a number of works, step-by-step instruction below:
- The surface of the arch should be sanded, removing irregularities, creating a rounded edge.
- The seams, joints and spacing of self-tapping screws should be sealed with the help of putty, but before it is put on an angle, perforated plastic corner, it is necessary to fix it directly into the putty.

- When putty dries again, it is sanding all the sandpaper to remove unevenness.
- The arch is labeled primer and when it dries, the finish putty is applied and the last time is polished.
Arch management is completed, it is necessary to choose the finish and put it on the finished opening. As you can see the homemade arched opening, it can simply collect the frame and fix the plasterboard can anyone, not necessarily the master, even if the experience is small. It is recommended to make the arch, the same as the window in shape so that the interior is united, although the opening itself can be upgraded so that the house or cottage is transformed and functional. Finally, the video, where the work process is presented, how much material is needed and how the rectangular arched opening is done with rounded riding:
Photo gallery of finished work
Similar materials on the topic:
 Step-by-step instructions for installation of plasterboard arches with their own hands
 Arches in the apartment: what it is, species, dignity
 Interroom Arches in the kitchen: varieties and design
Owners small apartments Prefer not to close open doorways by the door, but to decorate them with arched structures. At the expense of this, the space is visually increasing, the interior of the room becomes much more elegant and the combination of two rooms in one thing is carried out.
You can use ready-made arched structures that are sold in construction stores and represent a set of details, and you can collect the arch own handsAfter preparing the necessary materials.

How to make elegant elements? Look at the photo of the arch do it yourself. List of technologies and materials used - huge - fantasize!


Installing arches in the apartment
At home you can not resort to help construction brigade and engineering skills to establish an incredible beauty of the arch. It is enough to choose your favorite arched design and a material with a tool to make it. If you follow the instructions below, you can avoid the most frequent errors that make newcomers.

The arches structure themselves in the construction industry usually play the role of supporting elements during the construction of ceilings and walls. In our example door loans Are not carriage structures. For the first case, materials are taken, given the serious load on the walls, decorative arched structures must withstand only their own weight.

The door arch in the apartment replaces the door, it is installed on the same place as a movable design. This is the future element of designer design.

The ideas of the arches are dumbfounded, the most simple we describe in our article. You can make an arch using a bar 2-3 cm by a cross se section or light profile. This design in any execution will be perfectly held the weight of the finish. The main thing is to reliably fix all the elements on the wall to beautiful decor Not sprinkled after a couple of days.

Note! Decorative arch More plays a designer function in apartments, it is not supported by the main designs. The main burden in a similar situation on the walls of concrete and jumpers.

There is a huge selection of arched forms and design solutionsEach of which is selected under the case.

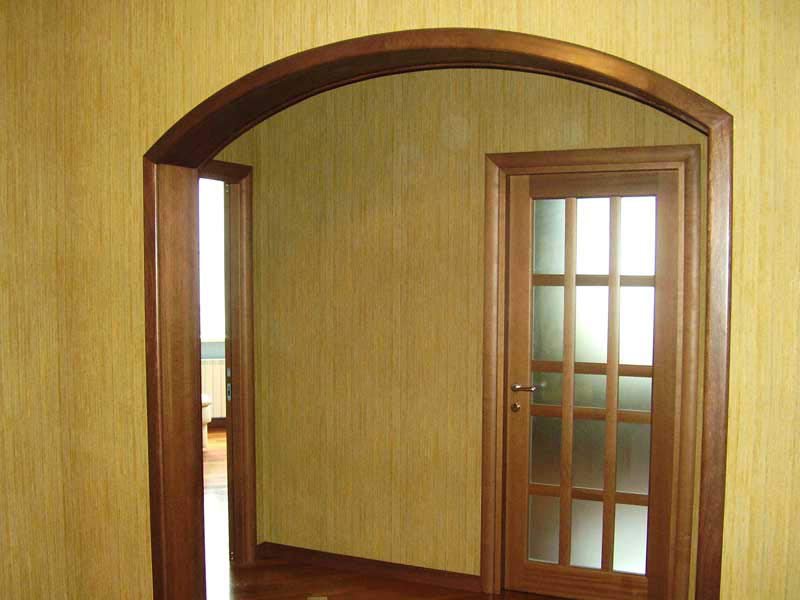
The arch presented above as a visual example of the arch has the form of a semicircle of the correct form. In the latter case, the passage with strict outlines of the rectangle. The intermediate options for arched structures go further.

There are a mass of other examples where only one support is used or curved racks. The appearance of the door arch directly depends on the selected room design.


It is necessary to take into account the size of the openings, the height of the ceilings and some possible features of the planning of the room. Someone at home in a classic retro style will be perfectly fitted with an elegant arch with a semicircular shape, in others in the modernist - rectangular portal form.

These things affect the taste of the owners and the design features of the apartment. Someone chooses the cone-shaped arches at all.

Choosing a classic, note that the ceilings in the apartment are tall and have a height of at least 3 meters. If you have typical panel apartment With low ceiling, use the arched system "Modern".

Wide racks of the Romance model will be perfectly complemening the army of the face with wide racks. The arch model "Portal" is suitable for the interior with clearly predominant direct forms. This option perfect choice For log houses.

Do the arch do it yourself
Make an elegant arch can be quickly using plastic and laminated elements, step-by-step instruction How to make the arch is presented on. They are cut to the desired size in height, and then they are attached according to the instructions in the right places. These are the standard options that are made on a single template, they do not surprise the buyer, and the price is not always tempting. Yes, and choose the model of the desired size under your discourse is sometimes very problematic.

To make the design elements of the arch, we will need the following materials: Fiberboard plates, drywall plates and plywood. How to make the arch do it yourself? If you watched as professional builders work with drywall plates, they probably guessed that they are best to choose to cover. They can be separated after installation with various materials. In turn, the thin plywood has one big plus - it is easily bent.

The frame of the Arches is made from the bar with a cross section of 20 x 20 mm (30 x 30 mm) or a metal profile.

How to make the arch in the opening?
Bright and causing arc made of red brick, concrete or aerated concrete blocks. Red brick can be used without finishing materials. Such an arch will emphasize the solidity and material security of its owner.

Perfectly suitable for modern design premises. The weight of such a design is very large and in old apartments to build a similar one is not recommended, a large load on the walls.

Metal structures of complex form should be left for work by professional designers and engineer. Metal is difficult and troublesome, these projects are very complex in their implementation and engineering documentation is prepared in advance.

Profile and drywall are the simplest and most affordable things that allow making the designs of any shape and style.


Arch of wood
Not every person like pine, but for finishing work Any other noble wood material can be used: oak, ash and others. Beautiful arches The interior will complement the elegant classic wooden furniture.

In general, working with any tree without experience is very difficult. Better all work entrust to professional builders. Focus on your own features and experience.

The opening of the arched construction from the tree is created by assembling a variety of small fragments. With the help of pressing, they make round elements, then glue them or twisted each other. At this stage, a lot of tools and time will be required.

Photo arches do it yourself


Several years ago, arched openings were included. This design of the entrance to the room is beautiful, originally and allows you to do without installing doors. Using modern materials, you can make and separated arched archdo it yourself. Work is not too complicated, but requiring great accuracy. In addition, you will need to think in advance how finish will be performed operactions. You can make design in various styles, considerhow to make the arch in the doorway.
Arch is quite spectacular way revive the interior and make it more attractive. Beautifully decorated arched opening in the arch will emphasize the beauty of the interior in the room, will make the situation more original.
A huge variety of arches forms and a harmoniously chosen finish will allow the room to transform. To make sure this is enough to see the photo of the room before the arch was inserted into the opening, and after repairing the repair. Consider how you can create a niche in the form of an arch, install it in the walls of the wall and separate it with your own hands.
Types of Arok.
When designing interiors, arched openings perform not only decorative, but also practical functions. Perform a niche in the arch of the wall separating adjacent rooms, or install a partition with an opening in the form of an arch in big room It is possible to separate space on the zone without using interior doors.
In most cases, semicircular openings are used, the following types of arches are distinguished:
- The classic arch is a structure in which the bending radius of the arc is half its width.
- Arch Modern. It has an original form in which the arc is performed with some lift.
- Romantic arch. It is almost rectangular opening, the edges of which have roundings.
- Elliptical arch. In this case, it has the form of oval, with an extension in the middle and narrowing at the top and bottom.
Tip! What looks different types Arch can be seen in the photo in the interior magazines.
Preparing for installation arches
Consider how you can install it yourself and separate the classical arch of drywall.
Make measurements
Starting the creation of the arch is necessary with removing measurements from the opening. It will be necessary:
- Remove measurements on two diagonals of the opening. These measurements must coincide, otherwise, it will have to first work on its alignment.
- Remove the width. This measurement is useful for determining the radius of the arc bend.
- Measure height.
Acquire materials
In order to install the arch required:
- Arched plasterboard sheets 6.5 or 8 mm thick. If we open in the room standard size, Enough one sheet. This material is very convenient in work. You can use Phaneur, but it is more difficult to work with it.
- Metal profile. It will take 2 pieces of the guide profile of 50 × 40 and 1 of the profile of the racking 50 × 50 mm.
- Fasteners: Dowels with screws (25 pcs.), Self-samples of 3.5 × 25 mm and Self-breeds of "Seeds" 3.5 × 11 mm.

After the construction is completed, it will be necessary to separate the arch. To do this, you need to stock:
- Primer;
- Putty finish;
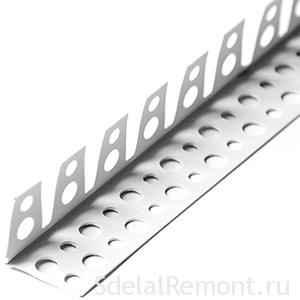
- Perforated arched corners.
The rest of the material is purchased depending on which the design of the opening and the wall adjacent to it is planned.
Mounting work
First, the framework is performed. Stages of doing this work with your own hands:
- We cut off the two profile segment at the height of the opening and one in width and fix them in the opening, using a dowel with screws.
- Now you need to prepare the arcuate part of the frame. The length of the profile for this part is determined by folding the two values \u200b\u200b- the radius of the arches and the height of the retreat from the top of the opening.
- To make it possible to bend profile, you need scissors for metal or grinder to make cuts in parallel side parts of the profile. A step of the arrangement of the cuts is 4-8 cm. After that, the profile is bent, giving it the necessary form.
- I fix the carcass made of the made part, after aligning it.
- The finished frame is wearing bilpers from plasterboard. First, the frontal parts are trimmed by overlooking the parts of the opening. Then is manufactured interior Arches. To bend the harvesting from drywall with your own hands, it is necessary to perform cuts from the wrong side, without damaging the outer layer. The prepared part of the drywall must be installed, consolidating on the frame using self-samples.
Finishing work
The arch of drywall is practically ready. But as you can see in the photo, it looks not very attractive without finishing. Consider how you can perform the design and framing the collected arched opening with your own hands.
First of all, you need to sharpen all the seams and locations of the self-seat. On the outer edges on the putty perforated cornerIn order not to mess with the shape of the putty.
Then over the entire surface of the arch, we apply a layer of finishing putty, and after it is drying, spinning the surface, seeking smoothness. It remains to be uploaded to the surface, after which a finishing finish can be performed.
How can I split the arch? The selected option should be harmoniously combined with wall decoration. For example, if walls are floating with wallpaper, the same material can be applied to the decoration of the arch.
You can use other options that combined with the wall decoration. For example, to separate interroom artificial stone arches, tiles, decorative plaster, you can use and combination different materials. As far as beautiful and original can be an arches finish, you can see photos.
So, interior openings in the form of the arches are an original and very attractive way to decorate the interior and arrange the opening between the adjacent rooms without installing the door. If desired, making the arch will not be difficult. And as it is interesting to separate the arch can be seen in the photo in the interior magazines.
The question of how to make the arch of drywall, with their own hands, is interested in every owner of the house, which wishes own forces Make changes to residential space. If you get acquainted in detail with how to put the arch with your own hands, then there should be no difficulties.
 Type of arch in the doorway
 In order for the installation process of the arc from drywall, it does not cause difficulties, one should first pick up the photo on which the framework will be visible, as well as the features of its structure, the main part of the profile in the finished form. Such photos will help to act correctly and prevent errors in the installation process.
The success of the case primarily depends on which materials and what tools the framework and quality is made. Therefore, it is necessary to pay due attention to the issue and instruments for labor.
 Plasterboard for Ark
 Important purchases
- To implement the conceived and make the arch in the apartment at the proper level you will need:
- or electric jigsaw.
- Pencil for marking.
- Roulette for measurements.
- Scissors that cut metal.
- Samores and dowels should also be stock in sufficient quantities.
- Such a tool as a screwdriver is necessary for high-quality design.
- A knife, which is used as a stationery.
- Natural paper will also need to align surfaces.
- Plasterboard sheets of the desired size.
 Required tools and material for work
 How to make measurements
Another important step in the installation process of plasterboard arches is measurements. It is from them that depends:
- The number of materials necessary to implement the idea.
- how many money It will be needed to acquire raw materials, for installation in the opening between rooms in the house or apartment of the plasterboard arch.
- As far as the correct form will be in the design.
- What framework under the plasterboard arch is installed for maximum stability.
Measurements for installation of plasterboard arches are as follows:
- First, the dimensions of the length and width of the vertical frame are determined.
- The next step is measured the upper part of the arched opening.
 Arch dimensions depending on the width of doorways
 - If the design is non-standard, then it is better to measure step-by-step, carefully measuring each segment, in which the arch will continue to be located.
 Step by step measurement of the place where to install the arch
 Cutting drywall
To make the required sheets to create a plasterboard arch, it is necessary to cut them, clearly adhering to the parameters of pre-performed measurements. To obtain an ideal arch, you need to understand what materials you can use in the process of cutting the strips of the required diameter.
 Cutting plasterboard occurs by the parameters of these designs
 Materials
To make marking and cut strips of the required size, you can use the following tools:
- Roulette, ruler, level. These guns will help make the markup of GLC.
 Construction markup tools
 - Construction knife. Cutting a profile with the help of such a tool requires some skills, so if a person never exercised such works with his own hands, it is better to prefer another tool for cutting drywall.
- Hoven also use. How to do this, tells the video of a given topic.
- Electric jigsaw. Giving preference to such an instrument, everyone will understand how to use it yourself. This device may be, which has non-standard rounded shapes. The electrolovka blade allows you to cut a model that will not require additional profile adjustment after the work is completed.
 Tools for cutting plasterboard
 - With the help of an electric drill it is possible to carry out even the most sophisticated work. This tool can create a variety of designs for the arches in the space of a house or apartment. With the help of the device cut out non-standard forms with which the interior design will be extraordinary.
- The planer will be needed to give a complete species. You can perform work at the stage when the design is in the opening.
Read also
Mounting framework Arches under plasterboard
Methods of cutting plasterboard
There are several types of cutting of plasterboard sheets, allowing everyone to install each other, in an entrance hall, living room, pickup required method Personally for yourself:
 Standard cutting of drywall is made in a straight line
  Figured cutting applied when cutting out non-standard forms
 The names themselves are talking for themselves. Nevertheless, it is worth understanding the features and nuances of each of the cutting methods.
Standard cutting
If in the former doorway is planned to install an ordinary style arch, without additional bends and geometric forms, you can use the standard cutting method. This type of sheet preparation for the implementation of the arranging arrangement procedure is performed in a certain order. Step by step instructions, as follows:
- List markup with a pencil or other writing subject.

- Then the long ruler is applied to the leaf of plasterboard, and it is necessary to cut the plasterboard plate with a selected tool.

- If some flaws turned out, you can handle the surface with emery paper or. It all depends on how noticeable irregularities.
This method you can cut rectangular or square segments of plasterboard.
Figured cut
Interior arches may have intricate and unusual forms and sizes. To perform the work beautifully, you need to know the details and nuances of the process of cutting plasterboard sheets. In order to prevent errors, it is better to have a photo of the design that will be installed in the doorway.
For proper cutting of plasterboard structures, step-by-step instructions will also need. She is as follows:
First, as with standard cutting, start with marking.
 It is necessary to make marking for drywall carving
 The next step is the choice of tools for work. Most often for figure cutting of plasterboard use:
- Electrode with a cylindrical nozzle. These devices are made round holes. In this case, you can not even mark the markup, because a special nozzle will help to make an ideal circumference in shape. And it does not matter at all, the owner of the house has previously similar procedures or not, experience is optional for such activities.

- The electrolovka will help cut the elements of various shapes, not only rounded. Any geometric decisions will be embodied in reality, so very soon in the doorway, that is, at its last place, a wonderful design of a lightweight material will appear.

- Hacksaw for plasterboard materials. This tool will help cut any geometric shapes and small details from drywall. Using hacksaw, it is necessary to pay special attention to the markup of the sheet of plasterboard and drawing the contours of the future product or sheet, which will be attached to the frame.

- Knife and hammer. These tools can be used in the absence of professional devices.
After the desired sheet is cut, irregularities are removed on it.
Mounting metal carcass
When all procedures for cutting the profile are completed, proceed to attaching sheets to the frame. To this question should be approaching, because it depends on how it will be appearance Arches upon completion of work.
The framework is part of one of the most important. From how correctly the design is made when fixing the profile, no matter how much the material costs and what is the price of tools purchased for installation, most importantly, the correctness and clarity of work. To carry out the necessary manipulations, nicely, follows in the opening where the arch is planned, correctly measure the height and length.
 So looks like a metal frame arch
 It is also very important when the frame is made for the plasterboard arch in the corridor, hallway, kitchen or rooms, take into account the weight of the structure. Due to this, you can clearly determine what kind of complexity and strength need beams.
The following details must be taken into account:
- Strengthening with or screws, the length of which is chosen on the basis of the wall thickness and the carcass itself.
 Fastening metal carcass
 - In case it is planned uneven, with arches bends, it is enough to make cuts on metal beams. After that, they can be bent and create the desired form.
Arch in the design of the apartment plays a big role. It visually increases the space, as well as if the owner is desired, it can zonate the room. Installation of the arc from drywall is easily and with no high cost. Performing a step-by-step algorithm of actions can easily solve an important task - to make a smooth semicircle for the design.
Arch in the interior of the house
The arch in the interior performs several functions. First, she zones the room. It can be separation between the kitchen and the hall, access to the balcony. Secondly, they make an apartment more and brighter visually. Thirdly, when creating a design, instead of the doorway, there is no need for the choice of doors that can make the room small and dark. Creating a backlight in arched openings will be additional lighting At night, as well as a supplement in the overall design of the apartment.
How to make a plasterboard arch? Before you get acquainted with step-by-step instructions, you should familiarize yourself with the types of arches.
In size, forms figured outresses from plasterboard are divided into types:
- Half a day from plasterboard. It has the form of a semicircle on the one hand, the second - remains a direct angle. She looks in the apartment with the design - minimalism, art deco.
- Classical arch. The top has the form of a semicircle, which coincides with the width of the door box along the radius. It can be installed instead of doors to the kitchen, exit from the corridor in the living room.
- "Modern" is a plasterboard arch. A small semicircle at the top of the doorway sharply turning into a vertical straight door frame. Mainly mounted instead of the door to the room or access to the balcony.
- "Romance" - rounded angles, but the straight line is at the top. Mounted in a large opening instead of two doors - entrance from the corridor to the hall.
- "ELIPS" - plasterboard arch. It is excellent from "Romance" greater rounding. It all depends on the size of the doorway at a standard height.
- "Trapeze". These are broken lines around the army around the perimeter. Such a plasterboard design is rarely used in the apartment design.

To improve the interior, the variety of arched openings, the shelves are often put on the side of the interior elements, plasterboard niches are created, the handrails and end-to-end windows are installed.
Before making the arc from drywall, it is required to remove the dimensions of the door, to know exactly the type of construction, familiarize themselves with ways to build a frame under the arch.
Necessary materials
For the production of plasterboard arches, materials will need materials. Only initially determine what material the framework for arched structures will be created. An excellent option is a metal profile.
It is worth noting wooden frame Created only in a dry room. The building must pass shrinkage. Since the tree "breathes" in the room should be constantly the same temperature, as well as a normal level of humidity.
So consider what will be needed in the manufacture of GCL:
- Plasterboard. What kind of plasterboard is needed for arch? For the ends, you will need a 12.5mm thickness., For a semicircle - 9.5mm (or arched).
- Profiles guide and racking. Arch profile Knauff.
- Reinforcing paper tape Knauff.
- Primer.
- Self-tapping screws or for wood.
- Putty "Knauf Fugen".
- Putty "Finish".

Gypsum Carton 9.5 mm. Bend to the desired radius easier than 12.5mm. There are 2 leaf bending methods.
"Wet" method requires accuracy and time. Flexing drywall sheets should be if the bend radius is large. Plasterboard is applied to the metal frame and from the center to the edge neatly, step by step, goes a leaf bend with its fixation by self-draws.
This method requires the use of needle roller. This tool needs to go through the GLC surface (only in one direction, and not there and here), after mixing the surface. Plasterboard is required for the night on a special layout. In the morning the leaf will dry and get a layout form. 
Another option serve notches along the entire length of the bend. On the cut-off sheet of drywall, notches are made (the greater the radius - the more often notches).
On the previously made layout, all sizes are transferred to GLC. With the help of a homemade circulation (to the profile or wooden bar At the end, a simple pencil is fastened), the second end is fixed at the point of intersection of the arches height lines and its width. The circular motion of the plank on the plasterboard from the pencil will remain in the form of a semicircle. A construction knife or an electric bike is cut out a drawn sketch in two parts. After that, 2 rectangles should be cut (the side side of the arch).

Profiles: Types and Applications
When creating a plasterboard design, the basis is the framework of metal profiles. Stroy the market offers such types of profile:
- Guide - the main profile in the creation different types Frame.
- The rack - profile, with which jumpers are created. It is also the main in the creation of partitions, alignment of the walls and the creation of plasterboard products.
- Ceiling - Applicable for ceiling structures from GLC.
- Arched - applies only to create a metal frame arch or curvilinear molds for drywall.
 Exist ready solutions With an arched profile, unfortunately, it will not be possible to buy in the usual store.
  Creating a frame using I am an arched profile
 Each profile performs its function. If this item is not applied for the purpose, the framework will be flimsy or does not work at all.
Knowing about profiles, you can understand how to make the arc from drywall is more durable.
Initially, for high-quality arch Plant KNAUF proposes to bend a profile on your size by the method of cold bending profile. Cost 1 m 700 rub. Folk craftsmen have learned to curb by cutting by cutting.
Tools for mounting plasterboard arches
For the construction of a plasterboard arch requires a set of tools that will help make easy work and fast.
- Marking will need a simple pencil, meter or roulette, as well as a ruler.
- To create a frame: Scissors for cutting metal, screwdriver or a set of screwdrivers, level, construction knife and set of blades to it.
- For finish finish: Capacity for mixing the solution, a set of spatulas with a narrow and wide spoon, grout (sandpaper), roller, brush.
- You may need a needle roller, challenges for chamfer.

This set of tools can be safely started to create a plasterboard arch.
Creation of plasterboard arch
Creating an arched opening requires compliance with step-by-step instructions.
It consists of several stages:
- Preparatory work.
- Mounting frame for plasterboard arch.
- Plasterboard sheath.
- Finish work.
Observing this instruction You can avoid mistakes, and the arch will turn out to be durable, beautiful, emphasizing the design of the apartment and making it bright, cozy.
Project Arch of Gypsum Carton
The device arches is different. For the work of this design, it is necessary to determine its shape and type. Next, you need to measure the doorway: its width and height.
After that, take the cardboard and apply a future design on it according to removed measurements. To create a semicircle, the arch is required to take the doorway center and drop out of it down to the height where the highest point of the arch is - to measure this distance. From this point should be measured down the distance where the arch will go smoothly into the vertical racks. And the arch is required (this is the width of the doorway).
Cutting an arc from the cardboard to attach to the doorway and look at the layout from the side. It is necessary that the arch is not low - for this you can deepen the center of the layout and the semicircle smoothly goes into the doorway racks.
With an extension layout, it is also worth it to decide on the finishing material (painting, wallpaper, gypsum stone), as well as backlit (along the entire arch or only the top), and maybe at all, the lighting devices will be superfluous. 
It is worth noting separately that when creating the Arch, the correct round shape of the arch is very rarely used. Beautifully look at the arches of a larger radius. Therefore, it is important to determine which it is better to make a semicircle in the design.
Preparatory work
To create a framework of Arches, it is necessary to conduct preparatory work:

Remove old doors. To collect all the dust with a vacuum cleaner, as well as remove all pebbles, it is possible to garbage.
If there are holes, they should be smeared. The gaps are slightly expanded, to launch with the use of reinforced tape.
Work with carcass
The guide profile should be bent in the form of a semicircle on plasterboard. To do this, take a profile and cutting scissors to cut the side side of the profile. Subscents should be made at a certain distance from each other. If the profile should be bent into a small radius, then the cuts will be more common if the radius is large, cuts can be made every 6 cm. When using the arch profile KNAUF, cut the side parts of the profile is not required. For mounting frame arch need 2 parts of the curved profile. 
After trying on the arc layout, the elements of the future design should be freely placed in the opening.
Installation of metal frame for arch
In order for the frame for the Arch to be tough and durable, it is required to use high-quality metal profiles. It follows and on the sides of the door input to fix the guide profiles.  They should be attached to the base, slightly retreating from the edges of the doorway. This size should be equal to the thickness of the plasterboard sheet. To do this, in brick or concrete, the holes should be made, the size of the coinciding with dowels. Profiles are fastened with self-pressing after 20-30 cm. If the doorway is wide, there are jumpers, fixable and to the wall and to profiles between the carrier profile.
For the strength of fastening the carcass made of drywall throughout the radius of the installed curved profile, jumpers should be fixed. They mainly cut from the rack profile and are attached to the curved self-drawing of the metal. The distance from each other should be no more than 10 cm. 
After fixing all frame elements, it is required to check for evenness and strength. If the frame base is shaky or uneven, you need to correct errors.
Upon completion of work with metal profiles, optionally you can. To do this, the cable in the corrugation is started in the frame.
Cracking frame plasterboard
Created durable frame is trimmed in advance prepared plasterboard. In order to make the arc from drywall not only durable, but also beautiful, you need:
- Fix the face. Cut parts of the semicircular are neatly mounted on the frame base using self-samples. Hats should be slightly "drown" in the installation of GLCs so that they are not a hindrance at finishing work and did not disturb the surface of the surface.
- When the two plasterboard parts of the front side are firmly fixed on a frame basis, you can proceed to the trim inside the arch. To do this, we will need prepared curved parts from plasterboard.
- Self-tapping screws in a sheet of screwdriver (screwdriver) at a distance from each other 10-15 cm. no more.
- Curved plasterboard must be attached to the frame gently and slowly so that it is not deformed and did not burst.
- The rest of the lateral part to the floor is sewn with a cut-off sheet of drywall of the desired size in the depth of the doorway.


Plasterboard is a durable, but fragile material. When working with it, it should be remembered.
If you often fix the screws on the details of the drywall frame, the edge of the sheet can burst or deform.
After the sheaving sheets of GKK, you need to do the finish finish.
Use a painted arched profile for drywall is an integral part for the manufacture of a frame that creates curly structures and a clear face of shapes. The construction market offers 2 types of this profile:
- Produced from metal. This element is used to create an archer and figured ceilings. The profile has its strength, practicality. Applying it, no need to resort to various ways Filtering a regular profile.
- Plastic arched profile. Not so practical, but the elastic element allows you to create figures of small radii. In this case, the plasterboard design should not be weighting. Data Figured products made of drywall only serve as decor elements.
Finish trim of plasterboard arch
The finishing trim plasterboard plays an important role in the strength of the structure. All joints of the created arch should be reinforced. There is a special putty and reinforcing tape for this.
- required to dilute according to the instructions on the package.
- A thin layer of solution is applied with a thin spatula on the joint and the reinforced ribbon is stacked on top.
- After drying the tape and the solution, it is necessary to impose another layer of putty.
Arch corners need to be covered with special reinforcing corners.
After completion of the process, the surface of the arch is covered with primer. Depending on the finishing material The plasterboard product is required to be covered, after drying to lure the sandpaper. 
The last step will be applied using a roller. Corners are processed by primer with a brush.