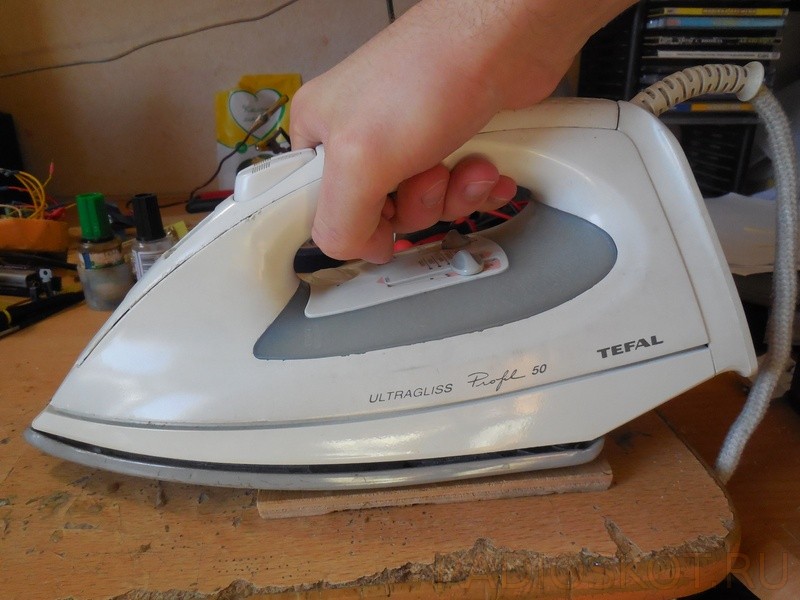
Production of printed circuit boards. Pricing fee at home
Many years ago, I first learned about the manufacture of boards using laser irony. For me it was akin to the invention of the wheels.
Read the continuation of the story under the cut.
Before that, the boards were drawn by varnish using the Rysfeheder. For printing boards on technology Lut, I even bought a laser printer (about 12 years ago it was very expensive). During the work, I tried a bunch of types of different paper. Yes, and the boards made on this technology are made not one square meter, I have ceased to consider the third. Currently I stopped on paper from the magazine "Popular Mechanics", before that I used the paper from the magazine "Kitchens and Bathrooms", but it disappeared from the sale.
But most recently, reading reviews on the Muske I accidentally in one of the reviews saw paper for printing boards, climbed to Ali and immediately ordered the trial 10 pieces of the leaves, deciding that if you like it, I will order 50, since the price difference between 10 and 50 just about two times.
By the way, be careful, I posted a link to Lot, but now there is a lot 50pcs in this place for 10 with something bucks, with the name of the link remained the same, 10 sheets.
I recently received my order. It happened that I was most afraid, the paper came to mint.
How everyone understands, crumpled paper into the printer is dangerous, the price of repair can be greater than the cost of the paper itself. I opened a dispute to the return of 50%, because after trimming I'm about so much and I can use. 
The paper was just in a large envelope, without a package or file, and a piece of some cardboard was laid, and this piece of cardboard was smaller in size than paper. Actually the main damage and were in places where the cardboard was absent. 
In the photo, the journal I used before and I received paper chose the leaf is more prolonged. 
Whatever the printer won my new leaf, the part had to cut off, on the other hand did not cut, because it is not critical there, the main thing in that area just does not print anything. 
Well, as such paper is well a very specific product, then without testing here, it's just no way.
In general, everyone who is interested, welcome to the spoiler.
Printed payment, as is done.
First, I tracing the printed circuit board, I use the Sprint Layout 6 program, before that I used a version 3 for a very long time, and I still can not have learned to the distinction in management. 
In the manufacture of the board, I always keep a protective zone of 5mm wide around the perimeter, because the blank is taken more than 10mm in length and width than the required fee, it is so convenient for me. 
The billet is inspired by small emery paper, it is not a mirror surface, but rather a lot of micro-sacrapine, then the toner is better kept. 
We print our future fee on paper (I usually print 2 pieces immediately, just in case), on the smooth side, by the way the whole process was made from one double, i.e. I did not adjust anything and did not rejoice specifically for the review, this was the meaning of the test.
We do not forget that it is necessary to print mirror in relation to the desired picture of the printed circuit board. 
Further, I lay down the workpiece on a specially trained book :), or rather, this is not a book, but the annual stitching of radio magazines, in a cardboard binding. I do this in order that it would not slide in the process, and did not spoil from heating what is under it. 
After that, laying a printout with a drawing to copper, then covering the sheet of ordinary printer paper from above, it slides so smaller at the initial stage, the most difficult moment is to not allow the leaves of the leaf with the seal to the side, I first put iron to a wide part on the book and paper, and then smoothly I lower it on the workpiece. 
Further smooth movements, with a small push, I stroke our future fee, I make several goals from different sides of the board, so that the edges would not be better in, it is impossible to put it hard, otherwise the toner can swim, if not to press at all, most likely the toner will not stick to the workpiece. I am ironing such a workpiece is about a minute.
By the way, the toner I use Static Control, in my opinion this is the best toner for Lut ...
The gluing process is completed, the paper stuck smoothly and beautifully. 
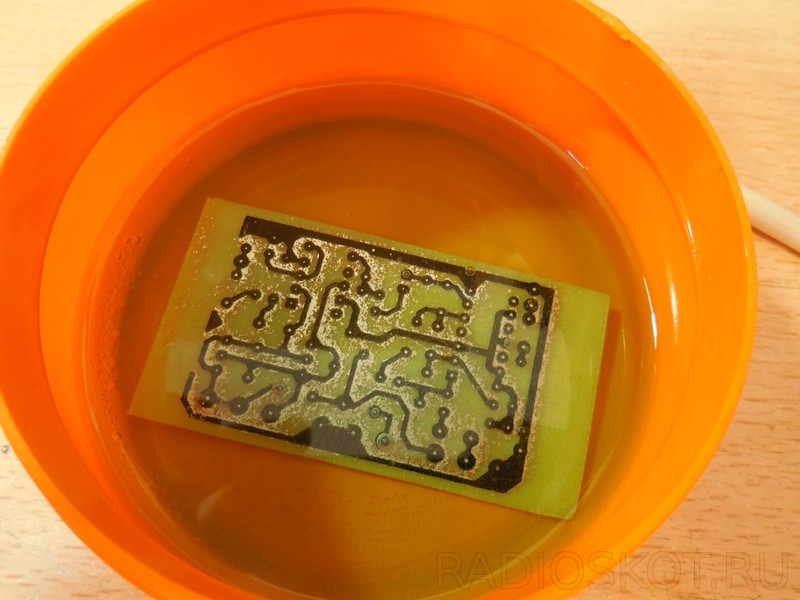
Now we throw our fee in a bowl of water for 5-10 minutes, you can leave the water included, it will help the paper faster to become softer. 
After 5-10 minutes, under a small water pressure (better room temperature), roll the paper, the tracks should be left on the spot, too neatly do it is not required, since the toner is erased with a finger, then such a fee need to redo, normally glued toner finger is not erased , just scratching. 
The photo shows the result of the drawing of the drawing on the fiberglass. Toner has a black color, before that, when I used the paper from the magazine, the toner had a grayish tint, since it remained paper particles. Here everything is beautiful, the holes are clean, there are no slips between the tracks.
I specifically picked up a printed circuit board for the test and with large flooded polygons and small tracks. 
Before etching, I do this "table", in the corners of the board, on the places free from the drawing, I will drill 4 holes in which I insert matches (either the toothpicks), the board is covered down. 
Eliminate fees are usually a solution of chlorine iron in water.
(Iii)
After immersing the fee into the solution, it must almost immediately raise and remove air bubbles, otherwise there will be not treated places. 
After some time (depends on the solution), the board is etched. 
Already spent its function toner wash off acetone (well, or any suitable solvent). 
Well, here I will show what the print quality I in the end got.
Place under the processor closer to the center of the board, the width of the contact pads is 0.45mm, the width of the track 0.45-0.5mm it is clear that even perfectly preserved the platform form. 
And this is a track along the edge of the board, two such places. Usually such places I adjust the permanent waterproof marker, I did not make it specially for the test. 
After washing the toner, drill the necessary holes, then clean the silence with the sandpaper. 
Already after all these operations, only cut off unnecessary, if it is done to stripping, you can damage the emotion to the edge of the track board. The edges of the board pass a little supfil to remove the sharp residues of fiberglass after scissors. 
Now cover the feet of the flux (I use alcohol F3), and break the track.
I know that some of this do not, but I like the board with spanwood. In general, the case of taste, well, copper is not oxidized, and the microcracks are poured by the solder. 
The last stage, wash off the remains of flux acetone. 
Everything is ready.
Yes, I know about photograppens, I know about applying masks and silkography, etc. etc.
These are all good and very useful things, but I think that for most applications the option described by me is enough. Make a fee very quickly and simple, and you need to have a minimum chemicals and tools.
The fee I made may take part in one of my future reviews, some readers most likely even learn what it will be for the device.
In general, my resume.
Pros.
I liked it, I think that I will order 50 or 100 sheets.
Toner slows well from the base.
Minuses.
The seller very poorly packed, for which he is big minus.
Price, especially the price when buying a lot of 10 leaves, but it is quite enough for the sample, although looking for magazines, and then the leaves in magazines without pictures (it is better to use pages or white to use for printing, or only with the text) already in order.
In general, experts, do not judge strictly, tried to describe how I could, I would be very happy with the advice and additions, and I hope that my review someone helped someone.
And yes, I know that on a beaker is cheaper :)))
I do not know how you, and I am with Lita hatred in classical installation fees. The mounting is such a crap with holes where you can insert the details and sewing, where all connections are made by means of wiring. It seems to be simply, but it turns out such a porridge that it is very problematic to understand in it. Therefore, errors and burnt parts, incomprehensible glitches. Well, her nafig. Only nerves spoil. It is much easier for me to draw in my favorite scheme and immediately raise it in the form of a printed circuit board. Using laser-iron method Everything goes for some other hour of non-job work. Well, of course, this method is great for performing the final device, since the quality of the printed circuit boards obtained by this method is very high. And since this method is very difficult for the inexperienced, I will gladly share my exhaust technology that allows you to receive the first time without any stages, printed circuit boards with tracks 0.3mm and the lumen between them up to 0.2mm. As an example, I will make a debug board for my training course dedicated to the controller AVR.. You will find a fundamental in the record, and
Demosham is divorced on the board, and even in bulk copper pyatkov, which can also drill and use under their needs, like the usual circuit board.
The shop manufacturing quality printed circuit boards at home.
The essence of the manufacturing method of printed circuit boards is that a protective pattern is applied to the foil textolit, which prevents copper etching. As a result, after etching, the conductor tracks remain on the board. Methods of applying protective drawings. Previously, they were painted nitrocracy, through a glass tube, then began to apply waterproof markers or even cut out of the tape and stick on the fee. Also for amateur use has become available photoresistwhich is applied on the fee, and then turns out. The floors are soluble in alkali and wash off. But on ease of use, cheapness and speed of manufacture, all these methods greatly lose laser-iron method (Further Lut.).
The LUT method is based on the fact that the protective pattern is formed by toner, which is transferred to the textolite by heating.
So we need a laser printer, the benefit they are not uncommon. I use printer Samsung ML1520. with native cartridge. The refilled cartridges are extremely bad, since they have insufficient density and uniformity of the toner. In print properties, it is necessary to set the maximum density and contrast of toner, be sure to turn off all savings modes - not the case.
▌ Instruments and materials
In addition to the foil textolite, we will need another laser printer, iron, photographic paper, acetone, small skin, brush for suede with a metal-plastic pile,
▌Process
Further draw a drawing of the board in any software convenient for us and typing it. Sprint Layout. Simple drawing for boards. To properly printed, it is necessary to put the color layers on the left. Otherwise, it turns out garbage.

Printing, two copies. You never know, suddenly one swaying.
Here is the main subtlety of the technology Lut. Because of which many have problems with the release of quality boards and they throw this business. By many experiments it was found out that the most best result It is achieved when printing on glossy photographic paper for inkjet printers. Ideal i would call photo paper Lomond 120g / m 2

It is inexpensive, sold everywhere, and most importantly gives an excellent and repeatable result, and does not burn with its glossy layer to the printer stove. It is very important, since I heard about cases when glossy paper felt the printer oven.
We charge the paper into the printer and boldly print on the glossy side. You need to print in mirror mapping so that after transfer the picture corresponded to reality. How many times I was wrong and did wrong prints, do not recount :) Therefore, the first time is better for sample to print on ordinary paper and check that everything is right. At the same time, the printer stove is proper.

After printing, in no case can not be missed and desirable to take care of dust. So that nothing interfere with the contact of toner and copper. Next, cut the drawing of the board exactly along the contour. Without any stocks - the paper is rigid, so everything will be fine.
Now we will deal with textolite. I cut immediately a piece of the desired size, without tolerances and points. As much as needs.

He must be pretty sanding. Carefully, trying to construct all the oxide, preferably circular movements. A little roughness does not hurt - the toner will be better held. You can not take a skirt, but an abrasive sponge "effect". Just take a new one, not fat.

The skin is better to take the smallest way. I have this.

After sanding it, it must be a thoroughly degreased. I usually tormented your wife with a cotton pad and, maminating it as acetone, carefully walks along the surface. Again, after degreasing, in no case cannot be missed by his fingers.

We impose our drawing on the fee, naturally toner down. Heat iron at maximum, holding the paper with a finger, creep and stroke one half. It is necessary that the toner adhesive to copper.

Next, not allowing paper shift, stroke the entire surface. Davim with all my might, polish and irrigate board. Trying not to miss a millimeter of the surface. This is the most important operation, the quality of the entire fee depends on it. Do not be afraid to put out all my might, the toner will not float and will not smell, as the photo paper is thick and perfectly protects it from the spreading.
Stroym until the paper does not boost. However, it depends on the temperature of the iron. I don't get yellow on a new iron almost, but almost charred on the old one - the result was equally good everywhere.

After you can give a board a little cool. And then, grabbing a tweeze, weer under the water. And keep some time in the water, usually two minutes.
Taking a brush for suede, under a strong jet of water, we begin to curtail the outer surface of the paper fiercely. We need to cover it with multiple scratches so that the water penetrates into the depths of the paper. In confirmation of your actions there will be a manifestation of a pattern through dense paper.

And this brush draping fee is still not holding the top layer.

When the drawing is all clearly visible, without white spots, you can start carefully, download paper from the center to the edges. Paper Lomond. Rolls great, almost immediately leaving 100% toner and clean copper.

Rocking your fingers the whole drawing can be a toothbrush to delay the entire fee to clean the remnants of the glossy layer and the paper points. Do not be afraid, toothbrush to tear off the well-fitted toner is almost unrealistic.

Wash the fee and let her dry. When the toner dry and becomes gray, it will be clearly visible where the paper remained, and where everything is clean. Blesley films between tracks need to be removed. You can destroy them with a needle, and you can produce with a toothbrush under the jet of water. It is generally useful to go through the brush along the tracks. From the narrow cracks, whitic gloss can be pulled out with the help of isol or painting tape. He lipnets not so violently as usual and does not break the toner. But the remnants of the gloss take off without a trace and immediately.

Under the light of a bright lamp carefully look at the layers of toner on breaks. The fact is that when cooled, it can crack, then in this place there will be a narrow crack. Under the light of the lamp cracks glitter. These places should be tinted with a permanent marker for CD. Even if there is only a suspicion, then it is better to scratch. The same marker can be drawn and poor-quality tracks, if any arose. I recommend marker Centropen 2846. - It gives a thick layer of paint and, in fact, they can stupidly draw tracks.
When the fee is ready, then the chlorine iron solution can be caught.

Technical retreat, if you wish, you can skip it
In general, it is possible to train a lot in what. Someone traverad in copper vitrios, someone in acidic solutions, and I am in chlorine gland. Because It is for sale in any Radio Store, etched quickly and clean.
But the chlorine iron has a terrible disadvantage - it is larger just a scribe. It will fall on clothes or any porous surface like a tree or paper everything, consider a stain for life. So your boards from the Dolce Gabana or Valenki from Gucci to nourish the safes and wipe the scotch for three rolls. And the chlorine iron will most cruelly destroys almost all metals. Especially fast aluminum and copper. So the utensils for etching should be glass or plastic.
I kidai 250 gram package of chlorine iron per liter of water. And the resulting solution is tens of plates, until it stops to ride.
Powder must be poured into water. And make sure that the water does not overheat, and then the reaction comes with highlighting large number Heat.
When the powder is dissolved and the solution will acquire a homogeneous color, then you can throw a fee. It is desirable that the board is swimming on the surface, copper down. Theme the precipitate will fall on the bottom of the container, without interfering with the etching of deeper copper layers.
So that the fee is not tone, then you can stick a piece of foam on the bilateral scotch. That's exactly what I did. It turned out very convenient. I screwed the screw for convenience to keep it for him as a handle.
The board is better than several times to the solution into the solution, and it is not plaffing, and at an angle, so that air bubbles do not remain on the surface of copper, otherwise there will be shoals. Periodically, it is necessary to get out of the solution and follow the process. On average, the collection of fees leaves ten minutes to an hour. It all depends on temperature, fortress and freshness of the solution.
The etching process is very sharply accelerated if it is under the fee to lower the hose from aquarium compressor and let bubbles. Bubbles mix the solution and gently knock out the reacted copper from the board. You can also swing a fee or container, the main thing is not to spill, and then you do not have it later.
When all copper is hidden, we carefully remove the fee and rinse under the water. Further look at the clearance, so nowhere has no snot and notice. If there are no snot, then we throw ten minutes for ten minutes. If the tracks were berthed or broken, then the toner is crookedly lay down and these places will need to suck the copper wire.

If everything is fine, you can wash off the toner. To do this, we will need acetone - the faithful friend of the toxicomic. Although now acetone is becoming more difficult, because Some kind of idar from the state officercontrol decided that acetone was a substance used to prepare drug trains, which means you need to ban his free sale. Instead of acetone quite suitable 646 Solvent.

We take a piece of bandage and a pretty smile in his acetone begin to wash off the toner. It is not necessary to press much, the main thing is not too fast, so that the solvent so much to get absorbed into the pores of Toner, swaying it from the inside. On the washing of toner takes two minutes. During this time, even green dogs under the ceiling will not have time to appear, but one still does not hurt the window.
Washing board can be drilled. For these purposes, for many years I have been using a motor from a tape recorder, whipped from 12 volts. Monster Machine, the truth is enough of its resource about 2000 holes, after which the brushes are combined completely. And from it you need to exhale the stabilization scheme, checking the wiring directly to the brushes.

When driving, you need to try to keep the drill strictly perpendicularly. Otherwise, then fuck you go there a chip. And with bilateral fees, this principle becomes the main one.

The manufacture of a double-sided board is also occurring, only here three reference holes are made, as smaller diameter. And after the etching of one side (another at that time, they rush with a scotch, so as not to be laid) on these holes combine and roll the second side. The first strip tightly tape and etching the second.
On the front, it is possible to apply the designation of radio components on the front side, for the beauty and convenience of mounting. However, I do not bother so much, but Kamrad Woodocat. from LJ community rU_RADIO_ELECTR Does it always, for what he has a big respect!
Soon I will probably give up a photoresist article also. The method is more damped, but at the same time, they make it more to do it - I love to pierce with reactivities. Although 90% of the boards, I do it all the same mud.
By the way, this is about the accuracy and quality of boards made by the laser irony. Controller P89LPC936. in the housing TSSOP28.. Distance between tracks 0.3mm, width of the tracks 0.3mm.

Resistors on top board size 1206 . What?
Recently, radio electronics as a hobby in the world is gaining popularity, people become interested in creating electronic devices with their own hands. On the Internet there is a huge number of schemes, from simple to complex, performing various tasks, so everyone can find in the world of radio electronics what will have to do with the shower.
An integral part of any electronic device is a circuit board. It is a plate of dielectric material on which copper conductive paths are applied connecting electronic components. Each of those who wish to learn to collect electrical circuits in beautiful video Must learn how to make these the most printed fees.
There are computer programs that allow you to draw pictures of circuit board tracks in a convenient interface, the most popular of them. PCB distribution is made in accordance with concept scheme Devices, there is nothing complicated in this, it is enough just to connect the necessary parts by the tracks. In addition, to many schemes electronic devices On the Internet, ready-made drawings of printed circuit boards are already attached.
A good printed circuit board is a guarantee of a long and happy device work, so it must be done to make the most accurately and efficiently as possible. The most common method of manufacturing printed at home is the so-called "", or "laser-iron technology". He acquired a wide popularity because it does not take much time, does not require the presence of scarce ingredients and learn how it is not difficult. In short, Lut can be described like this: let's say there is a path drawing drawn on the computer. Next, this drawing must be typed on a special thermotransfer paper, transfer to the textolitol, then reveal the extra copper from the board, drill holes in the right places and lead the tracks. We analyze the whole process in stages:
Print board drawing
1) Picture printing on thermotransfer paper. You can buy such paper, for example, on Aliexpress, there it stands in a kopeck - for 10 rubles per sheet of A4 format. Instead, it is possible to use any other glossy paper, such as magazines. However, the quality of toner transfer from such paper may be much worse. Some use the Lomond glossy photo paper, a good optionIf not the price - there is such a photo paper much more expensive. I recommend trying to print a drawing on different papers, and then compare which one will get the best result.
Another important moment When printing pictures - printer settings. In mandatory, it is necessary to disable the savings of the toner, the density is worth setting the maximum, because the thicker layer of toner, the better for our purposes.

It is also necessary to take into account such a moment that the pattern is transferred to the textolite in the mirror image, so you need to provide in advance, you need to or do not need to cut the picture before printing. Especially critical is on charges with chips, because they will not be able to put them with the other side.

Preparation of the textolite to transfer the picture to it
2) The second stage is to prepare the textolite to transfer the picture to it. Most often, the textolite is sold by segments of 70x100 or 100x150 mm. It is necessary to cut off a piece suitable for the size of the board, with a margin at the edges of 3-5 mm. Cut the textolit is the most convenient than all with a metal knife or a jigsaw, in extreme cases it can be cut off with metal scissors. Then, this piece of textolite should be wiped with shallow emery paper or hard eraser. On the surface of the copper foil, small-minor scratches are formed, this is normal. Even if it initially, the textolit looks perfectly even, this step is necessary, otherwise it will be difficult for him to regret it. After sanding, the surface must be wiped with alcohol or solvent to wash off dust and greasy traces from the hands. After that, it is impossible to touch the copper surface.


Pattern transfer to prepared textolit
3) The third stage is the most responsible. It is necessary to move on thermotransfer paper to transfer to the prepared textolit. To do this, cut off the paper as shown in the photo, leaving stocks at the edges. On a flat wooden plate we put paper up paper, then apply textolit, copper to paper. We drive the edge of the paper as if it hugs a piece of textolite. After that, carefully turn the sandwich so that the paper is from above. We check that the drawing has not shifted anywhere on the textolite and put on top of a clean piece of ordinary office white paper so that it covers the entire sandwich.


Now it remains only to heat the whole thing to warmly, and the entire toner from the paper will be on the textolite. You need to attach a preheated iron from above and heat the sandwich for 30-90 seconds. The heating time is selected experimentally and largely depends on the temperature of the iron. If the toner moved badly and stayed on paper - you need to keep longer, if, on the contrary, the tracks were translated, but a clear sign of overheating was smeared. It is not necessary to put pressure on the iron, there is enough of its own weight. After warming up, it is necessary to remove the iron and try not yet cooled workpiece with a cotton swab, in case, in some places, the toner has blocked poorly when ironing the iron. After that, it remains only to wait until the future fee will cool and remove the thermotransfer paper. From the first time it may not happen, it does not matter, because the experience comes with time.
Package etching
4) The next stage is etching. The entire area of \u200b\u200bthe copper foil, which is not covered with a toner must be removed, and copper under the toner should not be touched. At first, it is necessary to prepare a solution for etching copper, the easiest, affordable and cheap option is a solution of citric acid, salt and hydrogen peroxide. In a plastic or glass container, it is necessary to stir one or two tablespoons of citric acid and a teaspoon of cook salt on a glass of water. The proportions do not play a big role, you can pour out an eye. Mix thoroughly and the solution is ready. It is necessary to put in it a fee, paths down to speed up the process. You can also heat the solution slightly, it will still increase the speed of the process. After about half an hour, all the excess copper will be caught up and only the tracks will remain.


Wash off toner from tracks
5) the most difficult behind. At the fifth stage, when the board is already etched, you need to wash off toner from the tracks with a solvent. The most affordable option is a female liquid for removing nail polish, it is worth a penny and there is almost every woman. You can use conventional solvents, such as acetone. I use oil solvent, even though it stinks greatly, but it does not leave any black divorces on the board. In the extreme case, you can remove the toner, good lightering fee with sandpaper.

Drilling holes on the board
6) drilling holes. You need a small drill with a diameter of 0.8 - 1 mm. Conventional swells of high-speed steel are quickly stupid about textolite, so it's best to use tungsten carbide, although they are more fragile. I drill the boards using the engine from an old hair dryer with a small collet cartridge, the holes are smooth and without burrs. Unfortunately, at the most inappropriate moment, the last carbide drill was broken, so only half of the holes were drilled in the photos. The rest can be drilled later.


Long tracks
7) It remains only to raise the copper tracks, i.e. coat with a layer of solder. Then they will not be oxidized with time, and the board itself will become beautiful and brilliant. First you need to apply on the flux paths, and then rapid movements with a soldering iron with a solder droplet. You should not apply an overlooking layer of the solder, then the holes can close, and the fee will look inactively.

This is completed on this process of manufacturing a printed circuit board, you can now be filled into it. Material provided for the site of Radioshem - Mikhail Walnky, [Email Protected]
Discuss the article manufacturing printed circuit boards
Good afternoon friends! Today I will tell you how to make a printed circuit board at home. There are several ways to make it using:
- Varnish or enamel marker
- Laser printer (laser-iron technology (LUT))
- Film photoresist
In this article, I will tell you about the "Dedovsky", the first method, since these are the most basic and any newcomer must pass this stage. Manual wiring of printed circuit boards does not mean the inexperience of an electronic radio, although there are many drawing technologies on foil textolite, more beautiful and fast, but there are old-hardening radio electroners who belong to the manufacture of a printed circuit board, like handmade art and they do not care that there are photoresists , Laser printers, etc.
Also, this method of manufacturing a printed circuit board at home is useful in the manufacture of a double-sided board. When LTU technology is difficult to combine two sides due to inaccurate drilling holes, then it is easier to make the wiring of the printed circuit board in the manual, or only its second side.
All of the above printing methods listed methods are nothing more than the method of applying a picture to foil textolitol. And the principle of manufacturing a printed circuit board at home is reduced to one, it is removed excess foil, and the drawing (tracks) leave.
What we need:
- Foil textolite
- Paper and pen (pencil)
- Varnish, enamel, enamel marker
- Tara to etching board.
- Thin drill (0.7..0,9) mm.
At once a few words about varnish. You can use any, you can nail or color to be better visible. When I was completely small, 20 years ago, my father diluted the paths of the red nail polish, which was used by my mother. You can use quick-drying enamel. I use the Tsaponlak for the wiring of printed circuit boards, it is sold in our radio components, it is worth a penny.
Now enamel markers are sold in radio components, a very convenient thing, for the manufacture of printed circuit boards at home, costs about 200 rubles, enough for a long time. Thickness line 0.8 mm. Here is an example of my Marker Edding 780.
So, first, we make a wiring of the printed circuit board on a leaflet of millimeters or in a cell, marking the points of the hole under the conclusions of the elements. I always first buy all the elements, then depending on their size and execution I make a wiring. You can not draw a printed circuit board in manual, but to dilute in, then print on any printer, including inkjet, as I did.
When you wiring a printed circuit board, consider which side you draw. For this method It is better to draw relative to the side on which tracks will be, and the elements on the reverse side. If you draw relative to the side on which items are located, you will have to draw a mirror. Perhaps you did not understand anything, it's nonsense, everything comes with experience. Try, understand!
Next, we put our sheets with a flooding board, foil textolite and something sharp (for example, a gypsy needle) we apply labels for drilling holes. After that, drill holes with a thin drill.
Then I take a Tsamponlak or an enamel marker edding 780 and draw a track, sinking them with a leaflet. This stage is the easiest and most exciting.
There is another embodiment of the drawing on the foil textolitol. Figures on transparent paper (tracing) drawing, then neatly cuts the razor blade. It is superimposed on the textolite and processed by varnish. In short, like stencil.
After the lacquer dries, we prepare the chlorine iron solution, to take place the printed circuit board, you can buy in any radio car. How to breed the solution, written on the jar, I usually make it on the eye.
Everything, lowering a fee in a solution and a toothbrush I rub the board.
After some time, the fee must be removed from the solution of chlorine iron and rinse in warm water.
The tracks will better inflate the solder, otherwise copper is very good. Next we give the details, that's all, the printed fee at home is ready.