DIY cardboard toy house. Life hack: how to make a playhouse out of cardboard? DIY cardboard house
Today we will tell you how to make a New Year's house out of cardboard with your own hands. In this we can step by step master class, diagram and template that can be downloaded (see below).
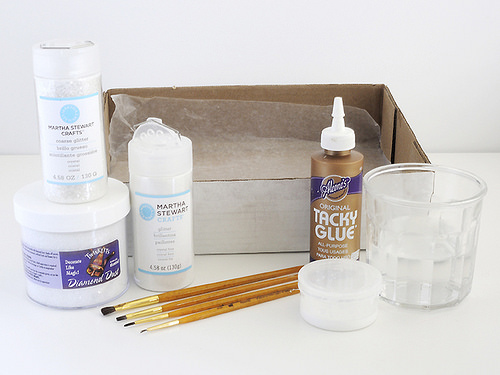
Tools and materials Time: 4 hours Difficulty: 7/10
- 1 sheet of design cardboard of a suitable size for the house (you can use cardboard of two colors: one color for the walls, the other for the roof and decoration of windows and doors) and another sheet for the base on which the house will stand;
- a piece of transparent film to simulate glass in windows;
- a template for a New Year's house made of cardboard (you can draw it yourself or download a drawing);
- scissors;
- glue;
- white small sequins;
- flat and round brush;
- artificial snow.

Now on sale you can even find ready-made kits for making these cute jewelry, but it is much more fun to do everything yourself from start to finish, attracting kids to help, who will definitely like this activity.
Step-by-step master class
Step 1
Draw or print out a template and cut out a blank for a house (walls, roof and chimney) from cardboard.

Step 2
We bend the cardboard blank along the fold lines and glue it together. To make window shutters and doors look more voluminous, it is better not just to draw them on the walls, but to cut out additional parts of the required shape from cardboard and stick them on. From the inside, we glue the window openings with a film that imitates glass.
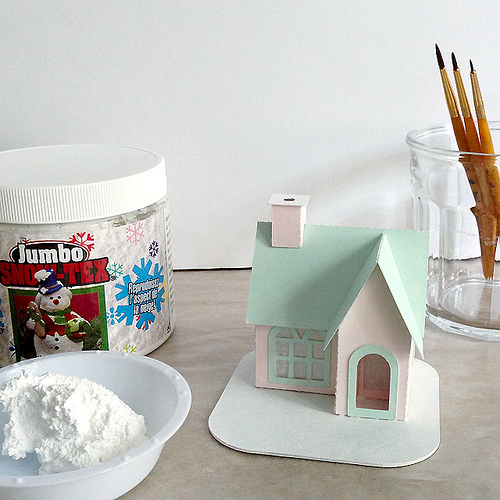
Step 3
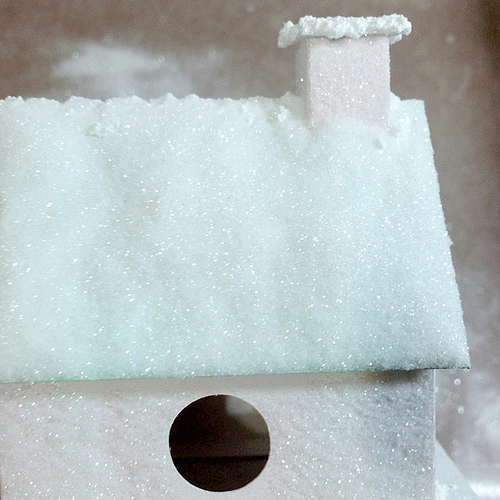
Let's start applying snow. A jar of artificial snow can be purchased at any craft store. In places where we will have snowdrifts, apply a little glue and spread snow on top of it with a round brush, giving a realistic volume. Remember what the roofs of houses look like in winter, and this will help you in your work.


Step 4
When the work with the snow is completed, let the product dry thoroughly, after which we proceed to create a shining icy frost on the walls of the house. To do this, in turn, use a flat brush to completely spread each wall with glue and sprinkle it evenly with a thin layer of white glitter. Blow off the excess shiny powder.
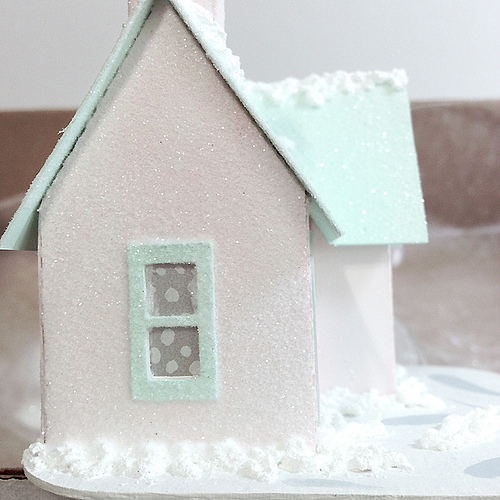
Our fabulous house decoration is almost ready. It remains to decorate the shutters and doors to your taste, as well as glue the craft to the cardboard base.
Alternatively, the house may not be glued, but simply placed on top of the base, additionally decorated with homemade trees. And in the evenings inside, try lighting a battery-powered LED candle. It looks amazing and really looks like a fairy tale!
Don't rush to throw away the cardboard boxes if you have children in your home. Such a thing, unnecessary at first glance, will serve as an excellent house for dolls, toys, or even for the child himself. How to make a house out of cardboard, we will tell you in this article.
How to make a cardboard house for dolls
You can make a house for a doll from a small cardboard box. To create such a product, you need to stock up on:
- cardboard boxes of a suitable size;
- glue, tape;
- scissors and a sharp stationery knife;
- watercolors and brushes;
- colored paper;
- any finishing materials, for which there is enough imagination.
Multi-storey cardboard Dollhouse is done as follows:
- The boxes from which the floors are supposed to be built must be reinforced with tape around all edges so that the house does not fall apart during the game.
- Then you need to cut out windows in them. To begin with, it is better to draw them exactly with a pencil, and then cut out with a clerical knife along the outlined lines.
- To create a multi-storey house, boxes must be placed on top of each other and glued together.
- Now you need to make the roof. To do this, take two cardboard sheets of a suitable size and fasten them at an angle of 45 °. The roof is installed on the top box.
- So that there are separate rooms in the house, partitions must be made. Like everything else, they are made of cardboard and installed inside the boxes.
- In principle, the dollhouse is almost ready, the most interesting thing remains - to decorate it. You can decorate such a toy structure as you like, for example, paste over it with colored paper or fabric, decorate with ribbons, lace, beads, buttons or something else. If you want to involve a child in the process, then cover the walls of the house with plain white paper, and let the child paint them at his own discretion.
- As well as outside, the inside of the house also needs to be decorated. Unnecessary remnants of wallpaper, fabrics, oilcloths will come in handy here.


How to make a cardboard house for a child
It's no secret that kids just love to build small impromptu dwellings for themselves from everything that comes to hand. You can help the child and make a cardboard house for him from a large box, which was left, for example, from a refrigerator or washing machine... The process of creating such a craft is similar to the previous one:
- The cardboard house must be strong, so glue all its joints and corners with tape from the inside.
- Draw the windows with a pencil, cut out with a clerical knife. Make the doors the same way.
- If the box is too small for a child, the top can be cut off and an L-shaped roof can be attached in its place.
- You can decorate such a house with any materials at hand. You can paste over with paper or wallpaper, just paint or paint. Can be used natural materials for decoration: cones, branches, leaves.
It is better to fasten all the details of the orphanage with tape or a stapler, since the glue will not give the desired result and the house will disintegrate.


Useful Tips
Sooner or later, everyone has cardboard boxes on the balcony, in the closet or in the country.
Not all of these boxes are worth throwing away, as many interesting and even useful crafts can be made from them.
One of these crafts is a playhouse for children.
Such a house can be built and decorated with children who will be very interested in learning something new.
Folding cardboard house

1. Start with an empty box. Turn it on its side so that the exposed portion is perpendicular to the floor.

2. Cut off the top of the box and save it - later this will serve as half of the roof.

3. Use a wide piece of tape to secure some parts of the box.

4. From the other cardboard, cut a piece that will be the second half of the roof.
5. Use adhesive tape to glue the roof halves together.
6. Connect the roof and the house, and tape them together.


7. Make the house foldable. Place the house face down and cut the back and bottom of the house in the middle. Also cut the area where the bottom and back of the house meet.


8. Add tape where you made the cuts. Make sure the bottom and back of the house fold in the right direction. Tape up any areas you think are loose.


DIY cardboard house with a pipe and a door

You will need:
Hot glue with glue gun
Stationery knife
Scissors
Several cardboard boxes.
The large box will be the main part of the house, while the smaller boxes will be needed for things like chimney and window frames.

1. Cut off the pieces of the large box that form its lid - these will be used to create the roof.
2. Turn the box upside down. Cut out the door by making a large "L" cut.
3. Cut out the squares for the windows using a utility knife.

4. Glue the 2 pieces from the cut box lid. Repeat with the other two parts of the lid. You will end up with 2 halves that you can use to make the roof of your house.
5. For windows, you can cut 2 wide cardboard strips and glue them to the window. You can also cut some strips to create a window frame.
6. To glue the roof to the house, you must first connect the roof halves using small L-shaped cardboard pieces. Next, use the same details to glue the roof to the house.

7. Now we make a small roof. You will need a piece of cardboard of the correct size. Divide it in half (or just bend it) and glue it to the house in the same way as a large roof, i.e. L-shaped details.

8. You can make a window in the door and, if you wish, glue a cardboard window frame to it.

9. Optional : If you want to make a pipe for a house, you will need a small box or 4 cardboard pieces of the same size that you need to glue into a small box.

10. Mark on the small box where you want to cut off so that the pipe lies flat on the roof of the house. To make it easier to do this, lean the box against the roof exactly from the side and draw lines with a pencil. When you glue the pipe to the roof, you can cover it with a cardboard lid and glue a cardboard toilet paper cylinder.
11. Optional: can add a handle to the door. Use any old handle and glue it to the door. You can also make a handle out of cardboard.

How to make a house out of cardboard with your own hands

You will need:
Large cardboard box
Wide tape (adhesive tape)
Stationery or construction knife
Metal ruler (to make even cuts)
Black marker
Double-sided tape (if necessary)
Curtain fabric (if needed).

1. Disassemble the box and turn it inside out so that the house is brown and solid later, and all the drawings on the boxes are hidden.

2. To make the house larger, the parts that form the box lid on one side must be lifted and secured in an upright position with adhesive tape. Place the box on its side so that on one side there is an "entrance" to the house.
3. Optional: to make a diagonal roof of the house, use a clerical (or construction) knife to cut diagonally (a small angle) the upper part of the future house (the part that is now at the top, after you turned the box over).

Cut the triangular pieces from a cut piece of cardboard and tape the roof back to the house with tape.
4. Cut the lower part of the house (the floor opposite the roof), fasten it with tape if necessary, and attach it to the open part of the box ("entrance", which turned out in step 2).

5. Now it's time to cut out the windows and doors in the cardboard house with a clerical knife.
If you want, you can draw window frames, bricks and other details with a marker. You can also cut a small handle in the door (semi-oval at the edge of the door).
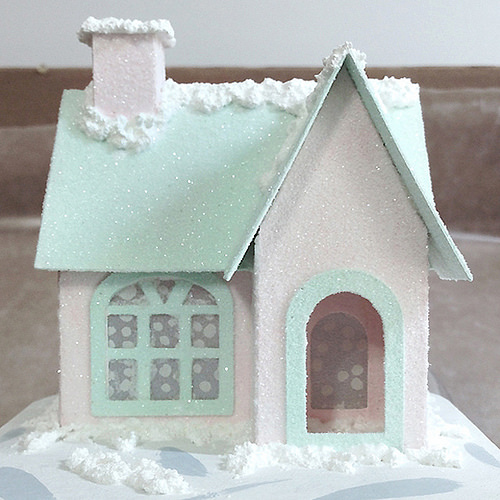
Yesterday we made a village out of colored cardboard. I was inspired by this idea: 
Such toy villages in Europe are very fond of making for Christmas, placing them under the Christmas tree and decorating them with lanterns.

I found a very interesting site http://littleglitterhouses.com/paul/howard_how_to.htm#crossbuck, which has a huge number of ready-made models that you can simply print and cut out of paper.
My idea is that children can cut and glue simple models themselves. Put together, they look like a real village!
To make the houses, I bought several sheets of colored rough cardboard. Directly on these sheets, I printed out the templates that I had drawn in advance.
A4 size
House number 1

House number 2 
House number 3 
House No. 4 with a chimney and a roof 
I decided that it would be more beautiful if the walls of the house are of the same color (I have white, orange and brown), and the roofs of a different color (black and red). Therefore, I connected the roofs in one template.

Separately, I made sets of windows and doors for houses No. 1,2,4. I printed them on red, orange and brown cardboard.

And windows with doors for a large house number 3

Patterns with trees


In order to make 14 houses, I printed a template with house No. 1, No. 2 each on two sheets of cardboard (these are 8 houses), three large houses No. 3 on four sheets (4 more houses), and house No. 4 on two sheets (2 more houses). For them I printed 4 sheets with roofs, one sheet with windows for house No. 3 and one sheet with sets of windows and doors for houses No. 1,2,4.
The trees I printed on thick cardboard Brown color... To make them stand, I made special coasters from wine corks: I cut each one in half, glued it to a small cardboard, and cut a gap at the top of the cork with a knife, into which I inserted a tree.

In the photo at the beginning of the article, this device is seen better.
Unfortunately, I did not have time to photograph in detail how the classes were held. I can note that everyone liked the idea very much, but not all children were able to cut exactly along the contour, they had to help. PVA glue did not fit this cardboard at all and after the first unsuccessful experiments they began to glue it with an ordinary glue stick. We got a little confused with windows and doors, small details just got lost on the tables. In addition, not everyone had enough red roofs, so it's best to have a supply of cardboard sheets with you. different color to quickly cut something extra.

The lesson lasted about 40 minutes, this time was just enough for everyone to make one house with a little help from an adult. As always, the girls were happy to cut and paste something for the whole lesson, and the boys only had enough patience for 20 minutes :)


And already in the next lesson, I plan to jointly make a prefabricated model Orthodox Church to decorate this Christmas village.
Paper is the simplest and most suitable material for a variety of creativity. For about three months, the child has been paying attention to rustling leaves and is engaged in them for a long time and with enthusiasm. As they get older, children do not lose interest in paper and love to make various objects out of it. They are insanely happy when adults do crafts with them.
And if you ask a child what he wants to do, most often it turns out that this is a house. Moreover, both boys and girls love to create houses with their own hands. Apparently, children, albeit unconsciously, already perceive the house as the main attribute of life. How to quickly and easily make a house out of paper?
Tools and materials for creating a paper house
When you decide to brighten up a family evening or a child at school gets an assignment to make such a craft, you need a little imagination, paper, glue and just a few tools. The paper can be any: thin from color sets, sheets of notebooks or albums, drawing (which, by the way, glues perfectly) or pieces of wallpaper. You will need scissors, a ruler and a pencil, and sometimes a glue brush.
If you have a clerical knife, it will help you quickly and accurately cut the cuts of windows and doors. The glue is very different: in tubes, PVA glue, wallpaper, glue stick, homemade paste or paper in bottles, scotch tape. The selection of items for decorating the future house depends on the scope of your imagination with your child. Paints, gouache, colored pencils, beads, cotton wool, lace and other items for application are suitable.
You can do a magical action at a table, on a wide windowsill, or sitting on the floor. If only the surface is smooth and resistant to glue and scratches (you can put a board or plywood).
Preparing a sketch of a paper house
When constructing a house, small or voluminous, simple or complex, first create a sketch. Work begins with a drawing. If you have only small sheets for making a bigger house, you can cut the drawing along the dotted line and perform each part separately.

When cutting the drawing, remember that the right side will remain without a bend for applying glue and it needs to be finished. You can add a floor to the sketch of the house. But is it necessary? Without it, it is more convenient for a child to place toys: dishes, furniture, "tenants" different sizes, and not everything can get through the door.

Connecting parts, decorating and assembling a paper house
Then the parts of the house are cut out and "construction" begins, smearing and gluing special folds.
It will take some time to dry the product.
The new building lacks stability - it is better to install and glue it on a cardboard frame.

The design of the house can be complicated by adding an annex, porch, attic, second floor, balcony and other elements. The stages of work remain the same: creating a sketch - cutting out parts - decor - gluing - drying.
Other options for paper houses
Round-shaped houses turn out to be very interesting from paper.
When you sketch, the body of this design looks like a solid long rectangle. The craft is glued one fold at a time. And the roof is often drawn separately in the form of a circle, then trimmed and connected to the body with glue.

But it is also possible to build a drawing in unity with the roof. Then many cuts are made for the roof, which can then be glued with an overlap, creating a conical shape.

With great enthusiasm, children make fabulous "log" huts.
The materials for work are taken the same, but the technology for building such a house is completely different. Here, first they procure construction material... From the same long paper rectangles with the help of a pencil, make tubes - "logs".

Whether it will be a small house or a voluminous house depends on the size and number of rolled tubes. Usually guys compete with adults or among themselves, who will roll or glue more.
Then the walls are neatly folded from the finished material. There are options here: the walls are glued with gaps, where there are two logs in a row, or a solid masonry is glued in four tubes each with their displacement to the edges in the next row. The roof of the house can be "log" or smooth.
Patterns and layouts of houses
Save the diagram to your computer and print.
You can make a paper house using origami technique
The creation of origami figures, including houses, according to ready-made schemes, serves to develop the logical and spatial thinking of the child, to activate his thought processes. You can do origami anywhere, for example, in line to see a doctor.
Having created the first simple paper houses with your own hands, you can come up with many others unusually interesting crafts and more often make them together with your beloved child.