Do-it-yourself cardboard roof for a house. House made of paper according to ready-made templates
Craft: a house with your own hands. Seven houses made of branches, cardboard, paper, pumpkin, chestnuts, natural material.

Craft: a house with your own hands. We master together with children
You already know how you can make a house for games with children out of cardboard from the article with Vera Higlod's master class, and today in the article there are houses of the most different materials: boxes, clothespins, natural materials- chestnuts, pumpkins. All these houses were made by the readers of the site "Native Path" together with the children and sent to our
In this article you will find a variety of houses with a description of their manufacture:
- the house of Baba-Yaga, made by hand from clothespins,
- Lesovichka's house made of waste material,
- a house decorated with chestnuts,
- handicraft House of the forester made of natural and waste materials,
- do-it-yourself pumpkin house (two options),
- a house - a small tower made of twigs.
House of Baba - Yaga do it yourself

This craft is made by children middle group MGBOU d / s No. 75 "Fairy Tale" together with an adult. Teacher - Tegaeva Olga Nikolaevna (Moscow region, Sergiev Posad district, Shemetovo village).
You will need to make a house - a hut of Baba - Yaga:
- moss (dry beforehand),
- cones (dry at home to open up),
- leaves (iron with an iron, for more details, see the article about the application),
- berries (dry).
- wooden clothespins, liquid nails glue.

How to make a house - Baba-Yaga's hut with your own hands.
Step 1. Clothespins need to be disassembled (pull out the metal spring) and glue them into the house (liquid nails are used, quickly and reliably). This part of the work is done by an adult.
Step 2. Install a hut on a cardboard base, put moss around it or glue it.
Step 3. Glue moss, leaves, berries on the roof of the hut.
Step 4. Paint the cones with spray paint - you get blue spruce.
Step 5. We make animals from plasticine and pine cones.
Do-it-yourself forestry house

This house was sent to our competition by the Potapov family (Potapova Tatyana Valentinovna and Potapov Andrey, 4 years old, Irkutsk).
Making the craft will take several evenings. In this case, the child will not get tired and
they will take part in all stages with interest.
How this forest house was made with your own hands:
Step 1. First, we took a cookie box in a candy store. Pasted over with scraps of wallpaper in the "tone" of autumn, left to dry.
Step 2. From cones, acorns, matches, they made the inhabitants of the forest - Lesovichka and his friend the hedgehog.
Step 3. Lesovichok settled in a house for which a yogurt box came in handy. And the logs on the house were made from dill sticks and fixed on double-sided tape. The roof was painted with gouache.
Step 4. The hedgehog settled near his friend under tree stumps. Penechki are cuts from branches that dad helped to make.
Step 5. A path leads from the house to the pond. For the path, we painted semolina and glued it to PVA glue. Lined with pebbles - beans. The pond was made of colored paper, the stones are the bones from the plums.
Step 6. From dry leaves, twigs, moss, dried flowers and mountain ash, we made a small forest and a clearing.

House of chestnuts "Hut on the edge" with your own hands

This craft was made by Ryzhkina Svetlana Aleksandrovna and Chesonis Daniel (6 years old), from the city of Bataysk, kindergarten "Raduga".
We need to make this house:
- Cardboard box
- Colored paper
- Glue stick
- Glue gun
- A pen
- Scissors
- A piece of wire
- Needles
- Foliage of autumn trees different colors
- Berries
- Dry twigs
- Chestnuts, about 2 kg.
- Scotch
How to make a house - a hut on the edge
Step 1. Making the base. We take an ordinary cardboard box, cut out a base measuring 40 x 40 cm, on which our hut will stand. We glue it with colored paper according to the color of any foliage used below.
Step 2. Making a house. We make a house out of cardboard, about 25 x 30 cm in size. We connect its sides with tape, fasten the bottom of the house to the base - the platform, using a thin flexible wire.
Step 3. We make windows, doors in the house. Cut out rectangles from white paper for two windows and a door. On the windows, we painted curtains with a handle. We glue them with glue to the house. On the door of the house, using glue - a gun, glue thin twigs of the same size and a handle.
Step 4. We glue the walls with chestnuts.
Step 5. We decorate the roof and ground (the basis of the craft). Lastly, we glue the roof and the rest of the earth autumn leaves(or leaves cut from paper). We alternate the leaves by color, to add variegation and volume.
Step 6. Decorating the composition needles and dried berries.
Craft "Forester's house" with your own hands

This craft was made by Bykova Maria Nikolaevna together with her son Roma (Arkhangelsk region, Mirny). Roma is 2 years 8 months old.
To make such a house, we need the following material:
- shoe box,
- a box of kefir 0.5 liters,
- beans,
- plasticine,
- leaves,
- cones,
- spruce branches,
- moss,
- pine needles,
- leaves from larch.
How to make a forester's house with your own hands
Step 1. Making the base of the house. To do this, coat the kefir box with plasticine from all sides. Put the beans on the plasticine. Let's make a window out of plasticine.
Step 2. We make the roof of the house. We make the roof from leaves. We also glue them on plasticine.
Step 3. Making a deer.
We take 2 cones. We connect them together so that we get the body and neck of a deer. Then we glue the plasticine head to the neck, make eyes and a nose. Pine needles will make beautiful horns. Glue the matches as legs and tail. The hooves were glued to the box on plasticine.
Step 4. Making a hedgehog.
We make a hedgehog's face, eyes and a nose. We stick the muzzle to the bump. Let's make needles from spruce branches. We glue them on the cone using plasticine.
Step 5. Assembling the craft.
When the main details are ready, then we begin to draw up the craft. We attach the spruce branches to the box on plasticine. We put a house. We spread the moss and sprinkle with larch leaves. We put the hedgehog. The craft is ready.
DIY pumpkin house: two options
The first version of the craft

This house was completed by Iskander Khazipov (6 years old). Teacher - Khazipova Gulnaz Galimkhanovna, Kazan. (MADOU " Kindergarten No. 174 combined type "Moskovsky district of Kazan)
Pumpkin house: necessary materials
Pumpkin, zucchini, rowan berries, blueberries, various sparkles, cones, dry branches, a knife, cloves, kitchen attachments.
How to make a pumpkin house with your own hands with children
Step 1. Idea - we come up with what our pumpkin house will be like... Before making a pumpkin house, decide how many houses will be in the composition. If everything is clear with one house, then multi-level compositions require some adjustments.
Step 2. The pumpkin follows clean from seeds and pulp using a knife (an adult does this).
Step 3. Now mark the pumpkin with a marker in places where doors and windows will be located. Mark the window with a felt-tip pen.
Step 4. Then proceed to cutting out parts... Carved shutters and other decorative items can be cut with curly kitchen attachments. It is not at all necessary to observe the accuracy and clarity of the lines (this will give the house a darker look). Attach the prepared parts to the pumpkin using small studs.
Step 5. It's time to tackle the roof of the house. Cut half of the zucchini and put it on top of the pumpkin and decorate with various sparkles. We spread red rowan berries on top of the pumpkin, and also put on a cone (in the form of a pipe) on the roof.
Step 6. We decorate the composition. Put the pumpkin on the zucchini cut into rings and decorate with cones and dried blueberries.
The second option for making a pumpkin house

This pumpkin house was made for our competition by a family: Nabukhatnaya Lyubov, Nabukhatny Dmitry and their son Nabukhatny Igor (9 years old), Perm.
To make this pumpkin craft, you will need:
Natural materials:
- pumpkin,
- bark,
- cones,
- needles, leaves, grass,
- an acorn hat,
- pebbles,
- moss,
- thin sticks.
Decorative material:
- wooden button,
- lace,
- key.
Super glue to hold all parts together.
How to make such a pumpkin house
Step 1. Making a house. Cutting out the bottom of the pumpkin, we cleaned out all the flesh from the inside. Carved out windows and doors. The roof was made from thin pine bark by gluing the pieces on top of each other. It turned out very similar to a tiled roof. The door was a solid piece of thick bark, the handle by the door is an acorn hat.
Step 2. Decorating the house. To make the house cozy, it must be decorated. Lace curtains were glued to the windows. The flower boxes were glued together from cardboard and decorated with pine cones. Summer is over, the flowers have faded. Therefore, the boxes now contain loose leaves and pine needles. To the window on the second floor stretch "grape whips", we made them from green marsh grass. The carved bottom of the pumpkin served as a decoration for the back wall of the house. With a button in the middle and rays, it reminded us of a mill. The key at the door and the steps made of sticks completed this stage in the work.
Step 3. We populate the house. The house was installed in a low box. A piece of moss became a clearing in front of the house. The rest of the surface was covered with small pebbles.
At the end of the work, we dreamed for a long time who could live in our house. Maybe a gnome, or a fairy with transparent wings, or a kind old sorceress. In the end, we decided that we ourselves are ready to live in a fairy-tale house. It is a pity that he is too small for our large family.
House - do-it-yourself twig teremok
This teremok was made by Vera Pavlova (6 years old). Teachers: Zueva Tatyana Vladimirovna, Karaguzheva Rufina Viktorovna (Perm Territory, Kungur MADOU "Kindergarten No. 6")
This teremok is made of twigs, folded like a real house from logs. The branches are glued to each other.
The straw on the roof is attached to the cardboard.
The gable of the roof is covered with pieces of pine bark.
The fence is woven from thin willow twigs.
Teremok and posts by the fence attached to a piece of plywood with glue.
The herringbone on plasticine is neatly placed in a moss-clearing.
Under the tree sits the Hedgehog, who plays hide and seek with the Bunny. Here is such a friendly company.

House-teremok for a mouse with your own hands
This simple house based on the fairy tale "Teremok" was made by Veronika Maskaleva, 5 years old (Perm Territory, Kungur MADOU "Kindergarten No. 6". Teachers: Tatiana Vladimirovna Zueva, Rufina Viktorovna Karaguzheva).
Teremok is a vegetable marrow and a pumpkin. A window is drawn on the roof with a felt-tip pen. The doors are cut out of colored paper and glued with glue stick.
The teremok fungus stands in the clearing of their soft moss. The ladder is made of wooden sticks, which are glued together for a moment.
A toy Infringement Mouse ran to the tower. And she began to live in it.

We wish you success and creative inspiration! Until we meet again at the Native Path. All master classes of the project can be found in the heading. Get a NEW FREE AUDIO COURSE WITH A GAME APP
"Development of speech from 0 to 7 years: what is important to know and what to do. Cheat sheet for parents"
Click on or on the course cover below to free subscription
Do you throw out the cardboard because it takes up a lot of space? But it can become a material for your creativity. For example, you can build a cardboard house for children or for a pet. Look for ideas for such crafts below.
Small house for dolls
Do you have a little daughter? Then make a do-it-yourself dollhouse for her from cardboard. Any girl will be delighted with such a present. If you have a lot of free time, then build a home for the Barbie, and if you are running out of time, then make a small shelter for miniature toys. How to assemble a house? The first step is to draw a pattern. It should consist of three walls, one pediment, a floor, a roof and a partition between floors. Let's start creating. Cut out the details. There are two ways to fasten the workpieces together. One is to glue the cardboard with a hot gun, and the other is to create grooves in the parts. You can combine the two mounting methods for reliability. First connect the walls together, then attach the floor to them. After that, insert the partition between the floors, and the last action is to attach the roof. You can decorate the front of the house with cardboard, which will act as a pediment.
Big dollhouse

Do you want to make a stable structure and at the same time not spend a lot of time on creating crafts? Build a large open cardboard house. Before starting work, you need to draw a pattern. It will consist of two side walls aligned with the pediments, a rectangle connecting the two parts of the future building, and three partitions between the floors. We transfer the pattern to cardboard and cut out the details. In accordance with the photo attached above, cuts need to be made in the blanks. They will play the role of grooves. Thanks to this fastening, the structure will stand steadily, and if necessary, it will be easy to assemble. When the grooves are made, you can start cutting out the windows. They can be of any shape and can be located in any part of the building. To make your home prettier, frame each window with a curly frame. For this purpose, use multi-colored gouache mixed with PVA glue.
New Year's house

Children like to do such crafts for the New Year holidays. A cardboard house can play the role of a candlestick or become one of the decorative details of a room. How to assemble a similar craft? You need to start with a sketch. Draw the house you want to design. If you do not often do prototyping, then you need to start by making a one-story structure of a simple structure. The drawing is ready, now you should draw its scan. Contrary to popular belief, this is done simply. If spatial thinking does not work well for you, first mold your project from plasticine. When the pattern is ready, transfer it to cardboard and then cut it out. Glue the parts with a hot gun. Color the craft with gouache or immediately make a layout out of white cardboard. Complement the project with trees and a fence, and then sprinkle the craft with artificial snow or fine foam.
Tea house

It is always pleasant to make not only beautiful, but also utilitarian products. One of them is a cardboard tea house. A master class for making such a product is given above. The roof of this craft is removed and the base is filled with tea bags. Such a house can be placed on the table or used to decorate one of the shelves in the kitchen. How to make a do-it-yourself tea house out of cardboard? Above is a pattern, you need to print it or redraw it. First, let's put together the base. It consists of four long rectangles and one small square. First we fasten the walls of the structure together, and then glue the floor. The cutout for the door must be made immediately. At this stage, you need to check whether the bags are removed from the hole, if necessary, the hole can be enlarged. We glue the base with beautiful paper with a suitable print or paint the house by hand. Now you can assemble the roof. We glue two rectangles together, and insert a bar between them. We make gables and make a floor near the roof. You can decorate the part with rectangles bent on both sides. Cover the roof with colored paper or paint the detail.
House for children

Do you want to please your child? Make a cardboard house for children with your own hands. The best fun for toddlers is to hide in a hiding place. The cardboard house will become a permanent place for the child to play. How to make such a gift to your child? Make a pattern. You can draw it on the wallpaper that was left after the repair. You need to design the structure with a margin so that your child can enjoy his shelter for more than one season, but several years. The two side walls must be combined with the gables. Long walls are rectangles. And the roof for the stability of the structure must be made of rectangles, rolled up with the letter "P". Such large "clips" will cling to the protrusions that need to be created in the pediment. Cut through the windows in the long walls of the house, and cut out the door in one of the side parts. You can attach it using springs or an old door mechanism.
Cat house

Do you have any pets? Make a cardboard house for your cat. This design will be very primitive, but your pet will be able to appreciate the work. What should an animal house look like? Take 8 old cardboard boxes. The first row of the structure will consist of four boxes. Connect them together with tape or glue. Cut through holes in a chaotic manner. But don't touch the floor of the house. The second row will have three boxes. Arrange them in a corner on the first tier. Make slots in each wall, and also several holes that will lead to the lower tier. Glue the rest of the box with the third layer. Cut through the moves in it. The house is ready. You can decorate it in any way so that it looks good in your interior.
House packing

Holidays are coming soon and you decided to give your friends sweet gifts? Then make a house out of cardboard. Such packaging can be filled with purchased sweets or sweets made by yourself. How to make a house? Above is a template. You need to print the pattern and then cut out the stencil. Take colored cardboard and transfer the drawing to it. Now cut out the workpiece and glue it. It remains to decorate the craft. You can paint your creation or make an applique out of colored paper. If you fill the box with homemade sweets, be sure to wrap them in foil or cellophane. This is necessary so that the product does not become saturated with oil and does not lose its presentable appearance.
Tower made of cardboard

It will be easy to create such a craft for those who have extra boxes from the refrigerator and TV. Cut the large box in two. The base of the house is ready. Cut through the window and door in the blank. Construct two thin rectangles out of cardboard - these will be the pillars at the entrance. Now, from another rectangle, but a larger one, you need to make an arch. We will make the roof of the tower out of a TV box. We cut it in half, and then make out the cut edge with a rectangular zigzag. Create a canopy decorated with the same snake as the roof. You need to place it above the arch. You can decorate the tower with cardboard overlays. Decorate the windows with them. From small rectangles, you can create
Every child needs toys for their full development. You don't have to buy them in the store. It is enough to know how to correctly make the same house with your own hands in order to please your baby with a new toy, with which he will tinker and not make noise for a long time.
Most available material for manufacturing - cardboard, paper, plasticine. But you can also make a house from pumpkins, chestnuts, zucchini, eggplants, clothespins and various shoe boxes, household appliances and equipment.

What kind of house can you make
You can see a lot of photos on the theme of crafts "House". The following wonderful toys for your child are made from improvised means:
- Hut on Chicken Legs - made of clothespins;
- Shalash Oldichka-Lesovichka;
- A hut in a clearing, decorated with chestnuts;
- A forester's hut made of natural materials;
- Build a pumpkin house;
- Using twigs, weave a teremok.


There are a lot of ideas and all kinds of instructions for making houses, imagination is limitless. A little skill, patience - and the craft will be ready!

Let's consider the most popular models and try to make them together.

Understanding what these toys can be made of and how to start this simple process, you can make a work of art. Let the house be far from perfect the first time, but every time everything will turn out better and better!

A hut on chicken legs
Children love fairy tale characters. And they will be happy to help in making a house for their beloved Baba Yaga. For such a craft, we need the following components:
- Dried moss;
- Opened spruce or pine cones;
- Pre-prepared (ironed) leaves;
- Dry berries;
- Clothespins;
- Plasticine;
- Glue.


Do-it-yourself Hut on Chicken Legs
We will show a simple diagram by which you can assemble this beautiful house for Baba Yaga. You can use other templates, but this one is the simplest and will not cause difficulties in manufacturing for either an adult or a child.

So, step by step instructions:
- We disassemble the chips and glue the house. It is best to use "liquid nails" for this;
- We put the assembled Baba Yaga's Hut on a cardboard, glue the space around it with moss;
- Glue the berries to the roof. We put the remnants of the moss there;
- We paint cones in green color, we also glue them to the cardboard. These will be our Christmas trees;
- We sculpt various animals - bunnies, squirrels from plasticine.

The scenery and the creation of the atmosphere of a fairy forest are important here, because we are creating the hut of Baba Yaga, which, according to the fairy tale, is in a place inaccessible to strangers.


Shalash Oldichka-Lesovichka
Making such a house together with a child can take several days. Such a joint pastime brings the parent and his child closer together. So from what can you make such a craft?

Let's list the main components that we need and start the process:

- You will need a pastry package from a cake or cookie. We decorate it with the remnants of old wallpaper, create an autumn forest background. With the help of matches, acorns, cones we make forest dwellers- Lesovichk himself and his friend the hedgehog.
- We make a house out of a kefir box, we glue the walls themselves with large dill sticks to create the effect of logs. The hedgehog will live under the stumps, which can be made from sawing branches.
- We make the path leading from the house to the pond with the help of painted semolina and beans. We create the effect of water using colored paper, stones - using plum stones.
- We decorate the forest and meadow with pieces of moss, dry twigs and leaves.

Hut in the meadow
We will hold another master class on crafts on the theme "House". This time, the construction will be more complicated, and the pleasure can be stretched for a long time.

For this we need:
- Scotch;
- Cardboard box;
- A couple of kilograms of chestnuts;
- Dry branches;
- Glue;
- Berries;
- A pen;
- Multi-colored fallen leaves;
- Scissors;
- Needles;
- Wire.

Hut in a clearing: we master step by step
We proceed to the next manufacture of crafts together with our child, we instill in him useful skills and curiosity.

We collect this toy in the following sequence:
We make the foundation on which our house will stand. For this he uses a cardboard box. We prepare a square of 400x400 mm. Cut out the elements of the house from cardboard, connect them with adhesive tape. We attach to the base.


Cut out windows and doors from pieces of snow-white paper. We glue it. Draw curtains with a pen. We decorate all the walls with chestnuts. We design the roof and the ground around the house using colorful leaves, needles and berries.

Thus, you can make a house from almost any material, combining the necessary components with tape and glue into one whole. Or - cut from pumpkin, watermelon, zucchini, eggplant.

There are many tutorials and master classes on this topic on the Internet. Many lessons are accompanied by excellent explanations of what and how to do it correctly in order to assemble a good and high-quality toy.

A new joint pastime will delight the child, and for a long time he will enthusiastically help in gathering it. And then - with pleasure to play!

Photo of crafts houses


In childhood, everything seems a little different and big, beautiful, modern house doesn't seem cozy. The kid will appreciate any decorations hung in the children's room, but not as much as you would like. It's all about the usual desire to have your own island: small house where the child can hide from "big" problems, play with dolls or read a book. To provide the little man with the desired home, we suggest making a cardboard house for children with your own hands. The templates for such a house are too large to publish, so we will offer miniature copies of children's houses.
Tools and materials
What kind of cardboard house can we talk about if you have not prepared tools and supplies? Of course not about any. So stock up on the following subjects:
- Large cardboard box from household appliances. Used packaging from a refrigerator, washing or dishwasher, several plasma TVs, wardrobes.
- Stationery knife
- Tape measure and large ruler or rail (draw straight lines)
- Old wallpaper or whatman paper if you plan to custom design
- Wallpaper glue
- Hot glue and glue gun for parts
- Plain and double-sided tape
- Pencil or marker
- Roof blanket
- A carrier and a light bulb to guide the light in the house
- Roof rafters made of plastic tubes sheathed with foam rubber
If everything is ready, we take a baby in an armful, good mood and we go on a good journey - to chic cardboard house for kids!
The process of creating a house from cardboard
First of all, decide with the size of the house: it is optimal if the walls are at least 1–1.5 meters. This will make the child feel comfortable inside. In the presence of a finished box of a given size, preparation for construction will be noticeably reduced. If there is no large box, connect together equal the height of the pieces of cardboard using adhesive tape and create the desired area of the future mansion.

 Cut in the roof round hole 6-10 cm in diameter, pass the light bulb connected to the carrier through it. Secure it with wire to the ceiling. It is advisable that the light bulb is not installed in the center, so the child will not touch it with his head and avoid injury. Make it a rule every day check the state of the lamp to protect the child from possible malfunctions.
 Stick on the walls of the house old wallpaper or whatman paper. It is better to glue the wallpaper on special glue, and whatman paper on ordinary PVA. It is not recommended to glue thick paper on double-sided tape, as it can come off at the most inopportune moment. If you have decorated the walls of the house with Whatman paper, then the best idea for registration will become bricks drawn with marker or paint.
Arm yourself with a pencil and make markings for windows and doors:
- If you are planning closing door, measure 70–90 cm from the floor. Further from the top point, draw a perpendicular straight line 40-50 cm to the right or left. Cut the door along two lines, bend it at the end point of the horizontal line. To provide your child with intimacy, attach a wire hook to the door. Be sure to put the tip on it so that the baby does not get scratched.
- Another door option is cutting a monolithic rectangle from a cardboard wall. In this case, the door will turn out to be completely through. For the child to be able to retire, offer to decorate the door with a light blanket.
 Cut the window out into a single square of cardboard, or make 4 small squares to simulate window sections. Do not forget about the decor: stock up on curtains for new apartment baby. It is better if you attach them yourself using double-sided tape or hang the fabric on a wire stretched along the windows.
 On this, the house can be considered complete, although, perhaps, there is one more detail left: hang up a sign with the house number and the name of the street. This is another surprise for the kid, because this is how he can live at any address: why not settle, for example, on Baker Street?
House furniture made of cardboard
Be sure to furnish your baby's new home. Very important to provide comfort at the initial stage of settlement. Furniture can be purchased in Ikea or made by hand. On our site, for example, you can find out how to make, which is a must for any girl. It is recommended to use the following items for decoration:
- Books
You can make a mini-table or a sideboard of them. - Cushions
Perfect for homemade sofa or a crib. - Artificial flowers in pots
Small neat pots will decorate the baby's house. By the way, here you can find out how to create in the form of a cat with your own hands. - Terry bath mat
Such a bedding will become a real Persian carpet in the cramped conditions of a baby house. - Figurines
Give your child the right to choose: he will certainly independently arrange his favorite items on the stylized furniture of his cozy corner.
 Templates
Sorry to present templates such a big house is impossible. Therefore, we publish reduced schemes-copies of cardboard houses, which can be easily made on one's own.
Gallery of cardboard houses
Be sure to look at cardboard houses, which the children made together with their parents. Perhaps this is where you will find your dream home.


Every little girl dreams of the biggest and the most beautiful dollhouse for barbie. And every house cat dreams of his cardboard house, where he can retire, without getting in the way under the feet of the owners. Having learned how to make cardboard houses with your own hands, you can not only please your children and pets, but also decorate the interior in an original way. This article shows the most requested do-it-yourself cardboard house schemes with mk.


Necessary materials
Materials and tools do not require additional costs, everything you need can be found in the household of any family:
- cardboard boxes of different sizes;
- glue gun or super glue;
- knife and scissors;
- pencils, markers, markers;
- watercolor paints, gouache;
- sequins and other decorations for decoration.

Helpful hints:
- when creating a box, it is better to use corrugated cardboard;
- only adults should cut cardboard;
- for the stability of the product, it is better to take cardboard pipes;
- in a house for children, it is advisable to make a door that opens outward. This will provide more space for games;
- do not throw away small cardboard boxes.
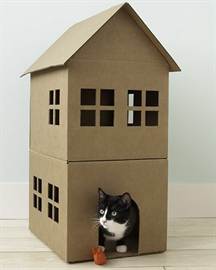
Cat shelter
A cardboard house for cats can be built by the whole family in a very small amount of time. The first thing to do is draw doors and windows using templates.

Start picking up the bottom of the box. Bend the opposite flaps, apply glue on them and bend the rest of the flaps from above. Press them together until the glue dries. At the top end of the box, cut off two wide flaps. Next, cut off half of the one remaining sash and bend it. Do the same for the second whole sash. Secure them with glue in this position.

The next step is to create the roof. On the top of the second box, on a small flap, draw lines from the center of the top to the bottom corners. Do the same with the second sash. Then cut out one large flap. Cut off the edge along the first drawn line, and bend the second. Repeat the same steps with the second sash.
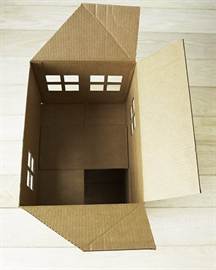
Cut off wide flaps at the bottom of the second box, and cut exactly half from the first smaller one so that when gluing two boxes there is a hole. Glue the boxes together. Then take the first cut off wide flap and glue it to the bottom of the second tier to strengthen it.
A roof will be made from the second box. To do this, cut a piece measuring 45 x 115 centimeters. Bend it along the long side in half. Glue the triangles of the small flaps on the top of the second box with glue and glue them to the wide flap. Apply glue on top and glue only the first side of the roof so that the cat can look out from under it.
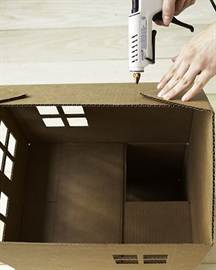
The house is ready!
Dollhouse
You can make this wonderful gift for children yourself from ordinary cardboard boxes.
The house will consist of two floors and two rooms. First, connect the boxes together. Glue on the bottom, side and sides more on the sheet thick cardboard... Strengthen the structure of the house with adhesive tape and let the glue dry.

To make the structure more durable, strengthen the walls with thin cardboard.

The next stage is decorating rooms and appearance house. Decorate the walls with colored paper applications, add mirrors, window curtains, toy furniture. In order for the dolls to be able to "climb" to the second floor, the house will need a staircase, which will consist of two parts.
Cut out the steps for the end of the staircase from thin paper. Cut the same out of cardboard. Choose the required width and height of the steps.

Cut out a couple more pieces from a thick sheet of cardboard. You will need a couple of rectangles for the steps and the bottom.

Glue the sides of the ladder together and squeeze with your hands to make them tighter.