Tuned pvc boats. Tuning of motor boats, improvement of serial motor boats
It all started with a purchase for 20 thousand rubles. boats "Dnepr" produced in 1983 - they found her in some village. It was decided to change everything that was possible as much as possible, so the design was first developed. Car tuning professionals took part in the modernization of the boat, and working with the boat was something new for them. We started with the selection of parts; about 30 thousand rubles was spent on consumables ...
Let's talk a little about tuning motorboats, and specifically about tuning the Progress boat. Despite the fact that more than three decades have passed since the work on the improvement of this serial boat has passed, the relevance of this article has not lost its significance, because the good old "Progress" has been serving its owners faithfully for almost half a century ... So, we offer to your attention a detailed report on a rather successful improvement of a serial motor boat - tuning the Progress-2 motorboat ...
Due to their relative cheapness and ease of operation, PVC boats have long gained their well-deserved popularity, primarily among amateur anglers.
But even the new PVC boat that you purchased in the store, unfortunately, will not be distinguished by special comfort and functionality.
The product clearly requires careful “file modification”, because the manufacturer, in pursuit of the reliability and cheapness of its products, seems to have completely forgotten about the convenience of using the boat.
Fishermen with great experience, of course, have not a single "trick" for a clumsy factory product to transform and become a truly functional and irreplaceable assistant to the fisherman. So, what are the secrets of finishing the boat?
We offer you five simple and effective ways to tune the boat with your own hands. They do not require any special knowledge and skills from you - even a beginner can cope with them.
Strengthening the bottom
Although the material of boats itself is quite strong, it is sometimes very difficult to avoid its wear or accidental damage during operation.
 This is the simplest and most obvious tuning that many fishermen resort to.
This problem is especially acute when fishing in reservoirs with rocky and pebble bottom.
Avoiding rocky bottom damage to your boat is easy. Special PVC profiles are glued to the places where your boat touches the stones. This cannot but increase the overall weight of the product, so proceed with caution and do not overdo it, especially if you plan to use the boat only on calm rivers.
But if you decide to fish on fast rivers, if there are rocky rapids on them, then do not be lazy and strengthen the bottom to the maximum.
Tuning the bottom of the boat can be done not only with the help of profiles. To increase the thickness of the bottom, a special PVC membrane can be applied, which is attached to the base of the boat without the use of glue.The very technological process of strengthening the boat in this way can be divided into several main stages:
- Cleaning the surface, which will intensify, from grains of sand and degreasing it, dismantling the transom wheels and valve.
- Development of patterns. To do this, paper sheets are tightly attached to the inflated boat between the keel and the cylinders, on which two patterns are made.
- On ready-made lines from a sheet of PVC membrane with a thickness of 1.5-2.0 mm. blanks are cut out. The weight of one product is usually up to one and a half kilograms. The finished cuts must be placed in a warm place so that the material can mature and take the required shape.
- In the process of fastening the finished parts, they are heated with a technical hair dryer and smoothed with a dense roller to avoid the formation of air bubbles. Particular attention should be paid here to the edges of the membrane, as the most problematic area of the entire structure.
The keel of the boat can also be reinforced on both sides. PVC profile... "Halt" will protect the keelson as well. You can strengthen the boat and cylinders. Not completely, but only one quarter of their length. It is better to strengthen the rear part of the base of the boat - the transom.
Soft seat
 For convenience, during many hours of swimming for fish, the boat should be equipped with a comfortable soft seat.
If you do not like the inflatable boat seats that are sold in the store, then you can make a comfortable and compact seat yourself. You will need two 150mm wide planks, 2 sets of window hinges and wide car seat belts.
The length of the boards is determined by the distance between the cylinders of the boat.
Connect the boards with fittings so that your future seat can be folded if necessary. Attach the car seat belts to the screws on both sides of the seat. The belts are passed under the bottom of the boat and can be adjusted if necessary. For convenience, you can attach a cover with a foam backing to the seat.
Such a seat will cost you quite inexpensively, and if necessary, it can be moved along the kayak. If you are interested in more detailed information on boat seats, you can.
Inflatable keel
 Tuning an inflatable boat can also increase its stability. Unfortunately, many boats are not equipped with an inflatable keel from the factory, and for boats over three meters in length, which are used in conjunction with a motor, it is absolutely necessary.
When accelerating on such a boat, if it is not equipped with a keel, the bow begins to rise above the surface of the water and the boat itself may capsize.
The keel gives the entire structure additional stability and improves handling.To make it with your own hands, you will need a thick PVC fabric and good glue... A homemade keel is made in the form of a slightly oval tube, which is securely glued along the seam. There is an air valve on the keel. The structure should be placed inside the boat.
Homemade collapsible anchor
To make an anchor, you need a stainless steel pipe with a diameter of 25 and a length of 270 mm. An M12 sleeve is welded to the end of the tube.
Anchor legs can be made from a 4 mm thick sheet of stainless steel with a size of 26x4 cm. A pair of strips is welded onto one of the legs so that they do not scroll in the assembled position. The paws are attached to the stem and fixed with a nut, and a cable ring is attached on the back side.
In order for the anchor to be more reliable, molten lead is poured into the pipe. The anchor is attached to the seat with a cable and a carabiner.Transom wheels
It is very difficult to do without this important device. It can be very difficult to transport a heavy inflatable boat to the water with your own hands, in this case the wheels will help us.
For small, light boats, one wheel is sufficient. The chassis can be made from any materials at hand, and the wheels can be purchased in the store.As a basis for fastening the wheels, you can use strips 20 cm wide, which are cut from a plastic barrel; fastening the wheels can be done with bolts.
Such a structure is fixed on the cylinders with fasteners, and if necessary, you can easily dismantle them. This simple tuning will allow you to avoid many of the inconveniences associated with transportation.
Such a thing as "tuning" means the improvement, revision or modernization of a product. In this case, the modification of the PVC boat. Large-scale "tuning" of such boats costs a lot of money, especially since it involves the improvement of the design or individual structural elements of the PVC boat.
Various factors can serve as the reason for the modernization of a floating vehicle. The first factor includes her imperfect appearance associated with the purchase in the "ancient" time, when few people thought about the perfection of the product. The second factor is very serious and related to the financial side of the matter. People buy inexpensive things with the hope that they will improve them without spending a lot of money. In addition, upgrades can be carried out incrementally without immediate costs. At the same time, it should be remembered that in the process of revision it is better to install only the necessary and useful elements that improve the characteristics of the product. Although, everyone has the right to decide which innovations are suitable for a floating vehicle.
Many items can be purchased and installed on the boat. It is not necessary to make them yourself, especially since this process can be delayed in time.
Bottom reinforcement
PVC fabric, which serves as the bottom of the boat, is quite durable, but it is inconvenient to move on it. Since the bottom is not rigid, every angler experiences a number of inconveniences. Therefore, strengthening the bottom is the first task. In the future, the reinforcement will have to be repaired, but not the bottom of the boat. It will cost less, and it will be easier to replace the amplification with a new one or to repair it. You can make both full and partial reinforcement of the bottom of the boat.
Bottom reinforcement is made by gluing a special PVC tape called "fenders". The fender bar can have a thickness of 1.2-3 mm and a width of 60-235 mm. It is attached with a 2-component glue. This will make the bottom harder and more protected from various underwater surprises.
Keel reinforcement
The operation is reduced to the fact that PVC tape (fender) is glued over the factory tape. A similar enhancement applies to keelsons.
Strengthening the cylinders
Strengthening is performed based on the need. The cylinders are also subject to constant wear and tear.
Transom reinforcement

For this element of the boat, reinforcement is simply necessary, since the transom is protected by only one layer of PVC fabric.
In order not to suffer with individual elements, the bottom of the boat can be sealed completely by using a fender. If you are careful and careful, as well as choose the right glue, you can do the operation yourself. This approach will solve many of the problems associated with the deterioration of the boat's performance.
Installing stringers
If the boat has a hard floor, then you will have to install duralumin profiles. Since the boat deforms during movement, the rigid floorboards touch the inflatable parts of the boat and friction occurs. This can lead to abrasion of the fabric, which is undesirable and can lead to a violation of the strength of the boat. In the bow, where the boat has a curved profile, stringers are not installed.

Self-attachment of the fender bar

Self-reinforcement of a PVC boat consists of the following operations:
- The boat is washed out, after which all impurities are removed. After that, the boat is dried as thoroughly as possible. It should be remembered that the slightest residual moisture will not allow the boat elements to be glued together properly.
- The surfaces to be glued are degreased with gasoline or acetone. Degreasing is carried out carefully so as not to break the fabric.
- Using a brush, a layer of glue is applied to the surface. Usually the glue is applied to the boat and fender. After 15 minutes, a second layer of glue is applied. The layers dry out until the glue stops sticking to the hands.
- The bar is applied to the surface and pressed against.
- In order for the surfaces to stick reliably, it is better to heat them with a hair dryer. Heating is done very carefully so that the plastic does not start to melt.
- After that, the surfaces to be glued are pressed again with maximum force.
Redans by boat

These elements make the boat more stable. Redans are PVC elements with various shapes.
Anchor

PVC boat anchor is required element, which allows installation at any point in the water area. It is especially effective in the presence of a current, when the boat can leave the intended place.
Spinning Rod Holders
A very useful accessory. Special mounts can be purchased at the store. The best option for one - 2 mounts, for two - 3 mounts. Extra bindings can be a hindrance. It is not desirable to be ready for a large number of spinning rods. If necessary, they can be pulled out of the tube at any time.
Alternatively, the rod holders can be made from PVC tubes yourself. They can be easily purchased at hardware stores.
Transom
A transom is required under the motor. When buying a boat, the transom may or may not be included in the package. It is advisable to install an echo sounder on the transom.
Anchor eye

It is installed at the stern of the boat and facilitates the process of lowering and raising the anchor. The roller is placed slightly lower so that there is no abrasion of the fender.
Transom wheels

Whether to install them or not depends on the nature of the reservoir. Most bodies of water, especially wild ones, do not have conditions for a normal boat launch. In such conditions, you have to lower the boat on your hands. This means that there can be no talk of any transom wheels.
Inflatable keel

As a rule, simple boats are not equipped with a keel, which does not allow it to stay on course. Installing an inflatable keel on it will help solve the problem of boat stability, especially in the presence of waves.
The keel size depends on the length of the boat. If you install the keel on a boat that is less than 3 meters long, it will cause the bow of the boat to rise. This element is attached using special tapes that are included in the package.
Seats

Almost all models of such boats are equipped with hard seats, which is not very convenient, since you have to sit a lot in one place. To make fishing a joy, it is better to replace the seats with soft ones or modify the old ones. Most boat owners make ice fishing-style seats with a storage box under the seat.
Alternatively, you can design a movable seat that can be installed at any point.
Bag installation

The bag can be fitted under the seat or in the bow of the boat.
Outboard motor insurance

Fishing is fun, but also dangerous. Sometimes it is difficult to predict what will happen on a fishing trip. Quite often, when abnormal situations intervene in the fishing process, the motor breaks down. As a result, the motor simply goes under water. To prevent this from happening, the motor is insured with a steel or artificial cable. It is attached to the transom through 2 eye rings. In other words, the motor simply binds.
Fastening the gas tank

Elements such as an additional gas canister require mandatory fastening. This is necessary so that during movement or sharp turns the canister cannot change its location. Fastening is carried out by means of a rope and half rings attached to the boat. They are attached to the boat as follows:
- half rings are glued to the bottom if it is made of PVC fabric;
- screwed to the floorboards if the floor is hard.
Fasteners
All additional elements are attached to the PVC boat using two-component glue. There are several models of universal fastening systems. If you install it, then any elements can be adapted to it.
Fasteners "penny"

Universal fastener, designed for attaching fishing rods, awnings, tables, etc. The main material for its manufacture is PVC. The dimensions of the penny fastener are 35 mm high, 20 mm in diameter.
FASTentm fasteners

It is a versatile yet fast fastener. It can be transformed for any attachments, such as echo sounders, navigators, belt holders, etc. It allows you to quickly switch from one type of attachment to another.
If you install all of the above elements on the boat, then their weight can significantly add to the weight of the boat and then you will definitely not be able to launch it on your hands. Therefore, before embarking on such tuning, you should think carefully.
DIY wooden boat
DIY PVC boat tent
DIY kayak
DIY PVC boat anchor
Homemade plywood boats
DIY boat water cannon
How to make a hinged transom for a PVC boat? ...
Do-it-yourself boat electric motor
Bagorik for winter fishing with your own hands ...
Said and Done. Here is the boat and a sheet of plywood 12mm thick, cut into 4 identical parts, already in the garage.
It was decided that the width of the slate would be 3 cm narrower than the bottom of the boat, so that the sheets would not damage the sides and could be easily removed from the lowered boat. Cut and file the edges of the sheets to remove any chipping that could damage the boat. In order for the slan to fulfill its role, it is enough to cover the place from the front seat to the rear with plywood.
Here the main part is done, it remains to protect the plywood from moisture, because it will definitely get into the boat, walked on two layers with stain and varnished.
A sheet of plywood was enough for 8 pieces, and I only used 3 so I decided to cut another sheet and make a floor in the back of the boat. Maybe someday I will decide to make a transom for the boat, then I will have a place to install the battery.
After the varnish had dried, it was time to test it. On the next weekend, the boat with a do-it-yourself floor was lowered into the water, the impressions were very positive, although a defect was also revealed - it was possible to stand in the boat and very steadily, despite the strong wind, although to make sure that all four parts were motionless among themselves also would not hurt.
It took me exactly half a sheet of plywood to make such a floor for a boat, and for the difference in cost I could have purchased at least five sheets of plywood, but only half was enough for me.
In conclusion, I would like to add! If someone decides to do everything that is described above with his boat, be careful on the water and remember that under your feet there is only an inflatable boat, and not solid ground!
Based on materials from the site: http://mgkfishing.ru
- Homemade hard floor for inflatable boat
Such a thing as "tuning" means the improvement, revision or modernization of a product. In this case, the modification of the PVC boat. Large-scale "tuning" of such boats costs a lot of money, especially since it involves the improvement of the design or individual structural elements of the PVC boat.
Various factors can serve as the reason for the modernization of a floating vehicle. The first factor includes its imperfect appearance associated with the purchase in "ancient" times, when few people thought about the perfection of the product. The second factor is very serious and related to the financial side of the matter. People buy inexpensive things with the hope that they will improve them without spending a lot of money. In addition, upgrades can be carried out incrementally without immediate costs. At the same time, it should be remembered that in the process of revision it is better to install only the necessary and useful elements that improve the characteristics of the product. Although, everyone has the right to decide which innovations are suitable for a floating vehicle.
Many items can be purchased and installed on the boat. It is not necessary to make them yourself, especially since this process can be delayed in time.
PVC fabric, which serves as the bottom of the boat, is quite durable, but it is inconvenient to move on it. Since the bottom is not rigid, every angler experiences a number of inconveniences. Therefore, strengthening the bottom is the first task. In the future, the reinforcement will have to be repaired, but not the bottom of the boat. It will cost less, and it will be easier to replace the amplification with a new one or to repair it. You can make both full and partial reinforcement of the bottom of the boat.

Bottom reinforcement is made by gluing a special PVC tape called "fenders". The fender bar can have a thickness of 1.2-3 mm and a width of 60-235 mm. It is attached with a 2-component glue. This will make the bottom harder and more protected from various underwater surprises.
Keel reinforcement
The operation is reduced to the fact that PVC tape (fender) is glued over the factory tape. A similar enhancement applies to keelsons.
Strengthening the cylinders
Strengthening is performed based on the need. The cylinders are also subject to constant wear and tear.
Transom reinforcement
For this element of the boat, reinforcement is simply necessary, since the transom is protected by only one layer of PVC fabric.
In order not to suffer with individual elements, the bottom of the boat can be sealed completely by using a fender. If you are careful and careful, as well as choose the right glue, you can do the operation yourself. This approach will solve many of the problems associated with the deterioration of the boat's performance.
Installing stringers
If the boat has a hard floor, then you will have to install duralumin profiles. Since the boat deforms during movement, the rigid floorboards touch the inflatable parts of the boat and friction occurs. This can lead to abrasion of the fabric, which is undesirable and can lead to a violation of the strength of the boat. In the bow, where the boat has a curved profile, stringers are not installed.

Self-attachment of the fender bar

Self-reinforcement of a PVC boat consists of the following operations:
- The boat is washed out, after which all impurities are removed. After that, the boat is dried as thoroughly as possible. It should be remembered that the slightest residual moisture will not allow the boat elements to be glued together properly.
- The surfaces to be glued are degreased with gasoline or acetone. Degreasing is carried out carefully so as not to break the fabric.
- Using a brush, a layer of glue is applied to the surface. Usually the glue is applied to the boat and fender. After 15 minutes, a second layer of glue is applied. The layers dry out until the glue stops sticking to the hands.
- The bar is applied to the surface and pressed against.
- In order for the surfaces to stick reliably, it is better to heat them with a hair dryer. Heating is done very carefully so that the plastic does not start to melt.
- After that, the surfaces to be glued are pressed again with maximum force.
Redans by boat

These elements make the boat more stable. Redans are PVC elements with various shapes.
Anchor

An anchor for a PVC boat is an indispensable element that allows installation at any point in the water area. It is especially effective in the presence of a current, when the boat can leave the intended place.
Spinning Rod Holders
A very useful accessory. Special mounts can be purchased at the store. The best option for one - 2 mounts, for two - 3 mounts. Extra bindings can be a hindrance. It is not desirable to be ready for a large number of spinning rods. If necessary, they can be pulled out of the tube at any time.
Alternatively, the rod holders can be made from PVC tubes yourself. They can be easily purchased at hardware stores.
Transom
A transom is required under the motor. When buying a boat, the transom may or may not be included in the package. It is advisable to install an echo sounder on the transom.
Anchor eye

It is installed at the stern of the boat and facilitates the process of lowering and raising the anchor. The roller is placed slightly lower so that there is no abrasion of the fender.
Transom wheels

Whether to install them or not depends on the nature of the reservoir. Most bodies of water, especially wild ones, do not have conditions for a normal boat launch. In such conditions, you have to lower the boat on your hands. This means that there can be no talk of any transom wheels.
Inflatable keel
As a rule, simple boats are not equipped with a keel, which does not allow it to stay on course. Installing an inflatable keel on it will help solve the problem of boat stability, especially in the presence of waves.
The keel size depends on the length of the boat. If you install the keel on a boat that is less than 3 meters long, it will cause the bow of the boat to rise. This element is attached using special tapes that are included in the package.
Seats
Almost all models of such boats are equipped with hard seats, which is not very convenient, since you have to sit a lot in one place. To make fishing a joy, it is better to replace the seats with soft ones or modify the old ones. Most boat owners make ice fishing-style seats with a storage box under the seat.
Alternatively, you can design a movable seat that can be installed at any point.
Bag installation

The bag can be fitted under the seat or in the bow of the boat.
Outboard motor insurance

Fishing is fun, but also dangerous. Sometimes it is difficult to predict what will happen on a fishing trip. Quite often, when abnormal situations intervene in the fishing process, the motor breaks down. As a result, the motor simply goes under water. To prevent this from happening, the motor is insured with a steel or artificial cable. It is attached to the transom through 2 eye rings. In other words, the motor simply binds.
Fastening the gas tank

Elements such as an additional gas canister require mandatory fastening. This is necessary so that during movement or sharp turns the canister cannot change its location. Fastening is carried out by means of a rope and half rings attached to the boat. They are attached to the boat as follows:
- half rings are glued to the bottom if it is made of PVC fabric;
- screwed to the floorboards if the floor is hard.
Fasteners
All additional elements are attached to the PVC boat using two-component glue. There are several models of universal fastening systems. If you install it, then any elements can be adapted to it.
Vladimir Kolgin
When the boat has already been selected, then, as a rule, upon sale you will be offered to conduct tuning boat... What does it include, and how much do you need this whole range of works?
The boat that leaves the production hall carries only the minimum of everything that is necessary for its operation. She, of course, can be used normally in this form, but will such an exploitation give a maximum of positive emotions and will it give a feeling of comfort on the water in terms of the level "that you expected?"
Based on more than thirty years of practice of using small boats, the answer is obvious to me: no, for the overwhelming majority of shipowners it will not!
After the very first out on the water, having looked at the boats of colleagues, you will want to adapt the boat to your tasks as much as possible. And first of all, as much as possible / * insure against unforeseen circumstances. Why such confidence? The boat does not always leave in good weather and return to the shore in calm weather. Variants are possible. Therefore, it is reasonable to direct the first steps in retrofitting a boat to increasing the level of its safe operation, so that it can forgive you mistakes as much as possible.
Outboard boat motor insurance
There are known cases on the water, when the motor rips off its regular place and, in parting, having managed to strike the end of the cylinder with a screw a couple of times, disappears into the abyss of waters. In reality, there are several reasons for such events - from violations of the rules for operating the vessel by the skipper, hitting an underwater obstacle to wear or tear of the transom linings, breakdown of the engine clamps.

The easiest way insure the motor by means of two eye rings (eyebolts) symmetrically installed on the boat transom. After installing the motor, they are interconnected with a strong steel or synthetic cable so as to capture the deadwood of the motor, but also not to prevent the motor from reclining freely in the event of a collision with an underwater obstacle.
Such a fixation, in my opinion, should be provided in any boat, despite different options payola or inflatable bottom. Having secured the gas tank in place, you can not worry about its safety and location, even in stormy weather. It is more convenient to carry out any fastening in the boat with the help of half rings and slings. Depending on the type of bottom, the half rings can be installed using [screws, self-tapping screws, or glued using special overlays. Exactly the same mounts can be placed in any part of the boat's cylinder to fix any equipment and inventory. In this way, you can unfasten small bags, sealed packaging, tubes with spinning rods, and, most importantly, an anchor, securing it with rings against spontaneous falling overboard.

Pvc boat hull
The boat is moored to the shore. There may be several such mooring lines during fishing. If the coast is a sandy or rocky shoal, then any, even the most gentle contact of the hull with it during mooring will leave marks on the boat. The accelerator, if you will - the catalyst for wear, will undoubtedly be waves. Regular dragging over sandy and rocky spits or shallow water can also quickly wipe off the PVC layer on the bottom. All this gives reason to think about the maximum reduction in the likelihood of damage that is caused to the bottom by such abrasive abrasion.
To reduce the consequences of this phenomenon, the bottom reinforcement system has been worked out. It boils down to gluing along the entire bottom or in places that most often encounter obstacles during movement, an additional layer of PVC. It can be either an additional layer of fabric or a profile molded from PVC.

It is clear that any such reinforcement will inevitably lead to a certain increase in the weight of the entire structure, which at high or extreme loads of the vessel can already be very critical. The width and thickness of the profile for reinforcement are different. The general selection criterion is the weight of one running meter; it usually ranges from 70 to 350 g.

It should be noted one design feature of boats with an inflatable bottom. Since there are no rigid elements on the bottom, there is no need for this type of protection. And on boats of the catamaran type, a kind of shell protection was already initially laid down by the manufacturer. Boats of this type, when mooring, come into contact with the shore surface exclusively with skegs / additional cylinders inside the protective covers.

If the boat is being prepared mainly for trips on rapids as a floating vessel, then the reinforcement for safety reasons should be maximized.

If exploitation is to be carried out in ordinary lowland waters, then it is possible, as they say, to get off with "little blood".
And one more argument in favor of installing protection. When the bottom part of the boat is worn out, it is much easier and cheaper to replace the PVC profile when wiping, than to patch or even change the entire bottom sheet.
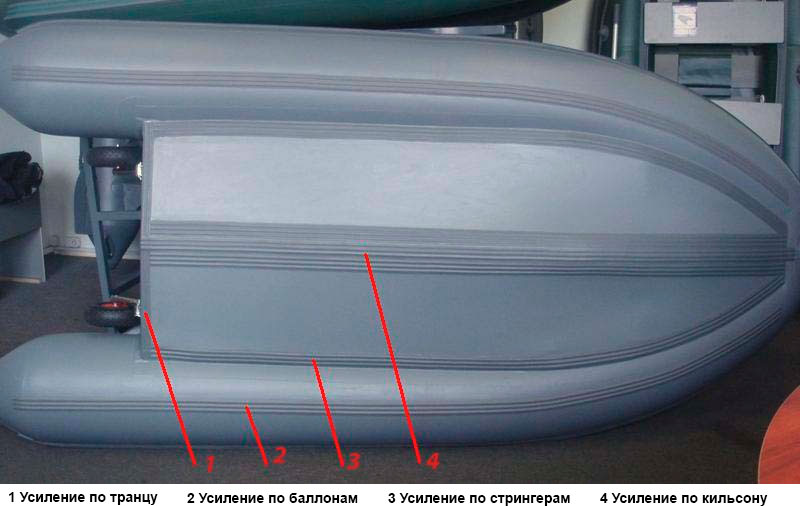
And now in a little more detail on which routes should be laid reinforcement on boats with a rigid floorboard.
Usually, the keel manufacturer lays only one tape of the so-called "halt" (the manufacturer's term for a profile molded from PVC).

If you glue one more tape on both sides of this profile to the transom itself, then such protection will reliably protect not only the bottom panel, but also the keelson.
The next element, which also wears out noticeably, is the balloon. Therefore, halting its lower surface is the second stage of reinforcement. It can take from ¼ to ¾ the length of the cylinder, counting from the stern, that is, only that part that is subject to wear. It is also recommended to reinforce the stringers.

And why is it actually needed? Unlike rigid hulls, a PVC boat is noticeably deformed during movement and the shape of its inflatable elements changes somewhat. Only rigid elements of its structure are subject to minimal deformation - the bottom hole and the transom. The tight contact of the transom with the balloon and the bottom is ensured by the strength of the gluing on the profiles or tapes. In contrast, the bottom liner is only inserted into the cockpit and installed in the spacer between the cylinders.

The places where the rigid floorboard or stringer touches the fabric of the cylinder or the bottom are the most vulnerable when the boat is moving. Especially if some kind of abrasive, such as sand, gets here. Without proper protection, the effects of such an “abrasive attack” can take place very quickly. Therefore, the installation of protection in these places is also justified, both inside the boat with appropriate tapes or overlays, and outside the boat, in the form of a PVC profile.

And one more necessary type of protection is protection against floorboard joints. PVC strips are installed underneath the floorboard sections.
Strengthening the transom of the pvc boat
And we are completing the complex of works on strengthening the transom. Structurally, in this place, only a layer of the bottom sheet is glued to the plywood.
Reinforcement along the transom is made with a low-profile cast halt or a special corner profile so as not to create additional resistance.
You can do the reinforcement work yourself if you have experience in handling PVC and you are far from service centers. Moreover, all the elements for this and for many other works with the boat, including glue, can be purchased in the stores of a number of manufacturers. Such kits for independent creativity have become quite widespread under the name "Tuning kits".

If the service is nearby, then you should entrust the work with the boat to professionals.
This is the starter complex that will significantly extend the life of your boat.
The next group of useful little things can be described as increasing the level of comfort on board.
Now let's see what else is in the manufacturers' store. What other devices are there that make life easier for a fisherman, hunter or just a rest.
Soft linings for cans of the boat
They can be both self-made from improvised means, and industrial production... They can be used both as independent devices and together with a waterproof bag. In this case, the bag with zippers is fastened to the cover and placed under the jar. The volume of such bags, depending on the boat model, is determined by the width of the cockpit and the width of the can used. A very useful device for storing small items, as well as those that moisture can spoil.

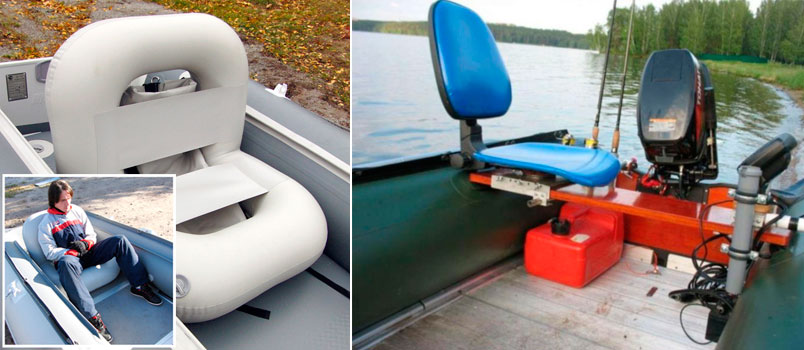
To get a little more comfort, inflatable seats are offered for use. These are inflatable ottomans of various shapes and sizes that can be designed to be placed in any part of the boat. They can be fastened both in space between the cylinders, and with the help of all the same half rings.

Even more comfort in the boat can be obtained by installing inflatable backrests for ottomans.
The result is a luxurious inflatable chair, which, however, relaxes rather than allows you to focus on fishing.

PVC boat tarpaulins
A canopy for small rowing boats resembles an umbrella in function, providing protection from the sun rather than rain.

There are several types of awnings for motor boats, which, in my opinion, deserve special attention, because they are very functional products. And they can be partially categorized as safety enhancements in a boat.

Let's start with the awning, which acts as a nose cone. With some handling skills sewing machine it is easy to do it yourself.

Most manufacturers have it in two forms: entirely made of thin PVC fabric and with a transparent window in the front. The awning is quickly installed on a U-shaped arch and stretches along the side berth on hooks. It protects the crew very well from splashes, and the boat from being flooded through the bow by a steep wave.

If the tail number is covered by the material of the awning, then a transparent pocket for the double number must be sewn on the side of the awning.

The cockpit of the motor boat can be covered entirely with an awning. It is made from Cordura or Advice, less often from 350-550

PVC Structural features of these awnings:
The basis of the awning is U-shaped aluminum arches, which are attached with bolts or screws to special eyelets, cast from PVC and installed on the boat's cylinder. The design is quick-detachable.
When raised, it allows the crew to take shelter from the weather. The main purpose is to protect against dust and precipitation at the ship's anchorage.
Due to the presence of transparent windows under the awning, it is possible to move under a motor in a displacement mode. Due to the large windage, movement under it is possible if there is no strong wind.
Fixation of the sides in the lowered position is carried out with zippers, and in the raised position - on special slings. The sides can be lifted in any quantity and in any sequence. Most comfortable - under an awning with ventilation windows.

A somewhat less common type of parking awning, which is created on the basis of collapsible arcs (the design is similar to modern tents).
www.prospinning.ru
PVC boat
Boats made of PVC material appeared on sale at the end of the twentieth century, successfully pushing rubber models off the counter, thanks to the possibility of their modernization and simple repair if necessary. Boats are made of five-layer fabric with reinforcement. Reinforcement refers to the sewing into the material of a lightweight and durable synthetic fiber carcass - cord.
At the exit, PVC boats turn out to be strong, it is difficult to damage them, but they still need some tuning. Let's take a look at what can be done.
Tuning your boat - a commitment or a necessity
Why do you need to remodel the boat? As a rule, there are quite primitive designs on sale that do not have additional equipment, or with such, but their quality will not be up to the mark. Therefore, to improve design features its boats will have to be slightly modified.
The most common types of PVC boat tuning
In most cases, after the acquisition, the following work is carried out to improve the functionality:
- reinforcement of the bottom;
- replacement of seats;
- production of a collapsible anchor;
- installation of a belay system for the outboard motor;
- installation of an inflatable keel and transom wheels.
Where to start tuning
At first, it is recommended to strengthen the structure. Considering the strength of the frame, only the bottom of the boat and the side tanks require additional reinforcement. This can be done in two ways. Only after that it will be possible to talk about other options for modernization.
Strengthening the bottom of the boat
Although they are made of fairly strong materials, there is no escape from wear and tear, and for this, special PVC profiles are used that are glued to waterproof glue or without it.
This will slightly increase the weight of the boat, so this process should be done wisely, taking into account the following recommendations:
- reinforcement is essential when using the boat in fast water with rocky rapids, in such conditions the risk of damage is highest.
- when using a boat on lakes and ponds with stagnant water, you can refrain from this.
Membrane reinforcement - a step-by-step process
- before starting work, the boat must first be washed, dried, removed all the smallest grains of sand and degreased with a solvent;
- then it is inflated to make patterns for cutting out the material, for this they turn it upside down, and take the necessary measurements from the keel to the cylinders;
- then, according to these measurements, the material is cut out (it is recommended to prepare two identical strips) and leave it in the sun or in a warm place to take an even shape;
- then the boat is lowered, after removing the valve and unhooking the transom wheels, they are laid on a level place;
- one strip is applied to the bottom, trimmed along its entire length, and they begin to warm it up construction hairdryer by putting it on the maximum mode, while smoothing it with a roller to expel air;
- after the same manipulations are done with the second strip, evenly attaching it to the first.
The bonding process occurs due to the heating of the membrane of the material by acting on it high temperature... In this case, no glue is required.
Reinforcement of the cylinder with a halt
The second element required for additional protection is the balloon, or rather the part that faces the water. There is no need to completely cover them with material. The process of work is the same as when reinforcing the bottom: the cylinders are pre-cleaned, the air is deflated, measurements are taken and the material is glued.
Also, for reinforcement, halts are used - glued to the bottom of the cylinder. They are sold in specialized stores, for specific boat models. Can be purchased for another model by pre-cutting it to the size of your boat.
Halt gluing process
- as in the version with reinforced bottom, everything is cleaned and dried, but gluing, in this case, is done only on an inflated boat;
- then it must be treated with a solvent and left for a while to dry;
- after that, glue is applied to the halt and the cylinder, it is kept for ten minutes and the material is applied to the bottom of the cylinder, after which it is also necessary to walk over it with a roller to level and seal.
Two options for belaying the outboard motor
The outboard motor is attached to the transom with screw clamps. With active driving or a slight clamp, it can come off, and given its cost, it is highly undesirable to drown the motor.
There are two ways to mount:
- Wire rope insurance. Of the two, this is the simplest. As a rule, all motors have special lugs, and there are additional mounts on the transom. If they are not there, then the transom can be drilled by screwing a ring bolt into it, preferably made of stainless steel. The motor is fixed with a cable with a carabiner and a thimble. A wide range of them are sold in specialized stores. You can also do with a strong nylon rope or install two eye rings with cables on the outside of the deadwood. After fastening, the cable is stretched so that they do not interfere with the "folding" and rotation of the motor.
- Suspension fixation. The motors have several holes for rigid attachment to the transom. It is not recommended to completely fix it, so as not to interfere with free control. Simply drill one hole in the transom and insert the M8 bolt into it. You do not need to tighten it, just tighten it by hand.
We put a soft seat
It is not very convenient to fish while standing. You can buy a soft seat in the store, but you need to know how to put it correctly, and again the cost of the issue. You can install a homemade seat on the boat.
What you need to work:
- this will require two boards with a width of 50 cm, and a length equal to the distance between the cylinders;
- two window hinges for the structure to fold;
- old car seat belts;
- foam rubber sheet.
Seat making process:
- the planks are connected with loops on both sides to make it look like a book;
- the belts are fixed with self-tapping screws on each board also on both sides; the seat is installed on the boat, such a seat is attached by placing belts under the bottom and fixing them in a certain place where it is convenient, adjusting, if necessary, the direction of their location of the boat;
- foam rubber can simply be put on the seat, and if you need to remove it by placing a waterproof material (for example, leatherette) on top, you can fix it on the boards with self-tapping screws.
Here is such a soft seat - simple and angry.
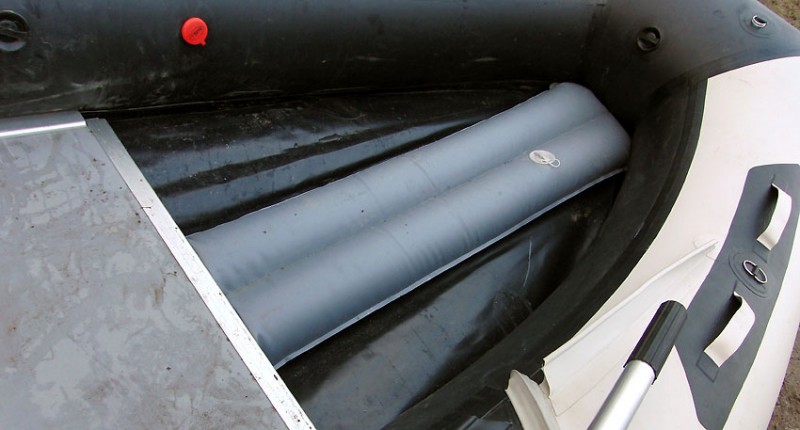
Inflatable keel
 The keel will give the boat stability and maneuverability.
 Not all boats sold in stores are equipped with inflatable keels, and this is a particularly important part for boats with a length of more than 3 meters and with a motor in the kit. If it is not there, then during acceleration, the bow of the boat will rise, and it may capsize.
It is a flattened tube with a valve. It is made of PVC boat fabric, it is rolled up into a tube, glued with waterproof Moment glue.
To seal the end seams, before use, a solution of liquid mustard is poured inside, shaken well and poured.
Such a keel is located not outside the boat, as is usually done, but inside. When driving, it presses the nose, improving maneuvering. As experts say, having made such a keel and installing it, the boat is easier to control, even easier than real keel specimens.
Collapsible boat anchor
Conventional sinkers used as anchors are not very convenient, take up a lot of space, and they weigh decently. Therefore, you can make a simple model of a homemade collapsible anchor.
What is needed for this:
- A stainless steel tube with a length of about 250 mm and a diameter of about 30, on one side of which you need to weld a sleeve, about 25 mm with an M12 thread cut on it, and on the other side, a ring. This is the stock.
- For the paws, you need stainless steel strips, 50 mm long, 250 mm wide and 4-5 mm thick. The edges are pre-processed with sandpaper.
- To prevent the anchor legs from twisting together when assembled, two metal strips need to be welded on one of them.
- On each foot, holes are drilled to match the thread on the stem sleeve. They will put on it and tighten with a nut.
- So that during the assembly process you do not have to use a wrench, weld a small metal bolt onto the rod mounting nut.
- When assembled, the total weight of the finished anchor will be approximately 2-3 kg. For weighting, lead can be poured into the stem.
Installation of transom wheels
This mechanism is no less important than, for example, an inflatable keel. If it is impossible to drive close to the reservoir, the boat will have to be dragged, which can damage it. Given the high cost of such products in stores, you can make them yourself.
Here you need to build on the size. For small boats, one is enough, for two- or three-seater models it is better to install two wheels. They are made practically from scrap materials.
What you need:
- plastic barrel;
- two wheels from an old cart;
- bolts for fastening;
- silicone.
The manufacturing process is simple to the point of banality, and all the time you will notice literally an hour:
- cut out two strips from the barrel in a circle with a width of 25-30 cm;
- cut them in the middle and make a couple of holes at the edges;
- the wheels are fastened in the middle of the strip with bolts, which are then processed with silicone.
The wheels are ready. They put them on the cylinders at the back of the boat, like a yoke. You can fix it with anything. Some fishermen adapt the latches from old boxes, or you can simply pull them off with bundles for transportation.
Additional boat tuning options
The above are the most common options for upgrading PVC boats. In addition, there is still a lot of opportunities for the improvement of these floating facilities.
Arc for spinning

Tarka is what the fishermen call her. It is carried out in the form of a pipe with glasses attached to it for installing a spinning rod.
They put an arc for spinning on the transom of the boat or in the midsection area, that is, in the middle.
Fuel tank mount
Such a device should be in any boat with motor engine... For this, half rings are used, mounted to the transom from the inside so that they do not interfere with the installation of the engine itself. The tank is twisted with a cable through these rings. In addition to him, in this way you can fix other devices in the boat.
That's basically it. Follow these tips, upgrade your boat and enjoy a pleasant vacation or fishing.
myownship.ru
Strengthening the bottom
Although the material of boats itself is quite strong, it is sometimes very difficult to avoid its wear or accidental damage during operation.
 This is the simplest and most obvious tuning that many fishermen resort to.
This problem is especially acute when fishing in reservoirs with rocky and pebble bottom.
Avoiding rocky bottom damage to your boat is easy. Special PVC profiles are glued to the places where your boat touches the stones. This cannot but increase the overall weight of the product, so proceed with caution and do not overdo it, especially if you plan to use the boat only on calm rivers.
But if you decide to fish on fast rivers, if there are rocky rapids on them, then do not be lazy and strengthen the bottom to the maximum.
The very technological process of strengthening the boat in this way can be divided into several main stages:
- Cleaning the surface, which will intensify, from grains of sand and degreasing it, dismantling the transom wheels and valve.
- Development of patterns. To do this, paper sheets are tightly attached to the inflated boat between the keel and the cylinders, on which two patterns are made.
- On ready-made lines from a sheet of PVC membrane with a thickness of 1.5-2.0 mm. blanks are cut out. The weight of one product is usually up to one and a half kilograms. The finished cuts must be placed in a warm place so that the material can mature and take the required shape.
- In the process of fastening the finished parts, they are heated with a technical hair dryer and smoothed with a dense roller to avoid the formation of air bubbles. Particular attention should be paid here to the edges of the membrane, as the most problematic area of the entire structure.
The keel of the boat can also be reinforced on both sides with a PVC profile. "Halt" will protect the keelson as well. You can strengthen the boat and cylinders. Not completely, but only one quarter of their length. It is better to strengthen the rear part of the base of the boat - the transom.
Soft seat
 For convenience, during many hours of swimming for fish, the boat should be equipped with a comfortable soft seat.
If you do not like the inflatable boat seats that are sold in the store, then you can make a comfortable and compact seat yourself. You will need two 150mm wide planks, 2 sets of window hinges and wide car seat belts.
The length of the boards is determined by the distance between the cylinders of the boat.
Connect the boards with fittings so that your future seat can be folded if necessary. Attach the car seat belts to the screws on both sides of the seat. The belts are passed under the bottom of the boat and can be adjusted if necessary. For convenience, you can attach a cover with a foam backing to the seat.
Such a seat will cost you quite inexpensively, and if necessary, it can be moved along the kayak. If you are interested in more detailed information on boat seats, you can read it here.
Inflatable keel
 Tuning an inflatable boat can also increase its stability. Unfortunately, many boats are not equipped with an inflatable keel from the factory, and for boats over three meters in length, which are used in conjunction with a motor, it is absolutely necessary.
When accelerating on such a boat, if it is not equipped with a keel, the bow begins to rise above the surface of the water and the boat itself may capsize.
To make it with your own hands, you will need thick PVC fabric and good glue. A homemade keel is made in the form of a slightly oval tube, which is securely glued along the seam. There is an air valve on the keel. The structure should be placed inside the boat.
Homemade collapsible anchor
To make an anchor, you need a stainless steel pipe with a diameter of 25 and a length of 270 mm. An M12 sleeve is welded to the end of the tube.
Anchor legs can be made from a 4 mm thick sheet of stainless steel with a size of 26x4 cm. A pair of strips is welded onto one of the legs so that they do not scroll in the assembled position. The paws are attached to the stem and fixed with a nut, and a cable ring is attached on the back side.
Transom wheels
It is very difficult to do without this important device. It can be very difficult to transport a heavy inflatable boat to the water with your own hands, in this case the wheels will help us.
As a basis for fastening the wheels, you can use strips 20 cm wide, which are cut from a plastic barrel; fastening the wheels can be done with bolts.
Such a structure is fixed on the cylinders with fasteners, and if necessary, you can easily dismantle them. This simple tuning will allow you to avoid many of the inconveniences associated with transportation.
For information on electric motors for inflatable boats, see here. We recommend that you familiarize yourself with the features of choosing a pump for PVC boats.
boatcity.ru
What can you do with your own hands?

You can do almost everything with your own hands in a PVC boat except the boat itself - it takes too much space and time to work with large PVC sheets, patterns, adhesives, etc. less "handy" angler.
Strengthening the bottom
The bottom of the boat made of PVC is subject to the greatest wear during operation. Therefore, immediately after purchase, without waiting for the formation of abrasions, the following prevention must be carried out:
- with special strips of PVC profiles (fenders) to glue the parts of the bottom that are most susceptible to abrasion - the keel of the vessel, the lower part of the cylinders, the joints of the bottom and the cylinders, the transom;
- for boats that are used on rapids, reservoirs with rocky, snagged banks, it is necessary to glue the entire outer surface of the bottom between the keel and the cylinders, the lower part of the cylinders;
- for gluing the bottom, a PVC membrane fabric with a thickness of 1.5-2 mm is used, which is glued by heating with a hairdryer and rolling with a roller, without using glue.
Redans by boat
Redan is, in fact, a profile with a pronounced guide, most often of a triangular shape. Equipping the boat with redans only makes sense if it is necessary to increase the stability of the boat on planing.
Equipping the boat with redans is combined with the application of additional prophylaxis on the keel part of the boat and on the cylinders.
Anchor
There are a great many anchors for boats. Often, anglers use the first piece of iron of suitable weight as an anchor, while others prefer collapsible models. General requirements:
- Weight from 5 kilograms, depends on the strength of the wind and current in the place of fishing, as well as the sail of the fishing vessel;
- It is desirable that the anchor can be raised or lowered from the place from which the boat is controlled - from the rudder, motor, can (seat) from which the oars are rowed.
It makes sense to equip boats with a length of more than three meters with an anchor eyelet and a roller, which provide the boat with greater safety in the place of friction of the anchor cord against it.
Spinning rod holder
PVC boat spinning holders are most often made using plastic tubes. On a boat, it is sufficient to have no more than 2 holders on each side.
Transom
Some PVC boats do not have a transom as standard. Such boats require retrofitting with a transom in the following cases:
- transition from oar to motor propulsion;
- equipping the boat with transom wheels.
The transom is convenient for installing the echo sounder transducer.
Transom wheels

There are as many options for making transom wheels as there are anglers who take on them self-production... The main purpose of such wheels is to transport a loaded, often powered vessel from transport to water. To make wheels you will need:
- Wheels - usually purchased separately or used those that are available, from some unnecessary devices (preferably inflatable, with a diameter of 300 mm, width from 100 mm). The larger the diameter of the wheels, the less chance they will get stuck in the ground.
- The wheel hub must be tightly connected to the wheel.
- The chassis are made from a piece of pipe, channel and other materials at hand.
- The simplest attachment of the chassis to the transom consists of a metal plate with a piece of pipe welded to it, into which the upper part of the chassis fits freely, but without excessive play.
- Each chassis mount on the transom must have a minimum of four attachment points and clamping plates on the inside of the transom to provide additional strength to the mount.
- Fastening the chassis to the fasteners is done in any way possible - on bolts, pins, may provide for lifting the wheels to the position "along the cylinders".
For boats with cylinders protruding far beyond the transom and with handles for carrying the boat on the aft parts of the cylinder, removable wheels are made that are attached to the cylinders:
- from any available material(for example, a plastic barrel of a suitable diameter) cut out "clamps" with a width of about 20 cm. Calculate the length of the clamps so that they pass through the stern handle for carrying on the cylinder;
- the wheels fixed to the platform are attached to the middle of the "clamp" with bolts or rivets;
- the clamp around the cylinder is fixed in any available way - a fastener riveted to the ends of the "clamp", bolts (like a water clamp), etc.
Inflatable keel
Not all inflatable boats have a keel. If only oars are used as a propeller, then the absence of a keel does not cause big problems... In the case of using a motor, a keel is necessary. Keel purpose:
- ensuring stable keeping of the boat on the course;
- preventing the bow of the vessel from taking off from the water surface while driving with the use of a motor.
Making an internal inflatable keel makes sense if the boat does not have an inflatable, flat bottom and the length of the boat is at least 3 meters:
- glue the tube (70 - 100 mm in diameter) with the valve from a boat or waterproof material of a similar quality. The length of the pipe is determined by the distance from the bow to the stern;
- point-to-point glue the pipe inside the boat to the bottom at the keel with transverse PVC strips.
The mustard solution launched into the pipe and drained will give the product additional tightness. In shallow water, you can deflate the keel and use a flat-bottomed boat.
Fastening the gas tank
There are always things on the ship that it is desirable to secure. Those places in which things will be fastened must be equipped with single or double half rings:
- glue the half rings to the sides and bottom, if it is made of PVC;
- fasten the half rings to the floor with bolts or screws if the floor in the boat is hard.
The gas tank is fixed in the right place through half rings with a sling, belt or cord.
Seat

Most modern inflatable boats are equipped with seats that have a number of disadvantages:
- Narrow and firm for long seating.
- They do not have a back.
- Freeze quickly in cold weather.
- They do not have the ability to rearrange within the vessel.
The anglers have learned to correct all these shortcomings on their own:
- heaters made of polypropylene (tourist mat) are glued to the seats - it does not get cold, does not get wet, it is convenient to stick spinning baits;
- install soft foam or inflatable seat pads;
- install additional folding removable movable backs or chairs using different kinds clamps and other fasteners;
- swivel chairs are rigidly attached to the hard floor (payola);
- use air mattresses.
Outboard motor insurance
The easiest way to secure the motor is to tie it to the securely fastened rings on the boat's transom. A good option is the cable connecting the ring rings.
Bag installation
Accessory bags can be conveniently installed in the following locations:
- under the banks (seats);
- in the bow.
Various basic boat fasteners are used to fasten the bags, the number of which can be easily increased independently - PVC is one of the best materials for gluing.
After purchasing an inflatable PVC boat, the fisherman is forced to gradually modernize the boat to fit his urgent needs. Someone spends additional funds on the modernization of the boat, someone enjoys independent creativity to improve the vessel. The main thing is not to overdo it in this matter - improvements should not interfere with comfortable fishing.
firstfisher.ru
Bottom reinforcement
PVC fabric, which serves as the bottom of the boat, is quite durable, but it is inconvenient to move on it. Since the bottom is not rigid, every angler experiences a number of inconveniences. Therefore, strengthening the bottom is the first task. In the future, the reinforcement will have to be repaired, but not the bottom of the boat. It will cost less, and it will be easier to replace the amplification with a new one or to repair it. You can make both full and partial reinforcement of the bottom of the boat.

Bottom reinforcement is made by gluing a special PVC tape called "fenders". The fender bar can have a thickness of 1.2-3 mm and a width of 60-235 mm. It is attached with a 2-component glue. This will make the bottom harder and more protected from various underwater surprises.
Keel reinforcement
The operation is reduced to the fact that PVC tape (fender) is glued over the factory tape. A similar enhancement applies to keelsons.
Strengthening the cylinders
Strengthening is performed based on the need. The cylinders are also subject to constant wear and tear.
Transom reinforcement

For this element of the boat, reinforcement is simply necessary, since the transom is protected by only one layer of PVC fabric.
In order not to suffer with individual elements, the bottom of the boat can be sealed completely by using a fender. If you are careful and careful, as well as choose the right glue, you can do the operation yourself. This approach will solve many of the problems associated with the deterioration of the boat's performance.
Installing stringers
If the boat has a hard floor, then you will have to install duralumin profiles. Since the boat deforms during movement, the rigid floorboards touch the inflatable parts of the boat and friction occurs. This can lead to abrasion of the fabric, which is undesirable and can lead to a violation of the strength of the boat. In the bow, where the boat has a curved profile, stringers are not installed.

Self-attachment of the fender bar

Self-reinforcement of a PVC boat consists of the following operations:
- The boat is washed out, after which all impurities are removed. After that, the boat is dried as thoroughly as possible. It should be remembered that the slightest residual moisture will not allow the boat elements to be glued together properly.
- The surfaces to be glued are degreased with gasoline or acetone. Degreasing is carried out carefully so as not to break the fabric.
- Using a brush, a layer of glue is applied to the surface. Usually the glue is applied to the boat and fender. After 15 minutes, a second layer of glue is applied. The layers dry out until the glue stops sticking to the hands.
- The bar is applied to the surface and pressed against.
- In order for the surfaces to stick reliably, it is better to heat them with a hair dryer. Heating is done very carefully so that the plastic does not start to melt.
- After that, the surfaces to be glued are pressed again with maximum force.
Redans by boat

These elements make the boat more stable. Redans are PVC elements with various shapes.
Anchor

An anchor for a PVC boat is an indispensable element that allows installation at any point in the water area. It is especially effective in the presence of a current, when the boat can leave the intended place.
Spinning Rod Holders
A very useful accessory. Special mounts can be purchased at the store. The best option for one - 2 mounts, for two - 3 mounts. Extra bindings can be a hindrance. It is not desirable to be ready for a large number of spinning rods. If necessary, they can be pulled out of the tube at any time.
Alternatively, the rod holders can be made from PVC tubes yourself. They can be easily purchased at hardware stores.
Transom
A transom is required under the motor. When buying a boat, the transom may or may not be included in the package. It is advisable to install an echo sounder on the transom.
Anchor eye

It is installed at the stern of the boat and facilitates the process of lowering and raising the anchor. The roller is placed slightly lower so that there is no abrasion of the fender.
Transom wheels

Whether to install them or not depends on the nature of the reservoir. Most bodies of water, especially wild ones, do not have conditions for a normal boat launch. In such conditions, you have to lower the boat on your hands. This means that there can be no talk of any transom wheels.
Inflatable keel

As a rule, simple boats are not equipped with a keel, which does not allow it to stay on course. Installing an inflatable keel on it will help solve the problem of boat stability, especially in the presence of waves.
The keel size depends on the length of the boat. If you install the keel on a boat that is less than 3 meters long, it will cause the bow of the boat to rise. This element is attached using special tapes that are included in the package.
Seats

Almost all models of such boats are equipped with hard seats, which is not very convenient, since you have to sit a lot in one place. To make fishing a joy, it is better to replace the seats with soft ones or modify the old ones. Most boat owners make ice fishing-style seats with a storage box under the seat.
Alternatively, you can design a movable seat that can be installed at any point.
Bag installation

The bag can be fitted under the seat or in the bow of the boat.
Outboard motor insurance

Fishing is fun, but also dangerous. Sometimes it is difficult to predict what will happen on a fishing trip. Quite often, when abnormal situations intervene in the fishing process, the motor breaks down. As a result, the motor simply goes under water. To prevent this from happening, the motor is insured with a steel or artificial cable. It is attached to the transom through 2 eye rings. In other words, the motor simply binds.
Fastening the gas tank

Elements such as an additional gas canister require mandatory fastening. This is necessary so that during movement or sharp turns the canister cannot change its location. Fastening is carried out by means of a rope and half rings attached to the boat. They are attached to the boat as follows:
- half rings are glued to the bottom if it is made of PVC fabric;
- screwed to the floorboards if the floor is hard.
Fasteners
All additional elements are attached to the PVC boat using two-component glue. There are several models of universal fastening systems. If you install it, then any elements can be adapted to it.
Fasteners "penny"

A universal fastener designed for attaching fishing rods, awnings, tables, etc. The main material for its manufacture is PVC. The dimensions of the penny fastener are 35 mm high, 20 mm in diameter.
fishingday.org
Good day!
I am spreading the result of my work on the boat, maybe my experience will be useful to someone.
A lot that was implemented, as an idea taken from different themes of the site
The boat is used for fishing, spearfishing, pokatushki.
What has actually been done (in order of priority):
1. Transom wheels (homemade).
2. From aluminum pipes d = 25mm longitudinal rails were made, to which the control post and seat were later fixed. Everything is assembled on standard connectors of the Joker pipe system. All attachments are attached to the pipes using plastic pipe clamps.
3. Remote control is mounted.
4. The voltage regulator VRNL-1 is installed.
5. An echo sounder is installed (the sensor is glued to the bottom on silicone sealant). It deceives only according to the readings of the water temperature (2-3 degrees).
6. Installed tachometer Tiny-Tuch and connected to the spark plug wires;
7. A navigator is installed on the console.
8. Cut to the floor floor covering on a rubber base. All rubbish, sand accumulates on it. It is easy enough to wash this coating with a kersher or simply shake it out;
9. On the port side, a table is fixed to the longitudinal rail and oar with the help of plastic clips.
10. The reel, with a halyard for the anchor, is also fixed to the longitudinal rail using plastic clips. I don’t fish or hunt on the current, so it’s enough for me to fix myself so that it’s not blown away by the wind.
11. I transfer the anchor to plastic pipe for sewerage (photo 4).
12. On the right, between the steering wheel and the seat, a box for documents, keys, a telephone and other small things is fixed to the clips (photo 5).
13. When I walk alone, I fasten the gas tank with ties at the stern, there is also a shmurdyak. When with passengers, the gas tank back to the transom, passengers on the bow (photo 3)
14. A container (plastic box with snaps) with food is conveniently placed under the seat.
15. In order not to get too hot in the heat, I bought a running awning.
16. To rise from the water into the boat after the hunt, the joker has assembled a ladder from aluminum pipes and mountings. Attached with hooks to the railing on the left side (unfortunately not in the pictures).
Anyone interested, ask questions.
Good luck to all!
www.drive2.ru
Strengthening the boat structure
Tuning should start with strengthening the bottom surface. Despite the fact that manufacturers pay special attention to the materials for the bottom, it wears out over time. Actively using a swimming device or inadvertently jumping on stones, you can severely damage the bottom.
What may be required to strengthen the bottom:
- PVC membrane or corresponding profile;
- adhesive base PVC "Vinikol" or "Uranus".
If desired, you can reinforce with a membrane without using an adhesive base.
Step by step process:
- The surface of the boat is washed from sand.
- Degrease the clean surface.
- After removing the valve, disconnect the transom wheels.
- On the swimming facility (inflated) paper is laid out and 2 patterns are cut, according to the dimensions of the bottom surface (the area between the location of the cylinders and the keel).
- According to the obtained patterns, we carefully cut out the elements from the membrane. The mass of one part is usually slightly less than 2 kg, and the thickness exceeds 1.5 cm.
- The cut material is laid out in an open area where the sun's rays fall until the desired shape of the product is fully assumed.
- Turn on the hair dryer, warm up all the details and squeeze while air is used with a roller.
- We are working on the extreme areas very well. The materials are glued together by heating the membrane material from the effects of high temperature conditions.
- We glue the PVC profile on the keel from both sides. This will protect the keelson.
- The boat is also strengthened by cylinders (by a quarter of their length).
- If you wish, you can also strengthen the boat along the transom.(it is covered only with a layer of the bottom woven base).
How to glue the fender yourself
Reinforcement with a bar can be done by hand according to the instructions below:
- We wash the surface of the bottom of the boat. Remove sandy deposits and dry.
- Degrease the dried surface with vodka, alcohol or gasoline.
- Using a brush, apply a thin layer of glue to the surface of the timber and the vessel.
- We leave it for 20 minutes, after which we apply the second layer in the same way.
- We are waiting for the material to dry completely (it should not stick to your hands).
- With the utmost precision, the applied timber is pressed tightly to the surface.
- To ensure the maximum degree of adhesion, the surface should be preheated with a hairdryer.
- Again we squeeze the place of gluing and roll a rounded weighty object over it.
Installation of redans
Redan is a kind of profile with a guide (mostly reminiscent of the shape of a triangle). By equipping the boat with redans, the level of stability of the boat on planing can be increased. It is possible to combine the placement of redans with the application of additional prophylaxis on the keel and cylinders. Short redans can be placed in the bow of the bottom (zone of intense splashing).
Installing stringers
Before starting the installation of stringers, markup should be done:
- By placing the set of floorboards on the floor, we ensure that the order is exactly copied. how they are placed in the cockpit.
- Stringer is applied to one side of the bottom, while observing the overlap with its length of three adjacent floorboards.
- It is not recommended to install stringers in the bow of the vessel. During planing, the main load falls on the floorboards of the third rear area of the PVC product hull. Based on this, it is more expedient to install the stringer on the outer floor from the transom of the boat.
- It is very important that the payolines do not protrude from the edges when installing stringers. To ensure this condition, the cutting depth should be marked, which will ensure that the stringer is put on the extreme area of the plywood.
- To carry out the markings, we apply a stringer and align it along the plane of the extreme parts of the floor. Observing the dimensions of the profile, we draw the contour for the cut (on both edges of the stringer).
- We connect the markup with one line and we get the desired maximum accurate marking of one side.
- When marking the cuts for the stringer, an allowance should be made for a length of about 4 cm(from each side). This will allow you to comfortably put on and take off the stringer if necessary.
- When marking, the middle payoline is slightly shifted to the opposite side from the marked area. After that, markings should be carried out on the second side of the floorboard.
- Having finished the markup and taking a jigsaw, we proceed to sawing along the markings of the pockets(for installing stringers). It is possible to prevent the appearance of chips on the plywood if you use nail files "on wood materials"Which have small teeth. When working, you should take your time so as not to make mistakes.
- After completing all the steps, we slightly round off the extreme cuts of the payolin and process them with a water-repellent impregnation type. Pinotex Focus, which contains a sufficient amount of wax, is perfect in this case. If desired, the extreme sections can be treated with linseed oil (well heated) or yacht varnish (waterproof). Compliance with these recommendations will help prevent the swelling of the payolin.
 By equipping the boat with redans, you can increase the level of stability of the boat on planing.
 Hard floor
When making a hard floor, you cannot do without:
- plywood sheet (10 mm);
- loops - about 20 pcs.;
- bolts;
- nuts;
- yacht varnish;
- impregnation;
- washers.
Step by step process:
- First of all, we make a suitable size. bottom pattern from linoleum.
- Width indicators(taking into account the rectangular part of the bottom) must be larger by 1.5 cm in order to ensure normal clearances.
- Having cut out the linoleum, we will carry out the marking of the hard floor. It will be placed between the floor (rigid type) and PVC coated bottom, which will prevent the hardware from damaging the existing bottom.
- The pattern is folded in half and cut its symmetry is achieved.
- Putting in front of you plywood sheet , carefully cut out six floorboards (80 cm wide).
- Remaining square after cutoffs can be used as a footrest if desired.
- Round off the long sides of the payolin with a file. We impregnate with a protective type of impregnation.
- We collect from payolin for the surface the bottom of the accordion on the loops.
- Be sure to use a bolt(hinge side) with countersunk head. Otherwise, the floor cannot be folded.
- The part of the bolts protruding from the back side is carefully cut off with a grinder. We grind the nuts. To ensure the maximum level of rigidity, 3-4 hinges should be placed on each connection.
- The resulting structure is covered from above with a piece of linoleum and outlined with a felt-tip pen.
- Cut off the excess parts with a jigsaw.
- Round the edges around the entire contour using a file.
- Taking sandpaper, we grind the entire surface, cover it with 3-4 layers of varnish (yacht look).
Boat anchor
There are many models of boating anchors. Most fishermen often use any iron device of suitable weight as an anchor. Some fishermen prefer to buy collapsible models.
When choosing an anchor, certain requirements should be taken into account:
- The mass must be at least 5-6 kg(depending on the strength of the wind gusts and the speed of the current, the sail of the vessel also has a great influence);
- Possibility of raising and lowering from the place of control of the swimming facility.
Boats, the length of which reaches 4 meters, must be equipped with an anchor eyelet and a roller (optional). This will ensure the safety of the cord in areas of friction against the metal.
Spinning Rod Holders
It is more expedient to make holders for spinning on the basis of plastic tubes. It is desirable to have 2 holders on each side.

Sounder transducer
The echo sounder sensor can be fixed with a suction cup, but in most cases on PVC boats it does not hold well. As a solution to the problem, you can purchase an aluminum tube with a square cross section. We drill holes (through holes) in the tube for the pin.
We make an eyeball egg and fix it with glue in the side upper area of the balloon. You can adjust the immersion depth of the sensor by gently moving the pin. We equip the lower part of the tube with a bracket for the sensor. By rotating it vertically, you can achieve the required level of inclination. Horizontal rotation is impossible due to the profile pipe.

Transom wheels
There are a lot of options for creating transom wheels. The main purpose of the wheels is considered to be the transportation of a laden watercraft from the trailer to the aquatic environment.
Step-by-step wheel manufacturing process:
- We prepare inflatable wheels with a diameter of 300-400 mm and a width of more than 100 mm. It is very important to select the maximum large diameters, which will prevent from getting stuck in the ground.
- The wheel hub connects to it as tightly as possible.
- The chassis can be made on the basis of channels or pipes. The simplest attachment of the transom to the chassis will be a metal plate welded to a piece of pipe that will accommodate the upper area of the chassis without play.
- All chassis mounts must have at least 3-4 points and plates(clamping type) located on inside transom. They will provide the maximum level of fastening strength.
- The chassis is secured to the fasteners with bolts. On request, the wheels can be lifted along the cylinders.
Inflatable keel
Not every PVC boat is equipped with a keel. It is especially important for boats with a motor. Keel has the following features:
- can keep the vessel on course;
- prevents the separation of the bow of the boat from the surface of the water surface at the moments of movement with the engine turned on.
You can also make a keel with your own hands:
- A tube is glued from waterproof materials with a diameter of 100 mm with a valve.
- The required length of the tube is usually calculated by measuring the distance from the stern to the bow.
- We glue the tube to the bottom surface in the inner part of the ship at the keel using cross-section PVC strips.
- It is advisable to pre-pour a mustard solution into the pipe., which will provide the required level of tightness.
- Reaching shallow water from the keel the air must be let down.
 The keel prevents separation of the bow area of the boat from the surface of the water surface during the moments of movement with the engine on
 Seats
Most of the shop models of PVC boats are equipped with hard seats, which deprive the angler of comfort and do not allow him to sit comfortably for a long time. To ensure your own comfort while on board, you can install soft seats on board, previously upholstered with leatherette.
Alternatively, you can purchase inflatable chairs... If desired, the padded seat is complemented by a bag located underneath and serving as a storage for small parts. The size of the bag should be in proportion to the size of the chair.
Insurance for the engine
Unfortunately, it is impossible to predict what might happen to the boat after going out into the open water. Quite frequent troubles for fishermen are unexpected collisions with obstacles. In this case, a poor clamping of clamps can provoke a breakdown of the outboard motor from its location. Very often, he simply goes to the bottom of the reservoir.
To eliminate this kind of misunderstanding, you should start strengthening the motor. For this, a cable (synthetic or steel) is pulled on the transom bypassing the eye-rings that are located on the transom. In simple terms, the motor is securely tied up and it becomes impossible to lose it.
Awning
When tuning a boat, anglers often equip an awning on it. Awnings are available in a variety of varieties and can be tailored to specific boat models. For small boats, umbrella-tents are usually used, which shelter a person from rain and sun.
Boats equipped with a motor are often equipped with:
- The nose cone is made of PVC material. Some models are complemented by an overview window. The awnings are easily thrown onto a special arc, protecting people from splashes and preventing high waves from getting inside the boat. When gliding, the nose cone performs the function of a rear wing, which prevents the boat from jumping in the air during strong gusts of headwind. The presence of a small pocket allows you to store a copy of the side number.
- The transformer awning is attached to the board with aluminum arches. The design is able to shelter people from raindrops and gusts of wind. The windows, located on the awning product, make it possible to move under the motor (with a slight wind). The side parts of the PVC fabric are movable and can be zipped and lifted when fixed with slings. By changing the position of the side parts of the awning, you can comfortably spend the night on the water, fish in rainy weather or get out on land. Most models are equipped with ventilation devices.

Table and hiking bags
To store useful little things that can come in handy on fishing, bags are actively used. They can be placed in the bow of the boat or under the seat. To secure the bag, use the basic boat hardware. You can build a small comfortable table on the ship from high chair for feeding (part of the plastic table).
Additional options
As an additional tuning, anglers attach the gas tank and equip the boat with an arc for spinning.
Fastening the gas tank is a very important procedure, which will allow you not to lose it during sharp turns or strong current. Usually, the tank is tied up using a strong rope passed through the half rings.
You can fix half rings in the following ways:
- by gluing to the bottom (in cases where the floor is inflatable);
- if the floor is hard, it is more expedient to screw the half-rings to the pajolin with screws.
The anglers call the arc for spinning among themselves a tarka. As a rule, it is performed on the basis of a pipe, attaching a glass securely to install the tackle. The tarka is installed in the transom of the vessel or in the middle.
- When gluing the accessories to the inflatable boat, it is necessary to use a high quality adhesive base (specialized).
- Before starting bonding, be sure to degrease both surfaces.
- Each of the layers of glue is applied after 15-20 minutes, which is necessary for the glue to polymerize.