How to make a do-it-yourself blade or snow shovel on a walk-behind tractor. Blade for a walk-behind tractor: factory and home-made varieties - design differences How to make a blade for cleaning snow yourself
Making such a device as a shovel for a walk-behind tractor with your own hands will help in situations when snow has fallen and you need to clear the road.
Where and why they use a shovel for a walk-behind tractor
Blade tool is a unit that is coupled to a walk-behind tractor and is designed for easy removal of snow, debris, for leveling irregularities and transferring small amounts of soil from one place to another.
The shovel can be used as part of equipment for the needs of a business object or for yard work. The shovel blade greatly facilitates the harvesting process due to the larger gripping area of the working surface.

Types of dumps: a - straight; b - rotary; в - spherical; g - shovel; d - with side loosening teeth; e - short pushing; 1 - frontal sheet; 2 - side shields; 3 - side knives; 4 - openers; 5 - medium knives; 6 - corner knives; 7 - retractable teeth
The system consists of three main parts:
- shovel;
- fastener assembly;
- device for adjusting the angles of rotation of the shovel.
The shovel for the walk-behind tractor has different modifications with characteristic common features for all models. This is, as a rule, the principle of operation and the device itself. The unit has the ability to work in several typical working positions:
- forward;
- to the left (with a slope of 30º);
- to the right (with a slope of 30º).
Before starting work, you need to independently select an angle of 30 ° to the right or left, necessary to complete the task, and fix the motoblock blade in this position using a cotter pin (in the factory model) and using the L-shaped attachment in the motoblock shovel with your own hands.
Today, this device is not a luxury, but a completely ordinary technique for the household needs of the population, with the help of which it is possible to perform a number of tasks for the arrangement and putting in order of private plots.
Back to the table of contents
How to make a blade with your own hands

So, you already have a walk-behind tractor. To save money, time and nerves, you can go to it yourself. For this, a bucket of an old shovel, an unnecessary sheet of iron, an old tin barrel, etc. will come in handy. How to make a shovel? Consider detailed instructions for making a do-it-yourself motoblock blade.
First, you need to collect the necessary materials and tools for making a motoblock blade at home:
- Tin sheets. Thickness 2-3 mm, dimensions 850x220x450 mm - 2 pcs. (or a 200 l tin barrel).
- Rack.
- Stiffeners - 4 pcs. 3-4 mm thick.
- Tin strip, 5 mm thick, length - blade grip (approximate dimensions: 3x100x850 mm).
- Rod fastening lugs - 2 pcs.
- Bolts M10, M12 and M8.
- Nuts, washers.
- Square tube 40x40 - 1 m.
- Rods 520 mm long - 2 pcs.
- Drills (5-6 and 8-10 mm).
- Rubber sheet.
- A small sheet of thick steel.
- Grinder with blades on steel.
- Welding machine.
- Electric drill or hammer drill.
After the entire set of tools and parts has been assembled, you can start making and assembling the blade with your own hands. It will be easier to make a bucket from an old steel barrel, since it already has a roundness suitable for a dump. You do not have to heat and bend flat sheets of tin to make them look like a ladle. As mentioned, you will need a 200 liter barrel, which must be cut into three pieces. Two of them need to be welded together along the contour using a welding machine, this will provide rigidity to the product.
Back to the table of contents
Continuation of the workflow

Now, to strengthen the structure, you need to make a knife for the bottom of the blade. The product requires a tin strip with dimensions of 3x100x850 mm. Three holes with a diameter of 5-6 mm are drilled in the knife with the help of a perforator or an electric drill and drills with a step of 10-12 cm. This is necessary to strengthen the protective rubber gasket. The knife is bolted to the bottom of the bucket.
Further, the manufacture and installation of the mount is carried out. We cut off a part of the square tube and weld it to the structure of two barrel elements at a distance equal to the middle of the height of the product. In the middle of this tube, we weld a small semicircle made of a fairly thick sheet of tin and drill three holes in it for fastening and fixing the turns at the blade of the machine.
After that, you will need to take the same square tube and make an L-shaped holder out of it. We insert one end of such a holder into the hole in this semicircle, and fasten the other with bolts and nuts to the frame of the walk-behind tractor. Two bolts help in adjusting the bucket lift height, which are screwed into the recesses in square tube, welded to the hitch and put on the L-shaped holder from the same pipe.
In our country, there are such winters that often the owners of individual households are faced with the difficulty of removing a huge amount of snow. Usually this problem was solved by means of ordinary shovels and all kinds of homemade devices... At the moment, when most farms have motor-cultivators available that can be equipped with various types of attachments, snow cleaning, garbage collection and other work has become much easier. In the article we will look at how to create a do-it-yourself blade for a walk-behind tractor.

Design features of the device
Snow shovels without special efforts are mounted on any type of equipment, seriously speed up and simplify the procedure for clearing snow. All snow plow equipment for a multifunctional unit includes 3 basic parts: a snow shovel, a plow angle adjustment mechanism and a mounting module that holds the snow plow to the frame of the unit.
There are a number of designs of factory shovels that are part of attachments., however, such a device for a walk-behind tractor can be built with your own hands, especially since there is a wide variety of information and drawings on this problem in the global network.
This makes it possible not only to manufacture equipment with the required characteristics, but also to significantly save money.


The blade is an integral part of the attachments used in conjunction with a motor cultivator. With his support, you can facilitate such everyday work on your own plot of land as collecting garbage in summer, in winter - clearing snow, in addition, leveling the surface layer of the earth and transporting it from one site to another. Snow plows come in different variations, but in their total mass they are endowed with one principle of operation and design. Basically, they have a number of standard working positions.
These are almost always the 3 points below:
- directly;
- to the left (with a turn of 30 °);
- to the right (with a turn of 30 °).


The principle of work with a snow plow for a walk-behind tractor
The mouldboard shovel of the walk-behind tractor must be properly installed before performing its functions. She turns her hands to the right or to the left at an angle of up to 30 °. The process of adjusting the position ends by setting a suitable angle and fixing the shovel in the chosen position using cotter pins. The grip area of a snow plow for a mobile power unit is usually one meter (some modifications may have different values) with a shovel material thickness of 2 to 3 mm. In an industrial environment, these devices are made from high quality steel.


Shovel for a motor cultivator
Mouldboard shovels for motor-cultivators can be equipped with a knife attachment, which is convenient to level the soil, as well as rubber attachments designed to eliminate the effects of snowfalls. The choice of models of snow plows is extensive; when choosing such a hinged mechanism, you must certainly make sure that the structure can be mounted on an existing motor-cultivator.
Manufacturers do not equip these attachments for motoblocks with a damping device(damping) or prevention of vibrations (spring dampers), because due to the low speed of movement, no special protection is needed against contact with uneven soil relief. When equipping your cultivator with additional snow removal equipment, purchase specialized steel lugs.
Replacing pneumatic wheels with such devices significantly increases the quality of snow cleaning.


How to create a snow plow from a barrel?
Make a shovel on their own just when you have a welding machine, a grinder and an electric drill in your house. Here's one easy way. You do not need to search for the necessary material, since you can use a simple 200-liter iron barrel.
Carefully cut it into 3 slices and you will have 3 curved pieces for the snow plow. Welding 2 of them along the contour line, we get an element with an iron thickness of 3 mm, which is fully enough for the rigidity of the shovel. The lower segment of the shovel is reinforced with a knife. This will require a metal strip 5 mm thick and the same length as the blade grip. Holes are made in the knife with a caliber of 5-6 mm with an interval of 10-12 cm for mounting a protective rubber strip.


The mechanism for attaching the shovel to the cultivator is quite simple and can be done at home. A pipe with a cross-section in the form of a square 40x40 millimeters in size is cooked to a shovel, assembled from two parts of a barrel, approximately in the middle of its height for reinforcement. Then, in the middle of the pipe, a semicircle of thick iron is cooked, in which 3 holes are pre-made, required to stabilize the angles of rotation of the moldboard shovel.
To adjust the level of the blade lift, bolts are used, which are screwed into the holes in a piece of tube welded to the hitch and put on the L-shaped bracket.


Making a moldboard shovel from a gas cylinder
Another of the available tools for making a moldboard shovel is gas bottle... This event will certainly require a detailed diagram. It should indicate the parameters of the spare parts used and the procedure for assembling them into a single structure. Work on the creation takes place in the following order.
- Release excess pressure from the cylinder, if any.
- Cut off both ends of the lid so that the width is one meter.
- Cut the resulting pipe lengthwise into 2 halves.
- Using a welding machine, connect these 2 segments so that the blade height is approximately 700 millimeters.
- The holder for fastening is made as follows. Cut a kerchief out of thick iron. Make a number of holes in it to rotate the blade in different directions. Weld a piece of pipe to the kerchief.
- Weld the prepared product to the snow plow at the level of the holder location on the walk-behind tractor.
- Installation is carried out using a cylindrical rod.


The thickness of the walls of the cylinder is sufficient, there is no need for reinforcement. However, the bottom can be fitted with durable rubber that will remove loose snow and not damage the rolled road. To do this, you need to take hard rubber from the rotary - conveyor lines. The width of the rubber strip is 100x150 mm. Using an electric drill, make holes in the shovel to fix the rubber. To firmly fix the rubber strip, a 900x100x3 mm iron strip is needed. Drill holes in metal and rubber, marking in advance with a shovel. Secure with bolts.

Sheet steel shovel
Some craftsmen prefer to use new material rather than used items. So you can assemble a homemade blade made of iron sheet 3 mm thick. To strengthen the device, you can use a steel strip with a thickness of at least 5 millimeters. Metal cutting is carried out according to the schemes. The blade itself contains 4 segments: front, bottom and 2 side. The assembled structure requires reinforcement. For this, components cut from 5 mm thick metal are welded vertically.
Then a rotary device is created. It is a lug with a hole for the axle. The eyelet is fixed by welding to the angle, which is attached to the shovel. The axis is fixed on one edge of the pipe, and with the other edge it is fixed on the walk-behind tractor. The required degree of rotation is fixed with a cylindrical rod (dowel). 3 millimeters is a small thickness, which means it needs to be strengthened. Cut a strip of 850x100x3 mm from a 3 mm thick sheet.
You can fix it with bolts, but you will need to first drill or weld the strip with welding.


To carry out the work you will need:
- sheet metal;
- angle grinder with discs;
- electric drill;
- set of drills;
- bolts with self-locking nuts (with plastic inserts);
- welder with electrodes;
- wrenches;
- profile or round pipe.
If you have the necessary abilities, the job is not difficult. And the created device can be used not only in winter, but also in summer. Improve the site after completion of construction and installation work, plan a site for a children's sandbox, and the like. What type of construction to choose is up to you to decide.


To learn how to make a blade-blade for the "Neva" MB-2 walk-behind tractor, see the video below.
Everyone who lives in a private house, in winter, has a need to clean the area from snow. It is especially hard for those who have a car, including me. In addition to the paths, the race must be cleaned. Remembering the winter of 2016–2017, there was a lot of snow then compared to this winter. I decided to make a shovel for a walk-behind tractor, thereby facilitating the task of cleaning the territory. After looking through the options for factory, as well as homemade shovels on the Internet, I decided to do it myself. This option is less expensive, the more the material is.
To make a shovel you will need:
Materials:
- profile pipe 20 × 40 mm.
- iron sheet 6 mm.
- iron sheet 1.5 mm.
- corner 50 × 50 mm.
- corner 40 × 40 mm.
- strip 4 × 40 mm.
- iron rod 10 mm
- bolts, washers, nuts 10 mm.
- bolts, washers, nuts 8 mm.
- conveyor belt
- dye
- LBM (Bulgarian)
- welding machine, electrodes
- drill, drill
- hammer
- pliers
- wrenches, etc.
All the materials are there, you can get to work.
Shovel size 1000 × 450 mm. I cut a profile pipe following sizes:
1000 mm. = 2 pcs.
450 mm. = 2 pcs.
370 mm. = 1 pc.
I cut all pipes, except for the one that is 370 mm., At an angle of 45 degrees. I weld. I clean the welding seams on one side, where the 1.5 mm iron sheet will be welded.
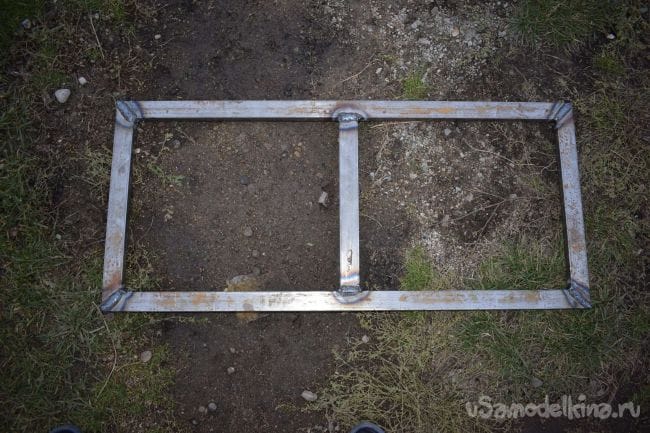
I cut 6 mm from a sheet of iron. two plates 200 × 100 mm in size. (since the second-hand sheet has already been drilled, they do not need to be drilled).

I weld these plates to a frame made of shaped pipe centered as shown in the photo.

I cut four strips 4 × 40 mm. approximately 400 mm. I weld them on one side to the plates on the other to the profile pipe. They serve to strengthen the structure.
Now I cut off four corners of 40 × 40 mm. 20 mm long. They will serve as a limiter for the rotation of the shovel (initially I did not want to fix the shovel with anything, it turned out to be inconvenient). I make markings, weld to 6 mm plates.
I drill 10 mm holes. for attachment to the bracket.
I weld on a 1.5 mm iron sheet.


I turn to the manufacture of the bracket. I decided to make it from a corner of 50 × 50 mm. Welding together in such a way that a shaped pipe is obtained. I decided to abandon the use of a profile pipe in this unit, because of the non-standard dimensions, and in my opinion there will be a weak structure. In my case, the width of the bracket is 47 mm, the length is 500 mm. I cut off one shelf at each corner by 47 mm. I weld together.

I drill 10 mm holes. for attaching to a walk-behind tractor, and for attaching a shovel. At the point where the shovel is attached to the bracket, you need to grind off the welding seam so that it does not interfere with turning the shovel.

In the same way, I weld two more corners, it is not necessary to cut the shelf on them. I drill 10 mm holes. for attaching the shovel at the bottom, just as I did before.

I weld all parts of the bracket. It turned out not quite exactly as we would like, it does not affect driving performance.

Now you can paint all the structures.
After assembly, I drilled two more holes to fix the shovel at the desired angle.

To fix the shovel at an angle, I use 10 mm round timber, 70 mm long, with a washer welded on top.

This is what the assembly looks like. The angle turned out to be not large, but as practice has shown, this is quite enough.

Tighten the nuts on the bolts until the shovel turns freely. Lock or use self-locking nuts (which are plastic inside).

I fixed the conveyor belt to the bottom of the shovel. Carrying out tape 50 mm. below the shovel. Bolted with 8 mm plates. The pitch between the bolts is 100 mm.
A motor-cultivator is a useful tool that will help you not only plow the land on the site, but also move loads or clear the area of snow. To use the additional functions, you will need to purchase a special attachment. It is not cheap, so many equipment owners make various hinges, including, for example, a do-it-yourself blade for a walk-behind tractor.
Snow clearing equipment can be installed on any agricultural machinery, including walk-behind tractors. The use of these devices will greatly facilitate the life of the owner of a private house, since with their help it is much easier to get rid of drifts than manually.
The blade for a walk-behind tractor consists of several parts: a knife, a mechanism for adjusting the angle of rotation, fasteners and a lock on the chassis. There are many options for factory dumps, but their cost is quite high. For this reason, owners use blueprints to help them assemble the attachment themselves.
There are several design options that allow you to work on different areas. The dump must be strong enough so that it can not only remove dense snow mass, but also level the sites, rake debris and perform other work in different time of the year. The advantage of using dumps is that all work will be performed as quickly and efficiently as possible.

Snow shovel design
Important! All shovels for walk-behind tractors have a similar device, so they can be made according to the general algorithm.
The structure must be rotated and fixed in three positions:
- directly;
- right and left by 30 degrees.
The shovel can be cut from an old tin barrel or an empty propane canister. Metal cotter pins are used for fixing to the chassis. The grip of the working surface of the knife should be about a meter, and the thickness of the metal should be about 3 millimeters.
In order to make a blade for a walk-behind tractor, you need to prepare:
- barrel with standard volume (200 liters);
- a steel plate with dimensions of 85x10x0.3 centimeters;
- a piece of pipe with a square section of 4x4 cm, 1 meter long;
- bolts of sizes M12, 10 and 8, as well as matching nuts;
- durable rubber plate;
- steel sheet.

In addition, prepare the tools: metal drills, welding machine and electrodes, electric drill, set spanner keys, grinder and discs for cutting metal.
Important! Before making a blade, make sure the tool is in good working order and that you can handle it. Observe safety precautions, wear a protective mask for welding, and use special glasses when drilling.
Instructions for making a homemade grader
We will give an example of how the most in a simple way a shovel is made - a blade for a walk-behind tractor. You do not need to purchase large metal sheets for it, this is the main advantage of this method.
Three blade options can be cut from the barrel: standard, with a small working width, or, conversely, extended. This will allow you to use the walk-behind tractor for both cleaning narrow paths and leveling spacious areas. The good thing about a barrel is that it already has a ready-made roundness that a grader should have. You will get rid of the need to warm up a metal sheet and arch it.

Important! Before installing the grader on the walk-behind tractor, treat it with a special primer or paint. This will greatly increase its lifespan, as the paint will resist corrosion.
A rubber gasket is installed on the working edge of the blade, which should be slightly wider than the knife. This way, you can be sure that the paving stones or flooring in the yard will not be damaged when turning or changing the angle of the bucket.

Differences between other modifications of the grader
If you want to make attachments from steel sheet, then you should take options at least 3 millimeters thick. You should not buy thicker steel, as it will be very difficult to shape it. To ensure rigidity, make the posts of stronger steel, narrow strips will be easy to bend.
Holes are made in these racks to help you attach the attachment to the walk-behind tractor. In total, this design provides 4 parts: a pair of rods, a working blade, brackets and rods. A steel plate knife is bolted onto a shovel. A minimum of 4 stiffeners must be installed on a steel grader. Brackets are mounted on the frame of the motor power unit.
The rods are attached to the blade and brackets. When inoperative, it is necessary to lower the working blade in order to relieve the load from the frame of the power unit of the cultivator. The swing mechanism of this grader is manufactured according to the same principle as in the variant described above.

Purchase of finished attachments can punch a decent hole in your budget, so it's worth paying attention to the instructions above for making it yourself. Having a gas cylinder or an old barrel on hand, you can make this design yourself.
In terms of time, work usually takes no more than three hours. Additional materials for making a grader will cost you much less than a factory made knife. It is quite simple to use a walk-behind tractor to clear snow from areas: set the shovel at an angle of 30 degrees and lower it.
A self-made grader will do an excellent job of handling the snow mass. Users report that it is easy for them to level sites for construction, laying paving slabs or equipping beds.
All people living outside the city in winter are faced with the need to clear their areas of snow. Clearing snow with your own hands of the entire adjacent area will take a long time. Therefore, many gardeners and truck farmers use a walk-behind tractor for these purposes. You can make a shovel with your own hands and save money on buying it. What is a motoblock shovel and how you can do it yourself, this article will tell you.
To understand what drawings will be needed in the course of assembling the tool with your own hands, you need to understand what a shovel blade for a walk-behind tractor is. A fully equipped walk-behind tractor (Neva or another model) consists of the following parts:
- a pen. It is often made in the form of a "telescope". This allows you to adjust its height. In addition, there are convenient handrails on the handle itself on both sides. With their help, the unit (Neva or another company) is guided in the course of movement. All handle parts are firmly fastened with nuts;
- ladle. It is fastened with nuts to the base of the electric motor.
- electric motor. It is located under the body and below it has the main ones for connecting a variety of nozzles.
In this case, the motoblock shovel itself consists of the following parts:
- the shovel itself;
- a device for adjusting the angle of rotation of the shovel;
- fastener assembly.
This add-on can have various modifications depending on the type of walk-behind tractor (Neva, etc.). But the general features and principle of operation are characteristic of all models. Rotation of the structure is possible at the following angle:
- to the right (with a slope of 30º);
- to the left (with a slope of 30º);
- forward.
As you can see, a shovel blade for a walk-behind tractor acts as an attachment. Drawings for this tool can be easily found in specialized literature or instructions for the unit (Neva, etc.). Using them, you can easily make it yourself. Such a homemade shovel blade will be operated no worse than its factory counterpart.
What is it for

After correct connection of all parts of the walk-behind tractor (brand Neva, etc.), we connect it to the outlet and remove the snow from the required area. But do not think that you will need such equipment only when clearing snow. The unit can also be used when removing plant debris from the fields after harvesting, as well as for leveling the soil before planting. cultivated plants... In addition, a shovel blade will allow you to transfer a small amount of land from one place to another.
As you can see, this tool is very necessary when growing cultivated plants in the garden. With its help, it is possible to carry out certain tasks for the arrangement and improvement of the garden and personal plot.
How to do it yourself
If you already have a walk-behind tractor, then you can easily make this structural addition with your own hands. Most often, people buy a Neva brand unit.
To assemble the blade, you may need the following materials and tools:
- a bucket from an old and already unnecessary shovel;
- iron sheet with a thickness of at least 2-3 mm;
- tin barrel;
- Bulgarian;
- welding machine;
- hammer drill and electric drill.

This list can be expanded additional materials depending on which version has been chosen. For example, this list can be expanded with the following materials:
- rack;
- tin strip 5 mm thick;
- stiffening ribs 3-4 mm thick;
- attachment lugs for traction;
- drills, washers, nuts and bolts (M12, M10, and M8);
- rods with a length of 520 mm;
- rubber sheet, etc.
Finishing preparatory phase in terms of finding necessary tools and materials, you can start assembling the blade with your own hands.
Shovel device video
Execution options
There are several options for assembling this add-on to the walk-behind tractor with your own hands. Which of them you will make the product depends on your preferences, available materials and tools, as well as free time. Consider the most popular options for making a shovel.
Option number 1. The easiest way is to make an instrument from an old steel barrel. Ease of manufacture is due to the fact that the barrel already has the required roundness. The tool assembly process is carried out as follows:
- we take a 200-liter barrel;
- we clean its surface from rust and dirt;
- we saw it into three parts;
- we weld two parts with a welding machine along the contour. This will give the structure additional rigidity;
- the bottom of the blade should be reinforced with a knife or a steel strip. In the reinforcement, you need to drill holes with a step of 10-12 cm and a diameter of 5-6 mm;
- in the resulting holes it is necessary to fix a safety strip made of rubber;
- then we attach the fastening system to the walk-behind tractor to the resulting product.

Option number 2. Using an iron sheet. In this case, you need to carry out the following manipulations:
- clean the sheet from dirt and rust on it;
- bend the sheet. For these purposes, you can use any large semicircular object (barrel, buckets, etc.). In such a situation, you will achieve a better curvature and optimal shape of the sheet than when bending without additional devices;
- the lower edge of the sheet should be heavier. To do this, we weld a strip of iron or a piece of wire to it;
- turn over the resulting bucket. We weld fastening systems to its convex side, with the help of which it will be hung on a walk-behind tractor (Neva and other firms).
The result is a plate that can be bolted to the machine. Now you just have to install the resulting tool and test it for durability and efficiency in work.
As you can see, both options can be done with your own hands in a home workshop. The dumps obtained in this way, subject to the technology of working with metal and the welding machine, will not differ in any way (in terms of physical, chemical and technical parameters) from the purchased models. At the same time, you will save a significant amount of money, since such a complete unit is quite expensive. The main thing in the assembly process is to deal with the drawing of the tool and properly weld all its components together.
Video "DIY snow plow for a walk-behind tractor"
You will learn how to make this useful device from the video. This know-how will help you remove snow in winter without too many problems.