How to set up pressure in the pumping station. Adjusting the water pressure relay for pump and troubleshooting on their own
One of the working parts pumping station is a pressure switch. It is intended to enable or disable the unit of the unit depending on the pressure in the system.
On new equipment, it is already adjusted to work with optimal loads, so without the need to do not change these settings. But it happens that without interfering can not do.
Device of the expansion tank and pressure switch
With intensive operation, various kinds of malfunctions may occur in the work of the equipment, in which the need for a pressure relay arises again.
For example, there are often situations when the device simply stops turning on, or does not stop sufficiently for a long time. These are obvious signs of malfunction.
Usually this device is a small box with wires from it. To get to the adjustment springs, it is necessary to unscrew the plastic screw, located on top.
Inside, two springs are installed - one more, the second is smaller, as well as the mechanism of automation of the contact group. Small spring is necessary to adjust the pressure difference. Big - to adjust the pressure of shutdown.
If you do not correctly install the air pressure in the hydraulication, then the testimony on the water pressure gauge will be incorrect. Therefore, the first thing is necessary to set the air pressure in the hydrophore.
For this procedure, it is necessary to de-energize the electrical part of the station and drain the water.
Hydrophore consists of only three parts:
- housing;
- nipple;
- rubber diaphragm.
Rubber pear is attached to the hydrofluble body with a check valve (nipple), through which the pressure is either added or reset.
You can measure the pressure using a car pressure gauge used by motorists to measure pressure in wheels.
Purpose the pressure into the receiver can be automotive or cycling pump.
Depending on the volume of the expansion tank, the pressure is also selected. Normal is the air pressure, which is 10% less than the pressure at which the equipment is turned on.
For example, if the pressure at which the electric motor begins to work, is 2 bar, then expose air pressure by 1.9 bar, that is, to lower or pump a rubber pear.
Masters advise: The air pressure should be monitored, even if you did not conduct any changes in the operation of the pressure relay.
How to perform adjustment

Before you start adjusting, you need to turn off the power pump from the power supply. Dump water and dry the tank is optional.
The relay setting is to add or decrease the spring pressure on contact group. Typically, only a screw with a nut on a larger spring is adjusted. This screw is responsible for turning off the device.
If you want to add pressure by reaching which the pump should stop, then the nut is needed to spin, thereby clinging the spring. If you need to reduce the pressure - then the spring should be loosen, respectively, the nut must be unscrewed.
It is recommended to make a half-turn, after which it turn on the equipment, and check the pressure according to the testimony of the pressure gauge. This procedure You must repeat until the unit becomes automatically disconnected on the pressure that is necessary.
 For optimal operation of the water supply system of a small house, it will be enough to maintain a pressure of 3 bar.
This value may vary depending on the devices connected to the water supply. Based on this, the disconnection pressure can be set 2.5 - 3.5 bar.
The second (small) adjusting screw is erroneously called the power pressure regulator screw. In fact, he regulates the difference of pressure and turning pressure.
So, when you install the pressure of the pumping equipment for 3 bar, automatically the power pressure will be set to 1.7 bar. If such a result arranges, you should not touch the settings.
If you need another result, the adjustment is made similar to the shutdown screw. Watching the nut - the value increases, releasing - decreases.
Specialist offer: Record all the testimony of the pressure gauge. This will allow not to get confused and set the necessary parameters.
Another point that should be considered is to install the lid in place. The fact is that during installation, the pin can shift on which the spring is attached. For this most pin, the lid is attached, which can shift the adjustment, as a rule, in the most side.
Video: Water pressure adjustment
Properly installed and configured equipment will last much longer and save a lot of your money. Well, do not forget about the timely maintenance pump.
Modern houses are provided with water due to the complex pumping system. The pressure in it can reach huge values \u200b\u200band with too high pressure the system can deform.
To prevent such cases, there is a special device - the pumping station pressure switch.
1 Purpose
Pressure switch is a special device controlling a number of parameters in the system. It is triggered after reaching the top level of the pressure, after which the pump is turned off. The main working mechanism is the movable spring group.
Also, the device helps to adjust the pressure level, down or increase it. More advanced and expensive models have additional features, such as: different kinds Descent, connectors for connecting an additional pump, various indicators, their pressure gauge, temperature adjustment.
1.1 Principle of work
On the spring group, the main part is affected by force. With too much pressure, the spring is drawn up due to electrical contact.
This contact is attached to the sensor, which when triggered gives a signal to stop the pump. Spring stretching is regulated by special nuts that help install the upper and lower compression limits.
2 Scope of application
Now there are several types of such devices:
- water pressure relay for pumping system;
- air pressure relay for compressor;
- charging voltage relay for devices.
On the principle of operation, the first two devices are absolutely the same.
The first device is also called the water duct apparatus. The first type controls the compression of the water of the pumping system, thereby protecting it from the superfluous pressure. In such systems, it joins the hydroaccumulator. The hydroaccumulator is a special container where the pump is pumping water, which after under pressure enters the water system. It is important to install the device close to the hydroaccumulator for more correct and accurate work. Without this component, the autonomous operation of the pumping station is impossible.
The relay on the air pump acts in a similar way, but it is joined to the compressor. Air pumps have a high power, and if they are not controlled, then the system can break from the inside. In such a system, it is set closer to the pump for better work.
3 Installation in the water system
Incorrectly installed machine does not turn on and does not turn off the pump. It is installed in front of the hydraulic accumulator. This increases the accuracy of his work. To begin with, the device is connected to the pumping system, after it leads to action. You need to connect hermetically so that the setting is more accurate.
4 Installation Instructions
You must do the following actions:

5 Water Drift Adjustment
Since water systems are popular in everyday life, it is important to know how to adjust the water pressure relay. This will help effectively use the resources of the pumping system, and also for a long time to maintain it in working condition. Below is described how to adjust the water pressure relay with your own hands.
The device has 2 main limiters: for upper and for lower pressure. Lower - the indicator at which the pump is turned on. Upper - in which it turns off. These two indicators are regulated using special nuts on the device housing. The larger nut is responsible for the top, smaller - for the bottom.
When buying has standard settings, where the upper is installed at a 2.5 atmosphere mark, and the lower is 1.5 atmosphere. However, these values \u200b\u200bcan be changed, configuring under the individual characteristics of the pumping station with their own hands, because the configured factory switch is suitable for the needs of the consumer.
Adjusting the device, you should create an air pressure in the pump system hydroaccumulator. To do this, you can use the automotive pump. After the necessary parameters are created, you can proceed to setting the water duct relay with your own hands.

When setting the water level relay, you need to remember the following positions:
- to increase the pressure of the nut, you need to rotate clockwise, to reduce - against;
- hydroaccumulativePrils can break too much pressure. No need to exceed the upper pressure limit. This value can be found on the packaging of the hydroaccumulator;
- hoses and cranes also have their own pressure limit;
- setting the settings follows from the capabilities of the pump. The pump simply may not cope with its task;
- if the gap between the high and low level of compression is large, the tohydroaccumulator will contain a lot of water, and the pump will turn on little. However, this option will create differentials in water pressure;
- in the inverse situation, when the difference between high and low compression is small, the pressure will be constant. However, the pump will work continuously.
In terms of competent tuning, the device will provide the entire system with constant and uninterrupted water pressure, saving the electricity of the pump. Proper setting provides long service device.
5.1 How to set up pressure relays? (video)
6 malfunctions
When operating, the most common problems can be corrected with their own hands. These are problems from the category: "It does not turn on or off the pump", "does not work", "does not shut down, shutdown", etc. Below are a description of these problems and solutions. If the device is configured incorrectly, it may not work.
6.1 Problem: When the top is reached, the pump does not turn off the pump
The reasons for which the device does not disable the pump can be set. The main ones are:
- Incorrect adjustment of the upper pressure controller.
- Malfunction of spring springs.
- Unstable voltage in the network.
- Depressurization of the hydroaccumulator.
- Breakdown electronic system.
In the first two cases, it is possible to repair a malfunction with your own hands, in the latter you need to give the device in the hands of a specialist or make a replacement.

If the upper pressure controller is incorrectly adjusting, when too high pressure is set, the pump will work constantly. To correct this problem, you need to reconfigure the device.
The spring may break, and the high pressure will not stretch it, and, therefore, the contacts will not be closed. It can also break the mechanism connecting the nut and spring. Fortunately, the spring has a simple design, in contrast to the electronic filling of the device, and it will not be replaced. Accessories can be purchased in construction stores.
Since that electronic deviceThe voltage drops affect it. They can cause arbitrary inclusions and turn off the pump system. If the breakdown is suspected, check the stability of the voltage.
The depressurization of the hydroaccumulator leads to the loss of pressure in the system. The device does not turn off the pump, and it continues to pump water. To prevent such a situation, carefully follow the sealing of the pump system.
The filling of the relay is a rather complex device that is intended to disconnect the pump. With her breakdown dIY repair It is impossible. Customize the relay in this case must master. Replacement too a good option, the relay is not very expensive. If you decide to replace the installed relay, pay attention to the PDM 5 pressure relay, whose cost does not exceed 1000 rubles. Cheaper option - PM 5 pressure switch.
6.2 Problem: The relay disables the pump even when the pressure has not reached the highest level
Causes and solutions to this problem are the same as the previous one.
6.3 Problem: in the water duct relay something constantly clicks
The reasons for this malfunction are only two: there is not enough air pressure in the hydraulician or breaking the membrane.
In the absence of pressure in the hydroaccumulator, it is necessary to re-download the air there, after setting the relay, as described above.
The membrane is installed in front of the hole where water comes from the system. With her breakthrough, the water of water makes it beating about the wall of the pipe, thereby making the sound of the click. It can be easily replaced by breaking the device. After replacement, you need to set up the switching station relay with your own hands. How to adjust the pressure relay, is mentioned above.

- thoroughly follow the sealing of the water system;
- competent setting will provide constant water pressure and energy savings;
- check compression in the hydroaccumulator must be at least half a year;
- use the accurate pressure gauge to set up pressure;
- non-pumping subsegidroaccumulator. The maximum pressure for it is written in the instructions;
- follow the insulation of electrical contacts, as they are near water;
- if you are not sure that you can independently configure the pressure relay, use the services of a professional. It will save your time and money.
8 relays do it yourself
If there is a need to make a water duct relay with your own hands, it makes sense to use the flow switch from the gas column for this purpose. The rod must click on the micro switch, which includes the pump. But in order for the system to work for a long time and meet the security requirements, the device is still better acquired in a specialized store.
The water pump relay is a device that controls the pressure level and providing offline operation in the water system. That is why when it is competent operation, the service life increases significantly.
Setting the pumping station pressure relay with your own hands is an important procedure. Proper setting provides stable water pressure and saves electricity, which is consumed to power the pump.
If there is a faulty contact, then the device should be replaced. Most of the frequent faults can be corrected with their own hands without referring to the master. Repair of the pressure switch of the pumping station is easily carried out at home.
To automate water supply using a pump, a special relay is used, which runs from electricity. It is mounted in the immediate vicinity of the expansion tank. Proper relay adjustment allows you to reduce the number of inclusion and shutdown cycles, thereby reducing the operational period of the equipment.
Main appliance with additional elements
By its design, the device represents a small block containing special springs. One of them is configured to the maximum pressure, and the other is to minimal. Their adjustment can be carried out by means of special nuts located on top.
Directly to the springs attached a membrane reacting to a pressure change in a certain way. With a minimum value, a tension of the metal spiral occurs, and at the maximum - compression. Thus, the contacts are closed and opened.
The operation of the device is approximately the next.
- At the initial stage, water is spent from, which leads to a decrease in pressure in the circuit. When it drops to the bottom threshold, the pump is turned on.
- Water pumps into the main tank until it is filled to a certain level. As a result, the pressure rises. After it reaches the upper threshold, the feeding equipment is turned off.
Note! To find out the pressure in the membrane tank, you should unscrew the cap with the nipple, then attach to it special measuring device - Manometer.
Rates for some models
In fact, water pressure relays can be purchased for a relatively small amount of money. The table presents prices for popular models. famous manufacturers.
| Picture | Manufacturer and model | Price in Rubble |
|---|---|---|
 | Belamos PS-02 | 540 |
| Caliber RD-5 | 490 | |
| Danfoss KP1. | 1 570 | |
| Jilex RDM-5 | 900 |
As for prices for electronic water pressure relays for pumps, they are approximately 2-3 times higher than on mechanical analogs. Such devices make it possible to make more accurate working range. In addition, they protect shut-off valves from a possible hydraulic impact.
Installation and adjustment of water pressure relay for pump
If the installation and adjustment of the water pressure relay for the pump will be carried out on their own, they will not have to spend financial resources directly to attract professionals. The process of connecting and setting the device is not characterized by complexity.
Article on the topic:
If the water pressure is normal or even strong, then you just need this device. And why do you learn from our separate review.
Consideration of the water pressure switch connection scheme for pump
The finished device is connected to electrical and plumbing systems stationary, as there is no need for its movement. To connect the dedicated line of electricity is not at all necessary, but still desirable. From the shield it is recommended to bring a copper cable with a cross section from 2.5 square meters. mm.
The scheme should present, as the combination of electricity with water is quite dangerous. Cables are inserted into special holes located on the back of the housing. Under the lid there is a special shoe with contacts:
- terminals for connecting the phase and zero wire;
- contacts for grounding;
- terminals for wires leading from the pump.
Note! Connection is carried out according to the standard scheme. With conductive elements, a certain part of the insulation is removed, after which the stripped edges are fixed by the clamping bolts.
Configuring the pumping station pressure relay independently
To configure the system, a reliable pressure gauge is needed that allows you to accurately measure pressure. According to his testimony, adjustment is performed. The whole process comes down to twisting springs. When turning clockwise, pressure increases and vice versa.
The sequence of actions when setting up approximately this:
- The system is launched, after which the thresholds are tracked using the manometer, at which the device is turned on and turned off;
- With suitable wrench A large spring is released or pressed, which is responsible for the bottom threshold.
- The system is turned on and checking the settings. If necessary, adjustments are made.
- After setting the lower pressure level, the upper limit is adjusted. For this, the same manipulations with a small spring are performed.
- The final testing of the system is carried out. If the results are arranged, the process of configuration can be considered complete.
Note! When adjusting the water pressure relay for the pump, it should be remembered that the minimum range between the upper and lower threshold should be more than 1 atmosphere.
About protection from idling
In some cases, water through the pump may not pass, and it will continue its work. This mode of operation of the device is extremely undesirable, as it significantly reduces the service life. However, this applies only to devices with a wet rotor, where water acts as a cooling and lubricating fluid.
To avoid equipment output, it is necessary to establish a relay that protects the dry function. Contacts should open in the absence of water and turn off the device. The instrument engine will be run only if there is enough water.
If water consumption from a well or well will exceed its receipt, then no idle move. In this regard, the installation of water pressure relays for help to cope with such a situation.
Discovery of idle operation can be calculated by one of several quantities:
- pressure pressure on the outlet;
- water level;
- flow liquid through the device.
Helpful information! Protection of the device from idling in plumbing systems country houses Needless. Most often it is used in conjunction with other automation devices.
Need to know
When installing high pressure, suction equipment is turned on much more often, which leads to an accelerated wear of the main parts. However, such a pressure allows you to apply even a shower cabin with hydromassage without any difficulties.
With low pressure, the device feeding the fluid from the well or well is wears less, but in this case you will have to be content with a regular bathroom. All the delights of the jacuzzi and other devices requiring a sufficiently strong pressure, it is unlikely to be evaluated.
Thus, the choice should be done depending on the goals pursued. Each decides itself, which preferred in a particular case.
Summarizing
After installing and adjusting the pressure switch of the pumping station, monitor the system and adjust its operation will still have to be performed periodically. Experts are recommended once a quarter to produce a complete drainage of water from the expansion tank and test pressure. Proper operation equipment will avoid unnecessary expenses for repair work and buying worn items.
How to connect pressure switch to pump (video)
You may also be interested in:
 Pumping station for a private house: water supply, varieties and installation features
  Check valve For pump water: species and features
Operation of pumping equipment in the system autonomous water supply Adjusted by special automation. One of the main parts controlling network parameters is a pressure switch. This device has factory settings that define the lowest and the highest limit at which the pump is turned on. If necessary, change the indicators performed the pumping station pressure relay. Such an operation does not require the involvement of specialists, knowing the rules of configuration, it can be carried out independently.
 Water supply network with relay
How is the pressure relay
Regardless of the manufacturer of the water pressure relay in the water supply system, it is a compact block with two springs and electrical contacts. The hydraulic part of the device is a membrane with a piston and two springs of different sizes. The electrical part is the contact group, which is broken / closing the pump to turn on / off. All structural parts, including a terminal block, are attached to a metal base. The device has several groups of terminals:
- to connect voltage 220V;
- for grounding;
- terminals on the pump.
From the back of the Nut Connection to the Stacker. From above, the device is covered with a plastic lid fixing to the screw of a larger spring. Products of various factories can be equipped with additional elements, possess the characteristic form and location of the nodes, but they all have a similar design. The sensor can be mechanical and electronic. Mechanical devices are more popular due to low cost.
 Relay design
Attention. For removal from the device plastic cover Requires a screwdriver or wrench.
The principle of functioning of the relay
The pumping station pressure relay device does not require human intervention in the process of incorporating and disconnect the pump. The principle of its work is based on changing the degree of impact on the piston responsible for the closure of contacts. A large spring planted on a rod with an adjustment nut has to oppose the movement of the membrane and piston. When the pressure in the system decreases due to the analysis of the water, the contact platform is lowered and closes the contacts. The pump turns on and starts to swing fluid.
 Mechanical pressure controller
The flow of water in the hydroaccumulator leads to an increase in air pressure on the device membrane. Piston, overcoming the springs action, starts to shift the contact platform. This process causes opening of electrical contacts. Turning off the current does not occur immediately, but when the platform is assigned to a distance determined by the setting of a small spring. This regulator is responsible for the pressure difference. After complete blurring of contacts, the unit stops working on pumping water.
Information. To adjust the lower pressure level (inclusion), a large spring is used to exhibit the upper limit (shutdown) - a small spring.
Preparation of pumping station
When organizing individual water supply is established special equipment - pumping station. It consists of two parts:
- submersible (superficial) pump;
- hydroaccumulator.
A sealed tank with an inside rubber membrane is used to store water stock and maintain stable pressure in the system. Before proceeding to setting the pumping station pressure relay with your own hands, a reservoir should be prepared. The tank consists of a rubber pear, which is injected with water, and air filled cameras. The magnitude of the air pressure affects the work of the entire water supply system, so the pumping station is required.
Preparation of the membrane tank begins with a complete drain of water from the pipeline and the tank itself. This uses the bottom valve system. In an empty tank, air is injected, its pressure must be less than the lower limit by 10%. The minimum pressure value is determined depending on the size of the hydroaccumulator:
- 20-30 L - 1.4-1.7 bar;
- 50-100 l - 1.8-1.9 bar.
After determining the pressure in the accumulative tank, the system is immediately filled with water, it is impossible to make the rubber pear drying.
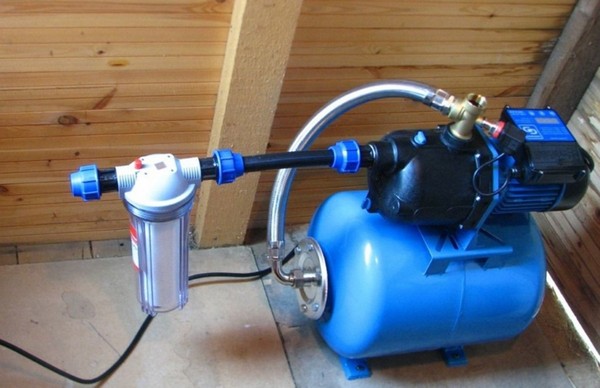 Pumping station with hydroaccumulator and sensor
Attention. An independent pressure test in the tank is necessary when equipping equipment from individual parts. Modern models Pumping stations made in factory conditions have ready-made settings specified in the documents.
To the tank membrane served a long time, it is recommended to set pressure in the drive by 0.1-0.2 atm. lower than the minimum level in the system.
Where to install a mechanical controller?
When choosing a pressure of a pressure relay to submersible pump, Avoid possible turbulence and jumps of pressure. The optimal option is to install near the hydroaccumulator. The conditions of operation of the instrument should be taken into account, the manufacturer specifies the permissible parameters of temperature and humidity. When the sensor is waterproof, you can set it together with the drive in the caisson. In order for the controller to start functioning it, it must be connected to the electrical and water supply network.
It is advisable to select a separate electrical line for the relay, but this condition is not mandatory. From the shield, the cable is paved with a cross section of 2.5 mm 2. For safety, it is recommended to install a protection machine, with parameters corresponding to the pump characteristics. Be sure to ground the device.
 The terminal block has three groups of contacts: grounding, phase and zero from the shield, the wire from the pump.
  Connection is performed standard - the wire is cleaned, inserted into the connector and fixed by a bolt
Attention. Connecting to the electrical network is made according to the inscriptions specified on the contact group.
Submersible pump with a pressure switch can be connected with a tee or fifth fitting. Connection is performed through the nut on the back of the device. In the first case, the device is installed directly on the highway. Preferably a second option when a node of five parts is assembled:
- Submersible or surface pump.
- Manometer.
- Hydroaccumulator.
- Pressure meter.
- Pipeline.
 Relay installation scheme
Council. Everything threaded connections The node needs to be sealing, a sealant or fum-tape is used for this purpose.
Mandatory elements of the water supply network are filters. These devices are necessary to clean the fluid from impurities, worsening the operation of the equipment, including the pressure switch. After connecting the sensor to the water supply and the electrical network, it remains only adjusting the pumping station with their own hands.
The filter can be installed to the hydroaccumulator and automation. It will delay all major particles that can damage the relay systems, membranes and rubber gaskets. But in this case, it is necessary to clean regularly - strong pollution worsens it throughput. This increases the load on the pump, which can lead to its premature failure. When installing the filter after the station, it will work in normal mode without increasing the load. Under the weakening of the pressure, the consumer will understand that the filter element requires cleaning.
Relay setting
The manufacturer provides the setting of pumping stations to the average indicators:
- lower level - 1.5-1.8 bar;
- top level - 2.4-3 bar.
Lower pressure threshold
If the consumer does not arrange such values, then knowing how to adjust the pressure in the pumping station, they can be changed. Having understood with the installation of the correct pressure in the accumulative tank, proceed to the adjustment of the sensor settings:
- The pump and the relay turn off from the power. All liquid descends from the system. Pressure gauge at this moment on the zero mark.
- The plastic sensor cover is removed using a screwdriver.
- Turn on the pump and record the testimony of the pressure gauge at the time of the equipment shutdown. This indicator is the upper pressure of the system.
- A crane is further located on the aggregate. Water gradually merges, the pump is turned on again. At this point, the lower pressure is determined on the manometer. The difference in pressures on which the equipment is currently tuned is calculated by a mathematical method - using the results obtained.
Attention. To get the correct setting, a reliable pressure gauge is needed, the testimony of which can be trusted.
Having the opportunity to estimate the pressure from the crane, select the necessary setting. Adjusting to increase the pressure of the pumping station is performed by twisting the nut on the large spring. If the pressure needs to be reduced - the nut is weakened. Do not forget that the adjustment work is carried out after turning off the power supply.
Attention. The setting is carried out carefully, the relay is a sensitive device. One turn of the nut changes the pressure by 0.6-0.8 atmosphere.
Upper pressure threshold
To adjust the optimal inclusion frequency of the pump, it is necessary to adjust the pressure difference. For this parameter corresponds to a small spring. The optimal value of the difference in the upper and lower pressure threshold is 1.4 atm. If you need to increase the upper limit at which the unit is turned off, the nut on the small spring is twisted clockwise. When decreasing - in the opposite direction.
 Setting circuit
What action does such an adjustment have? The indicator below the average (1.4 atm) will ensure uniform water supply, but the unit will often be turned on and will break quickly. Exceeding the optimal value contributes to a gentle mode of use of the pump, but water supply will suffer due to noticeable jumps of pressure. Adjusting the pressure of the pumping station pressure is carried out smoothly and carefully. The result of the impact requires verification. The scheme of actions performed when setting up the lower pressure level is repeated:
- All devices are disconnected from the electrical network.
- Water merges from the system.
- Pump equipment is turned on and the result of the setting is evaluated. If unsatisfactory indicators, the procedure is repeated.
When performing the settings of the pressure difference, there are limitations to be considered:
- Relay parameters. You can not set the upper pressure threshold equal to 80% of the maximum device indicator. The pressure on the pressure on which the controller is designed is present in the documents. Household models usually withstand up to 5 atm. If the system needs to raise the pressure above this level, it is worth buying a more powerful relay.
- Characteristics of the pump. Before choosing the adjustment, it is necessary to refer to the characteristics of the equipment. The unit must be turned off at a pressure, which is 0.2 atm. Below its upper limit. In this case, it will function without overload.
Features of adjustment "from scratch"
If both relay springs are weakened, adjusting the automation of the pumping station is performed according to the following algorithm:
- The unit turns on to pump water into the system. The level of pressure is controlled by the observation of the stream from the remote crane. If the pressure is acceptable, the test date of the pressure gauge is recorded, and the pump is turned off.
- Distinguishing the sensor from the network, open the lid and turn the big spring nut until the contacts are closed.
- The box is closed and turn on the device to the network. The pump includes and left to work while the pressure on the pressure gauge does not reach the mark with the previous value plus 1.4 atm.
- The unit and relays are disconnected from the power, then screw the nut on the smaller spring until the contacts open. The settings of the lower and top threshold are finished.
 Pressure switch with pressure gauge
Use sensor without a hydroaccumulator
For some equipment models, a junction pump circuit with a pressure switch without cumulative Tank. A special automatic controller starts and stops the unit when the boundary indicators are reached. The electronic unit has a function of protection against "dry stroke" and ensures the safe operation of the system.
Attention. Minus such a scheme is the lack of a minimum water supply that provides a membrane tank.
 Electronic pressure relay for surface and submersible pump
Imagine that in order to obtain water in the country, you can simply open the crane. That you do not need buckets to fill the containers for the elementary hygienic procedures, cooking, cleaning. To do this, you just need to install pumping equipment with a pressure sensor, but before you understand it with its device, agree?
Our article in subtle details will introduce you to a pressure switch for the pumping station. You will learn how the device works, how it activates and stops pumping. We describe in detail in demand options for pressure sensors and ways to adjust them.
Role of pressure relay in the water supply system
Small in size The device refers to the group of automation serving pumping equipment. Its functionality is possible only in a bundle with a hydroaccumulator. Despite its small sizes, the relay performs a number of important functions:
- allows all devices to function in a given mode;
- sensitively reacts to changing the on / off thresholds;
- activates and stops the operation of the pump when critical values \u200b\u200breaches.
Simply put, it regulates the automatic process of pumping water in independent water supply schemes with membrane tank. Adjustment is performed during switching of electrical circuits when two pressure parameters accepted as the upper and lower limit are achieved in the system.
Buying a pumping station, you get a set of equipment, part of which is the pressure relay. Externally, models of different brands and series are similar, but may differ form, size, body color, method of setting up and location. For self-assembly Automation It is necessary to study the characteristics of the instruments and select the most suitable for a specific system.
The devices are adapted to the convenient installation and maintenance of the pumping station. Most often, they are fixed by the fitting at the inlet of the hydroaccumulator, but can be mounted in the pipe system in the immediate vicinity of the machine.
Construction and principle of operation
The relay for adjusting the pressure has a simple collapsible design, thanks to which the user can configure the operation of the hydroaccumulator, to narrow or expand the parameters.
Internal parts are condensed in a solid plastic case, reminiscent of an incorrect box. She has smooth surface And only 3 outdoor working elements: two coupling clamps for electrocabilities running from the network and pump, and the metal nozzle ¼, ½, 1 inch for connecting to the system. The carving on the nozzle can be outdoor and internal.
Inside there is a base to which the working elements are attached: large and small springs with adjusting nuts, contacts for connecting, membrane and a plate, changing its position depending on the increase / decrease in pressure parameters in the system.
Contacts of two electrical chains closed when the limit pressure parameters are reached, are under springs that are fixed on the metal plate. When the pressure rises, the hydraulic membrane is deformed, the pressure inside the pear increases, the mass of water presses on the plate. That, in turn, begins to affect the large spring.
When compressing the spring, the contact that feeds the voltage is triggered and opens. As a result, the pumping station is turned off. With a decrease in pressure (usually it is in the range of 1.4 - 1.6 bar) plate rises in the original position and the contacts are closed again - the motor begins to work and produce water pods.
When buying a new pumping station, it is recommended to test equipment to make sure that all components are performed. Verification of operational qualities The relay occurs in the sequence set out below. As an example, the Haitun PC-19 model.
The mechanical indication models and control panel do not, however, they can be equipped with a forced switching button. It is necessary to force the device to function.
Relay selection criteria for pump
There are many universal models that are sold separately from pumping stations and can be used to assemble the system with their own hands. By purchasing a relay or automation unit, it is necessary to rely on the characteristics of the device. They can be found in technical documentation. It is important that the relay capabilities coincide according to the characteristics with the possibilities of the rest of the equipment.
It should be repelled from the nominal pressure, but the upper limit of the working pressure is also important. It is necessary to take into account the electrical indicators and the maximum water temperature. The required parameter is the IP class, denoting dust and moisture protection: the higher the value, the better.
The dimensions of the connecting thread are indicated in inches: for example, ¼ inches or 1 inches. They must coincide with the size of the connecting fitting. The dimensions and the mass of the instruments themselves are about the same and are secondary characteristics.
It should also be remembered that there are built-in and remote models. Most of the existing devices are universal: they can connect directly to the hydraulicock or mounted on the pipe.
Electronic relays have the same functions as mechanical: they are responsible for the supply of water and protect the pump mechanism from dry stroke. They are more capricious than simple models, and persistently react to suspended particles in water. To protect the device, a mesh filter mud is installed before the connection location.
One of the differences from the traditional model is to delay the pump disconnection. If, with an increase in pressure, the mechanical device works quickly, then the electronic analogue turns off the equipment only after 10-15 seconds. This is due to a careful attitude to the technique: the less often the pump will turn on, the longer it will last.
Some shooting models, as well as automation blocks work without a hydroaccumulator, but their functionality is limited to more simply use. Suppose they are perfectly suitable for watering the garden or pumping fluid from one tank to another, but in the water supply system at home does not apply.
Wherein specifications devices are the same as traditional relays: factory setting 1.5 atm., Tripping threshold - 3 atm., Maximum value - 10 atm.
Causes to perform individual configuration
The collapsible design of the device and the instruction on the setting came up with no vain. The factory parameters are rare when comply with the requirements of the water supply system, as well as the volume of the hydroaccumulator.
With the help of the setting, you can not only "fit" the upper and lower limit for optimal values, but also make the operation of the equipment more gentle - for example, reduce the number of inclusions / turn off the pump. To do this, it is enough to increase the range between the working pressures - the delta.
You can encounter with the incorrect setting of the factory model. If the delta was incorrectly coordinated and made too small, the pump will be constantly turned on and off, responding to a minimum increase in parameters.
Manipulating springs, you can achieve a change in the pump shutdown threshold, as well as adjust the volume of water in the hydroaccumulatory tank. It is believed that the more Delta, the greater the volume of fluid in the tank. For example, at a Delta in 2 atm. The tank is filled with water by 50%, at Delta 1 atm. - by 25%.
First, let's remember the general rules of adjustment:
- to increase the top border of the triggering, that is, increase the pressure of the shutdown, the nut on the large spring should be tightened; To reduce the "ceiling" - weaken it;
- to increase the difference between two pressure indicators, tighten the nut on a small spring, to reduce the delta weaken it;
- the movement of the nut clockwise is an increase in parameters, against - reduction;
- to configure, you need to connect a pressure gauge that shows the initial and changed parameters;
- before adjustment, it is necessary to clean the filters, fill the tank with water and make sure that the entire pumping equipment is working.
All adjustment actions are carried out only after testing the system and detecting low performance or explicit errors in operation. It also happens that the station ceases to work due to a clogging that scored a filter or one of the narrow nozzles.
Practical examples of relay settings
We analyze cases when the pressure relay is really needed. This usually happens when you buy a new device or when frequent pump shutdown occurs. Also, the setup will be required if you have used a used device with knocked parameters.
Connecting a new device
At this stage, it should be checked how correctly the factory settings are correct, and if necessary, make some changes to the work of the pump.
The pump stopped off
In this case, forcibly turn off the pumping equipment and act in the following order:
- We make inclusion, and wait when the pressure reaches the maximum mark - suppose 3.7 atm.
- Turn off the equipment and lower the pressure by descending water - for example, up to 3.1 atm.
- Slightly tighten the nut on a small spring, increasing the difference between the differential.
- Check how the disconnection pressure has changed and test the system.
- Configure the optimal option by pulling up and loosening nuts on both springs.
If the reason was in the wrong initial setup, it can be solved without buying a new relay. It is recommended regularly, once in 1-2 months, check the operation of the pressure switch and, if necessary, adjust the on / off limits.
Situations that do not require adjustment
The reasons when the pump does not turn off or does not turn on, there may be a set - from a blockage in communications to the failure of the engine. Therefore, before you start disassembling the relay, you should make sure that the rest of the pumping station is working properly.
If everything is in order with the other devices, the problem is in automation. Go to the inspection of the pressure relay. Turn off it from the fitting and wires, remove the lid and check two critical points: Thin connections to the system and contact block.
If the cleansing measures did not help, and the adjustment of the springs was also in vain, most likely, the relay is not subject to further operation and should be replaced with a new one.
Suppose you hit the old, but the acting device. Its adjustment occurs in the same order as the configuration of the new relay. Before starting work, make sure the integrity of the device, disassemble it and check if all the contacts and springs in their places.
Useful video on the topic
Practical videos will help you better understand how to adjust the new pressure switch relay, if the parameters for some reason do not suit you. You will also learn what is the difference between the dry movement.
Professional advice By proper adjustment:
Comparative characteristics of two types of relay:
To correct the operation of the pressure relay, specialists are usually not invited, as it is a simple procedure that occupies a little time. You can leave the factory settings, but even the minimum adjustment will help extend the operation of the pump and the hydraulicock, and also optimizes the operation of the station.
soveet-ingenera.com.
Features of the design and principle of work
In order for you to properly adjust this relay with your own hands, you should deal with the features of its design and understand the principle of the aggregate.
Pressure Pressure Relay is a metal base, on the upper part of which the contact group is recorded, two spring different dimensions and terminal blocks. At the bottom of the steel plate, the membrane cover is attached under which there is a steel piston and the membrane itself, as well as a quick-up nut for fixing to the adapter installed on pumping equipment. All these details are covered with plastic lid. It in turn is attached to the screw part of the large regulator. This lid, if necessary, is easily removed using a wrench or screwdriver.
As a rule, the relay in the pumping stations of water supply may differ configuration, shape and arrangement of individual elements, but usually they have such a design as we described above. Sometimes the relay can be equipped with additional elements that allow the unit to protect the unit from the work "on the dry" and protect the motor from overheating, for this device will measure the temperature of the pumped fluid.
The principle of operation of this device is as follows:
- Under the action of water pressure coming from the pumping equipment, the membrane due to an increase in air pressure in the second chamber presses on the piston, driven by the contact group.
- This group is attached on a steel platform, equipped with two hinges. Depending on which position it will take, contacts through which 220 V voltage on the pump unit can close or unlock, thereby causing the launch or stopping of the pump.
- To equilibrate the pressure of the piston, the springer of the regulator is used, affecting the platform to install the contact group. The springs compression force is adjustable by means of an appropriate nut.
- As the amount of water decreases in the system due to consumers, the air pressure in the water supply tank falls. As a result, the spring, overcoming the effect of the piston, closes the contact group, which leads to the launch of the pump.
- As the water in the tank becomes greater, the air pressure increases. This leads to the fact that the piston gradually displays the platform with contacts, despite opposition to the spring. However, the opening of contacts does not occur immediately, but after the platform is offset for a certain distance. This value depends on how the second small spring will be compressed. It is as well as a large spring, is on a stem with a nut. As soon as the contacts are broken, the pump unit stops working.
From here it turns out that in order to adjust the pressure on the water supply unit, it is necessary to properly adjust the strength of the compression of a large spring. Pressure adjustable by this element is also called the bottom. To adjust the upper pressure in the water supply system, you must configure the triggering of a small spring. The force of compression of this element allows you to set the difference between the disconnection and switching pressure.
Setting the pressure of the pumping station pressure may be needed if the factory host settings are not tired or they have come down. However, before proceeding with the adjustment, it is necessary to properly prepare a storage tank.
Preparation of hydrobacket
Hydrobacus, storage tank or hydroaccumulator is a sealed tank consisting of two parts. In one part in the form of a rubber pear, water accumulation occurs. And the other part is the space between the walls of the pear and the inner surface of the hydraulicock, into which a certain amount of air is injected.
Since water is accumulated in a pear, it connects to the water supply system. Air injection in the second chamber can be performed using a conventional car pump. Thanks to this air, there is a compression of pear with water, which helps to maintain a certain pressure in water pipes. Due to this, after opening the crane, the movement of water through the pipeline is under pressure without inclusion of the pump.
ATTENTION: If it is incorrect to choose the air pressure in the hydraulician, it will not be possible to achieve system operation in optimal mode.
Too high or low indicator can lead to frequent start and stopping the pump, which will negatively affect the deadline for the operation of the device. The reduced value can lead to excessive pear stretching and its rapid way out.
Sequence of hydrobook preparation:
- Before downloading the air into the hydraulicum or before checking the indicators, it is necessary to drain the water from the pipeline. To do this, open the bottom crane. As a result, the pear in the accumulative tank will empty.
- Now you can produce air injection and pressure test. It must be 10 percent less than the lower indicator. If you have not yet configured the system and do not know what the lower value should be, then the adjustment is done like this:
- if the hydrobook volume is 20-25 liters, then we put the pressure in the range of 1.4-1.7 bar;
- with the accumulative tank capacity, within 50-100 liters, the rate is required in the area of \u200b\u200b1.7-1.9 bar.
Important: Do not stand for a long time to leave the punch of the hydroaccumulator without water. From this, its walls can refuse or glue. Air pressure in the hydraulication must be checked every month.
Relay setting
With the right air pressure in the drive and clean filters, you can proceed to setting the water relay in the pumping unit. Adjusting work in such a sequence:
- After disconnecting the pump, we produce draining water from the pipeline. To do this, open the bottom crane in the system. With the help of a screwdriver or wrench, remove the lid with the relay.
- Turn on the pump that makes the water injection into the system.
- At the time of turning off the pump unit, you must record the testimony of the pressure gauge. So you will learn the current upper pressure.
- After that, it is worth a slightly open the crane that is in the highest point of the system. If you have a single-level system, then open the crane that is most remote from the pump. When the pressure drops to a certain value, the pump unit will start again. You should point out the testimony of the pressure gauge at the time of launch and write them again. So you will find the current lower pressure. Related results, you will receive a pressure difference on which your relay is configured. In addition to recording indications, evaluate the pressure from the open crane (the very far in the system).
- If the pressure turned out to be insufficient, then the lower pressure must be increased. For this, the unit needs to be disconnected from the power supply and click the nut on the large spring. If you need to reduce the head, then the spring is worth weakening.
- Go to setting the pressure difference that you have already learned, taking the foundations found. Optimal indicators must be within 1.4 atm. If your result is less, then it can give you a more uniform water supply, but more frequent starting pump. This can lead to premature depreciation of the unit. If your result exceeds the optimal indicators, then work will take place in a more gentle mode, but will become a tangible difference between extremely high and low pressure. To configure this parameter, you need to rotate the nut on the low spring. To increase the pressure difference, it is necessary to increase the compression force. Spring loosening will cause an opposite effect.
- After adjustment it is worth checking its effectiveness. To do this, water from the system is again drained, the power supply and the unit is connected to the pumping equipment starts. Next steps Repeat while the relay settings will not arrange you.
ATTENTION: The second (small) spring is very sensitive, so its adjustment should be carried out very carefully, screwing the nut on a small turn.
Primary setting
If the springs are completely loose on your relay, you will have to set up from zero. In this case, the work is carried out in such a sequence:
- It is launching the pumping equipment and pressure the pressure in the system to the level when the water pressure from the tap itself is not more or less acceptable for you. Suppose that the measuring device showed a value of 1.5 bar at this moment. We will turn off the pump.
- Now you need to turn off the pumping station from the power supply, open the lid on the relay and start tightening the nut on the large spring until the characteristic click indicating the contact of the contacts.
- The relay cover is installed in place and launch pumping equipment. In this case, the pressure must be touched to 2.9 bar.
- Now the unit must be turned off again from the power, the cover on the relay is again open and press the small springs nut until the contact opening is performed.
- After the generated settings of the relay will be triggered at the lower indicator of 1.5 bar and turn off the pump at the top pressure of 2.9 bar. The lid on the relay is returned to the place, and the station is connected to the electrical outlet.
Video Instructions for adjusting the pressure of the water supply unit with their own hands:
vodakanazer.ru.
Adjusting pressure in the pumping station
Adjusting the pressure relay begins with checking compressed air pressure in the hydroaccumulator. In this case, the pumping station should be disconnected from the network and the tank of the hydroaccumulator should be empty. To do this, unscrew the side cover on the tank (see Figure - the Red Arrow) and using a conventional car pump with a pressure gauge to check the pressure. It must be about 1.5 atm. If the measured value is less, the pressure must be raised to the pump to the required level. It should be noted that the air in the tank must always be under pressure, and during the operation of the pumping station, it is necessary to check and pump it from time to time, if necessary, it will increase the service life of the hydroaccumulator membrane.
If, after adjusting the pressure in the hydroaccumulator, the pumping station will not work in normal mode, it is necessary to start configuring the pressure relay itself. At the same time, it should be remembered that the pressure of the pump (upper setting) should not exceed the pressure that is able to develop the pump!
Setup Pressure Relay RDM-5 Pumping Station

Setting the PDM-5 pressure relay is performed in a working system under pressure. To do this, we turn on the pumping station to the network and give the pump to raise the pressure in the system, after which the relay will work and turn off the engine.
- Remove the relay cover and completely weakening the clamping nut of a smaller spring.
- Configure the required minimum pressure (Turning on the pump). To do this, rotate the pressure nut of the greater spring (clockwise - increase the pressure and vice versa). Then we open the crane and give water to drain, the pressure in the system is reduced. We look when the pump turns on and, if the result does not suit, regulate on until we achieve the desired result ..
- Adjust the pump off pressure (upper limit). Rotating a smaller nut pressure, set the desired upper pressure value. We do as follows. We turn on the pump, waiting for the relay. If the disconnection pressure is not suitable, we descend water, adjust the spring and repeat the process.

Thus, we set pressure relays.
Repair Pressure Pressure Relay (Video)
What to wish if the relay is not configured? Probably it failed. There are two ways to solve this problem: buying a new relay or repair of an existing one. In the first case, we advise you to look at the modern and inexpensive pressure relay - the arrow or digital.
For those who have not yet want to change the reason for one reason or another, we recommend using the methods of repair and cleaning the RDM-5 pressure relay.
Detailed repair procedure can be found in this video:
In the event of other malfunctions and malfunctions of the pumping station, we strongly recommend reading an article where it is discussed in more detail how to identify the cause of the breakdown and repair the pumping station yourself.
muzhik-v-dome.ru.
Purpose and device
In order for the private house in the water supply system, constant pressure was maintained, two devices are necessary - a hydroaccumulator and pressure switch. Both of these devices through the pipeline are connected to the pump - the pressure relay is found in the middle between the pump and the hydroaccumulator. Most often it is in the immediate vicinity of this container, but some models can be installed on the pump housing (even submersible). Let's figure it out in the assignment of these devices and in how the system works.
The hydroaccumulator is a container separated by an elastic pear or a membrane into two halves. In one, the air is under some pressure, water is injected into the second. Water pressure in the hydroaccumulator and the amount of water, which can be downloaded there, is regulated by the amount of pumped air. The air is more, the higher the pressure is maintained in the system. But at the same time, and the water in the container can be downloaded less. Usually, it is possible to download no more than half of the volume into the container. That is, a 100 liter hydroaccumulator will get up to download no more than 40-50 liters.
For the normal operation of household appliances, a range of 1.4 atm is required - 2.8 atm. To maintain such a framework and requires pressure relay. It has two trigger limits - upper and lower. When the lower limit is reached, the relay starts the pump, it pumped water into the hydroaccumulator, in it (and in the system) increases the pressure. When the pressure in the system reaches the upper limit, the relay disables the pump.
In the diagram with the GyrDroaccumulator, for some time the water is consumed from the tank. When a sufficient number is submitted so that the pressure fell to the lower threshold, the pump will turn on. So this system works.
Pressure relay device
This device consists of two parts - electrical and hydraulic. The electrical part is a group of contacts that closes and opens including / turning off the pump. The hydraulic part is the membrane that puts pressure on metal base And the springs (large and small) with which the pressure on / off pressure can be changed.
The release of the hydraulic part is on the back of the relay. It may be release with outdoor thread Or with a nut for the type of American. The second option is more convenient when installing - in the first case, you need to or search an adapter with a suitable nut of a suitable size or twist the device itself, winding it on the thread, and this is not always possible.
The inputs of the electrical part are also on the back of the case, and the terminal block itself, where the wires are connected, hidden under the lid.
Types and varieties
Water pressure relay There are two types: mechanical and electronic. Mechanical is much cheaper and preferred usually, and electronic are mostly brought to order.
| Name | Pressure adjustment limit | Factory settings | Manufacturer / country | Device Class | Price |
|---|---|---|---|---|---|
| RDM-5 Dzhelex | 1- 4.6 atm | 1.4 - 2.8 atm | Dzhelex / Russia | IP 44. | 13-15$ |
| Italtecnica RM / 5G (m) 1/4 " | 1 - 5 atm | 1.4 - 2.8 atm | Italy | IP 44. | 27-30$ |
| ITALTECNICA PT / 12 (M) | 1 - 12 atm | 5 - 7 atm | Italy | IP 44. | 27-30$ |
| Grundfos (Condor) MDR 5-5 | 1.5 - 5 atm | 2.8 - 4.1 atm | Germany | IP 54. | 55-75$ |
| Italtecnica PM53W 1 " | 1.5 - 5 atm | Italy | 7-11 $ | ||
| Genebre 3781 1/4 " | 1 - 4 atm | 0.4 - 2.8 atm | Spain | 7-13$ |
The difference in prices in different stores is more than significant. Although, as usual, buying cheap specimens, there is a risk of running on the fake.
Connecting water pressure relay
The water pressure relay for the pump is connected immediately to two systems: to electricity and water supply. It is installed stationary, as it is not necessary to move the device.
Electrical part
To connect the pressure relay, the dedicated line is not required, but is desirable - more chances to work the device will be longer. From the shield should be a cable with a solid copper residential cross section of at least 2.5 square meters. mm. The installation of the bundle of the machine + Uzo or DiffAvtomat is desirable. The parameters are selected for the current and depend more on the characteristics of the pump, since the water pressure relay consumes the current very little. In the diagram, it is necessary to have a grounding - a combination of water and electricity create a zone of increased danger.
Cables are hardened in special inputs on the back of the case. Under the lid there is a terminal block. There are three pairs of contacts on it:
- grounding - the corresponding conductors coming from the panel and from the pump are connected;
- terminals Line or "Line" - to connect phase and zero wire from the shield;
- terminals for similar wires from the pump (usually on the block located above).
Connection Standard - Conductors are cleaned with insulation, inserted into the connector, tighten with a pressed bolt. Up servers for the conductor, check whether it is secure. After 30-60 minutes, the bolts can be pulled as copper - soft material and contact can relax.
Connect to pipeline
there is different methods Connecting water pressure relay to watering system. The most convenient option is to install a special adapter with all the required outputs - posterior fitting. The same system can be collected from other fittings, just a ready-made option is always bustling.
It is screwed into the back of the housing back, the remaining outputs are connected by a hydroaccumulator that feeds the hose from the pump and the highway, which goes to the house. You can install another mud and pressure gauge.
Manometer - the right thing is to control the pressure in the system, follow the relay settings. Mud - too the desired deviceBut it can be installed separately on the pipeline from the pump. There is generally a whole system of filters for water purification.
With such a scheme, with a large consumption, water is supplied directly into the system - bypassing the hydroaccumulator. It begins to fill over all the cranes will be closed in the house.
Water Pressure Relay Adjustment
Consider the process of adjusting the most popular copy - RDM-5. It is released different plants. The limits of adjustments are changed, since different pressure is required in different water pipes. From the factory, this device comes out with the basic setting. Usually it is 1.4-1.5 atm - the lower threshold and 2.8-2.9 atm - the upper threshold. If you are not satisfied with some parameter, you can reconfigure it as it is required. Such a procedure is usually necessary when installing a jacuzzi: standard pressure at 2.5-2.9 atm for the necessary effect is not enough. In most other cases, reconfiguration is not required.
In the PDM-5 water pressure switch, there are two springs that are adjusted for a threshold / turning on the pump. These springs are different in size and appointment:
- large adjusts the limits (immediate upper and lower);
- little changes the delta - the gap between the upper and lower boundary.
Changing parameters occurs when twisting or unscrewing nuts on the springs. If the nuts are spinning, the pressure increases, if weaken - falls. It is not necessary to twist the nuts. There is no need for one turn - this is a change of about 0.6-0.8 atm, and this is usually a lot.
How to determine the switches of the relay
The pouring threshold (and the lower pressure threshold on the water pressure relay) are associated with pressure in the air unit of the hydroaccumulator - the minimum pressure in the system must be 0.1-0.2 atm above. For example, if the pressure of 1.4 atm, the threshold of shutdown is desirable 1.6 atm. With such parameters, the tank membrane will serve longer. But so that the pump worked under normal conditions, see and not its characteristics. He also has a lower pressure threshold. So, it should not be higher than the selected value (below or equal). Based on these three parameters and select the inclusion threshold.
By the way, the pressure in the hydroaccumulator before setting should be checked - there are significant deviations from the claimed parameters. Under the removable lid (in different models It looks and located in different places) is hidden nipple. You can connect a pressure gauge through it (you can automobile or the one that you have) and see actual pressure. His, by the way, through the same Nipple can be corrected - to increase or lower if necessary.
Top threshold - turn off the pump - when adjusting is set automatically. The relay in the original state is set to some pressure difference (Delta). This difference is usually 1.4-1.6 atm. So if you set the inclusion, for example, by 1.6 atm, the trip threshold is automatically displayed in 3.0-3.2 atm (depends on the relay settings). If you need a higher pressure (raise water to the second floor, for example, or the system has many watershed points), you can enlarge the threshold to zoom. But at the same time there are limitations:
- The parameters of the relay itself. The upper limit is fixed and in household models usually does not exceed 4 atm. More to put simply will not work.
- Upper pump pressure limit. This parameter is also fixed and the pump must be disconnected by at least 0.2-0.4 atm to the declared characteristics. For example, the upper pressure threshold of 3.8 atm pump, the shutdown threshold on the water pressure relay should be no higher than 3.6 atm. But so that the pump worked for a long time and without overloading the difference is better to do more - overloads are too bad for the period of work.
That's all the choice of water pressure relays. In practice, when setting up the system accounts for selected parameters to adjust into one direction or the other, because it is necessary to choose everything so that all the water-based points work normally, including household appliances. Therefore, it is often said that the parameters are chosen by the "Scientific Tyk" method.
Setting the water pressure relay for the pump or pumping station
To configure the system, you will need a reliable pressure gauge, whose readings can be believed. It connects to the system near the pressure relay.
The process of adjustment consists in twisting two springs: large and small. If you need to raise or lower the lower threshold (pump turning on), you turn the nut on the large spring. If you turn clockwise clockwise, the pressure rises, against - omit. Turn to a very small value - half turns or so.
The sequence of action is:
- Start the system, the manometer is monitored at what pressure turned on and the pump turned off.
- Press or release a large spring.
- Include and check the parameters (at what pressure turned on, as it turned off). Both values \u200b\u200bare shifted to the same value.
- If necessary, adjust adjustments (regulate a large spring again).
- After the lower threshold is exhibited as you want to see it, proceed to adjust the threshold of the pump shutdown. To do this, pressed or lowered a small spring. The nut on it is also not particularly twist - the floor turns is usually enough.
- Reconnect the system and look at the results. If everything suits, it stops.
What else do you need to know about the adjustment of the water pressure relay? That not in all models there is an opportunity to change the delta, so you look attentively when buying. There is a pressure switch for a pump in moisture and dust-protected case. They can be put in the pit, some models can be installed directly on the pump housing, if there is such an output.
In some water pressure relays there are still idling (dry) switch, in general this device is in a separate case, but there are also combined. Safety from idling is needed so that the pump does not break if suddenly water in the well or well will not be. Some pumps have built-in protection of this type, for others separately buy and install the relay separately.