Do-it-yourself Musical Instruments project. Drum
The drum is one of the first musical instruments that became available to mankind due to its ease of manufacture. You can easily make a small drum for a child with your own hands.
Materials that will be required to make a homemade drum:
scissors
tin can with plastic lid
yarn raspberry and blue flowers
elastic
yellow self-adhesive paper
PVA glue
two sticks made of wood
thin raspberry felt
thin coffee-colored felt
two foam balls
superglue in the form of a transparent gel
At the first stage of work, it is necessary to remove the lid and paste over the jar with self-adhesive paper. To do this, you need to wrap the future drum body with it, mark the shape with a pencil, and then cut out a piece of a suitable size from the yellow self-adhesive. After that, with transparent superglue, you need to draw even diagonal lines along the entire body, alternately directed to the right and left, thereby forming a pattern of classic triangles. Raspberry yarn is superimposed on these lines. For greater adhesion to the surface of the case, the colored threads must be gently pressed into the glue strips. The excess yarn is cut off.
The second stage of work is the drum membrane. It is made from a plastic lid that fits the given tin can. The lid must be circled by attaching it to a piece of coffee-colored felt. Next, you need to cut an even circle out of felt along this contour, be sure to leave an allowance of two centimeters. Then the lid should be put back on the jar, and the felt circle should be carefully glued on top using transparent superglue. Care must be taken to ensure that the fabric lies flat and smooth on the lid. Indents and bumps can be avoided by slightly pulling the felt over the lid when gluing. Superglue is applied not only to the lid, but also to the jar itself from above, not far from the lid. Then an elastic band is put on top of the resulting structure, successfully fixing the fabric and hiding the junction of the drum body with its membrane.
The yellow drum needs red stripes to complete the decoration. For this, raspberry felt comes in handy, from which it is necessary to cut strips a centimeter wide. These will be glued along the circumference of the drum, over the elastic and along the bottom of the can.
The toy is almost ready, the last stage remains. It is necessary to take wooden sticks (it is desirable that they are round in cross-section) and make holes in the foam balls with them. The holes should not be through. In the resulting holes, transparent glue is poured and then sticks are inserted. Let the structure dry. The final stage of work: PVA glue should be applied to the foam balls. After that, you need to wrap them in blue yarn, and wait for the glue to dry. The drumsticks are ready.
Watch a short video tutorial on how to make a homemade drum from a bottle.
"If a person has golden hands, it doesn't matter where they grow from!" (with) Russian radio
It all started with a strong desire to play drums and practice at home, not just at the rehearsal room. I already had a homemade simulator for practicing at home. But knocking on rubber bands and felt without hearing "normal" sounds got bored with time. Creative itch and engineering education pushed me to look for something else. Installing an acoustic drum kit at home would be inadequate. Apartment in panel high-rise building with all the consequences, as they say ... Therefore, I settled on the version with an electronic drum kit. And I really wanted to electronic drum set it would feel as much like an acoustic one as possible. Option with hard drum pads was discarded at once. But the drums with grids - it seemed very interesting!
The price issue was also not the last one. Having studied the materials of various forums for drummers, I realized that it is quite possible to make a drum kit that you want yourself.
Further - drum module... Which? Conditions: home use, flexibility of settings, connection to a computer and the price, of course. In the end, the choice was reduced to a purchase Alesis Trigger IO module and requiring self assembly the MegaDrum module. Defeated MegaDrum.
When I first learned about MegaDrum and got acquainted with this project in detail, then, to be honest, I really liked it and aroused my sincere admiration! Especially captivating (in good sense) the reverent attitude and attention of Dmitry Skachkov to his brainchild and a very informative forum where you can get answers to almost any questions regarding the module. Taking off my hat!
Below I will try to tell you in detail and in an accessible way about how I made my electronic drum kit and what nuances and difficulties arose in the process. Some things and solutions were not invented by me and are described in various forums. So this article (among other things) is an attempt to combine your own and others' practical experience.

DRUM MODULE
As I indicated above, the MegaDrum module is used as a midi converter. At first I wanted to build it from scratch, but then I leaned towards the All In One v3.2 PCB 56i Kit. The kit allows you to assemble a 56-input electronic drum kit based on the Atmega644. Yes, it came out more expensive, but the advantages outweighed:
- all items are "in one package". This is important, because it is not always possible to purchase everything you need at once and in one place;
- prefabricated double layer printed circuit board with applied markings to facilitate the installation of elements;
- already "flashed" PIC and Atmega with a protected bootloader.
All this contributed to the fastest assembly electronic drum modules and reduced the likelihood of "jambs".
The payment was made by a payment card through PayPal. After 2 weeks I received a parcel post from France. The package bundle and quality corresponded to the declared (and expected too).
There were no problems during assembly. Soldered with a low-power soldering iron (25 W) with a thin tip. Solder in the form of a wire with a diameter of 1 mm with a flux inside. At the end of the soldering, the flux splashes were washed off with a brush and a PCB cleaner.
It took about a week to solder. soldered after work in the evenings, when the household cleared the kitchen. The kitchen with an extractor hood is unambiguous!
As soon as the editing was completed, there was a desire to check whether the animal was alive. Plugged into USB and ... Works !!! At least the system (I have WinXP SP3) recognized the device and the display showed information that it was MegaDrum and copyright D. Skachkov. The next step was to check the inputs and buttons.
At the weekend I went to the radio market in Kardachi. They bought a plastic case of a suitable size, jacks, buttons (I decided not to use those in the set), additional connectors (for connecting drums and cymbals for drums) and ten pieces of piezics with a diameter of 35, 27 and 20 mm. Just in case, I took it with a margin (and as it turned out, not in vain).
Returning home, I quickly soldered the cable with the piezoelectric and the connector. I connected the MegaDrum, loaded the EZDrummer program and began to plug the jack with a piezo into the module connectors one by one. I couldn't believe it myself, but EVERYTHING worked! It seems like it should have been, but deep down I was expecting some kind of joint. And then - I collected it, connected it and here's your happiness!
I didn't need 56 inputs. 32 was quite enough even with plans for the future. Therefore, I postponed the payment with 24 inputs. I made markings on the body and drilled holes for the connectors. For the USB connector, I had to work with a jigsaw to cut it out. I decided not to use the midi connectors.
For drilling holes in plastic with respect to large diameter(more than 5 mm), use wood drills. This will create smooth, neat holes, not torn holes.
I managed to spoil the "native" front panel of the case, having drilled holes for buttons of a larger than necessary diameter by mistake. Swearing, I thought about how to make a new one. The office that deals with outdoor advertising came to the rescue. I drew a drawing of the panel in Adobe Illustrator and emailed them. For 20 UAH ($ 2.5), a new socket was cut out of 2 mm acrylic with a laser with all cutouts for screws, buttons and LCD. Looking ahead, I will say that they also made round blanks for cymbals for drums from 5 mm thick acrylic.
In the same Adobe Illustrator, I made a drawing of the front panel. Printed on photographic paper and laminated. Then I cut the holes and glued them with double-sided tape to the acrylic panel. Here's what happened in the end.


During the final assembly of the module, I did become a victim of my carelessness. Plugged the keyboard connector into the encoder connector by mistake. After launching, I tried unsuccessfully to get to the settings using the buttons. But it doesn't work! As a result of my chaotic button presses, I turned off the display contrast to zero and stopped seeing anything at all. Climbed to the forum to ask the eternal question "What to do ?!". The joint was discovered the next day. The connector was plugged in where it should be, after which everything worked out. Contrast and settings have been restored. Hooray!
DRUMS
- Kadushki
After assembling the module, it was the turn of the drums. It was decided to make drums standard sizes, namely: bass drum and snare drum - 12 inches, toms - 10 inches. Such dimensions were chosen in order to obtain the optimal ratio of such parameters: the quality of removal, the possibility of installing firm nets, dimensions and ease of play.
Initially, I wanted to cut PVC pipe tubs of appropriate diameters. And very soon I realized that everything is not so simple! It was very expensive to buy pipes of such diameters and lengths of 2-2.5 m, and pipes with a length of 1 m exist only in price lists. None of the suppliers saw them live. Those. the situation is like in a Soviet joke about toilet paper... It seems to exist, but it is impossible to buy.
Again the same question: what to do? On bourgeois forums, people solve a problem using a flexible wood. The thing, of course, is useful, but for our region it is still exotic. It seems like a couple of companies in Kiev began to supply this so-called. "flexible plywood", but the price ... And bending shells from ordinary plywood at home is still a hassle. In the end, I decided to try to make tubs from fiberboard. After all, I’m not acoustic drums was going to do.
It was not possible to cut evenly a sheet of fiberboard at home. Therefore, I went to the nearest "Epicenter" and bought a sheet of fiberboard 2440x1220 mm with a thickness of 3.2 mm. I also ordered sheet cutting into strips of 1220x110 mm.
Because the thickness of the material was 3.2 mm, then when using 3 layers, the wall of the shell turned out to be about 10 mm, which seemed to me to be quite sufficient.
I put 3 strips of fiberboard in a bath with lukewarm water. After 15 minutes, the stripes began to sink. This was a signal that the fiberboard has absorbed enough water and is ready to bend.
It should be borne in mind that fiberboard strips during the drying process receive various internal stresses and deform. If you just twist the strip into a roll, securing it along the edges, then the result will be an egg-shaped spiral. And it will not work out of it to glue a perfectly round tub. The strips should be dried by wrapping something around it and securing it tightly. I used 2 saucepans of the correct size. More for snare and bass drums, less for toms.
In turn, I rolled the strips into rolls and laid them inside the pan for a minute (so that they could remember the shape a little). Then, one after the other, he tightly wound it on the pan, joint to joint. On top, I also tightly wrapped it with nylon twine and left it to dry for 4 days.

After 4 days, I removed the "bagel" from the pan and wrapped it with twine around the ring, leaving it to dry for another 3 days.

So, the blanks for the tub are ready. Can be cut and glued. Next, I will describe the process of making a tom shell.
The first layer is the outer one. If the shell has an outer diameter of 10 inches (254 mm), then the length of the first strip should be 798 mm (L = 2 * Pi * R). To accurately measure the given length, I took a flexible sewing meter and using an accurate tape measure put a mark on it (you cannot believe the graduations on the sewing meter). Having fastened one end of the meter to the strip and wrapped it tightly around the workpiece, marked the desired length. I cut off the excess with a hacksaw for metal.
It is not necessary to calculate the exact length of the second (third) layer using the formula corrected for material thickness. It is enough to estimate the length with a small margin, and cut off the excess during the gluing process, when the actual length is clear. The "seams" of the layers must be opposite each other.
For gluing the fiberboard, I used moisture resistant B3 glue. It is similar to PVA, but becomes tougher as it dries.
First, I missed a small area with glue at the junction of the outer layer, covered it from the outside and from the inside with pieces of the previously cut strip and clamped it with clothespins on both sides. After 30 min. took off his clothespins and glued the right half of the ring, holding it with clothespins. Leave to dry for 40 minutes.
During gluing, it is very important to make sure that the edges of the strips do not climb over each other!
Then he took off the clothespins and cut off the excess glue from the edges with a knife. I firmly pressed the left half of the inner strip and determined how much to cut off so that in the future it would stick to the joint with the right one. Cut it off. Then I glued it in the way described above. I did the same with the third strip and left it to dry overnight.


The next day, I sanded the sides and edges, rounding the top (under the mesh). Next, I made markings for the holes for the screws (fastening the lags and the bottom) and the connector (jack-mother).
I decided to decorate the tubs from the outside with the help of a self-adhesive film "under a tree". So that the film adheres well, I covered the tub with water-based varnish in 3 layers with intermediate sanding, leaving the upper part about 7 mm wide intact. Accordingly, the film was cut 7 mm wide. less height tubs. The indent is needed so that the mesh does not tear off the film when pulled. I impregnated this indent with wood varnish and sanded it. In general, I would like to note that after the fiberboard was impregnated with glue and varnish, its properties began to resemble a piece of wood.
The rest of the shells were made in exactly the same way.
- Hoops for drums, bottoms and logs
Tatiana Shubenkova
Project passport
1. Educational areas within the framework of which the work on the project is carried out: music, socialization, artistic creation
2. Project participants: children of preparatory groups and their parents, educators, music director (project leader)
3. Terms of the project: month (1.10.2015 - 30.10.2015)
4. Project type: creative
5. Problem: How to organize a children's orchestra of drummers in kindergarten?
6. Purpose of the project: Create a children's orchestra "Drummers"
7. Objectives of the project:For kids:
To acquaint with the history of the appearance of the drum: what kind of drums are there, what is the difference between a hand drum and a military one, methods of performance on a hand drum ("knock", "slap" - high-close, far-low, on a military (long and short sounds);
Participation (playing music) in a collective (drummer orchestra)
For a music director:
Create a material base of drums, replenish the section "Percussion Instruments" in the mini-museum "Rainbow of Sounds";
To acquaint children with the device of the drum, with the methods of playing the hand and military drums;
To involve educators and parents in cooperation in matters of musical education for their children;
For the teacher:
To acquaint children with the history of the drum (manual, military);
Teach children to compose a story based on the picture "drum" (speech development);
Making a stick for a military drum (manual labor);
Involvement of parents in the educational process (making drums)
For parents:
Participation in the production of drums and costumes for the "Drummers" orchestra
8. Project summary:
Relevance of the topic. One of the important tasks of personality-oriented aesthetic education is the development of the child's emotional responsiveness, his culture of feelings. The solution to this problem is possible in the development of all components of musical and aesthetic consciousness, creative activity in different types children's musical activities, including playing children's musical instruments. After all, playing children's musical instruments is one of the most favorite types of musical activity for children. It develops and implements musical ability performing abilities of all children. Acquaintance with musical instruments gives the child the opportunity to experiment, develop creativity and communication skills.
Significance at the preschool level. Do-it-yourself Musical Instruments project. Drum ", implemented in work with children preparatory group makes it possible to integrate the content of various educational areas; realize educational activities based on the interaction between the music director and educator; involve parents of children in the educational process.
Family relevance. Involvement of parents in the educational process; educating parents on how to make a drum at home with their own hands and spend family leisure time.
Personal orientation of children. During the implementation of the project, children will learn the history of the appearance of the drum, its device, methods of sound production on the drum, which will contribute to the development of their cognitive interest and form the need to play music in the orchestra;
Educational aspect. A prerequisite the implementation of the project is an acquaintance with different drums, with the techniques of playing them, which will contribute to the formation of a musical sense of the rhythm of children.
Stages of the project.
Stage 1 (organizational)
Collecting information about drums (hand and military);
Clarifies the content and forms of interaction with educators;
The musical corner in the group is being replenished: scores, cards, pictures with the image of drums;
Materials are being developed to involve parents in the project (consultations, memo-booklet, folder-moving - recommendations)
Stage 2 (implementation)- Organizational-pedagogical and cultural-leisure forms are distinguished, which become a condition for the implementation of the project and the content of work in each of the forms is determined: excursions-classes to get acquainted with the drums different types, their sound, ways of playing;
They learn the score of the drummer's orchestra, dance movements to the performance of the orchestra. A leisure scenario "This is such a drum" is being created. MC is being held for educators "Drum";
Products received during the project are processed
Stage 3 (presentation)
Leisure activities "Here's a drum" are held (performance by the orchestra of the Drummers, the exhibition "Our Drum Cheerful", where all the participants (educators, children and their parents) of the project present their results;
Methodical association of music directors of MDOU (exchange of experience)
Stage 4 (reflection)
Project materials are drawn up and systematized;
Self-analysis of each of the participants of the project "What has changed for me during the implementation of the project" is carried out;
Ways to continue the project are outlined (creation of other musical instruments
Project portfolio
Master class "Drum" (for educators)


Exhibition "Our cheerful drum"

Leisure "This is a drum" ("Drummers" orchestra). More in the next works

Related publications:
Our kindergarten hosted a competition "Do-it-yourself musical instruments". The competition was held among parents and teachers. Instruments.
The Federal State Educational Standard (hereinafter - FSES) sets serious tasks for the pedagogical collectives of preschool educational institutions. Implementation.
Soon there will be a competition of music corners in our kindergarten. At the parent meeting, we decided to make musical instruments with our own hands. By.
For the harmonious development of children between the ages of one and a half to two and a half years, it is important auditory perception and a sense of rhythm. Develop and.
Good afternoon, dear colleagues! I decided to replenish the musical piggy bank with homemade musical instruments. As you know, all items.
Abstract of the GCD "Musical Instruments" Musical director: Guys, today we will talk about musical instruments. On earth, everyone has a home. Good.
Children adore music, as well as everything that we, adults, are ready to classify as noise, including unbearable noise. They knock on pots and pans plastic panels and across the table. We invite you to combine a lesson in creativity with quenching the child's passion for the manifestation of his musical talents. The site will tell you how to make a drum with your own hands for children's games.
So, to make a drum, you will need:
- coffee can with plastic cover (required condition, for example, you can take from Nescafe Classic);
- yellow self-adhesive film (can be replaced with colored paper, ideally - glossy);
- some thin felt of the color of coffee or coffee with milk;
- a bit of crimson felt;
- crimson thread;
- elastic;
- scissors;
- glue stick;
- transparent glue (like "Gel Moment");
- 2 wooden sticks;
- 2 foam balls;
- blue thread.
We make a drum with our own hands:
Remove the lid from the can and set it aside. We wrap the jar with yellow paper, outline the boundaries for cutting, cut out the desired shape and stick it on the jar.
Using transparent glue, "draw" lines diagonally from top to bottom and bottom to top, forming triangles. Do this procedure around the entire perimeter of the future drum. If you find it difficult to do it "on the go", first outline the lines with a simple pencil, and only then use glue.
Take raspberry yarn and, following the lines on the side of the drum, apply it to the glue strips, gently pressing the threads into the glue for better adhesion to the homemade drum surface.
Cut the thread when you reach the end.
Cut a circle out of coffee-colored felt: to do this, take a lid, attach it to the felt spread on the table and trace along the contour. You need to cut out a circle, on each side adding 2 cm to the one you drew with the lid.
Close the jar with a lid. Apply transparent glue along the lid and along the top edge of the can close to the lid. Cover the can with the now cut coffee felt mug and slide the elastic over the top. Gently pull the felt in different directions so that it lies as flat and tight as possible.
Cut two strips of raspberry felt about 1 cm wide, the same length as the circumference of the jar. Glue these strips across the bottom of the can and over the rubber band holding the coffee felt.
Now it's time to make sticks for the drum.
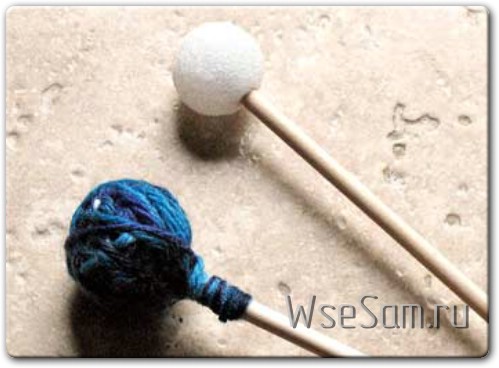
To do this, take wooden sticks of a round shape in cross-section. Insert each stick into the ball so that it only slightly enters it, but is relatively tight in it and does not come out on the other side.
Now take out the sticks and cover the inside of the hole with transparent glue. Reinsert the sticks and leave to dry.
Then cover the balls with a layer of PVA glue and wrap the top with a blue thread until you completely cover the ball.

Place a little glue under the ball on the stick and wrap the thread around them as well, cut the thread and smooth it over the glue with your fingers so that they do not frizzy.
Before playing a DIY drum, it is important to wait until it is completely dry!
Tips for DIY Toy Drum Making:
Before you put a lid on the jar and glue felt to it, you can make holes along the edges of the jar and insert a cord or tape into them to put a homemade drum around your neck.
You can make the drum in a different color.
Be sure to leave the drum to dry overnight or even overnight. Otherwise, it may fall apart at the very first game - it will be very disappointing ...
As you can see, making a drum for a child with your own hands is simple and fun!
Zoya Preobrazhenskaya specially for the site I am a young mother
2012,. All rights reserved. In case of full or partial use of site materials, an active link to the source is required.
We are offering to you simple idea how to make a children's drum with your own hands for, which he will be happy to use in his own or in nature, and which will help to distract from the tablet or TV for a long time.
All children sometimes love to rattle and drum something. Toddlers, for example, love to use pots, basins, or bowls as homemade drums. This passion for "music" is of great importance for the future. For older children, they are great. Moreover, it is an integral part.
Drums are always a win-win option that can captivate a child for a long time. Making a children's drum at home with your own hands is very simple and quick, but the child's pleasure will last for a very long time. And in this way you can, which you previously planned to throw away - a double benefit.
To make a toy drum with your own hands, you will need:
- an empty aluminum coffee can with a lid;
- 2-3 sheets of thick paper;
- feathers, sequins, stickers, pom-poms and ribbons;
- fabric (square piece, sides length - 30 cm);
- yarn;
- thick elastic band;
- scissors;
- PVA glue;
- 2 pencils;
- 2 small foam balls.
How to make a DIY children's toy drum
1. Aluminum can and is a baby drum. Remove the lid from the jar and cover the jar with paper on all sides. Decorate the drum by on their own or whatever the child wants - paint with markers or pencils, pens, glitter, stickers, etc.

2. On the lid of the coffee can, glue the cloth, cutting off unnecessary edges. This is necessary so that the top of the drum that you make with your own hands is as round as possible.

3. Now close the jar with the lid and secure the outside with a rubber band around the circumference. Hide the elastic by gluing yarn or ribbon on top of it. This will add even more musical decor for the child.

4. You can play the children's drum with your hands, but it is better to make special sticks. Take two small foam balls and push a pencil into each of them to create a hole. Put some glue into the hole and put the pencil back inside. Let dry.

After that, coat the balls with glue and wrap them in yarn. Pencils can also be decorated with ribbons, stickers, or wrapped in paper. Before you start making music on a DIY drum, let everything dry properly so that neither the baby drum nor the sticks to it will crumble.
Such a children's toy drum, made by yourself or by the child himself, will definitely become his favorite musical instrument. And if one is not enough, you can always make a whole drum kit. After all, who knows, maybe your future is growing up?