Fan coil unit cassette ceiling freon electrical connection. Competent installation of fan coil units: features and nuances
The device of chiller-fan coil units is often an integral part of the central air conditioning system of office buildings, shopping centers, public areas great cross-country ability, other large objects. Installation of fan coil units allows you to provide cooling / heating of air in a large space. Design, installation of chillers and fan coil units, estimated estimates are carried out by specialists, depending on the modification of the device, the features of operation.
Chillers and fan coil units for central air conditioning systems
Chiller-fan coil is a type of air conditioning devices, distinctive feature which is the circulation between the blocks of water (ethylene glycol / propylene glycol) as a refrigerant.
Chiller- a refrigeration machine that lowers the temperature of the liquid inside the coolant. Installed on the roof, attic space, technical room. When installing the machine on a roof, it is necessary to drain the water from the system before the onset of the cold season.
Fan coil unit- the internal block of the device, equipped with a fan (fan), a heat exchanger (coil). Outwardly, it is very similar to a split-system block.
The equipment can operate in three modes: cooling, heating, cooling-heating (4-pipe piping).
Indoor unit modifications:
- wall
- cassette
- duct
- floor and ceiling.
Let's briefly present the installation diagrams.
Installation
Installation methods:
- hidden - installation of frameless blocks. Placed above the false ceiling, in the inter-wall space, in utility rooms.
- standard - installation of equipment with a track length of no more than 5 m.
- non-standard - the length of the tracks is more than 5 m, high-rise installation with a call to the industrial mountaineering service.
Wall fan coil installation
Wall-mounted options look like regular externally household air conditioner... Wall-mounted, installation is simple, inexpensive. Best suited for rooms with low ceilings, inability to construct a suspended ceiling. The most optimal option for small office space.

Device and installation:
- determine the installation location;
- mark the mountings for the mounting panel;
- fix the block with anchor bolts;
- align the position strictly horizontally in all directions;
- distribution of pipelines;
- drainage system connection;
- placement of a drainage pipeline;
- electrical connection
- filling the system with water / ethylene glycol, trial run, testing.
Installation of a cassette fan coil unit
A kind of ceiling device, it is placed inside the ceiling space between the "armstrong" slabs. Standard sizes: 600x600 mm, 900x600 mm, 1200x600 mm. Only the front side of the intake grille is visible.

Installation methods:
- hidden installation inside a suspended structure. A standard option, often used for office premises, business centers;
- open placement on the ceiling with anchor bolts. Applied: large hypermarkets, shopping centers.
Layout scheme:
- choose an installation location;
- mark the ceiling mounts;
- secure with anchor bolts;
- connect to the chiller, central heating system (if heating is planned, 4-pipe piping);
- laying the pipeline route, thermal insulation to protect against condensation;
- equipment of the drainage system with a pump;
- collection of a mixing unit, 2 or 3-way valve;
- tightness test;
- commissioning works.
Installation of a duct fan coil
A distinctive feature is the placement of equipment under the ceiling, additional organization of air ducts for supplying cooled / heated air through air intake grilles, diffusers. Typical for office, industrial, trading areas, country houses.
Connection to a ventilation system is possible. Purified cool air will be supplied with a mixture of fresh outdoor air.
Open accommodation is typical for large shopping centers. But most often, a closed installation of horizontal or vertical design is used.

With horizontal installation, all communications remain under the ceiling, closed by a suspended ceiling structure. When the height of the room does not allow, vertical execution is possible - communications are arranged inside the wall ceilings (using fan coil units of the vertical type).
Organization chart:
- mark the installation location under the ceiling / inside the wall covering;
- dilute the system of air ducts, grilles, diffusers;
- protect the pipeline from condensate with thermal insulation;
- equipping with a drainage pump, installation of a condensate drainage system;
- collection of the mixing unit;
- starting fluid, checking for leaks.
Fan coil installation with piping
In addition to cooling, this air conditioning system is used for heating. The indoor unit is connected to the chiller and central heating system. For this, a second heat exchange circuit is used.
Depending on this, two types of strapping are distinguished:
- Two-pipe. Operation only for heating (the chiller is equipped with a heat pump) or cooling. The piping is organized by a two-pipe circuit with one heat exchanger. In this case, the device is equipped with a 2-way valve that works to open / close the fluid supply inside the heat exchanger.
- Four-pipe. Connecting a device for cooling / heating at the same time. One circuit is for connection to refrigeration machine... The second two-pipe circuit is for connection to central heating. Thus, the device simultaneously cools and heats the premises. Relevant for buildings where a separate setting of the temperature regime in different rooms is required.
A 3-way valve is used here, which supplies liquid bypassing the indoor unit when the heating is connected, which allows maintaining the autonomy of the circuits with their own temperature characteristics.
The use of this device as part of central air conditioning equipment allows you to bring the quality of the cooled air to the required microclimatic indicators. The ability to connect to central heating during the cold season significantly saves energy costs. Especially important for large office buildings, business centers, large shopping areas. Installation for suburban housing is also possible.
Friends! More interesting materials:
 Room air conditioning
 Air conditioning system project. Key aspects
Due to the restrictions on the volume of premises and the length of the freon line, typical for split systems, the demand among our compatriots for the installation of fan coil units in residential and commercial premises has significantly increased. Regardless of the version, wall-mounted fan coil, floor or ceiling, this device is a fairly compact heat exchanger connected to the hot and cold circuit of the device for the preparation of working fluid. In other words, this device can be compared with indoor unit conventional split systems. Fan coil units may differ in design, but each has the following components:
- Heat exchanger, thanks to which the supply air is cooled or heated.
- A fan that directs the supply air to the heat exchanger.
- A filter that serves to clean the supply air from mechanical impurities.
- Control unit with remote control.
A typical design of a fan coil in section, with the designation of elements, can be seen in the figure.
Please be aware that the presence of a housing is optional for fan coil units. There are both packaged and unpackaged versions of this equipment.
The principle of operation of the system is quite simple: from the treatment device (chiller), the working fluid of a given temperature enters the fan coil, where heat exchange takes place between the air and the walls of the heat exchanger. Air can be supplied to the heat exchanger in two ways:
- Outdoor, from the supply ventilation system through the air duct system;
- Internal, from the premises. In this case, the air masses are heated much faster than in the case of supplying supply air.
Such a system is called and can work both for cooling and for heating the air in the room.
Varieties of fan coil units
Today, there are four main types of such equipment:
- Cantilever frameless.
- Console in the case.
- Horizontal.
- Fan coil unit cassette.
Depending on the installation, each type of this climatic equipment can be wall-mounted, floor-mounted, ceiling-mounted or built-in. Depending on the tasks, fan coil units can be equipped with two or four-pipe piping. When using two-pipe piping, the device can only work for cooling or heating the air in the room. The use of a four-pipe piping makes it possible to use both a cold and a hot circuit of the chiller, while operating the unit for both heating and cooling, making settings from the control panel. Due to the complexity in implementation, the cost of installing fan coil units with a four-pipe piping is much higher than with a two-pipe.
Features of installing fan coil units
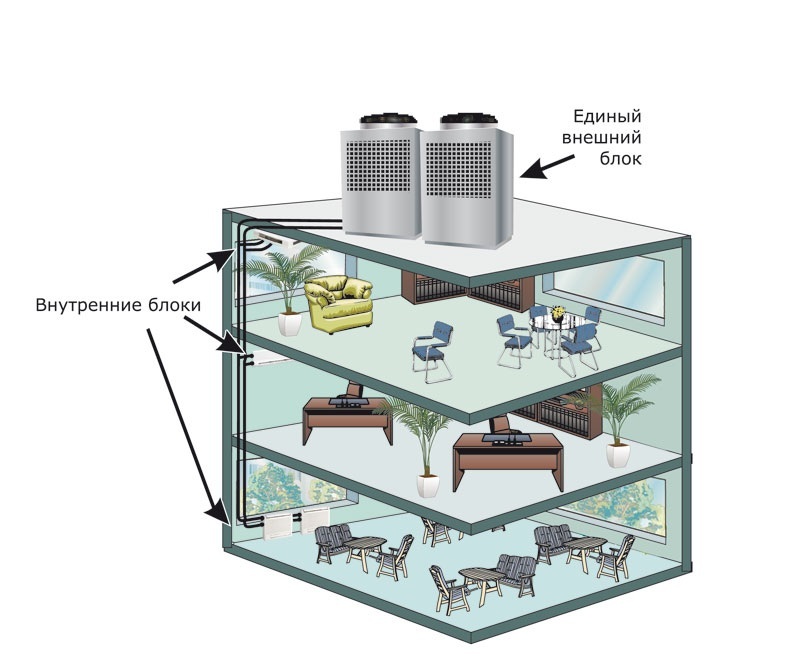
Most often, such a technique is not installed one by one, but in groups, which are distributed over rooms and floors.

Differences in the installation of different types of fan coil units
Two-pipe fan coil units are mounted, distributing them evenly around the entire perimeter of the room. Installation of four-pipe models, as a rule, is carried out under windows. The ability to quickly change the operating mode, from cooling to heating the room, allows you to compensate for heat loss through the glazing. For all types of fan coil units, it is necessary to make a piping, with shut-off valves, and connect to a common hydraulic system... Unpackaged devices are located in the space between the ceiling and the suspended ceiling. The main requirements for the installation site of these devices are:
- minimum length of air ducts;
- service access.
When installing frameless fan coil units on the ceiling of the house, anti-vibration mountings should be provided.
The simplest installation is typical for floor-standing fan coil units. Enough to connect drainage pipeline to drain condensate, as well as to carry out work on connecting the device to the hydraulic system, mixer and power supply. Work on the installation of floor models can be easily carried out independently. Installation of a wall fan coil unit, as well as ceiling models, is much more difficult and requires the participation of a specialist who will perform work on:
- assembly of the strapping unit;
- installation of the necessary devices for monitoring and controlling the device;
- competent laying of pipes and air ducts;
- thermal insulation works;
- pressure testing of the system;
- connecting the device to the power supply.
Installation of cassette fan coil units is also associated with certain difficulties, since it is supposed to be built into a suspended ceiling. First of all, in false ceiling the hole is cut to the desired size. After that, the device is mounted to the ceiling in compliance with anti-vibration protection and sound insulation measures. Depending on the model, the master connects one or two hydraulic circuits, mixers and supply air to the main unit. http://www.youtube.com/watch?v=6cD0K8B48bY
It is extremely important that, after connection, work was carried out to adjust the supply of working fluids. This is why everyone assembly work must be carried out by specialists.
Stages of installation work
Fan coil installation works can be roughly divided into several stages:
- The correct choice of installation site.
- Fastening the device to the enclosing structures.
- Create a strapping node.
- Laying of a pipeline for supply and discharge of working fluids.
- Installation and connection of the drainage system.
- Connection of power supply and control system.
- Checking the tightness of the system.
- Setting up work.
Despite the difference in design, the installation work of fan coil units is almost the same.
It should be understood that the quality and durability of the entire system directly depends on the competent installation of fan coil units, therefore it is best to entrust the implementation of such work to professionals. When contacting a company for the installation and maintenance of such climatic equipment, you should pay attention to the experience of specialists and the availability of the necessary equipment in the company.
Today, in homes, instead of air conditioning systems, they often resort to installing fan coil units - devices that cool and heat the air in the room. The heat exchanger can be installed in different rooms buildings and set an individual temperature regime for each of them.
Principle of operation
The operating principle of a fan coil unit is quite simple. The air is driven by the fan through the heat exchanger and is cooled or heated, depending on the selected mode.
In this case, the air flow is created not from the volume of air in the room, but from the outside air. Fresh air is supplied by a special unit - a chiller. This device is paramount when creating an air conditioning and heating system for a building with a chiller fan coil system.
The chiller is connected to an air supply unit, which draws air from the street.
Classification
Devices can be divided into four groups depending on design features:

- cassette;
- horizontal;
- console;
- console in the case.
When choosing a specific device, it is important to pay attention to two parameters: overall air performance and cold air performance.
Water as a carrier
Heat exchanger systems that use water as a carrier can be of two types: two-pipe and four-pipe.
Two-pipe is the most common on the market and its installation is not difficult. It is used to cool the air in the room and only, and therefore the cost of installing a pipe-type fan coil is low. It is possible to switch to heating mode in winter, but for this you have to disconnect the pipes from the chiller and connect them to heating system... This happens with a manually adjustable valve.

The four-pipe one has two heat exchangers: one is connected to the chiller, the other to the heating system. This scheme is more complicated in installation and the principle of operation, and, accordingly, is more expensive. It allows both cooling and heating the air in the room by switching the mode on the control panel.
What are they made of?
Each type of device has its own type of design, but everyone has common details:
- filter element. Protects the fan coil system from foreign particles entering it;
- electric heating element;
- heat exchanger. Cools and heats indoor air.
- fan. Provides a forced air flow that passes through the heat exchanger;
- control Panel.

Installation of chillers and fan coil units of any of the above types can be either wall-mounted, floor-mounted, or built into the ventilation of the building and installed in a suspended ceiling structure.
Advantages
There are several advantages to installing a fan coil unit together with a chiller.
- Energy saving.
- Possibility to connect an unlimited number of fan coil units to one chiller. In this case, the distance from the device to the farthest fan coil should not be more than 600 m.
- High environmental safety. The equipment is much more environmentally friendly than air conditioners.
- Creation of a comfortable indoor climate.
- Providing complete cooling and heating in just 5 minutes after starting.
- Saving money necessary for the organization of pipe routes, if water is used as a carrier. However, such a system has one drawback - the lack of a ventilation function. Therefore, when installing it, it is necessary to equip in parallel a system of forced circulation of air masses in the room.
Mounting
Installation of chillers and fan coil units consists of several main stages:

- First, the device is mounted indoors.
- Then the strapping unit is assembled.
- Installation of pipelines and thermal insulation to them is in progress.
- Air ducts are laid and their sound insulation is organized.
- A drainage system is being created.
- The equipment is connected to the mains.
- Check the tightness.
- Start the system.
Mounting by device type
Floor
The easiest installation process is to install a floor-standing fan coil unit without a condensate duct. They do not spoil the interior and can be installed independently. The typical design of such equipment consists of two nozzles through which the mixer and the working fluid go.
Cassette, wall and sub-ceiling
Mounting cassette fan coil unit and the other two are a little more complicated, since they can be either two-pipe or four-pipe. Moreover, their electrical system may differ significantly from floor systems.

Therefore, it is best to entrust the installation of a wall-mounted fan coil unit, under-ceiling and cassette, to specialists.
With the help of specialists
Connecting a fan coil is a complex process that requires professional approach, so it is best to consult a specialist. Only they will be able to competently do the work on:
- installing the unit in the most efficient location;
- assembly of piping units by installing the necessary taps, temperature and pressure control devices, valves;
- laying and thermal insulation of pipes;
- installation of condensate drain;
- connecting devices to the electrical network;
- pressure testing of the system;
- checking the tightness;
- water supply.
They will do all the calculations before starting work and will take into account the characteristics of the room and the load of each fan coil. Experts will create a safe and reliable system that will serve the user for a long time.
What to remember when contacting specialists
In order to correctly select a company that provides installation services, you should pay attention to the following criteria:

V Lately channel fan coil unit is becoming more and more common among consumers. This device is equipment that has the ability to heat or cool indoor air at the request of the consumer. Simply put, such a unit can be called a heat exchanger, which can be installed in any building room for any purpose, this will allow you to choose a specific temperature regime at any time that will be comfortable for people inside the building.
Design features
A duct fan coil unit can have various design features, but most often the models consist of a filter element, a heat exchanger, a fan, an electric heating element and an equipment control panel. As for the filter, it is able to protect the system from the ingress of foreign particles that can penetrate along with air masses. The heat exchanger allows you to effectively cool or heat the air, which will depend on the set operating mode of the equipment at a certain moment. The fan provides air flow that is forced through the heat exchanger.
Principle of operation
If you decide to purchase a duct fan coil, you should initially familiarize yourself with the principle of its operation, which is that the air is cooled and heated, depending on the selected operating mode. Air masses are driven by a fan through the heat exchanger. In this case, the air flow is created not from which are present in the room, but from fresh air supplied from the chiller. The last element acts as a central component during creation. In the chiller, air masses come from supply unit, which carries out air intake from the outside.

Main advantages of the system
The duct fan coil unit has a lot of advantages, among them it is possible to highlight the provision of full cooling or heating of the room within five minutes after starting the system. This possibility is guaranteed by the method of simultaneous installation of a fan coil unit and a chiller. Among other things, the system allows you to create a comfortable microclimate in the rooms where the fan coil is installed. The owners of an apartment, house or building will be able to save energy.
Additional features include the ability to connect a different number of fan coil units to the chiller. But the step of the route from the chiller to the most distant fan coil unit cannot be more than six hundred meters. Fan coil unit of channel type allows you to save cash that are required to create pipe routes when choosing water as a carrier.

Lack of system
Before installing the system, you must understand that the arrangement has one significant drawback, which is expressed in the absence of a building ventilation function. That is why there is a need to create a parallel system that will provide forced air circulation.
Choosing a type of fan coil before installation work
If you decide to install a channel-type fan coil in a building, you must decide on what classification the system should have. Today there are four types of designs on the market, namely: console type, cassette type, horizontal type, and cantilever type enclosed in a case. Each of these heat exchanger systems can be installed indoors using different technologies: elements can be hung on the wall, built into ventilation system buildings, set on the floor or suspended from the ceiling. The main features of the fan coil unit, which affect the choice of a particular device, are the overall air capacity, as well as the cold air capacity.

Characteristics of two-pipe and four-pipe heat exchanger systems
Before you install a duct fan coil unit, you need to decide whether a two-pipe or four-pipe heat exchanger system that uses water as a carrier will be used. The simplest strapping scheme has two-pipe system, because of this, it is so common. With it, you can cool the air inside the room, and the cost of the device will be relatively low.
For the winter period two-pipe fan coil unit it is possible to switch to heating mode, but for this it will be necessary to disconnect the pipes from the chiller, and then connect them to the central heating. This function can be carried out using a special valve, which is manually adjusted.
The four-pipe system contains two heat exchangers, one of them is connected to the system with a hot medium, while the other is connected to the chiller. A similar strapping scheme is characterized by more complex design features, this affects the increase in the price of the fan coil, which is why consumers quite often refuse to purchase this equipment.
The four-pipe duct fan coil unit can cool or heat the air in the room, while you do not have to make particularly difficult pipe switching, you just need to select a certain mode using the equipment control panel. This is very convenient, according to the assurances of users who have been using a similar system for heating for a long time or

Four-pipe duct fan coil, the principle of operation of which was described above, is best installed near windows, as this will compensate for losses from warm air through window openings. As you know, most of the heat is lost precisely through the windows, which is why this approach can be called a very effective solution.
Installation technology
Before starting work, you must definitely consider the connection diagram of a channel fan coil, this will eliminate errors, which is especially true for inexperienced novice craftsmen who have not previously encountered solving such problems. Due to the fact that the system, in which the chiller and the fan coil are present, is distinguished by rather complex design features, it is best to entrust installation work and adjustment to highly professional specialists. They will be able to complete the installation by correctly installing the equipment in the place where its work will be most effective. In this case, you can take advantage of the warranty and service... Most often, supplying companies guarantee full service in case of breakdowns within 24 hours.

If you yourself plan to deal with these manipulations, then at the next stage it will be necessary to assemble the strapping units, and this can be done after installation required valves, taps and pressure and temperature control devices, which is a very important task. The next step will be the installation and insulation of the pipe, as well as the installation of a condensate drainage system, which will protect the system from premature failure even before the end of the warranty period. When a high-pressure channel fan coil is installed, it will be necessary to perform manipulations to connect the devices to the power supply network. The system must be pressurized and its tightness checked.
The last stage is the supply of water, which acts as a carrier in the system. Before deciding on the maintenance side of the Clint duct fan coil unit, it is worth considering whether you can do everything necessary calculations that are needed to carry out the work. They will allow you to take into account the functional load that will be on a particular fan coil. Among other things, specialists will help to determine the characteristics of each room in the building, which allows you to choose the right equipment for the most efficient work.
Why choose a fan coil unit?
If you decide to install a fan coil unit indoors, you will find a heat exchanger with a fan inside. All of the above components are enclosed in one compact housing, which looks very aesthetically pleasing and does not take up much space, in particular when mounting on the ceiling. That is why experts advise resorting to such a solution. By setting this system, you will be able to simultaneously solve the issue of air conditioning and ventilation, which saves money on the purchase of appropriate equipment. The equipment operates with minimal noise and does not involve complex maintenance, which is undoubtedly an undeniable advantage.

Conclusion
After everything is done, regardless of whether you will deal with them yourself or entrust experienced craftsmen, you will be able to use a system that is durable, trouble-free and safe in operation. This will help you ensure that your fan coil chiller system is as efficient, reliable and economical as possible. It does not involve carrying out particularly complex operations for the installation and commissioning of the system. In order to ensure effective work, it is best, of course, to involve employees of the relevant organization, which specializes in the creation and arrangement of such systems, in the installation. This will allow you to avoid premature repairs.
Initially, it should be noted that without the availability of project documentation, the installation of a single fan coil unit is not allowed. Any replacement of one type for another type or of the manufacturer of the fan coil unit must be agreed with the designers, otherwise it can lead to the failure of the chiller itself.
Fan coil connection in several stages
First stage- this is the installation of the fan coil itself in the place allocated in the project with its subsequent connection to the pipeline system supplying water (or any other coolant). Again, all the characteristics laid down in the project should be taken as a basis.
- It is impossible to change or change the diameters of the pipelines, the material from which the pipes should be made, which will definitely affect the flow rate of the coolant through the fan coil and, in the future, on the operability of the chiller itself.
- Do not allow the installation of valves, adapters or other elements of the hydraulic circuit that are not provided for by the project, as well as the installation of the same elements.
- It must be remembered that when the fan coil is in operation, condensate forms on its heat exchanger and this condensate must be discharged into the sewage system.
- To avoid stagnation of condensate in the drainage pipelines during its laying, it is imperative to maintain a slope of 1 degree along the entire length of the drainage pipeline.
- Completely eliminate failures and the formation of stagnant zones.
- There are unpleasant odors in the sewage system and the ingress of these odors through the drainage pipeline into the fan coil unit, and then into the room, must also be excluded by providing a water seal or odor-locking device on the drainage pipeline.
Second phase. Since ducted fan coil units are of different types of location, the most difficult thing at this stage is to connect the fan coil units to the air ducts.
- Not all ducted fan coil units can be connected to air ducts, so this stage is more for those who have such a connection. If a duct fan coil requires the connection of air ducts, then at this stage such a connection is made through which air flows to the fan coil itself, and through which the prepared air enters the room after the fan coil. In addition, it is necessary to pay attention to the air duct that provides the flow of fresh air, if such is included in the project.
- The material and cross-section of the air ducts are different and therefore these parameters of the air ducts should be observed in accordance with what is laid down in the design documentation.
- Attention should be paid to the length of the air ducts through which air must flow from the room and into the room. This length is directly related to such technical characteristics fan coil unit as a static head. Increasing the length of the duct can lead to a decrease in the air flow rate.
Third stage... The fan coil units are connected to the power supply network.
- Before connecting, it would be a good idea to take a little time to verify that the voltage of the fan coil unit matches the network to which you want to connect. The machine through which a fan coil unit or several fan coil units should be connected should be slightly more (by about 15-20%) in current strength (amperes) than all fan coil units connected to it. You can use the formula from the 6th class to calculate the current strength of the machine. P = U * I whence I = P / U. Where P is the electrical power of the connected fan coil units; U is the voltage in the network (usually 220 V); I is the current strength (amperes) to which the machine must correspond through which the connection is made.
- We must not forget that it is imperative to connect all three wires, especially the third - ground.