Making a model for children Russian house. Layout of a house made of paper do it yourself schemes
You can make a layout of the village from different materials... Cardboard and paper are suitable for children, and adults can create it out of wood. Also, you will find a miniature "city in the country" and a reduced copy of the village.
The content of the article:
It is interesting to create small copies of houses, villages and entire cities. Such layouts will allow you to make the layout of the future. country house or to build a whole city in a dacha, but in a reduced form. If you want a real country house in your apartment, only in smaller sizes, then buy a prefabricated wooden structure and glue the parts.
To instill interest in such activities in very young children, we suggest that you first start with a picture that will help to recreate a suburban corner.
How to make a winter painting with your own hands?

It consists of only two colors, but this does not lose its charm. For work you will need:
- sheet of whatman paper;
- wax crayons;
- gouache;
- PVA glue;
- cotton wool;
- sponge.

Show your child how to draw with crayons on a drawing paper. Now let the kid feel like a real artist, dipping a sponge in paint, paint the background of the future picture.

When the paint is dry, paint over here with wax crayons. Help your child to depict village houses, let him draw the road and Christmas trees himself. He will also be able to create the features of future clouds and the sun. Now you need to apply glue to the markings and attach the twisted cotton wool here. Thus, the outlines of trees, clouds are created.

Also, you first need to create edging for trees and houses, and then fill them with soft cotton wool. Have the child also attach it with glue.

It remains to create the rest of the details from the twisted cotton wool, and after the glue dries, you can frame such a beautiful work.
V kindergarten are often asked to make crafts at home. This could be a mock-up of a village courtyard. See how to make it from scrap materials.
Craft a village courtyard for a kindergarten

To create such a layout of a village courtyard, you will need:
- cardboard;
- PVA glue;
- colored paper;
- scissors;
- twigs;
- miniature jigsaw or stationery knife;
- tree branches;
- acorns;
- figurines of the inhabitants of the village courtyard;
- plasticine;
- colored paper;
- hot glue gun;
- cardboard box.

Tell him how to make a house out of colored paper. It needs to be glued to a rectangular sheet of cardboard, and acorns or hazelnuts should be attached to the side with a hot gun. They will become the ends of the logs.

A frame for windows should be cut out of colored cardboard, and glass should be made from white colored paper. Let the child first glue them on the marked places, and then draw pots with flowers here. Now you need to glue the strips of cardboard so that they turn into frames.
The roof for the house is cut out of red cardboard or from ordinary gray, and a triangle of scarlet paper is already glued to it. The roof can be tiled, then you need to draw wavy lines in a checkerboard pattern with a pencil.
Here's how to proceed with the layout of the village. With his own hands, have the child cut a rectangle out of colored cardboard and fold it in half. To this bench at the bottom you need to glue small rolls of cardboard, which will become logs. A bench rests on them.

Nice to sit on it surrounded by flowers. The baby will create them from colored paper. To be able to admire a small reservoir, wrap it with acorns or nuts together with the child, and the baby blinds the water from plasticine, giving it a semicircular shape.
You can focus on highlights made from plasticine of other colors.
Perhaps it will be a fireplace. Then you can put a few sticks here, which will give the picture more realism.
Make a visor on the roof, then you can put a toy cat here, attach it with silicone from a hot gun.

There will be room for other animals too. Have your child make a cardboard kennel for the dog. It is not difficult to create this structure. You will need to cut two identical walls for the sidewall and two for the back and front of the kennel, with a pointed top. In the front, you need to cut a large hole in order to put the dog here. The roof is created from a rectangle of cardboard that needs to be folded in half and glued.
The layout of the village will be incomparable if you, together with your child, create a lake with a bridge. Let your beloved child crumple the blue and white plasticine and cover the oval territory with it. This water is surrounded by acorns or nuts glued directly onto the clay or with a hot gun. Attach the duck and her babies in the same way. The bridge needs to be made of cardboard.

It is also quite easy to create a stable using cardboard, and to glue pieces of twigs on the roof, which will turn into a roof.

In the same way, a barn is created, where the heifer will live with the foal.

To make a pen for sheep, you need to cut a wide strip of cardboard and glue it to the clearing, and also glue the ends to make a circle. Inside, you will place the sheep. Glue some twigs to the outside of this pen to make the fence look more realistic. Inside, you can place an inverted cover from plastic bottle, in which you need to put food from green plasticine.

Such a layout of the village will accommodate many characters. The pigs will be next. The pen for them is made of twigs glued together.

Using the same material with your child, you can create a goat stall. And the roof is made for him in a very interesting way. To do this, you need to glue twigs on an old CD, and on top of them? hazelnuts. With the help of these same gifts of nature, you can decorate the cardboard walls of the building to make them look like logs.

The child will be happy to mold bowls from plasticine and put them next to the animals.
It remains to make small accessories:
- Make firewood from wine corks, which you need to cut lengthwise into 4 parts with a clerical knife and paint in the appropriate color.
- Also, with the help of it, a spinner is made for the well. You will need to make holes in the wine cork with an awl, thread a wooden skewer here and wind the thread. A shampoo cap is attached to the rope from below, which acts as a bucket.
- And the well itself was made from a bottle of Agusha yogurt. In it, you need to cut out the side walls, leaving only one vertical stand on both sides.
- A spit for a well is attached to them, and its roof is made of a bag taken from thermal milk. Now these masterpieces will be painted and admired the results of the work.

Who knows, maybe your child, when he grows up, will want to recreate such a model of the village, but already more realistic. We suggest that you familiarize yourself with one of these projects, which was created in England.
English village layout

Here is a small copy of the village of Borton-on-Water at a scale of 1: 9. The houses are made from the same material as the original. The craftsmen did their best, because they even made shop windows, signs, like in that real village.

The streets here are quite spacious so that visitors can freely walk and admire such a layout of the village.

The gardeners are also hard at work here. After all, ordinary trees near such buildings will look too tall. Therefore, low ones were used. They are pruned periodically to look like real trees.
Lawns are made in English style and also require periodic maintenance. They are watered, fed, cut.

Do you think that only professionals can build such miniatures? No, if desired, people without special construction or architectural education can do this. You will be convinced of this now.
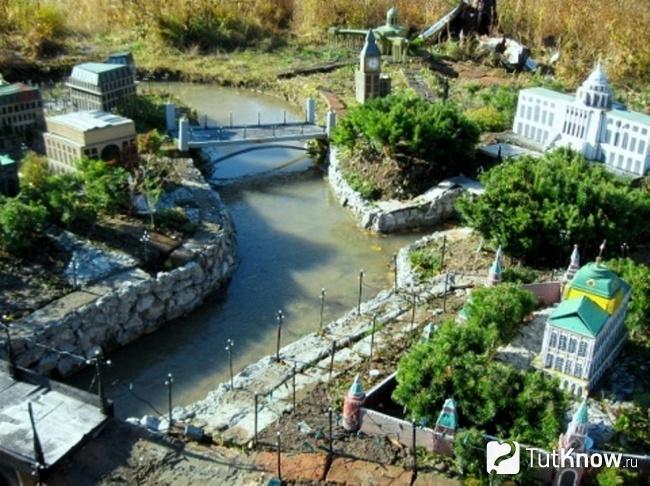
Miniature city in the country - model

Note, there are houses here different shapes and destination and even a pond with a bridge.
To have such a miniature on your personal plot, first you need to choose a place where it will be located. Draw a plan of houses and other structures first on a Whatman paper. Now we need to start creating individual objects.
By making templates out of plywood, you can pour cement into them and create some houses that way. Once dry, these structures need to be painted over and placed on a level cement pad or on blocks.
Fences can be wooden, they are painted to make it seem as if they are made of brick.
It will be necessary to lay a canal according to the markings, which will turn into a river. Strengthen its banks with stones and cement.
Make a metal bridge or some other material that is available in the country. If the river is not in the lowland and the water dries up, you can fill it by placing a special water pump at the mouth.
And if the reservoir is located in a low place and there are no problems with water, then you may need to install a solid bridge. So that you can walk on it, reinforce the bottom with reinforced concrete pipes. Fill in the space between them and the bridge with stones and cement.

Of course, such painstaking work takes a lot of time. After all, you need to make not only the structure and other objects of the city, but also plant such plants that will look natural here.
You can start with a small section of a village or town. And if you like this kind of work, then do these settlements more numerous.
Such models of the village and city will allow any person to feel like builders of a large territory, architects and make dreams come true.

To make it easier for you to deal with construction works, see first how you can assemble a model of a house from a tree.
The second video will teach you how to make a model of a village in order to then take the craft to kindergarten.
House model and its architectural model - how are they different? The first one can be made from available materials: paper, cardboard or wood. It does not have to repeat the shape of any particular structure. The architecture of the building can be anything you like, as long as the result of your creativity pleases both you and those around you.
An architectural model is an exact copy of a building with repetition of all the main and secondary features. It is built with expensive materials and can take months of hard work to create. Therefore, we propose to start with building a model of a house from scrap materials. Don't know how? In this article you will find recommendations and detailed instructions on how to make a layout of cardboard and wood.
Miniature paper house
A model of a paper house, the diagram of which is attached in this article, is a simple construction, although the work on its creation can be an interesting creative process that requires attention and perseverance. You will need thick paper, newsprint or packing paper will not work.
It is better to take a standard sheet of 29x21 cm. If the contours of your future house do not fit into the size of the sheet, you can glue two together using the "joint to joint" method with overlapping a strip 2 centimeters wide. After the blank of the required size is received, it is necessary to make a markup. We propose to build a model of a house out of paper, which will be rectangular in plan, two-story, with three doors, windows and

Drawing
First of all, we recommend that you copy our scheme, which you see in the photo, in order to indicate the dimensions of the future building. Then you need to decide what length and width the layout will have. Write these numbers on the diagram. Next, determine the height of the first and second floors, as well as the roof. Now you can transfer the resulting drawing to the base sheet using a ruler and a pencil, measuring out all the parameters of the future house. The next step is to draw windows and doors. Their location can be changed as you like, depending on your taste. The layout of a paper house allows you to make design changes at any stage of construction.
Assembling the layout
The next step is to draw all the "wings" that you see in the diagram. They will act as mounting brackets when assembling the breadboard, supporting the roof and connecting the walls. This is followed by the most important part of the work, requiring accuracy and attention. Go through all the lines of the drawing with a ballpoint pen along the ruler and with pressure. This is done so that you can fold the paper where you want it.
A paper house layout requires precise fold lines. After all the borders have been drawn, you can cut out windows and doors, as well as "wings" with scissors. The next crucial moment: it is necessary to bend the entire structure correctly and glue it in the right places. For this we recommend PVA glue. When the layout is dry, you can start painting.

House layout made of cardboard
Such buildings are made not only of paper. A do-it-yourself model of a house can also be made of cardboard, a material strong enough to make the building look "real", with opening doors, windows, floors and ceilings, interior decoration and even inhabitants sitting inside on miniature sofas and chairs.
It all depends on how much the "builder" is interested in the end result. He can build any model of the house with his own hands. However, its implementation is a complex creative process that requires accuracy and perseverance. You will need a regular tool: scissors, a stationery retractable knife, an awl, a ruler (preferably metal) and PVA glue.

Corrugation as the main material
It is better to take two types of cardboard for making a layout: smooth and corrugated three-layer. The second will go to the floor and ceiling, and the first will be used to make a corner for connecting individual parts of the structure, small parts of the external and internal design. A cardboard house layout needs a base. It can be a plate glued from two layers of corrugation or cut from plywood. The base or sole of the model is drawn according to the dimensions of the future house and can be filled with decorative miniature flower beds, garden vases, and benches.
Next, you need to draw on the basis of the layout of the walls, porch and outbuildings. After that, you can start making the main parts: walls with cut out door and window openings, ceiling and floor of the second floor (if to assemble the structure it is necessary to prepare corners from thin smooth cardboard. The longer the corner is, the stronger the connection. Optimally, its length should be at least 70% of the connection length. The width of the cardboard corner is 1.5-2, 0 cm.
House model made of wood
A do-it-yourself model of a house from wood can be made only with the participation of adults, since the work is related to woodworking machines for home use. They are quite dangerous if there are no working skills. Hand tool for wood processing also requires care when working with it. The blades of knives, planers, files and graters have sharply sharpened cutting edges.

Blanks
Layouts wooden houses do it yourself require accuracy in the process. Their creation is a fascinating creative activity, during which the master can show ingenuity and ingenuity. First you need to make a drawing of the future house. Then make a base for the breadboard. After that, you can start creating parts.
Walls and floors are best made of thin planks 1.5-2.0 centimeters wide and 5.0-7.0 mm thick. The workpieces are placed on a flat surface close to each other and fastened with the same strips, which are applied perpendicularly from above and pressed with some kind of weight. Previously, all parts are coated with PVA glue. After the manufactured block dries out, it can be customized according to the drawing and docked with other parts.

Finishing
The assembled model must be sanded and sanded. This is done by hand with 25-H grade glass cloth on a fabric backing. Then the surfaces are sanded clean with 8-H grade sandpaper to full smoothness. After processing, the layout can be painted, doors installed, windows inserted and finishing work can be done.
A do-it-yourself model of a house, as a rule, has a removable roof. This is necessary in order to have free access to indoor areas, since toy furniture and other items will have to be installed in a miniature building interior decoration... The surface of the walls is covered with "wallpaper", that is, painted strips of paper. The floor needs to be painted in Brown color or cover it with linoleum - it can be made from oilcloth.
It would be a mistake to believe that only little girls make models of houses from paper with their own hands. Of course, your princess will also be happy with such a gift, but they can also come in handy in an architectural idea. Before starting to build, always make a small copy. In this case, PVC (polyvinyl chloride) is used, from which the finest details are cut with a milling machine. Then they are combined with a solvent.
But you can repeat the masterpieces of architects without special equipment... Such a house can be not only a useful layout, but also a home decoration. The most common material for this is paper, so the process will not cost you too much.
We buy materials

For work, you need colored paper or cardboard. The latter is preferable for complex models, as it requires increased strength. It is better to take paper for scanning.
All windows, doors and other small parts will be cut with a knife. Make sure that it is sharp enough, it is better to buy at a hardware store.

You can connect the parts with both super-glue - it allows you to speed up the process - and PVA (but it is better to speed it up with a hair dryer). Scissors, a pencil, and a ruler are also useful. You can use paints for decoration.

Choosing a flat pattern

If this is your first experience in reproducing models of houses, it is better, of course, to take a ready-made scan. You can not only find them on the Internet, but also make them yourself. This is a very fun process.
You can choose almost any program. It is desirable that she work with vector images. One of the most convenient in this regard is CorelDRAW. Constructions in it are very easy, you can change the thickness of the lines and load your own textures. But the built-in library also pleases with the proposed photos.

The first step is to draw an oblong rectangle. Now it needs to be split into two pairs of identical walls located across one. You need to build a floor along the bottom edges, it is attached to one of the edges to the general layout. We divide the roof into segments and also attach it. Then you can add architectural elements and visual effects. And don't forget the straps.

Assembly stages

We print and cut out the diagram we received earlier.
If you do not have a color printer or have not used textures, you can transfer the blank to cardboard.
Use a needle and an awl to mark the locations of windows, doors and decorative elements. You need to cut everything at once, entirely. And preferably with a clerical knife - the scissors will leave serifs. Place a sheet of plywood beforehand.

Additionally, make shutters, doors, awnings, and the like. We will glue them at the very end. Use a ruler to work through all the folds - this will make it easier to assemble.

Related videos
In our selection of video tutorials, you can learn how more complex houses are created and get a lot of interesting ideas:
Natalia Karpenko
Master class on making a model of a Cossack courtyard for a mini-corner"Cossack courtyard"
Master- the class is designed for the audience of parents and teachers of children of senior preschool and primary school age.
Appointment master - class: making crafts on the Cossack theme.
Target: development of creative abilities in children.
Tasks:
Develop imagination, spatial thinking, fine motor skills arms,
Develop aesthetic taste,
To form the ability to apply previously acquired skills of working with natural and waste material,
To cultivate love and respect for the native land, Cossack life, traditions of Russian Cossacks.
For registration mini- we made a tabletop corner layout one of the options Cossack courtyard .
To do this, we took thick cardboard about 40x40 cm in size, and with the help of PVA glue we pasted over it first with newspapers, and then with yellow felt, so that in the future, ready layout on the one hand did not slide on smooth surface, and on the other hand, it could be easily and firmly glued to it mini decorations.

Further we made hut from thick cardboard, covered the walls with PVA glue, then sprinkled them with semolina and, after drying, covered them again with PVA glue, thus imitating a "hut". Roof, plinth and bench - cardboard covered with burlap, pipe - cardboard cylinder, glued with twine. Well made from a cardboard cylinder pasted over with coffee beans, a pencil pasted over with twine, and a recycled part of an old wooden constructor, two buckets of harvest made from cut out cells of egg trays, pasted over with twine. The harvest in buckets was imitated using multi-colored beads. Well bucket made from a plastic bottle for dispensing medicinal syrup, glued with twine, on the sides with the help of an awl heated on fire, we made holes where we passed the wire, which served as an imitation of the handle of a bucket. Sunflowers can be made from colored paper, cardboard, fabric.


Fence underworld made of toothpicks glued to a thin foam sheet, which in turn is glued to the base layout.

Further, all the components are glued to the base. Simulation of two garden beds- regular black long tea with slices of lemon peel. Firewood in the backyard - pieces of branches, grass - dry moss glued to PVA glue, path - Pistachio nut shells. In the end, that's what we got.

And what about a hut without windows and doors. This is cardboard covered with burlap and trimmed with toothpicks.

Good luck to you, dear colleagues and parents in your work!