Do-it-yourself shelf for dishes at the dacha. Everything according to the shelves: we choose hanging shelves for different styles of kitchen design
Both wooden and plastic boards and simple pallets can act as a basis for the design.
- Minimalism and hi-tech... In this case, constructions with simple laconic forms will be the most appropriate. The color scheme is monochromatic, but sometimes it is permissible to use bright shades. As an addition, the do-it-yourself kitchen shelf can be decorated with LED lighting.

Simple and laconic design is typical for minimalism and hi-tech
- Loft or Scandinavian... Solid shelves with a slightly rough texture are perfect. Chipboard sheets, rough boards, old pallets and boxes can act as a basis for them.

The more original the materials, the better they will fit into the loft interior or Scandinavian decor
- Modern... Glass or metal accessories will perfectly complement the modern style.

Metal fasteners - what you need for the Art Nouveau style
- Country, provence and shabby chic... Decorative shelves with metal consoles, patina, decoupage patterns or carvings as decoration will laconically fit into such an interior.

The best shelf for a country or shabby chic kitchen is a natural wood construction
- Modern... To fill it, you can use unusual lattice shelves, cork wine bottle racks, etc.

Shelf ladders will fit perfectly into modern decor
What to look for before starting work
Before you create shelves for the kitchen with your own hands, it is not enough just to decide on their style. There are a couple more to consider. important nuances that affect the visual perception of the structure.

Thinking over the creation of a shelf, it is necessary to take into account its location, shape, fasteners and dimensions
- Location... Think carefully about the place where the structure will be located. It should be easily accessible, so don't place it too high.

The entire contents of the shelf must be available at any time
- The form... The most popular due to their ease of execution are structures with a rectangular shape. Moreover, they are the most spacious.

Rectangular shapes are most popular due to their spaciousness and ease of implementation.
- Dimensions (edit)... It all depends on the area of the kitchen and the items that you are going to store on the shelf. The shelves for decorative accessories, spices or bottle holders can be made small. Designs that are designed to serve as a complete replacement for top cabinets headset, can be massive and located along the entire wall.

In a spacious kitchen, instead of standard shelves, you can install full-fledged shelving
- Fastening... To make a do-it-yourself kitchen shelf look stylish and complete, you need to carefully choose the mount to it. It should match in color and material with the base.

Fasteners should be organically combined with the color and texture of the base
Finally
Do-it-yourself kitchen shelves will make the interior individual and unique. We offered you three interesting master classes with which you can really create stylish designs... More useful ideas you will find in the photo and video in our material.
DIY kitchen shelves are not just an additional surface for kitchen utensils, but also an opportunity to save money on upgrades kitchen set by creating the author's design of the room. It is not necessary to buy such interior details: if you have the necessary tools, improvised materials and original ideas shelves can be made by yourself. 
Similar articles:
Wooden shelves for kitchen
Sometimes, even in a large kitchen, there is not always room for all the kitchen utensils available. If it is too expensive to buy ready-made headsets, another solution should be found. In this case, the optimal and economical way out is to make an original shelf for the kitchen with your own hands, using the necessary tools.
The simplest wood shelf for the kitchen has a square or rectangular shape. The functional purpose of the product plays a key role in the manufacture and selection of the parameters of building materials, since the thickness of the material used must withstand the expected load.
When making do-it-yourself shelves for the kitchen, you should take into account the size and weight of the items that will be placed on it. Oil and vinegar bottles require a taller and more durable construction than low containers.
Before starting to master the carpentry craft, you need to carry out preparatory work:
- Choosing a place where the shelf will be installed. The size of the structure depends on the location.
- Schematic drawing of the design for work. It is not necessary to create a graphic drawing strictly to the millimeter, it is enough just to draw the intended product on a sheet of paper, indicating its parameters. Also on the sketch you need to indicate the attachment points of the structure.
- Preparation of a working tool so as not to be distracted from the work process in the future.
After making sure that you have the necessary equipment, you can start making a do-it-yourself kitchen shelf from wood.
Stage-by-stage production:
- Markings are drawn on the wood material, along which the board is sawn, then the parts are sanded with sandpaper.
- The processed workpieces are fastened together with self-tapping screws. Fasteners cling to the frame.
- A protective layer is applied. Such measures are necessary to protect the structure from external factors: moisture, grease, chemicals. To achieve the goal, paint, varnish or adhesive film is used. When painting the product, a color is selected that matches the overall interior and style of the kitchen.
- Mounting. The mounting method depends on the load capacity and the material of the kitchen walls.
Wooden walls allow you to make fasteners of various sizes using nails, screws and other fasteners. Working tool: hammer, screwdriver.
In work with concrete walls with a high level of lifting capacity, it is better to use a hammer drill and dowels. It is necessary to drill holes in the designated place and hammer in the dowels. Attach the shelf using the accessories with a hammer. If the wall in the kitchen is plasterboard, it will not be possible to attach heavy structures. For fasteners, you will need special nails and a drill.
Knowing how to make a shelf from wood, you will be able to quickly make the desired kitchen element.
Corner manufacturing options
There is often a lot of free space in the corners in the kitchen. There is not enough space to accommodate a standard bedside table, but it is possible to make a corner shelf yourself.
To work, you need a few screws and a surface blank. If the placement is planned next to an existing hinged bedside table, you need to screw in the screws on the unused wall and side wall of the headset so that the caps look out by 2-3 cm.You need to put a blank on the resulting support - the corner shelf is ready.
For more reliable shelving, corner shelves are designed using auxiliary materials, additional fasteners and tools.
Spice rack
When a lot of different spices have gathered in the kitchen, which are packaged in containers, the problem arises of the location of all these small jars. You can make your own spice racks to arrange the seasoning.
The shelf material can be medium density fiberboard (MDF).
The plywood construction is simple in its design:
- determine the size of the shelf;
- posted on kitchen wall attachment points for retaining elements;
- holes are drilled, holders are fixed;
- the created element is installed in the fixed elements.
Such a structural detail in the kitchen will help organize spices and add space to the kitchen.
Decorative constructions
Do-it-yourself decorative shelves for the kitchen are also easy to make, having at hand necessary tools and raw materials.
The decorative shelf is made of fragile material and has no functional load.
Drywall
You can even make a shelf in the kitchen out of drywall with your own hands.
To build such a structure in the kitchen, you need to take measurements, transfer them to the drawing, and then to the material. Having cut out a sketch with a special file, you need to fasten the parts together. When the structure is ready, it should be pasted over with wallpaper or self-adhesive film to give the product a complete look.
A DIY plasterboard shelf is fragile, so its durability is not guaranteed. The location of such a surface in the kitchen should be away from the stove and sink, a convenient option is near the window.
Constructive options
The execution of shelves in the kitchen can be not only angular and vertical. The design of the stand surfaces may vary. Some structures have a movable facade, so they are difficult to make at home, but if you work hard, you will be able to make products.
You can create an interesting shelf in the kitchen from a pallet by attaching it to the wall or by drilling several holes in the plywood. This will allow you to create a do-it-yourself bottle rack in the kitchen, placing them with the neck in the hole. Using the items at hand, you can imagine hundreds of shapes and varieties of designs for the kitchen.
Open and closed
Open shelves in the kitchen began to supplant hinged sets. Such designs are a trend in the kitchen interior. Open surfaces visually expand the space, and everything you need is available at any moment.
Closed shelves in the kitchen are the usual hinged sets and small bedside tables.
Lattice shelves
A grid-shaped kitchen shelf is designed for storing dishes in the kitchen after washing and can be installed inside a wall set.
The kitchen has not been considered a simple room for a long time, where you can only cook and eat. This space has become one of the main and important in the house, since most often guests are received here, important meetings with old friends and others are organized.
In order to make this room even more functional and convenient, many people want to use different pieces of furniture, for example, kitchen shelves that could replace cabinets.
For many owners, the problem of the lack of kitchen footage is familiar, but you need to mark out so many things, utensils and little things, which you simply cannot do without in the cooking process.

Pay attention to the article - it is this area that is typical for a large number apartments with small kitchens.
Shelf types
The kitchen is a place where there should be many different drawers and shelves. Only in this room can you close the entire wall with shelves to place everything you need on them. Today, similar products are produced in various configurations from all kinds of materials, differing in size, color, texture, and so on.

Structurally, the shelves can be classified according to the following criteria:
- corner;
- console;
- asymmetric;
- vertical;
- open;
- with built-in light and drawers;
- closed with glass;
- having a conventional mount or hidden from view.

The most optimal are open shelves that look great in the kitchen space and can be easily hung on the wall.
Open shelves: wood, glass or metal?
Basically, jars of cereals and spices, bottles of oil, nice knick-knacks for decoration are placed on such structures with easy access. However, they can also accommodate pots with live indoor plants, candlesticks, other decorative elements.

The convenience of open shelves also speaks in favor of these models, since it is much more comfortable to reach out and take what you need in an instant than to open a drawer in the table and look for the right things.
Wooden shelves for kitchen
Hanging shelves are usually made of wood, since the material is practical and durable, and it does not need special care. Such products look especially impressive in the kitchen, decorated in the interior of classic, country or Provence styles.

Wood shelves can look like regular stripes of solid wood or be decorated with painted or carved designs. Glass or chrome inserts will give them a special style that fits perfectly into a high-tech or modern interior.

As for the coloring of the shelves, in this matter everything will depend on the holistic picture of the design of the space. When the kitchen is decorated in white, products in a juicy green or red can become attractive bright accents. When it is impossible to choose in the store suitable option by color, then this problem can be solved in a different way. For example, take chipboard boards, fasteners, a little paint, a little work, patience - a dream will come true.

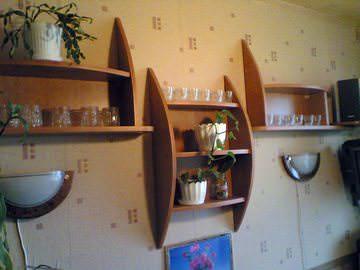
Often in the interior of a small kitchen, shelves become the center of the design of the common space. If one of the walls is filled with shelves and decorated with interesting things, then even an ordinary kitchen - sink, stove, table and chairs will become a real decoration.

Glass and metal shelves for the kitchen
In addition to using wood for the manufacture of shelves, you can take other materials - glass or metal. Metal models will give the kitchen space laconicism and solidity, glass will add elegance and modernity. If you have experience or desire, then you can make glass shelves yourself.

For this work, you will need the following items:
- drill;
- self-tapping screws;
- glass;
- holders;
- pencil.

First, a shelf template is drawn. To do this, select the size of the finished product. Make the dimensions of the corner to which you have to attach it. When the shelf is made taking into account accurate measurements, it will be able to perfectly adjoin the wall. The template should resemble the shape of a pentagon. The difference between the manufactured shelves can only be in length.

Cut out the shelves from the glass according to the template made. At home, this is not easy. It is best to consult a specialist. This will allow you to get the edges of the shelves, aesthetically pleasing and professionally executed. The corners of the product should be rounded. The glass thickness must be at least 5 mm.

After that, you should fix the glass shelves to the wall. For this purpose, you can use ready-made structures. The bottom shelf is fixed first. On the surface of the wall, mark a point under it, applying the holder together with the glass. Mark the place of the hole with a pencil, then drill it into the wall, install the dowel. The shelf is secured with a holder, and then clamped with a screw, leveled, and then screwed to the wall.

In the kitchen, it is not just a beautiful accessory, but also a place to store a variety of kitchen utensils. Usually men do not understand why a woman needs so many shelves, when any housewife knows that it is much faster and more convenient to cook delicious food if everything you need is at hand, in a conspicuous place.
Classic interior
Hanging shelves for the kitchen are used to store spoons, bowls, bowls, jars with cereals and spices. It should be noted that such a piece of furniture can be both purely decorative and practical. In the first version, the shelves are usually located outside the cooking area. Decorative vases, figurines, painted dishes or various cute hand-made things look great on them.
Decorative hinged shelves for the kitchen, as a rule, are made of wood, since it most favorably emphasizes the coziness and comfort of the room. It cannot be said that they will play a decisive role in the interior design, but they will certainly bring their own flavor. For classic style wooden hinged shelves for the kitchen are perfect, the photo of which is presented below.

Modern kitchen
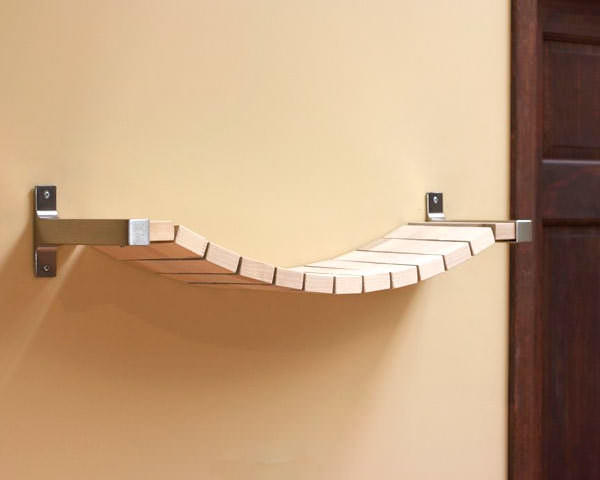
In the case of an Art Nouveau interior, shelves with big amount chrome parts. They can be attached to the walls, but more and more often on sale you can see metal curtain railing structures, which are compact in size and can be easily attached to an iron rail. A photo of this type of hanging shelves is presented below. They are usually in the form of lattices and are associated with cleanliness and order.
V modern interiors very often, backlit designs are used, which can advantageously complement the main lighting. A hinged shelf with glass can become a bright accent in the interior of any kitchen.

Optimal dimensions of hinged structures
This type of interior can be radically different in width, height and depth. As for the last parameter, then the best option kitchen hinged shelves are considered to be 30-33 cm deep. The height and width will depend on the purpose of the hinged structures, as well as the size of the room. For a small family, a 40 x 60 cm shelf may be quite sufficient, but for four or five people it is better to choose a more practical option.
In a spacious room, wide, but low hinged shelves for the kitchen look much better. And for a small room, it is more appropriate to choose high and narrow options... The design from several identical small shelves will also look good.
Materials and tools for creating hinged structures made of wood
In order to make kitchen wall shelves with your own hands, you need some tools and materials that can be easily found in almost any hardware store. You will need:
Chipboard sheets (width - 30 cm);
Furniture corners;
Door handles;
Screws and screwdriver;
Spring brackets;
Joiner's glue;
Rods for hanging kitchen utensils;
Electric jigsaw;
Drills and drill;
Roulette, pencil, ruler, measuring stick, clamp.

Preparatory stage
Before you start manufacturing, you need to look at the photo of the hinged shelves and choose the option you like the most. Then you need to draw up a drawing and calculate the required amount of material for the future hinged structure. It is best to purchase factory blanks from laminated chipboard. But you can also buy a chipboard sheet and cut it out according to the drawn up drawings.
For this work, it is best suited which leaves almost no defects on the edges of the product. For a high-quality result, the ends of the parts can be milled using manual machine... You should also use an electric saw with a tungsten carbide disc with a reverse inclination of the teeth to cut the chipboard.
Assembling the shelf
All cuts are covered with melamine lining. To do this, the edge is applied to the end of the part and gently pressed moderately with a hot iron, the excess is cut off.
In order for the kitchen shelves to serve for a long time, their body must be completely assembled with screws. To do this, holes are drilled in each part with a depth equal to a third of the screw's length. For the correct placement of the inner sections, it is better to use a measuring rod, which must be pulled to the bottom of the shelf with a clamp.
If the structure has hinged doors, then you need to attach the supports of the spring brackets. They are first fixed on the partitions and side walls of the hinged shelf, and only then screwed directly to the doors. It should be borne in mind that the upper edge of the door should be 3-5 mm from the upper edge of the shelf body, then nothing will interfere with opening and closing.

How to give an aesthetic look to homemade shelves
Depending on the general style of the kitchen interior, as well as the personal preferences of the owners of the house, you can choose different options... Most simple solution the issue is painting. Hanging shelves for the kitchen are better to paint acrylic paint water-based, since it is non-toxic, practically odorless, dries very quickly and has an incredibly wide palette of colors and shades.
Another option is to make an ornate pattern with a jigsaw and cover the shelf with varnish for woodworking. You can also cover it with self-adhesive paper of a suitable color. Here, as they say, you need to rely on your imagination and create a real masterpiece.
A place for books, souvenirs, trinkets dear to the heart - this is the main purpose of the shelves on the wall. Someone has a collection of candles on them, someone has volumes of their favorite poet, and someone keeps photo albums on the shelves. It is important that the shelves themselves should be no less aesthetic than the items stored on them.
Making a shelf out of wood is the first thing that comes to mind when self-made shelves. Indeed, this option is the most common.

Wooden shelves are good for the availability and cheapness of the material, ease of processing, and the ability to experiment with design. And you can start learning how to make such creative designs from a simple and universal shelf, which will not be superfluous in the kitchen, in the living room or in the nursery, and other options for its placement can be considered.
Shelf materials:
- Wooden scraps of different lengths;
- Cutting the rope;
- 5 furniture boards;
- Wall fasteners;
- 2 rope rings;
- Jigsaw;
- Drill;
- Roulette;
- Pencil.
Holes must be made on the shelves (boards). They should be drilled out at a distance of 6 cm from the edge, and 12 cm between each other.
Wooden scraps need to be sawn, their length may be different, but the height needs to be made common. Holes for the ropes (through) must be drilled inside the sawn scraps.
First of all, the lower knots of the ropes are tied. A lower shield (lower shelf) is strung on them, between the shields at the edges, like a gap between the shelves, there will be stacks of scraps. It is better to divide all the scraps into parts, and lay out the same number of equal segments between each floor of the shelf.

The procedure is repeated, above the uppermost shelf on the wall, the ropes are tied in knots. This must be done firmly so that the wall structure cannot be deformed either with your own hands or by any other forceful action.
You will get a nice shelf on ropes inside stacks of scraps, you can place it in any room.
DIY wooden shelf, the simplest way (video)
Chipboard shelves on the wall
Chipboard is a chipboard, a truly versatile material for construction works... The dimensions of the slab, its flat surface allow you to make various designs do it yourself, including wall shelves.
Perhaps only sawing chipboard causes difficulties, since the material is impregnated with resins. The most suitable tool for working with chipboard is an electric jigsaw.

The following tips for working with this material will not be superfluous.:
- For wall shelves laminated chipboards are often purchased;
- Often, do-it-yourself shelves are pasted over with laminated film or paper, imitating various patterns (including natural ones);
- To smoothly tighten screws and self-tapping screws in a chipboard structure, you need to get an electric drill;
- Shelves of this material are often made in the kitchen, since it is convenient to store containers with spices, cereals and pasta, jars of herbs collected by hand;
- In the hallway, such shelves serve as a place to store important household items;
- Such a shelf on the wall in the nursery may have the purpose of a book storage.
In small storage rooms, which are included in the layout of many apartments, you can make original shelves for household needs - with your own hands, quickly and inexpensively.
Round shelves on the wall
Round cardboard shelves for the kitchen or bathroom are the squeak of interior fashion. They are usually made of cardboard and plastic pipe, which is cut with a saw with your own hands into circles 10-15 cm wide. The edges of the circles are sanded with sandpaper, and then the future shelves are painted over in several layers.

It turns out pretty original round shelves, for the kitchen - very interesting option registration. They can store:
- Kitchen towels;
- Various brushes and sponges;
- Decorative trinkets;
- DIY herbal tea bags;
- Other beautiful kitchen gadgets.
In the bathroom, round, unusual and very convenient shelves on the wall will also be in place: jars of cosmetics, towels, washcloths can also be stored in these nice shelves.
How to make a round shelf (video)
Square wall shelves
Wall compositions from square shelves on the wall in the living room look great. Shelves of different sizes are painted in one color, or in contrasting ones, and are combined into one wall pattern - small with large ones in one line, vertically or horizontally, diagonally.
Square shelves are usually small and difficult to hold many items. Most often these are various souvenirs, miniature vases, books.
Often these shelves are decorated with antiques, vintage things.
And to make such an interior decoration with your own hands, you can use standard materials... In most cases, the tree is painted with a matte bright paint, varnished. Or self-adhesive tape decorates the surface of such shelves.


Small shelves on the wall
Kitchen walls often require small shelves. They do not take up space, do not burden the interior, but emphasize the overall mood of the kitchen. The wall shelf can be used for room decor.
If the shelf is placed in the kitchen, you can place on it:
- Bright spice jars;
- Cookbooks and notebooks;
- Canvas bags with spices;
- Nice dishes.
Such shelves can be made of wood, plastic, glass, and even stacks of painted and glued books.
Designer wall shelves
Such designs are rarely attracted to the kitchen, yet these exquisite things often decorate the living room, study, and nursery.

Shelves on the wall in the form of:
- Labyrinth;
- Asymmetries;
- Upside-down bookshelves;
- Modules;
- Forged designs in Provencal style.
Some shelves seem to continue the furniture, some are like protrusions on the wallpaper, as they are disguised as a wall. There are fancy shelves that are made to order, they often have something in common with a curtain pattern or a parquet pattern.
DIY bookshelf (video)
Conclusion
Shelves in the kitchen, in the living room, or in the nursery - you can make all of them yourself, armed with ideas from the Internet and your own imagination. Of course, such designs will outperform their shop counterparts due to their hand-made origin. And in monetary terms, they can be cheaper.
Examples of shelves for the house with your own hands (photo)