Retractable ladder to the attic. We make an attic staircase with a hatch with our own hands
For country cottages, private houses and simple country houses equipped with an attic, the availability of a comfortable and reliable staircase leading to the said room is a common vital necessity.
At the same time, the ladder does not have to be capital and cumbersome at all - you can assemble and install an excellent folding structure, which will in no way be inferior to stationary ladders.

You can handle all the related tasks with your own hands, saving money and testing your own strengths.
There are several types of stairs that can be installed to access the attic.
Stationary


A staircase with wide flights and handrails is the most reliable, durable and easy-to-use design. However, the possibility of arranging such a staircase is far from everywhere - it is definitely not possible to equip it in small areas.
Portable

They are mainly used as a temporary option, as well as for access to rarely used premises. The main disadvantages of such a ladder are low safety and ease of use. Therefore, whenever possible, the use of such a design should be discarded.
Foldable

They are something between portable and stationary ladders. In terms of ease of use and safety, they are practically in no way inferior to full-fledged stationary structures and have, at the same time, a significant advantage - very little space is needed for their arrangement. Therefore, at self-production it is recommended to give preference to stairs with a folding structure.
Choice of materials
No less important point is the choice of materials from which the stairs to the attic will be assembled. For the main elements of folding sectional stairs, wood is usually used, and fasteners are traditionally made of metal.

Nowadays, there are many different materials, types of controls and fasteners, which makes it possible to easily assemble a folding ladder that will best suit your particular room.
When choosing materials for the manufacture of an attic staircase, a number of important factors must be taken into account. First of all, decide on the functional purpose of the structure, its type, width, as well as the optimal number of sections.

The functional purpose of the attic staircase is very important in terms of determining the maximum permissible load on the steps. So, for example, factory-made wooden stairs are capable of withstanding an average load of 150 kgf, metal ones - 250 kgf. For homemade stairs, these figures are slightly reduced.
This does not mean that the steps will not be able to withstand a higher load, but it is definitely not worthwhile to load them so regularly, otherwise the structure will break down very quickly.

The width of the stairs, however, should not be greater than the width of the attic opening.
When choosing the size of the attic staircase, be guided by proven and approved standards.


Remember: the steps must be installed strictly parallel to the floor surface. In addition, the rungs of the stairs must be non-slip. To do this, you can fill overlays of any non-slip material over the main material.

Attic Stair Making Guide
There is nothing super complicated in making the stairs to the attic yourself. Of course, an inexperienced craftsman is unlikely to be able to assemble a structure with the same attractive appearance as factory-made models, but it is definitely worth a try.

Before starting work, create a drawing of the future staircase. In the absence of the necessary skills, order the creation of a drawing from a specialist, or select a suitable scheme from the options presented in open sources.

Instruments
Prepare all the necessary tools at once so as not to be distracted by the search for missing tools in the future.
You will need:

Also, before starting work, you need to buy or assemble an ordinary ladder. For a self-made assembly of such a structure, you only need to fix the transverse steps between two long vertical posts and additionally strengthen the structure.
The finished staircase should be about 30 cm longer than the distance from the attic opening to the floor.

With the manufacture of the hatch, you can also easily cope with your own hands. Of the materials you need only sheets of plywood and wooden beam 5x5 cm.
First step. Choose a location for the hatch and determine its optimal dimensions. Add about 7-9 mm to the dimensions of the hatch on each side, so that in the future you can easily close the lid without squeaks and other noise. Make an opening according to the specified dimensions.

Second step. Cut the timber into four pieces to match the dimensions of the hatch.

Third step. Make grooves at the ends of the bars. Lubricate the prepared grooves and join the bars into a rectangular (square) structure. Additionally, strengthen the connections with self-tapping screws. Screw on the scarves so that the diagonal does not move.
Fourth step. Attach a plywood cover to the resulting base and try on the product through the hatch opening.

Fifth step. Cut a regular latch into the hatch cover. You will use the handle to open the latch. Attach it to the cover and finally fix the product in the pre-aligned opening. Usually, hinges are used for this.

Simple folding ladder
Start making a folding ladder. It is assumed that you already have the aforementioned wooden ladder at your disposal.

First step. Attach a wide beam to the bottom of the ladder. Attach the same block to the top of the product. In this case, the lower bar must be fixed rigidly, and the upper one - on the hinges.
Second step. Saw the ladder in 2 pieces. The upper part should have a length of about 2/3 of the total length of the ladder.
Third step. Attach a pair of slats for extra diagonal stiffness.
Fourth step. Connect the parts of the structure with hinges.
Fifth step. Secure the top beam under the hatch with anchors.
Sixth step. Secure the bottom of the ladder with a hook so it won't open spontaneously. Place the loop on the stringer above the cutting line.
Seventh step. Press the finished structure to the wall surface and fix it.
The main disadvantage of such a homemade staircase is not very attractive appearance- all timber and fasteners remain visible. However, with the main tasks - ensuring a comfortable and safe ascent and return descent - such a ladder copes 100%.

Improved and more attractive version of the previous design. There is nothing difficult in the manufacture of such a ladder, it is enough to step by step follow all the provisions of the manual.

First step. Divide your regular wooden ladder into 3 pieces. Make the first part according to the size of the attic hatch, make the second a little smaller than the first, and the third such that the remaining space to the floor surface is completely covered.
Second step. Take a bevel and measure the angle of the attic hatch. Transfer the corner to the boards, thus marking the location of the steps.
Third step. Drill holes at the hinge locations between the individual ladder sections.
Fourth step. Sand the edges of the structures.
Fifth step. Saw the planks at the hinge points.
Sixth step. Cut and sand the steps.
Seventh step. Prepare the indentations for the steps in the bowstrings.
Eighth step. Insert the steps into the prepared slots. Use glue and additionally reinforce the connections with self-tapping screws.
Ninth step. Connect the sections of the ladder with special hinges. To do this, the sections must be placed on a stable, level surface.

Tenth step. Check the operation of all sections. If you find defects and deviations, try to fix them immediately.
Eleventh step. Grind everything wooden surfaces and varnish them.
Twelfth step. After the varnish has completely dried, install the structure in the opening of the attic hatch. If necessary, make final adjustments to the structural elements.

Thus, self-assembly stairs is extremely simple and affordable for almost every activity. At the same time, the cost of a self-made ladder will be much lower compared to the price of a similar factory-made design. Follow the instructions and everything will definitely work out.
Happy work!
Also read on our website an article - DIY stairs to the basement.
Video - DIY ladder to the attic
Any room in the house can and should be equipped in an optimal way for the people living in it. This also applies to the attic. A DIY attic staircase is a great example. correct use space and forces to organize the space inside the room.
The ascent to the attic includes a ladder itself, a special access hatch and a system of levers for fixing the installed span. A self-made attic staircase saves money and provides excellent construction quality.
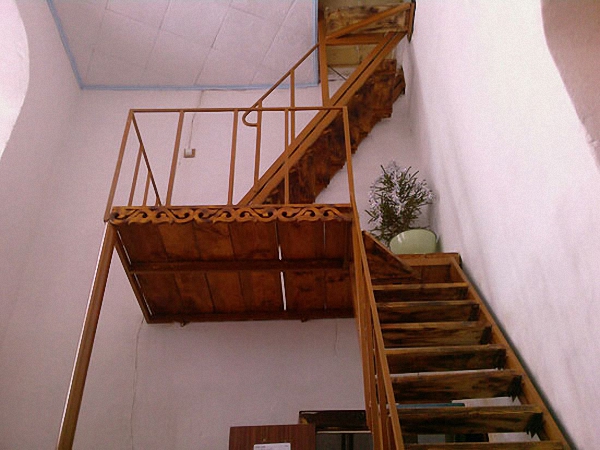
Classic view of a retractable staircase to the attic
There are plenty of options for how to make a staircase to the attic. Therefore, the choice of the optimal solution and its implementation depends on you.
Ladder manufacturing, its installation and testing are the main stages of work. But without designing and calculating the future structure, construction will be complicated, and the quality may not meet expectations.
The beginning of work is the creation of a hatch leading to the top. A DIY attic staircase is a great approach if you have the knowledge and skills. The correct choice of the location of the hatch, its precise creation and the equipment for the stairs serve as the basis for the entire project.
You have 2 options: use a ready-made hatch or make one yourself. The size of the hole should be comfortable for lifting, so as not to touch the ceiling and lines with your head. The place should not be crossed by beams and structural elements. The hatch must be additionally insulated, because the integrity of the structure is compromised and this can lead to loss of heat.
If you decide to make an attic staircase with your own hands, then you should understand that this is not just a classic path to the upper floor. The attic staircase has its own characteristics and requires a special approach.
Manufacturing a hatch for an attic staircase includes the following work:
- Development of drawings
- Accounting and detailed analysis of the thickness of all structural elements, hatch dimensions.
- Selection necessary materials and tools.
- Forming a hole where there will be a folding ladder or other option for climbing to the attic.
- Assembly of the hatch frame and reliable fixation of all elements.
- Making a cover from the remains of the floor covering.
- Decorative design and complex of insulation works.
As a result, you get an equipped hatch that can be easily closed for a while.

The hatch in the closed position practically does not stand out against the background of the ceiling
Folding ladder to the attic with your own hands
In most cases, the design of the stairs to the attic seems to be like this. The attic staircase, which can be folded freely, looks comfortable and practical, saving space without sacrificing functionality.
Self-production of this type of staircase is quite complicated and time-consuming, but with proper preparation and step by step quite feasible. Of the tools for making a folding attic staircase, you will need the following:
- Hacksaw
- Mounting foam
- Screwdriver (preferably electric)
- Screwdriver
- Anchor bolts
- Self-tapping screws of different diameters
- Hinges for fasteners
- Roulette.
Before starting the production of an attic staircase, you should take care of the presence of an extension staircase, which will serve as the basis for work. A folding ladder can be made in just 1 day, provided all materials and tools are available.
This design option is objectively the most popular, for which there are reasons:
- The foldable ladder saves a lot of space.
- The element is easy to fold and extremely easy to operate.
- Harmonious fit into any interior.
- Fast manufacturing speed.
- High strength and long service life.
If you manage to make a folding ladder exactly according to the planned dimensions, then you will get an effective and effective element in home improvement.
Standard sizes
Although the attic staircase is done by hand, there are certain established dimensions that are recommended to be observed. They are selected and laid down at the design stage, and in the manufacturing process they serve as the starting point for all actions. Below is a list of sizes that can be used:
- With a staircase height of 290 cm: 60x90, 60x120 or 70x120 cm.
- Height 280 cm: 60x120 and 70x120 cm.
- Height up to 280 cm: 60x120, 70x120 and 70x130 cm.
This is the accepted order of numbers. In any case, you choose the final parameters yourself, solely from personal preferences and understanding of the ease of use of the structure.
Drawing
Here is a set of versatile ladders with detailed drawings for work.


Manufacturing process step by step with photo illustrations and detailed descriptions
When making stairs for the attic, it is important to follow the stages of the work in order to get the best result. For this we offer you universal instruction(attention: for a specific case, some changes and adjustments are allowed).
- Drawing development. It does not require high precision and correct design. The main thing is that your document is understandable to you personally and contains precisely calculated and verified parameters.
- Preparatory work. This important and extensive stage includes the selection complete set tools and materials that will be required to complete the work. Already at this stage, a drawing will help you a lot, because you will visually imagine how the staircase will look, which means it is easy to make a complete list of everything you need.
- Support frame manufacturing. Based on the standard and selected size of the hatch, you shape the frames by carefully adjusting all corners and cleaning individual areas.

Installed frame and mounted hatch in open position
- The frame is set in working position and secured with bolts and inserts. The opening is precisely adjusted.
- After mounting the frame, the hatch cover is inserted into the body.
- Grooves for stairs are made on the guides.
- The ends of the support beams should be sawn off at an angle that will best fit the floor when the stairs are opened.
- Sawed off and sanded steps are carefully installed in the groove and secured with self-tapping screws.

Installation of steps on the base
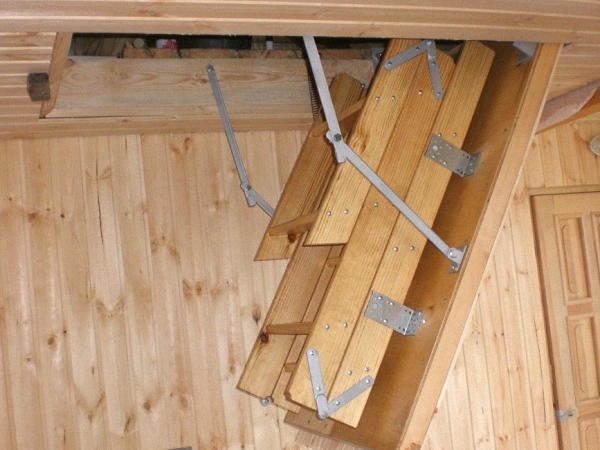
- All elements (ladder segments) are assembled into a single structure. Metal hinges are used to fasten all parts.

Metal hinges for connecting structural elements
- The ladder assembled on the floor is set into working position and attached to the hatch frame.
- Be sure to carefully check how the design you create works. To do this, perform the full set of open / close movements several times.

Assembled ladder of several sections
See how you can make a staircase to the attic with a visual example
Attic staircase mechanism with hatch - articulated without spring
The design of the hatch opening mechanism is one of the key elements in the design of the staircase. You can purchase a ready-to-install mechanism at any department store. If you do not want to purchase such parts, you can make it yourself.
To make a simple version of the opening system, you will need the following set of parts and tools: a corner, a metal sheet (a small piece), 2 strips with different blade lengths, bolts for fasteners, drills, a bevel, a jigsaw, teski and clamps.
The manufacture of the mechanism for the stairs is as follows:
- Drawing up a drawing with a detailed description of the elements. Be sure to calculate the contact angle and the angle of inclination of the lid when opening.
- Make a draft of the mechanism out of cardboard in order to accurately calculate the size of the hinge.
- Take metal strips and mark the holes on them. The hinges will be installed here. The size of the hole is determined by the size of the M10 bolt.
- The strips are collected together into a single structure and tighten, but not strongly.
- The exact angle is determined using a bevel.
- Move the created mechanism to the set angle.
- On sheet metal mark the part that will overlap when the hatch is open.
- Use a jigsaw to cut off this area.
- The stripes must have a presentable appearance, for which they are thoroughly cleaned and rounded. The processing of all elements is very important, because it is precisely this that guarantees the exact match of all elements and their optimal fit. Friction between parts must not be allowed.
- To make the second part of the mechanism, we recommend using clamps. To give accuracy to the dimensions, it is enough to reliably fasten the finished element and the source.
- Also, with the help of clamps, you can achieve the exact location of the holes.
- After the bolt holes are created, the bolt is placed in the finished one.
- The workpieces are twisted with two bolts and aligned in length.
Your task is to make 2 identical mechanisms. Completely ready-made opening mechanisms are installed on the hatch. Be sure to re-try the hatch with mechanisms to the opening - make sure there are no gaps and areas where the elements are in contact.
Adjustment of the structure in this area is possible and does not represent anything difficult, so take this carefully.
The hinge is easy to use and allows you to use the ladder with comfort.
Ladder options
The attic staircase can be of several types. The choice allows you to optimally equip any room, depending on your personal wishes and needs.
- folding ladder with hinges
A fairly common format for making stairs. The project consists of 3 sections, which are connected into a single structure. This format is suitable for equipping stairs in any room. Hinges for the opening hatch can be purchased ready-made and installed as soon as possible.

Folding hinged ladder
- a simple wooden staircase to
This option is more attractive and is a definite modernization of the previous design. For manufacturing, it is enough to cut a standard ladder into 3 sections. The smallest one should be the size of the hatch, the second is larger, and the third should completely cover the remaining distance to the floor. Make grooves on and fit the steps into them. Be sure to accurately machine all corners and surfaces.
- folding ladder in two parts
An attic staircase option that is suitable for low height premises or a view of a simplified design.

Folding ladder
- sliding attic staircase - sliding flights to the attic
Ladder with large retractable sections that pull out and close the distance to the hatch at the same time. Requires precise fit of elements and sufficient space.

Sliding ladder
- DIY stairs to the attic from the street
The attic staircase can have an unlimited number of design options - below you can admire the completed projects.

Stairs from the street
Photo gallery of attic stairs
Today on the net you can find a large number of designs of stairs for the attic. Everyone can make them with their own hands, so you should not be afraid - you just need to prepare well and do it.


Do-it-yourself stairs to the attic are a great way to make your home more comfortable, and going to the attic is a real pleasure. The design has a small set of technical difficulties - therefore, the product is often made by hand. Basic rules for someone who decided to make an attic staircase on their own:
- Carefully draw up a drawing based on the received dimensions and personal wishes.
- Choose the best quality tools and materials.
- Visually inspect all connectors and fittings.
- Check the ladder elements frequently to prevent defects and correct them in a timely manner.
The loft staircase is easy to decorate and fits perfectly into the style of any room. Comfortable grips and secure fit make it ideal for climbing to the top, which is an excellent alternative to the standard fixed ladder.
In most private homes, an attic or other roofed space is assumed, so a staircase to the attic is necessary. The structure for climbing upward should be not only safe, but also aesthetic, matching the design and type of frame with other stairs. An exception is a hidden or folding structure, which is used periodically so as not to clutter up the living space. How to do it yourself - we suggest using examples and tips from the article.
What type of stairs should you choose?
The zealous owners try to use every meter of their personal space rationally. With a small living area of the building, a massive wooden staircase to the attic with your own hands is inappropriate, it is better to give preference to a light structure, regardless of the material. Ascent to attic floor everyone equips it to their taste. Even a light rope ladder that can be folded into a net or onto a shelf next to the hatch is possible. But this option is only suitable as a temporary one, and even then for an adult single person. For children and the elderly, something more reliable is needed, for example, a staircase to the attic - photo:
There are also ready-made telescopic and folding ladders and high ladders on sale, but not all of them are suitable for permanent use. And it is important to fix the finished ladder correctly or make an adaptation for it so that it can be removed when not needed, for example, in winter. And with a large area of the house, where there are several stairs, it is advisable to make all the flights in the same style. All parts of the structure must be reliable in order to walk on floors without risk.
The construction of a private house involves stairs of different functionality:
- indoor and outdoor (inside the house);
- attached and fixed;
- auxiliary (workers) and design (aesthetic part of the interior).
When choosing the type of stairs, it is important to be guided not only by your own preferences, but also by considerations of expediency. The operational requirements are higher for stationary ladders, and the folding structure must be compact and reliable so as not to be injured during the next descent or ascent.
Tip: Make your attic staircase as lightweight as possible to save materials and space. It should withstand no more than 1 person with a small load, since furniture and heavy household appliances are not lifted into the attic. Before making a ladder to the attic, think about how it will be attached at the top and what to rest against at the bottom.
Suspended and folding ladders are more suitable for a small suburban building, and massive stationary ladders are more suitable for a large country house... The type of stairs depends on the location of the attic hatch. If the entrance to the room under the roof is located in a narrow space, then a spiral staircase is installed. It is not very comfortable, and large things cannot be lifted on it. But this is the only thing Possible Solution where there is nowhere to put the classic staircase. For example, a spiral staircase to the attic, photo:

By type of construction, the most common:
- screw;
- marching;
- on the bolts.
The optimal choice of stairs for attic spaces
More recently, attic and mansard stairs allocated in a separate row, and they are classified into subspecies:
- sliding telescopic;
- folding scissor ladders;
- sliding "accordion";
- suspended (rope, rope);
- folding (attached at the top).
There is no difficulty in using or installing each variety. The simplest metal staircase to the attic in several additions can be made from 2-3 ladders. The cost of each structure depends on the materials and the type of the staircase itself.
Folding models are made from pipes and a corner of light alloys, mainly aluminum and stainless steel. But this requires a tool (metal cutting) and reliable fittings. It is much easier to work with wood in a domestic environment, so most stairs are made of wood, in a classic design:
- supports;
- steps (tread);
- stringers;
- approach;
- railings;
- handrail
- filly, etc.
The attic staircase is an accessory for climbing under the roof, so there is no point in making it wide. The optimal width is no more than 60-70 cm, depending on the build of the people using it. But the step between the steps should be classic, about 20 cm, so as not to experience difficulties when going up or down the stairs.

But the most important thing is the angle of inclination, if it is a flight of stairs. Any staircase to the attic, folding or spiral, should be inclined so that it is convenient to use - within 75 °. A very steep descent is impossible without handrails, otherwise it will be difficult to return from the attic, especially if there are narrow steps. Yes, you can also make a vertical ladder (attached, in the old fashioned way), but this is not very convenient, and it will be problematic to take things out of the attic.
Caution: Some narrow metal steps are very slippery, especially when condensation builds up on them in cold weather. This is counteracted by special rubber pads that minimize the risk of falling and injury.
The maximum weight that a self-made attic staircase should withstand is in the range of 120-150 kg, if larger people will not use it. In the finished product, which remains only to be fixed at the attic hatch, all parameters must be indicated in the technical description. There are models where folding ladder attaches directly to the hatch, which is equipped with a compact transformation method.
Types of attic stairs and their properties
Stairs to the attic or attic lead both from the outside of the house and from the inside. A street staircase, not an attic, is most often made capital - metal with handrails. The inner product should take up little space, be lightweight and compact. They give preference to screw stationary structures and to be removed from the room after use:
- portable;
- retractable;
- folding.
1. A stationary attic staircase of one-piece design is the most convenient and safe, but it requires a lot of space. The most compact are the screw models, which are much more difficult to make due to the calculations of wedge-shaped degrees fixed at an equal interval on a pole support. In addition, they are necessarily equipped with spiral handrails or made in the form of a glass capsule. Direct or flight staircase also must be equipped with some kind of support - railings or handrails. The width of the rectangular steps is made, if not for the full width of the foot, then at least the ba by 3/4, so that it is convenient to step, especially when descending.

2. Mobile or portable ladders and stepladders, for all their compactness, create more conditions for falling. Due to the increased danger and instability, they are not so in demand. And it is important to do everything to increase the stability and reliability of the stairs (non-slip flat floor, support stops). Their main advantage is the ability to bring and easily spread, and then remove. It is not recommended to use such devices for lifting under the roof:
- sick people with frequent dizziness and high blood pressure;
- disabled people without any limb;
- the elderly and the infirm;
- children.
3. Folding. The most compact is a folding ladder to the attic, which is attached at the top and folds under the ceiling. The main requirement is that it should not literally fall on its head, that is, a phased and slow transformation is important when using a structure of several blocks. If all the joints between the sections of the folding structure are reliable, then it is as reliable as one-piece. If it is made of metal from a hollow steel tube or aluminum profile, then it is very lightweight and comfortable. Among other modern devices for climbing the attic or attic, they are most in demand. The best option is if the folding ladder transforms along the wall, on which there is something like a handrail. Many craftsmen do this type with their own hands.
4. Retractable ladder- a kind of folding, only its structural elements do not fold back, but slide along the guide to the limiters on both sides. The transformation mechanism is somewhat similar to a telescope. Such a structure is made on hinges, and not only from a profile, but also from wood, but the guides are also from a metal corner.
5. An external staircase to the attic leads from the street, and from it design features the safety of the owners of the house climbing along it depends. Non-slip steps and non-freezing handrails are required. Usually they are built of metal from several marches along the walls of the house.
How to make a folding ladder to the attic on your own?
Making a folding ladder to the attic with your own hands is not as difficult as it seems. For example, it is easiest to construct from fragments of a finished staircase or step-ladder. It is important to make the correct articulation at the folds by choosing the right fittings. It is advisable to fix it directly to the hatch or under it in a special mount. Rigid fixation at the entrance to the attic is a basic requirement.
All fragments of the folding attic staircase are folded like an accordion. On the longest segment, the rest of the transformation should be attached, there should not be too many of them. Ideally, there should be no more than 3-5 folding modules, depending on the height of the ceiling or the distance to the hatch.
Attention: Pay attention to how the structural elements are attached so as not to disturb the "accordion". But even if an error occurs, don't be discouraged, just dismantle the wrong joint. The modules are assembled on the floor, periodically checking the work.
To minimize the work of assembling the stairs to the attic, the dimensions of each element should be indicated in the drawings, taking into account the slope - for ease of lifting. When everything is calculated and sketched, there is all the necessary fittings, then the assembly process will not take much time and effort. The most difficult thing is the choice of fittings for transformation, which will ensure the ease of use of the stairs.
Tip: It is best if the structure is attached at the top of the entrance, and the first fragment is equal to the length of the hatch. The rest of the parts can be equal, shorter or longer, but all proportions must be harmoniously combined.

Build Algorithm:
- a finished step-ladder or long ladder is sawn with an appropriate tool (for wood or metal);
- the first segment is connected to the next one using a hinge mechanism with clamps;
- a hinge mechanism is attached to the second and subsequent segments, but this is done every time from the opposite side to get an accordion layout;
- a non-slip floor support is attached to the lower segment (with rubber or thick leather so as not to scratch the coating);
- with the help of a partner or assistant, we attach the structure to the hatch or entrance to the attic, once again checking how it should look in working order;
- we attach the latch, which should fix the layout at the ceiling;
- if the folding ladder does not have locks that prevent a sudden fall when the latch is opened, it is advisable to cover the floors with a material that softens the sudden fall of the structure.
An improved version is a "clamshell" with a remote control panel, but not every master can install the electric drive independently. Typically, this “smart” function is only available on finished products.
Ease of use of the ladder also depends on the hinge mechanism on springs and stops, which ensures smooth opening of the modules. And it's better to spend money on a more perfect layout mechanism than to experience inconvenience every time.
Attention: In any variant of joining parts of the ladder, bringing it to working condition, it is important to stand to the side of the trajectory of a possible transformation! And periodically check the reliability of the fastening to the hatch or ceiling at the exit to the attic so that the stairs do not accidentally fall on someone's head!
The simplest options for an attic staircase
For a beginner, unsure of his abilities, it is better to limit himself to a simple structure - to fix a regular single-flight ladder made of light metal along the wall.
A great option for the young and energetic is to make a folding rope ladder with wooden steps and holes on the sides on each tread. They should be strung between knots of rope or thick twine. For convenience, the steps are not made rectangular, but triangular with rounded edges.
The wide sides of the triangles are attached to the sides, the narrow ones alternately towards. Then you get a ladder "duck step", that is, steps under the right and left legs. The lift involves a wide stance of the waddle legs, which is why this is the name. The only inconvenience is to go down and go up facing the rope (wall) holding on to its sidewalls.
If there is no room for a full-fledged staircase, then a ready-made spiral staircase is also used, which should coincide with the height of the ceiling in the height of the support. Parts (wedge steps, support and handrails) can be ordered from the carpentry shop. It remains to assemble the structure and securely fasten it below and at the entrance to the attic.
When constructing any staircase, it is important to provide for:
- free approach for use;
- the place where it will be removed if the ladder is mobile;
- handrails or other handholds when descending and ascending (they may not be available with a reliable design);
- secure top mount and non-slip bottom stop;
- stylistic performance or decor.
An external metal staircase cannot be made without the help of a professional welder. However, some of the work can be done by hand:
- choose a design based on ready-made illustrations or drawings;
- calculate the height and width of the stairs, the size of the tread, the number of flights and landings;
- make a sketch and drawing;
- cut metal parts.
Leave the assembly and fastening of the external metal ladder to specialists.
Tip: If the gentle flight of a fixed staircase leading to the attic or attic takes up a lot of space, consider how to use that part of the room. Shelves and shelves for books, souvenirs and collections are made in a niche. Or a "living area" with an aquarium, cages for rodents and parrots, they will have to provide additional lighting under the stairs.
The space between the ceiling and the roof in private houses is attic... It is used by owners for storing things, provides the ability to inspect and repair inside roofing cake. A folding ladder installed to get to the attic can be made by hand. Portable structures such as a ladder are not always convenient and reliable. The stationary version, which can be easily pulled out when necessary, and is folded most of the time, will become optimal model for a small space.
- At the place of installation:
- outdoor - they are mounted outside the building, the disadvantage is the need to leave the room in any weather;
- internal - located in the house.
- By design:
- monolithic - screw or marching;
- portable - attached, ladders;
- folding - sliding, folding, scissor, folding.
Monolithic structures provide complete safety when lifting to the attic. But they occupy the usable area of the room. Portable models are convenient as a temporary option, but they are not suitable for permanent use due to the increased risk of injury. The best choice is a folding ladder that takes up a minimum of space. Such a structure is often attached to the hatch, it has a compact size, and making it yourself will save money.

Features of folding structures
Transforming models have several options of execution, from which you can choose the one suitable for your home. When designing a product, one should take into account not only dimensions, but also design features. The minimum number of ladder sections must be 3 pieces. The 2-piece model will require a significant increase in the size of the attic hatch. Folding ladder lowered manually, using a weight for weight, or automatically, using an electric drive.
Varieties of folding attic stairs
Telescopic model consists of parts that slide into each other. The material for it is aluminum, which has lightness, strength, and corrosion resistance. It is compact, functional, will last a long time, but it is difficult to make such a product with your own hands. The option of mounting on a ready-made hatch is possible.

Scissor model made from metal parts. It folds like an accordion. The robust construction with comfortable steps has one drawback - over time, creaks appear at the joints. Timely lubrication of the attachment points will help prevent the problem.

The scissor ladder is reliable and has a beautiful appearance
Folding ladder will not take up a single extra centimeter. It is difficult to design and install. Its steps are attached to the bowstring with card loops, and in the folded position the folding model is fixed on the wall.

Retractable ladder the attic consists of several sections, the upper part is firmly attached to the hatch, it is equal to the size of the cover. The rest of the sections are connected with special fittings and hinges. When unfolded, they form an even flight of stairs. It is easy to bring the product into working position due to its mobility. The difference between telescopic and sliding models is in the way of sliding sections. In the first case, they are placed one in the other, and in the second, they move with the help of rollers outside along the guides.

The structure for lifting to the attic should be installed in a place where it will not interfere, usually a hallway or corridor. Sliding and folding ladder adapts to standard sizes that are designed with safety in mind:
- the angle of inclination of the structure is 65-75 degrees, a larger value will make the use unsafe, and a smaller one will require a lot of space for placement;
- the optimal staircase width is 65 cm;
- the recommended number of steps is 13-15 pieces;
- the length of the structure should be about 3.5 m, with an increase it loses its rigidity and strength, the processes of lowering and lifting are complicated;
- the distance between the steps, convenient for movement, is 19.3 cm;
- a ladder made by hand is calculated for a load of up to 150 kg;
- the safe thickness of the steps is 1.8-2.2 cm;
- the horizontal bars are mounted parallel to the floor, for safety they are supplemented with anti-slip pads.
The attic hatch also has standard dimensions, its parameters are 120x70cm, they provide an unobstructed passage and minimal heat loss.
Materials for making
Strength and weight requirements are imposed on the materials from which the staircase is made by hand. Construction for frequent use due to rapid wear is not made of wood. Metal is the best option for such a product; it will ensure safe and durable operation.
A combination of materials will reduce the overall weight of the ladder attached to the hatch. Steps are made of lighter wood. Bars of hard wood with a thickness of about 2 cm are used. To connect the products, metal or plastic fittings are installed, the latter reduces the friction of parts. In the folded position, the structure is attached to the hatch, which excludes spontaneous falling out.
Manufacturing technology of a simple folding structure
If the hatch is located near the edge of the ceiling, then for lifting, you can install a folding ladder of two sections with your own hands, which will rest on the wall. The basis for the design can be a finished product; it will take about two hours to transform it.

Simple folding ladder that is easy to make by hand
Tools for work:
- screwdriver;
- roulette;
- hacksaw.
Materials:
- wooden blocks 2x3 cm in size;
- card loops;
- self-tapping screws;
- hook and loop.
- Take two bars equal to the width of the stairs. One is attached with loops to the upper edge, and the second is firmly fixed at the bottom, ensuring the stability of the unfolded structure.
- The ladder used is divided into two parts - one of them is 2/3 of the length, and the other is 1/3. A neat cut of the bowstring is performed along the outlined line.
- Metal hinges are screwed to connect the sections. Pay attention to how the hardware is located. It should ensure that the lower part of the ladder folds under the upper one.
- A block is fixed on the wall under the attic opening, to which the folding structure is attached.
- For reliable fixation in the folded position, a loop is screwed in near the cut, and a hook is installed on the wall in the appropriate place.
The advantage of such a product is the simplicity of do-it-yourself execution, and the disadvantage is its open location.
Manufacturing the hatch
If the folding ladder is placed on the opening cover, it is not visible from the room and will not interfere with the interior. Simple drawings will help determine the size of the hatch and product. Having measured the sides of the passage to the attic, they begin to assemble the hatch with their own hands.

The following materials must be prepared:
- bars with a cross section of 50x50m;
- plywood sheet 10 mm;
- PVA glue;
- fasteners;
- door latch with handle.
Two parts are cut from the bar, equal to the length of the opening and two parts similar to its width (120x70 cm). Each edge of the bar is cut half the width. These areas are smeared with PVA glue and glued together in a rectangle. To keep the exact diagonal, they are attached to the frame right-angled triangles made of plywood, called kerchiefs. After the glue dries, the bars are additionally connected with self-tapping screws, and the kerchiefs are removed. A prepared plywood sheet is screwed to the workpiece. The structure will fit into the opening. To keep the hatch closed, a door latch is cut into it. The fittings have a convenient handle with which the hatch will open.
Assembly of the opening mechanism
Making a hatch opening mechanism with your own hands is a rather complicated process to facilitate the task, it is enough to purchase a finished product in a store.

Those who decide to assemble the entire structure on their own must prepare a metal corner, two strips and a sheet of metal.
In order not to be mistaken with the size of the hinges, they are initially cut from cardboard. After trying on, go to work with metal.
- Places for fastening according to the template are marked on the metal strip.
- Holes are drilled for a bolt with a diameter of 10.
- Parts are assembled and bolted. The small one measures the selected angle of fixing the ladder, and then the parts move apart by the desired amount.
- On the metal, a section is indicated, which, when lowered, is overlapped by a corner. This area is clipped. After removing the excess, the details are processed to give an aesthetic appearance.
- The second mechanism must be identical to the one already made. For exact matching of the holes, the parts are connected with a clamp and drilled.
- Having inserted the bolts into the second mechanism, it is equalized according to the sample, cutting off the excess metal.
- Ready-made opening mechanisms are installed by hand on the hatch . They will create a stop by fixing the folding structure at the desired angle.
The installation of a second hinge mechanism supporting the hatch in the middle will provide an even distribution of the load. You will need: two metal strips 2 cm wide, a corner and a piece of metal. The corner serves as a support for the mechanism when opening. A piece of metal is welded to one part, against which the second part rests. When lowering the hatch, the hinge will move apart, taking part of the weight of the structure.
Wooden staircase, do it yourself
The easiest way is to make a structure of wood, the material will be a board of 2.5x10 cm. The product consists of three sections, the first two are equal in length to the hatch, and the size of the latter is the distance remaining to the floor.

The length of the sections is marked on the two boards used to make the bowstring. The marks should mirror each other, therefore, before work, the workpieces are connected with tape. Holes for the hinges are drilled in the designated places, after which the boards are sawn. All wooden parts are sanded and covered with two layers of varnish to make them look attractive. Before installation, metal hinges are coated with a primer and paint with their own hands.
For fastening the steps, holes 5 mm deep are cut from the inside of the bowstring. PVA glue is applied to them, and then fixation is performed with self-tapping screws. The next stage is the connection of the three sections in general design with loops. Having checked the possibility of bending the parts, the ladder is fixed to the hatch. The upper section of the product is fixed to it with anchors. The folding ladder to the attic is ready.
In contact with
This article provides step-by-step instruction to create a folding attic staircase. You will learn how to properly assemble the main hinge element, from which to make ladder sections and how to securely fix the structure in the installation position. The article contains diagrams and drawings.
Inventory factory stairs to the attic are a fairly common product that can be purchased at many hardware stores. but budget options are not always reliable, and strong branded products cost accordingly. Making the necessary item or device with your own hands from scrap materials is very popular among home craftsmen. The attic staircase is no exception.
Material for work
To assemble an analogue of a factory product, you will need high-quality materials that may be available, especially during construction:
- Bar 50x50 (pine) 1st grade - 20 lm. m. The frame of the cover and opening will be made of it.
- Plywood 8-10 mm - 2 sq. m. Needed for lid trim.
- Board 100x25-30 mm - 15 linear m. Will go on steps and bowstrings.
- Steel strip 3-4x20 mm - for flexible knee fasteners.
- Corner and plate 3-4 mm - for the main mechanical element.
- Bolts, nuts, washers, grovers M12-M14.
- Self-tapping screws.
Tool:
- Plotnitsky - saw, screwdriver, goniometer.
- Locksmith - welding machine, electrodes 3-4, grinder.
- Workbench and clamps.
Operating procedure
First of all, you need to choose a place for the stairs and make an opening. If necessary, trim and install intermediate beams in the floor - 6-7 mm larger than the size of the intended cover. Further, according to the size of the hatch, you need to assemble the cover itself - from a bar and plywood. The design can be arbitrary, but it must be reliable (it is better to glue the connections). The bar on one of the short sides should be rounded so as not to interfere with the opening of the lid.

Assembling the hinge mechanism
This is the most critical structural element. To make it you will need: a steel corner, a plate and strips with a thickness of at least 3 mm. The shape of the parts is clear from the diagram, but the dimensions of the drilling site should be determined individually, based on the situation in place. The manufactured parts must be of high quality, they must be cleaned and the edges processed.
 1 - thrust plate; 2 - corner, top view; 3 - short curtain; 4 - long curtain
The key point is determining the opening angle. This angle is very important and figures in the manufacture of the plate. In order to set it correctly, project the future march on the ground - stretch the thread and experimentally (by choosing the best position) set the desired angle. Fasten it securely to the protractor - it will be needed when making steps.
The resulting angle must be transferred to the part, namely to the plate. To do this, set the mechanism to its original position, apply a protractor and move until the angles of the angle shelf and protractor coincide. Then mark the plate along the resulting trajectory and cut out the path of the part.
Pre-drilled holes in the plate for mounting to the beam. We assemble the mechanism on bolts through washers.

After a rough assembly, you need to try on the assembly in place, make money and exactly reproduce the procedure for opening and closing the hatch. If you find flaws in the move, fix them.
Then you need to make a response mechanism. He must completely repeat the first, but in a mirrored form. Use clamps and a workbench - clamping parts together, you will achieve complete identical dimensions.


Make adjustments and final assembly empirically. When open, the lid should follow the angle projected by the cord exactly.
Making sections
Calculation of the length of each section:
- 1st - opening length minus 10%
- 2nd - length of the first minus 10%
- 3rd - march length minus the sum of the first two
Let's assume that the march length is 2500 mm. Based on the length of the opening 1200 mm:
- 1st - 1080 mm
- 2nd - 972 mm
- 3rd - 448 mm
We mark out the whole boards according to the calculation and transfer the march angle to the bowstrings.
Attention! Bowstrings must be installed mirrored! Consider this when marking and drilling.
At the joints of the sections we drill Ø 25 holes - mirrored through one.

All parts must be properly processed with sanding tape, chamfers must be rounded in order to bring the quality as close as possible to the factory one.
Then we cut the grooves for the steps according to the marking. We select the wood with a chisel.

The structure of individual sections is assembled on self-tapping screws 65 mm with a press washer through D-3 wood glue.

Knee loops can be made from the same strip as the opening mechanism. To do this, we cut 4 strips of 160 mm and 4 strips of 120 mm, round off the ends. For four of them we weld on legs up to a length of 160 mm with an 8 mm hole. You should get 8 parts of the same length, but 4 of them with a step.
Assemble the individual plates into hinges using bolts.

Assembly of sections and installation of stairs
Lay out on a flat surface and install the finished section hinges so that the mounting bolts fall into the holes in the tree. Install the hinges on the M8-10 bolts.
After assembling the first elbow, check the system for operation. Correct the misalignment if necessary.
Then attach the lower short elbow and test the system.

Now the ladder remains to be mounted in the design position - on the hatch cover. Use screws for installation (self-tapping screws are not reliable). If after installation and testing everything works without distortions, the structure can be dismantled for painting. Use varnishes and metal spray paint.
Subsequently, the design can be made more complex and more convenient by adding to it:
- Additional hinges to eliminate backlash.
- Spring to support the structure to make opening easier.
- Lock-retainer.
- Handrails.
- Use decorative trim and additional insulation.
Finished staircase view:

The issue of finishing and insulation is decided locally, based on the needs. You can trim the lid with any material that fits into the ceiling. Basically it is plastic - lightweight, inexpensive and with an additional layer of air. The difference in price between the "home" and "store" folding ladder is about 90% ($ 80-150). The work required only a few new boards, a covering for them and hardware.