How to make a flower pot for a garden: original and creative ideas for planting ornamental plants (125 photos). Do-it-yourself flower stands - the advantages of home-made products, good advice and photo ideas Do-it-yourself wall bracket for flowerpots
The easiest way is to go to the store and buy a ready-made flower stand / stand. Manufacturers today offer many different models pots, shelves and wall structures. Moreover, such products can be quite different in appearance, design and shape.
More fun making flower shelves with my own hands... The internet is full of detailed instructions and master classes detailing this process. With regard to materials, you can use any available means of your choice or purchase "raw materials" in a specialized store.

The advantage of making a stand for indoor plants yourself is the uniqueness of the end result. You can decide by yourself on the configuration of the structure, color scheme, texture. And you will have no doubts about its exclusivity. Such a thing will be the subject of your pride and the envy of others.

A piece made with trepidation can become one of the brightest accents in the interior. As a result, all actions for its manufacture must be done carefully, without haste and fuss.

Thanks to homemade flower stands, you can highlight the design features of the room, for example, create the atmosphere of a French province or an Alpine chalet.

An example of an original stand
You can make a stylish flower shelf using the simplest things, for example, rods and planks. The pots must be placed on the planks one above the other. And if you replace the plant pots with glass jars, then this will add originality to such a craft.

This design looks very interesting and allows you to quickly arrange indoor flowers. It takes up a minimum of space.

Are calculations necessary
Simple variations of flower stands do not require any calculations. However, for more complex structures you may need to sketch. The more complex the idea, the more calculations will be needed. They are necessary to avoid instability and unsteadiness of the stand. In addition, thinking about the nuances allows us to achieve ease of use.

The advantages of making your own hands
- Now there are a lot of outlets selling materials that you can use to create your own flower shelves.
- Any creativity allows you to make a thing so that it fits exactly into the existing interior.
- The rack can be made in any size you need.

Construction for pots on the windowsill
A flower stand on a window must meet the following requirements:
- compactness;
- high light transmittance;
- aesthetics.
It is best to place violets on it.

When deciding on a design, you need to pay attention to lightweight suspension-type systems. Most often they are designed to be placed on the sides of windows. This solution has many advantages, the main of which is that they give a minimum of shadow.

Most often, multi-tiered shelves are made of wood, choosing species that are easy to work with. There is nothing complicated in creating wood coasters. The process itself is very exciting.

The cost of flower shelves will tend to zero if you use materials left over from repairs, for example, chipboard trimmings.

Wrought iron stands / stands for flowers
Making a metal stand at home is not easy, but it can be done with enough effort. It also requires forging skills. But, before starting work, you need to make sure that such a thing will be appropriate in relation to the chosen interior style.

Forged structures for plants can be both floor-standing and wall-mounted. Both solutions are quite elegant and convenient. The choice depends on your preference. But remember that metal stands are more expensive than wooden ones.

Other materials
Plastic is a popular material for creating flower shelves. He might be different color and textures. It's easy to work with him. No special skills or special tools are required. Shelves and racks made of plastic for placing plants can be made even by a beginner in needlework, if he has such a desire.

All the products that are offered in stores for the design of flower stands cannot be listed - they are too diverse. You can easily choose any option that suits your case. And the cost of such "raw materials" is quite acceptable.

A bookcase or stand for indoor plants can be a good gift for an amateur florist. Especially if it's handmade. After all, by independently creating a thing, you put a particle of your soul into it.
Many of us have houseplants at home and sometimes there is a small problem, where to put them. What kind of stand to come up with to please the eye and be practical?
1. Flower pots will look nice on a wooden wall rack
2. Such a stand for pots made of wood can be easily made by hand

3. Wooden wall grate for hanging small pots

4. A rack, a metal pipe and an ordinary bucket are ideal stands for pots with indoor plants and flowers

5. An old table can serve as a good flower stand

6. Forged metal stand

7. Forged stand made of metal wire

8. Forged shelving made specifically for indoor plant peas

9. Compact MDF shelves will become bright and functional decorations in the kitchen

10. An ordinary wooden block can become an original stand

11. From an old wooden ladder, you can make an original stand for plants in pots.


12. Stand for a flower from a pair of bars and a box made of chipboard

13. Charming hanging shelves for planters and pots, which can be made from ordinary wooden boards and rope

14. Plastic cups that can be used as containers for small flowers

15. Wicker baskets, fixed on the balcony wall, in which you can place flower pots

16. Hanging wooden boxes for indoor plants

17. Stands for polka dots from height-adjustable classic chairs

18. Shelves, which can be made from small metal pipes, are perfect for placing pots of indoor plants.

19. A simple rack for your flowers can be built from a regular pallet

20. Simple metal structures of golden color for pots

21. An old folding ladder that can become a pot holder

22. An old stool will make a good stand, you just need to file the legs

To save space and more functionality, flower stands are used. Such a solution will perfectly fit into any stylistic solution, it will allow you to place more plants with minimal use of space. There are several options that you can do yourself. You just need to make a little effort and desire.
DIY product
In the photo of the flower stand, you can notice the differences between the products. Models of the same type will be a great addition to your apartment. Other options are suitable for the home, because they will take up a lot of space.

Do not forget about the appearance of the product. You should decide on a specific model, prepare the appropriate materials. There are different types of products:
- wall products;
- floor stands for flowers that perform different functional loads. Despite the size of the room, such a product will harmoniously fit into the overall atmosphere.


Their differences lie in maintaining different types plants. You should decide in advance which plants you want to place on a particular stand.

The first type can be divided into stationary and mobile, they have wheels for movement.

Each variety has its own advantages and disadvantages. You should choose the option that is suitable for a particular plant.

The advantages of the mobile type are the ability to move the plant, the uniform distribution of sunlight and air, which has a beneficial effect on their growth.

The stationary type has the advantage of being able to withstand heavy loads. Therefore, more pots can fit on the stand. High supports are often used, which occupy the entire section of the wall, or windows, for example.

Additionally, you can use light bulbs that will evenly distribute the light. Pallets will help make cleaning easier.

Floor type
A wide assortment allows you to choose the option you need. The design allows you to easily fit all plants, taking into account their individual characteristics.

It is important to know how to make a do-it-yourself flower stand, where to start. To begin with, you should develop a specific model, drawing. After that, you will decide what type you need, size, plants that can fit on such a product.


It is believed that the minimum permissible height between tiers is 40 cm.After all, regardless of the size of the plants, care should be taken to receive fresh air, the required amount of light. With this distance, it is convenient to water, care for and clean them.

One of the most simple options considered a flower stand made of metal. In order to make a product, you will need pipes or metal profiles... The main thing is that the product fits into your home.


The main elements are connected using standard fasteners. Often the upper part is made of wood. To embellish the final result, paint should be applied. The monochromatic coating will complement the interior and help the stand last longer.

For the Provence style, a wood flower stand is considered the most optimal. Another style is vintage artwork. It is important to pay special attention to the legs, because the service life and functional load depend on the quality of their manufacture.

The curved shape is considered common, which is a characteristic feature of the vintage style. At the final stage, the product can be painted white, rubbed with sandpaper. Thus, you artificially age the thing. Decoupage involves the use of patterns, pictures, depending on your wishes.

Materials (edit)
It is worth noting that flower stands are often made from scrap materials. In this case, it is necessary to take into account the free space.

With minimal square meters must be high compact design... Having supplemented it with additional elements, it is turned into an excellent decorative item.

conclusions
Plant stands are often used for houses, apartments. Hand-made products are especially valuable. They differ in type, material of manufacture, color.

Consider the basic parameters, surface features and plants for a harmonious combination of the product and the style direction of your home.

For self-fake, use the advice of designers, do not forget about preparatory stage work. You need to do planning, create a drawing.


The most optimal model is considered to be where the plants are staggered. This arrangement will provide required amount air, light for plants. Caring for them, cleaning is greatly simplified.


Photo of a stand for flowers with your own hands


Flowers are beautiful creations of nature. But it looks much better when they are in the pots. To improve appearance your yard, you can go to a store specializing in this subject and buy everything there. But isn't it more interesting to do everything yourself? Make a planter for the garden with your own hands, put your soul and your strength into it.
And if you nevertheless opted for the second option, then below we will consider several ideas on what is the best planter to decorate your garden and how to make them.

What can pots be made of?
It is not so difficult to create pendants for your pots yourself, and you can even find the material for this in your attic, in the garage, and sometimes even in the kitchen, because almost everything that we see around can be useful to us in this matter. ...

Materials for pots can be very diverse. For example, it can be wood, cement, fabric, threads, bottles, cans, buckets and much, much more. You can list it endlessly.


Planters from plastic bottles
Admit it, because even such a simple and, at first glance, not necessary in Everyday life subject like plastic bottle at times can help us find unusual idea... In the case of pots, this is no exception.

One has only to cut off part of the bottle and your planter is ready. And it's not that difficult. And then you can hang it like this, or you can color it in bright colours by yourself or using a stencil.

Cement and fabric planter
Cement pots will look very original in your garden. They are durable and stylish in appearance, and if they are also painted, there will be one feast for the eyes. We'll take a closer look at this option.

It is also not difficult to create such a planter. To do this, you will need: cement, fabric you do not need, a deep container in which you will mix everything, and any item that will have to give shape to your creation.


The first step is to prepare cement mix... It should be of medium consistency and smooth. Then put a cloth in it and do not touch it for about 10 minutes. All this is needed in order for the fabric to be saturated with cement.

Then you should take out the fabric and put it on a previously inverted bucket or other object that you will use to shape. But in our case, let it be a bucket.

So, put the fabric on a bucket, flatten it if you wish, or make folds and leave it as it is until the cement is completely dry. And only then carefully remove the frozen cement from the bucket.


That's all. As you can see, this is not as difficult as it looks at first glance.

Flowerpot made of wood
Wooden pots will look no less original in your garden than cement ones. In addition, wood, as a pure and natural object, will perfectly harmonize with any color. And especially with vines.


Making them is also not difficult. Take about twenty identical bars and stack them in a checkerboard pattern, remembering to secure them. You will have to choose the size and number of beams yourself.

It is also quite possible to take ordinary wooden boxes in which vegetables and fruits are sold in the markets. One has only to correctly process and paint them, and a new decor for your garden is ready.


Rope pots
Hand-woven pots from ropes will look beautiful. To do this, you will need a metal ring that will serve as the center and beginning, buttons and about ten pieces of strong rope. See their length yourself, how much you need. Since here you have to choose yourself, based on the size of the pot.

The process of creation itself will be a bit similar to macrame. So if you are familiar with this technique, then it will be even easier for you than expected.

To begin with, take a metal ring and attach the doubled ropes to it. See the number of ropes according to the size of the ring. The attachment points must fit snugly together.

Then we take any such two strings and fasten them at a distance from the ring with a button with two holes. We do the same with the rest. Then these ropes diverge in different directions and there they are attached to the neighboring ones in the same way.

And all this continues until you run out of threads. That's all. There is nothing complicated here either.


Burlap pots
Even ordinary sturdy fabric can serve as a material for the pots. All that is required is to sew two dense pieces of fabric together like a pocket and hang the product with a pot inside on the fence.

Watering can, bucket and basin planter
If you have these three items lying around somewhere in your house, then you should not throw them away right away. They are also quite suitable for pots. One has only to decorate them to match the interior of your garden. And that's all. Flowers in such containers look pretty cute and funny.

There are millions of options for do-it-yourself pots, and in one article you cannot consider all of them, so you can look for everything else among the photo pots for the garden.

As we said earlier, making them is not difficult at all. One has only to turn on the imagination and add a little of your heart to this business. And you will definitely succeed.

Good luck and beautiful planters for your garden.


Photo pots for the garden


A cache-pot or an unusual pot can emphasize the unique charm of the plant in it, add zest to a mini-garden on the windowsill, or become an interior decoration both inside the house and in the garden. However, the question of what material should be preferred when choosing a container for flowers often arises. The article will talk about how to choose, or make a planter for flowers with your own hands.
Material selection
Depending on your needs and budget, you can choose from a wide range of planters. Before deciding to buy, it's worth comparing different variants, and weigh the pros and cons.
Several points to consider:
- finance... There are a lot of options on the market - from inexpensive pots to exclusive handmade ones;
- destiny... Will the flowerpot be part of a temporary project? In this case, it makes no sense to spend a lot on it. If it is an element of interior decoration, then it is worth investing in the long term;
- self-production... Often, to save time, a ready-made planter is purchased, however, nothing beats your own unique product;
- advantages and disadvantages... Before purchasing, it will be helpful to consider the advantages and disadvantages. different types pots.
Types of materials for pots
Plastic flower pots

A cheap versatile material from which both small pots and large flower pots are made.
- The color of the pot is preferable to light, this will not quickly heat up in the sun, the plants in it will be less susceptible to the spread of microorganisms.
- If necessary, you can always make additional drainage holes for the root system in such a planter.
- Of the minuses of the material, it is worth noting its fragility, especially if it is used outdoors, over time the material becomes thinner and becomes fragile.
Clay pots

Traditionally popular material for pots.
- In terms of design, clay pots offer many attractive options.
- However, for plants clay pot is not always the best place to live, as it is nearly impossible to provide adequate drainage.
Planters made of natural stone

It is most often used in the manufacture of outdoor flower pots, as an element of landscape design.
- They are very beautiful, monumental and, of course, durable.
- In addition, stone can be called, perhaps, the most environmentally friendly material.
- Its main drawback is its large weight.
Wooden planter for flowers

Wooden pots are very attractive and distinctive.
- They provide excellent thermal insulation for the soil. Help insulate plant roots from excessive solar heat where necessary.
- However, due to the fact that wood is a natural material, insect pests can start in it, and wooden bottoms rot over time. To avoid this, it is recommended to combine wood with other types of planters, for example, put several plastic pots in a wooden pallet.
Metal pots

Metal containers will add a touch of rigor to the design.
- They are strong and durable, but have a very high thermal conductivity, therefore, like wooden pots, it is recommended to use them in tandem with insulating pots, for example, made of clay.
Nylon threads

With their help, flower pots in the macrame style are weaved. These are inexpensive, but at the same time exclusive pots that will perfectly fit into the interior not only country house v rustic style, but also suitable for a modern city apartment.
Six ideas on how to make a planter for flowers with your own hands
In spring and autumn, gardeners traditionally put things in order in their gardens, both ordinary and mini-gardens on the windowsill: they transplant plants, get rid of unnecessary ones. Why buy a new expensive planter if you can make it yourself from scrap materials? Surprisingly, from such simple things as baskets, shoes, dishes, furniture, amazing, unique pots are obtained, which will undoubtedly become a decoration of any garden.
Old wardrobe drawers or a chest of drawers will look very interesting as a flowerpot. To extend their life, it is better not to pour the earth directly into the box, but to put smaller pots with plants in it.

Helpful hints:
- at the time of watering, it is better to remove the pots from the box, so its life will be noticeably extended;
- to disguise pots in a box, they are covered with coconut fiber or moss.
Sackcloth. This material, rough at first glance, becomes an excellent design tool in the right hands. The fabric can be dyed and you can simply wrap the pot over it. So, even pots of different shape and quality will turn into a single ensemble.

Helpful hints:
- in order to securely fix the fabric on the pot and simplify the process of creating a pots, it is recommended to use a glue gun;
- it is possible, and vice versa, to create a removable cover for the pot, in this case it is sewn with threads.
Multilevel basket construction. This technique will not only help to optimize the space for the plants, but also make watering easier. In addition, this is a great option for flower pots for ampelous flowers.

Helpful hints:
- to extend the life of the baskets, a layer of coconut fiber (peat) is first laid on the bottom, and then earth is poured;
- before planting, it is necessary to calculate the height of the baskets and the height of the future plants in them.
Bright plastic sand buckets. Just for children playing in the sandbox? Not at all! It is enough to make drainage holes in the bottom, and bright plastic buckets will cheer up at the summer cottage.

Helpful hints:
- with the help of such pots, you can create a kindergarten by planting your baby's favorite plants in them so that he learns to take care of them on his own.
Unusually stylish looks old shoes in the role of pots... It can be rubber boots or leather boots. A definite plus this type of pots is the ability to replace them regularly. And old bags are also suitable as a hanging planter for flowers.

Wooden box... You can leave the tree intact, adding brutality to its appearance, or paint it to match the overall landscape.

Helpful hints:
- with the help of boxes you can create themed corners, for example: medical or culinary herbs, spring and summer flowers, etc.
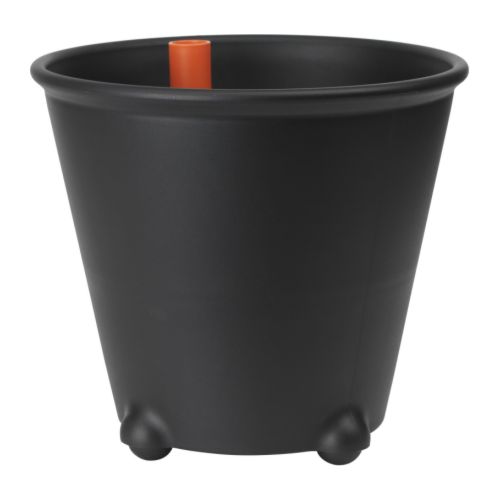
Do-it-yourself flowerpot with self-irrigation system
A planter for flowers with a self-irrigation system consists of the following elements:
- the actual pot. Any old plastic will do, the main thing is to make sure that it has the necessary drainage holes;
- moisture-absorbing area, any plastic bottle is suitable for these purposes;
- the tube for filling the tank with water is wide enough to conveniently and easily fill the water. You can use a plastic tube or hose;
- barrier ( mosquito net, plastic bag, etc.);
- stones (for example, large river pebbles);
- land (in which the plant will be planted);

Step one: preparation
- In the self-watering system of the pot, the heart is the area that is responsible for transferring moisture to the roots of the plant. Therefore, the manufacture of the pot begins with this element.
- For its manufacture, any plastic bottle is taken, from which it is necessary to cut off the bottom and make many small holes in it (through which the soil will be saturated with moisture).
- The height of this plastic piece depends on the height of the pot and should be at least a quarter of that.
Step 2: preparing the tube and drain hole
- The tube must be installed in the planter and cut to height. It can be 2-4 cm above the surface of the earth.
- Then the level is measured at which the water drain hole will be made. It should be flush with the top of the plastic piece that was made to saturate the soil with moisture.
- The drainage hole is responsible for preventing excess water from getting to the roots of the plant in order to prevent them from rotting.

Step 3: fill with soil and install a moisture-absorbing site
- At this stage, a mesh or film is required, the size is determined by the diameter of the pot, the fabric should be 2-2.5 times larger.
- A middle is marked at the cut, which is inserted into a plastic drainage cup.
- Then the mesh must be straightened, and earth must be poured into the glass. It is important to make sure that it lies flat on the edges, and the ground is carefully tamped.
- Then the cup can be placed in the center of the planter.
Step 4: install the irrigation tube and fill stones
- A glass with earth was installed in the center of the pot, a tube (or a hose for water supply) is installed on one side and then stones are poured to the height of the plastic cup.
Important: the protective barrier (mesh) at this moment must be held, then it will be neatly laid on top of the layer of stones. Its function is to separate the stones from the soil. You do not need to cover the glass itself with material.
Step 5: backfilling the soil and planting the plant
- The filling of the earth begins from the middle of the pot, from the place where the plastic glass is placed, which performs the function of saturating with moisture, moving from the center to the edges.
- When filling the soil, the mesh can be gradually pressed down. When most of it is covered with earth, the plant itself is planted to the required depth. Then the earth is poured to the top of the pot.
Step 6: watering and finishing work

- Now that the plant has been planted, the earth has been filled up, it is time for watering.
- It is watered for the first time after transplanting upper layer soil, and then water is poured through a tube into the lower layer.
- The plant will now be able to take the moisture it needs with its roots through a moist patch of soil in a plastic cup.
- To feed the plant, you can add fertilizer to the water, which is poured through a tube.
A flower pots made in this way can be used as a wall planter, if braided using the macrame technique, or as a floor planter for large-sized plants.