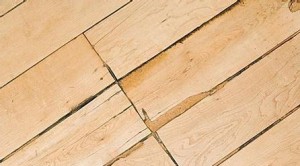
Sealing cracks in a wooden floor - how and how to carry out repair work? Sealing gaps in a wooden floor with glue with sawdust, cement mixture, putty, paste and paper, cord and silicone sealant Sealing deep gaps in the floor between the boards.
Wood is a material that is very susceptible to fluctuations in temperature and humidity, so even boards that are initially perfectly fitted to each other may not lie so tightly after a couple of months. In addition, the floor in the room is always subjected to a large mechanical load, which means that the boards gradually wear out, wear out, chips and cracks appear. The result is one - cracks appear in the floor covering. Of course, you can remove the floor and rebuild it again, but there are less radical repair methods, and one of them, simple and convenient, is the use of sealants for sealing.
As the name implies, the main purpose of the entire group of such building materials is to create an airtight coating. Sealants can be completely simple, without any additional properties, or special, for example, temperature-resistant, containing bacterial protection from fungus, etc.
According to the method of preparation, the sealing compounds are divided into:
- One-component (freeze in air when applied to a surface);
- Two-component (they are two separate compositions in different packages, which begin to solidify only after some time after mixing).
The main active ingredient in sealants is acrylic, silicone, thiokol or urethane. For interior work and for wooden floors in particular, the first two types are usually used.
Requirements for the sealing compound:
- Good adhesion (adhesion) of the sealant to the surfaces on which it is applied;
- Elasticity, after all, even after applying the sealant, the small mobility of the wooden elements relative to each other does not disappear anywhere;
- Lack of harmful emissions during operation;
- The possibility of applying a finishing paint and varnish coating over it or the presence of persistent colored pigments in the sealant itself;
- Water resistance. Of course, the wooden floor, and with it the sealant, will not be exposed to prolonged and abundant exposure to water, but moisture drops, cleaning with a wet rag or accidentally spilled water should be tolerated by the sealant, otherwise there is little sense from it.
Using wood floor sealant
There are many ways to seal unwanted gaps at the joints of individual floor elements. Why is a wood floor sealant good?
- Allows you to get rid of drafts and heat loss through cracks in the surface;
- Will completely remove or reduce the squeak from friction of individual boards with each other;
- Prevents moisture penetration between the boards;
- Protect from insects who love to settle in the space between the boards;
- Eliminates dust and dirt collection points.
Sealing compounds can be used on any kind of wood floor, whether it is just planks, parquet or laminate.
How to use
Before sealing gaps in wooden floor At home, these cracks must be cleaned of dust and dirt with a sealant, and dried if necessary. It is also desirable that for some time before the application of sealants and for the entire time of their hardening, approximately the same temperature and humidity conditions are maintained.
When the surface is properly prepared, the sealant is squeezed into the space between the planks in the wooden floor, spreading evenly with a spatula, spatula or even just with gloved fingers, and the excess composition is removed with a dry cloth. To make this easy to do even before the composition begins to harden, it is better to apply it in small portions.
The sealant does not require special sealing for uniform filling of the joints. The fact is that in most cases such products are produced in packages like a syringe or squeezed out through pistols, i.e. enter the spaces between the floorboards under pressure and thus fill them tightly.
The sealant begins to dry within 10-15 minutes after application, but completely solidifies on average in a day. The higher the humidity and the lower the temperature in the room, the longer it will take. Information about how long each specific composition dries is always indicated on its packaging.
An important point: most sealants, when applied, have an unpleasant odor to one degree or another. You should not be afraid of this, frozen, such compositions stop smelling, but it is better to do the work in a ventilated room.
Which sealant should you choose?
The variety of sealing compounds in building materials stores for an untrained person can be confusing. With special properties sealants are clear: for example, for a damp room, it is advisable to choose a product with antibacterial protection; and if the seam in the wooden floor will be in sight, and its aesthetic is needed appearance, then it is easier for it to be cut off with a colored composition. But what about the main active ingredients of sealants?
For working with wood, acrylic and silicone compounds are most often used, a little less often polyurethane. They all meet the basic requirements for such formulations, but still have some differences.
Acrylic sealants tend to shrink more (relative to silicone) and become less elastic after curing. In this regard, such compositions do not tolerate significant temperature changes very well, and it is better not to use them in unheated rooms in cold climates. But such sealants can be sanded, if necessary, to obtain an even and smooth surface and also well colored.
Silicone sealants are more flexible after application, are resistant to compression, bending and other deforming loads, adhere well even to fairly smooth and even surfaces, but are not suitable for subsequent painting. However, no one bothers to buy an initially colored composition that matches the color of the flooring.
Polyurethane compounds are the most durable and durable, they are resistant to severe fluctuations in temperature and humidity conditions (i.e. they can be used outside the room), very elastic and resistant to damage. The only drawback can be considered only a higher price relative to acrylic and silicone compositions.
If we talk about specific manufacturers of sealing compounds, then the following are well-known and have proven themselves well:
- Ceresit (silicone and acrylic sealants);
- Moment (acrylic, silicone, polyurethane compounds);
- Tytan (silicone and acrylic sealants);
- Bostik (polyurethane, acrylic compounds);
- Neomid;
- Wepost Wood.
User opinions
| Sealant | Review |
| Auster parquet | In general, I am satisfied with the result. For a reasonable price it turned out quality product, which dries well, is plastic, economically consumed, easy to paint. Of the minuses - the color does not quite coincide with that indicated on the package, and with large gaps, an additional seal is required (for example, with a cord), otherwise the sealant falls through. |
| Neomid Wood Professional | For walls, this composition would fit much better. And on the floor it quickly cracks, despite the fact that the room is not such a walk-through. And the rest is a good sealant, lays down evenly, stains very well. |
| Wepost wood | Of the shortcomings, only a decent price. Otherwise, only positive impressions. The room has become much warmer, the floor does not creak, the seams do not crack, although they have been treated with a sealant for quite some time. And what is important, some annoying small insects have practically ceased to appear. |
Summing up
Sealing cracks and joints in a wooden floor with a sealant will reliably protect the room not only from drafts and heat loss, but also from dust, dampness and unwanted guests in the form of insects, and will most likely stop the annoying creak of the boards. It is easy to cope with sealing work, no skills in construction and repair business are required, in addition, manufacturers usually provide instructions for using the products on the packaging.
The difference between the compositions of the sealants was analyzed in detail, but in short - for normal room conditions, acrylic or silicone compounds are sufficient, with increased requirements for elasticity, strength and resistance to temperature fluctuations, it is recommended to spend money on polyurethane sealants.
All photos from the article
During the operation of wooden floors, the boards begin to dry out and deform, which leads to the appearance of gaps between them. In most cases, such a defect is not a reason for replacing the floors, since it is not difficult to eliminate it. In this article, we will take a closer look at how to seal cracks in a wooden floor with different compositions.
Sealing cracks
There are quite a few options for how to fill up the cracks in the wooden floor.
The most common are the following:
- Glue with sawdust;
- Cement composition;
- Putty;
- Paste with paper;
- Cord;
- Silicone sealant.
Below we will take a closer look at all these options.

Sawdust glue
This method is quite versatile, since it can be used on different parts of the wooden floor.
Work in this case is carried out in the following way:
- First you need to prepare sawdust - pour them into a suitable container and pour boiling water. The resulting mass must be mixed until a homogeneous composition is formed. After that, the sawdust must be left for several hours so that they swell.
- Next, add PVA glue to the sawdust and mix until a viscous consistency is formed.
- Then, before covering up the cracks in the wooden floor, you need to carefully prepare them - clean them of dust and dirty deposits. If necessary, the space between the boards needs to be slightly expanded so that it can be completely filled with the prepared composition.
- Next, using a small spatula, you need to apply the adhesive to the gap and tamp it inside.
Putty
If you don't want to mess around with making putty with your own hands, you can use a ready-made wood putty. True, it should be noted that this option is the simplest, however, not always reliable. The fact is that many types of putty crack and crumble rather quickly.

Therefore, when choosing how to putty the gaps in the wooden floor, it is better to give preference to acrylic or latex composition. They dry quickly, are odorless and do not crack over time.

If a putty for wood is chosen as the material, the filling of cracks in the floor is carried out according to the same principle as described above for other mixtures. It can be applied with either a rubber or a metal narrow spatula.
Paste and paper
To create this tool you will need:
- Paste;
- Paper;
- A small amount of copper sulfate, which will protect the floors from insects.
This putty turns out to be quite durable, while its price is minimal.
It is performed as follows:
- The paper must be cut into small pieces and filled with water.

- Then you should prepare a paste from flour or starch. To do this, bring the water to a boil, and then gradually pour one of the selected ingredients into it. In this case, the mixture must be thoroughly mixed so that there are no lumps in it.
- Further, copper sulfate should be added to the finished and cooled paste in a ratio of 1:10.
- After that, you need to grind the paper with your hands and add it to the paste. As a result, you should get a homogeneous and rather thick putty consistency.
As in all previous cases, in order to achieve a high-quality result, before filling the gaps in the wooden floor, they must be well prepared, clearing them of any dirt and peeling surfaces. After that, you need to fill the space between the boards with the mixture and tamp it as best as possible.

Cord termination
This option is good because it allows not only to eliminate the space between the boards, but also to get rid of their unpleasant squeak.
To carry out repairs in this way, you will need the following materials:
- Twine, cord or rope of a suitable diameter;
- Sawdust;
- Joiner's glue;
- Wood putty.
The work is done in this order:
- The cord must be moistened with an adhesive so that it is lubricated from all sides.
- Then you need to make a mixture of putty, glue and sawdust.
- Next, the rope must be laid in the space between the boards to a depth of several millimeters.
- Then you need to apply the prepared mixture over the cord. Moreover, the putty should rise slightly above the floor, since during the drying process it will certainly shrink.

If the floors "play" and there is no way to fix them firmly, then it is best to use a silicone sealant to seal the cracks in the wooden floor.
The process of applying it is extremely simple:
- The composition is drawn into a syringe.
- Then the tip of the syringe is lowered into the prepared gap and the sealant is squeezed out.
Due to the fact that the silicone remains elastic even after drying, such a seal can last for a long time.
Sealing the space between the wall and the floor
Separately, it should be said about how to remove the gaps in the wooden floor that arise between the boards and walls. It should be said right away that in the case when the gap is 1-2 cm, then it can not be repaired, since it is.
If the distance reaches 5 cm or more, then this space can be repaired in two ways:
- With the help of foam;
- Filling up the space polyurethane foam.
Note!
Before using polyurethane foam, the surfaces on which it will be applied must be moistened with water from a spray bottle.
Here are, perhaps, all the most common ways to get rid of cracks in a wooden floor.
Conclusion
As we found out, there are a lot of ways to seal cracks in wooden floors, and all the options discussed above are quite effective. Therefore, you should choose based on the condition of the floor and the presence of certain ingredients.
You can read some additional information on this topic from the video in this article.
A wooden floor is beautiful and environmentally friendly, but up to a certain point. Namely, until the boards dry out and gaps appear in the floor between them. How and how to fill the gaps in the floor so that it becomes attractive again is a whole science.
Often, within a year or two after laying a wooden covering, cracks appear between the boards. Boards shrink as they dry. This process is natural and normal, but he is not happy with the result. There is a cardinal solution - to rebuild everything anew, reuniting the removed boards again and adding a couple of new ones. But not everyone wants or can do it. It seems that it is too difficult. Yes. Not so easy. But other ways to seal cracks are no easier and take no less time. But let's figure out how to solve the current problem.
How to close up small gaps
If the gaps are not too large - 1-2 mm, you can use repair compounds, with which they are simply covered up. For these purposes, use:

After such repairs, the floor can be painted. If the color is well chosen, it can be varnished. Wax or oil, most likely, will not work - neither the mixture with PVA, nor the sealant will be tinted and will stand out very strongly.
Close up large cracks
When restoring an old wooden floor, the gaps can be half a centimeter or more. There are several techniques for solving these problems. The first is the same bulkhead and the rallying of the boards on a new one. But there is one trick here. Old boards are often deformed along the edge. To avoid problems with rallying, carpenters pass between the boards with a hacksaw. So the edges are leveled, and two in one pass, and flaws are immediately revealed and severely damaged boards can be discarded. For owners of a hand router, the process can be simplified by using a properly sized router bit.
If a bulkhead is not possible (for example, partitions are installed over the floor), there are other options for how to seal the cracks:

A few words about how to seal the cracks with wooden inserts. The slots are of different sizes, so you have to make each wedge separately. Long and dreary, and inserts of different sizes do not decorate the floor too much. There is an option to make the work easier and, at the same time, improve the appearance. Take a cutter and fit all the slots to the same size. If some are too wide, you can make two "gauges" or three. It's still better than slicing wedges under each crevice.

In addition to the advantages described above, we remove old wood from the edges with a milling cutter, expose the fibers. They will hold the insert better as the glued wood fibers will rise and join with the same fibers on the insert. After the glue dries, it will be very problematic to tear this piece of wood out of the groove. If everything is done correctly and carefully, the floor after sanding already looks good, and if it is soaked with stain and varnish (you can also matte, without shine), it looks very dignified. Stain removes color differences, and varnish hides blemishes.
 You can close the gaps so that the eye will rejoice
 All these methods are more or less durable, but only if the boards do not bend. If the wooden floor bends, it will not be possible to seal the cracks for a long time. The materials are likely to separate from the movement. So first you need to make sure that the boards do not "walk".
How to eliminate the deflection of the boards
If the boards "play" perceptibly when walking, mistakes were made. The lag step was chosen incorrectly or too thin boards were laid. So the solution is obvious:
- Set additional lags.
- Install thicker boards.
 Change boards or lay logs more often - radically, but reliably
 Both options require dismantling the old floor first. This is not always possible. Although, if there is such an opportunity, it is better to do so, but there is also a way without parsing the floor.
Bundle the boards with dowels
To eliminate the sagging of the boards, you can turn the flooring into a single surface. To do this, dowels are inserted into the boards at an angle, which fasten two adjacent boards. Dowels are wooden rods. The hole for them is drilled in such a way that it passes through two boards. The exact angle of inclination depends on the thickness of the flooring, so it is selected on site. The angle should be chosen so that the layer of wood above / below the dowel is not too thin.
The holes are drilled slightly larger diameter than dowels. Usually 5 mm more. For example, under the dowel 8 cm, the drill is taken 8.5 mm. For dowel 10 mm, drill 10.5 mm. Did you understand. Why is the hole larger? The dowels are seated on glue. If they go too tight, they will squeeze it out. The strength of such a connection will be low. And so, the fibers from the glue will swell, intertwine with the fibers of the dowel. When the glue is polymerized (PVA), the bond will become very strong. When trying to break it, the wood bursts nearby, and the connection itself holds.
 If the boards stagger, first we fasten them
 The drill needs to be very long - not so thin boards have to be drilled at an angle. It's hard to find. Alternatively, weld a rod of a suitable diameter. Another tip: make a template that will allow you to maintain the desired slope without any problems. It's difficult without him. Especially at the beginning. After several hundred holes, it will be possible to maintain the specified angle without a template.
Then the hole from the inside and the dowel are coated with glue. For the holes, you will need to regular bottle glue (in such stationery PVA they sell) fit a long nose from a tube. The tube is taken about 20 cm, sealed at the end. Holes are made in the sidewalls. Do not make the holes too large so that when pressed, the glue will spray on the sides. The technique is clear - a sprinkler is inserted into the hole, we press on the bottle, the glue hits the walls.

The dowel moistened with glue is installed in place. It is left like this until the glue dries. Then the protruding part of the wooden chopik is cut off, the cut is polished. The easiest way to cut is with a grinder, to grind - with what is. Manual grinder, a plane or all the same grinder or drill at low speeds and with the appropriate attachment.
How to close the gap between the floor and the wall
During renovations in an old housing stock, removing old skirting boards, we often find an unsightly picture. There is a considerable distance between the wooden floor and the wall, clogged with all sorts of debris. Immediately comes the desire to close this gap. You shouldn't close it at all, as it is needed, but you can reduce it.
In general, a technological gap is left along the perimeter of the wooden floor. It should be between 1 cm and 4 cm in size. Depends on the size of the room. We need this gap to compensate for changes in the size of the boards. But if you leave a large gap at once, over time, the wood dries out, the gap becomes too large. For dried wood, it is clearly superfluous. Moreover, modern skirting boards are 2-2.5 cm wide, and the rest cannot be covered with them. Is that custom made. This is also a way out, but you can go the other way.
 The gap between the wall and the floor can be significant
 The gap between the planks and the floor can be reduced by using wood inserts. Dry planks of the same thickness as those laid on your floor. You can put the insert, but you must leave 1-1.5 cm between it and the wall.
If the edge of the floor is uneven, it will be necessary to file and trim the boards. There is manual frezer- it's easier for you. No - with a hacksaw. After you have trimmed the edge, measure how thick the insert you need. Do not forget that there should be a free space of 1-1.5 cm. Cut out the required insert width from a dry board of suitable thickness. You can pin them to the beams on which the floor lies.
How to fill the technological gap
There must be a technological gap between the wooden floor and the wall. But emptiness will contribute to audibility, which is far from always pleasing. Alternatively, you can install polyethylene foam or of a suitable thickness (it is 10 mm and 8 mm). Polyfoam and polyurethane foam in this case, although much cheaper, but here they will not help. The wood is constantly "walking", will compress the material, then let it go. Foamed polyethylene and damping tape are compressed under load, and after its removal, they are restored. Foam and polypropylene, once shrunk, remain. So there is no point in them.

You can use not a damper tape, but a special elastic cord made of polyethylene foam and a sealant. This solution is better for sound insulation. Foamed polyethylene cord is used to fill damper (expansion joints). Its diameter is -1-1.5 cm. Choose which one you need. The cord should not be located at the very surface, but slightly below - at a distance of about 1 centimeter from the edge of the board. As batten usually at least 28 mm thick, a "stand" may be required. Here you can also use expanded polystyrene. It will only support the cord. Cut into strips of the desired size, put in the gap. Above is a cord.
Wood sealant is applied over the cord. When choosing a composition, pay attention that elasticity remains after drying. Sealant layer thickness - no more than the gap width... Less is better. Otherwise, it will lose its elasticity. After application, it is necessary to form a surface either as in the figure - concave, or - convex. So the sealant retains its elasticity longer and stretches / contracts better. This relief is formed by any overhang of a suitable shape. Even with a fingernail in a glove, even with the handle of a spoon or fork.
Now you know not only how and how to seal the cracks in the wooden floor, but also how to eliminate the deflections of the boards, how to seal the gap between the wooden floor and the wall.
You should ask this question at the stage of buying the material, because the cracks in wooden house can manifest themselves not only in the space between the crowns, but also on the surface of the raw material. How to choose correct material with the least loss and carry out a high-quality process for caulking and sealing gaps, details below. It should be noted that neglect of this action entails not only the impossibility comfortable stay, but also damage to the material.
Purity of wood is a guarantee of quality

It is possible to buy absolutely smooth raw materials. But the absence of cracks and cracks is more likely a sign of the freshness of a bar or log. This means that wood carries a high percentage of moisture, which is not good, since when installed in a log house, shrinkage can deform the elements and cracks will inevitably appear.
It is best to purchase dry raw materials with a minimum web of defects, then there is a chance that the aging and drying technology is followed. How to correct these shortcomings and how to cover up the cracks of a log house or cracks in a profiled beam? With the help of many means known from the time of our ancestors. Namely:
- Joiner's glue + wood waste. This is the most affordable tool for self-quality work.
- Synthetic derivatives - sealants, mastics, resins, polyurethane foams.
- Caulking with jute, flax, tow and moss.
- Decorative finishing.
More about the processes available to non-professionals:
- Using wood glue to seal the cracks in a wooden house, it is possible both at the stage of finishing and subsequent regular inspections of the object for damage. The tool is affordable, cheap, and brings a lot of benefits. But the disadvantage is only the use in small areas, with extensive lesions, it is worth using something else.
So: the cracks should be cleaned with fine emery so that sawdust and wood dust are collected. Next, a paste is prepared from them - glue is poured into the mass.
Then the substance is placed in the cracks and left for easy adhesion. After the grinding machine, the places are processed.
- Using a crevice sealant wooden house, you need to learn one rule - acrylic options are not suitable for outdoor use. Also, you need to be wary of silicone ones - they can exfoliate in the cold, so the bottle should be marked strictly as frost-resistant. It is worth choosing the right color for the general background of the wood.
Before applying the product, the crevices must be treated for biological spoilage. It will not be bad to walk, in general, with all kinds of protections. Next, the sealant is inserted into the gaps as deep as possible and compared to the surface.
Sealing cracks in a wooden house with foam for assembly purposes is recommended only on condition of further facing. It looks unpresentable and even after cutting off the protruding parts, attractiveness does not increase. In addition, foam is a kind of foam rubber with cells.
Consequently, moisture that gets there is able to retain and act destructively on the wood. Resins and mastics can play the role of a putty, but when sub-zero temperatures they are destroyed.
- Cauliflower is the most The best way sealing the inter-row gaps of the finished log house after shrinkage. It is of a periodic nature and takes place in three stages. The first one - immediately after the assembly of the object, the second after shrinkage and the third after 3-5 years of operation.
This process - sealing cracks in a wooden house - is subject to buildings made of all types of raw materials - timber, logs. Sellers of expensive materials - glued or profiled kits have no right to say that their wood does not need it. There is practically no such type that has done without the occurrence of gaps and cracks.
The caulking process is as follows:
- Previously, the surface of the walls is cleaned of chips, protruding fasteners and other things. You can use a grinder or vacuum cleaner.
- Then the surface, especially those places where it is required to seal the cracks, in a wooden house is impregnated with chemical or natural protections against fire, fungus, moisture and mold. Each coat must be completely dry before applying the next one.
- Further, it will not be difficult to seal the cracks in the wooden house with the chosen caulk. There are two ways to do this - in a set and in a stretch. The first for thread-like materials is tow, rope.
The second is for tape materials: jute, flax. You should use special tools in the process - an extension, a flat caulk and a mallet for accurate driving.
Sufficiency is checked with an awl - if it enters the sealed gap with difficulty, the material is laid with high quality. But you can't overdo it either - you can violate the position of the crowns.
- The work is carried out strictly in a circle, from two sides. Regular prophylaxis and removal of old material at home is a guarantee of a house that is not ventilated.
Decorative caulking is as follows:
- A decorative cord is used as a material and such raw materials are used in order to seal cracks in log house looked beautiful with expensive and elite material - glued laminated timber, rounded logs.
- Before laying the twisted rope, they carry out the usual manipulations for caulking - cleaning, impregnation. Further, the gaps in the wood are filled with a sealant, mastic or resin. This is done just in case the cord suddenly falls out.
- It remains to lay the rope. With the help of tools, it is carefully driven in between the logs, without waiting for the complete drying of the substance laid before caulking.
The wood house crevice sealant will bond with the cord and provide strength. When caulking with a rope, you should start with corner joints and then work on the remaining sections.
Sealing cracks in a wooden floor is required in cases where the boards have dried out during their long operation, and some of the floorboards have begun to creak. Since the wooden floor has been used for centuries, during this time many ways have been invented to repair it, and with the advent of new materials, the possibilities for eliminating flaws have expanded even more.
Therefore, if the need arises to seal the cracks, you can always choose exactly the method that is most affordable in terms of execution. To be aware of the ways to solve these problems, you need to consider some of them.
Repair of wooden flooring can be roughly divided into three types:
- Complete dismantling of the floor and bulkhead of the floorboards. To carry out this procedure, you will need a hammer with a nailer and a small crowbar. Such large-scale events are carried out if there is a suspicion of damage to the laths of the crate on which the floorboards are laid.
The boards are carefully sorted out, from which they choose healthy and strong specimens. If required, they are shaved off a little to smooth out unevenly dried edges.
It is possible that some of the floorboards will have to be completely replaced, so this must be foreseen in advance by purchasing replacement material. If necessary, some elements of the crate are also changed.
After all the repair and preparatory actions, the floors are re-laid. In this case, the boards should fit tightly and be fixed to the logs.
This type of repair is necessary if filling the cracks, due to their size, is simply ineffective.
- Partial dismantling of the boardwalk is carried out in cases where flaws on the boards have formed in certain areas, where wide gaps have appeared and the boards have begun to squeak. The flooring in these places is carefully removed, and a new one is laid in its place. Most likely, the second type of repair will have to be carried out in conjunction with the third, the most widespread.
- In most cases, it is only necessary to carry out repair work to seal the cracks. different ways... The choice of a specific technique, first of all, depends on the size of the slots and the scale of their distribution on the floor surface.
Methods for sealing gaps
Slots in the floorboards can appear in various parts of the floor, so you need to consider not only the technology of work, but also the options for the materials of the embedding, as well as the places where flaws may arise.
The cracks between the wall and the boards sex
Small distances are always left between these elements of the building for ventilation and in case of expansion of the material due to temperature and humidity changes. But if over time they have increased excessively, then they will need to be repaired. This can be accomplished with construction foam, sometimes even adding small pieces of foam to it. The work is carried out in stages:
First you need to carefully dismantle the skirting boards;
Then clean the cracks from dust and accumulated dirt;
After the foam dries, the excess is cut off exactly along the catchers;
On top of the seams, it will be best to seal up with putty so that dust does not collect in the pores of the frozen foam;
Sealing gaps with glue + sawdust
Floor repair, in any of its areas, can be carried out with an adhesive, which can be made in one of two ways:
First option
- First, small sawdust is prepared. They are placed in a convenient container and poured with boiling water. The mass is mixed until uniformity is achieved.
- The sawdust is left to swell and cool for one to two hours, then the mass is mixed again.
- Further, glue (carpentry or PVA) is added to the prepared sawdust, and the mass is well kneaded until a viscous consistency with high adhesion appears.
- Then you can proceed to the preparation of the floor - all cracks are cleaned of dust and dirty deposits. Sometimes, if necessary, their upper part expands slightly.
- The prepared glue mixture is applied to the cracks with a narrow spatula and gently tamped inward, as far as possible, but without much effort.
- The mixture is leveled from above, the excess is removed.
- After complete drying, after two to three days, the cracks are sanded with sandpaper or are looped using a special machine /
Video: homemade filler from sawdust and PVA
Second option
It is possible to repair floor coverings in a different way, using a repair compound made of sawdust and glue, but with the addition of cement.
- For this, two parts of PVA or wood glue are taken, 15 parts of very warm water are added to this, everything is well mixed until completely homogeneous. Next, 5 parts of cement and the same amount of sawdust are added to the resulting adhesive solution. The mass is mixed and left for 7 ÷ 10 minutes. If the mixture needs to be given a certain color of wood, then you can add a special coloring pigment or thick oil-based paint.
- Next, the gaps in the floor are cleaned and lubricated with the glue that was used to make the repair compound described above.
- The mass itself needs to be warmed up a little, and then quickly fill the cracks with a narrow spatula, trying to level the surface.
- It will take about two weeks for this composition to dry completely. Then the slots must be treated with abrasive materials to perfect evenness.
This method is often used not only for sealing widened gaps, but also for leveling the floor surface to a smooth state.
Repair with putty
If you don't want to bother with the manufacture of complex compositions from numerous ingredients, you can, of course, do an easier thing: buy a special putty for wood in a hardware store and seal the cracks with it. This option is suitable if the slots not great at all... But you need to know that such an autumn putty is often quite short-lived - it can crack and crumble over time. Therefore, it is better to use it when it is planned to then close the old boards with plywood flooring.
The finished putty is also applied with a narrow or rubber spatula, pressing it into the cracks. After it dries, it is necessary to level the sealed surfaces using the available means of abrasive wood processing.
Sealing gaps with paste and paper
This method is easy to implement and not expensive at all. To perform such a process, you will need paste, paper and a little copper sulfate, or, as it is also called, "blue stone". This ingredient of the composition is necessary so that nests of various small insects do not appear in the glue mass over time.
- The paper is torn into small pieces or cut, then it is filled with water. The paper should be allowed time to soak.
- While the paper pulp is being prepared, you need to prepare the paste. It is cooked from flour or starch and water. The water is brought to a boil and one of the selected ingredients is gradually poured into it, stirring constantly, so that there are as few lumps as possible. The composition should cool to a warm state.
- Then copper sulfate is added to the paste 1:10.
- Next, squeeze the pulp, grind with your fingers, add to the paste and mix thoroughly. You should get a fairly thick and uniform consistency, like putty.
- The preparation of the gaps for sealing occurs in the same way as in other cases. The main thing is to achieve their absolute purity.
- Further, the mass is superimposed on the slots and compacted into them. From above, it must be well leveled, and after drying, it must be leveled with sandpaper.
- After that, the floor can be safely painted.
Sealing cracks with a cord
It has long been known a method of sealing cracks, and not only between floorboards, but also in walls, using a cord chosen according to the width of the holes. The use of this popular technology will help not only get rid of cracks in the floor, but also save residents from the unpleasant creak of the boards.
For the repair process in this way, you must have a twine, rope or cord made of any material, sawdust, joiner's glue or PVA and putty.
- The cord must be passed through the glue so that it is completely lubricated with it.
- Next, a mixture of putty, sawdust and glue is made.
- The rope is laid on one of the slots and deepened inward until it is 2 ÷ 4 mm from it to the floor surface - this is a necessary condition.
- The distance from the cord carefully compacted into the slot to the floor surface must be filled with the prepared mixture with a small margin from above, since, when dry, the adhesive putty composition will surely shrink.
Sealing gaps with slats or wedges
For a long time, a more complex method of sealing cracks has been used - with the help of thin slats, cut at an angle in the form of wedges. These parts should be carefully fitted and should not overlap the floorboards, but, at the same time, completely cover the cracks. The work is carried out in several stages.
- As with other repair work to seal floor flaws, the cracks must be cleaned and their upper part widened somewhat.
- Further, according to the size of the slot, a rail is made, narrowed to its lower part, so that it, like a wedge, enters the prepared and cleaned groove.
- The slit and lath are thickly processed with PVA or wood glue.
- Further, the rail is glued into the slot, it can be knocked out a little with a rubber hammer or a mallet, or you can place a plank on top and hammer the rail through it with an ordinary hammer.
- If the rail does not fully enter the slot, and a small part of it protrudes above the floor surface, then it is removed with a plane after the glue has completely dried.
- When using this method of sealing gaps in the floors, the color of the wedge-strip to be driven in will differ significantly from the main coating, so they can be leveled using a stain or a well-chosen paint.
- If there is a thick layer of paint on the floors, and it is cracked and peeled off around the cracks, it can be removed with construction hair dryer or clean it using special drill bits with a soft iron brush. You can also resort to sanding paper installed on a sander.
Other repair methods
In addition to the methods mentioned above, there are many other known techniques. In addition, hardware stores can offer numerous modern materials for this purpose.
- Oakle - familiar to everyone construction material made of flax fibers, which has long established itself as its positive qualities... Therefore, even with the advent of numerous new compositions for sealing cracks and cracks, they are in no hurry to abandon it.
This material is treated with carpentry glue and tamped into its cracks in the cracks with the help of an improvised tool. After the glue dries, the gaps are tinted to match the overall floor.
- A composition of epoxy glue and cement, which is prepared based on equal proportions of the material, is excellent for repairing floors with small gaps. This product is carefully poured into the openings with the top, in the expectation that the mass will sag. As epoxy in a batch with cement, it sets quickly enough, it will not have time to seep into the subfloor.
Then, after the glue has dried, the gaps are sanded and covered with paint.
- Composition made from thick oil paint, sawdust or small shavings and varnish on wood in a ratio of 1: 4: 1, mixed into a single mass of a homogeneous consistency, is also excellent for filling gaps of different sizes. The process can be carried out in one step, when the gaps are poured immediately, or maybe in several stages, when it is changed in cases where such an amount was formed between the floorboards different sizes Therefore, it will be easier, observing all the technologies for working with plywood, to fix it on the floor surface with self-tapping screws and close all the flaws that have appeared at once.
- Well-known sealant, which has a convenient packaging and a nozzle in the form of a syringe, is well suited for sealing joints. Thanks to this special device, you can accurately fill both a wide gap and a very narrow one by cutting off the tip to the desired thickness.
The sealant perfectly closes the cracks and frees from the resulting squeak. Spreading under the pressure generated in the syringe, it covers the entire inner surface without ramming or other forces. This is a durable and fairly reliable material that will save you from problems for many years.
Acrylic- and silicone-based sealants that are designed to work with wood are well suited for sealing gaps. They are very easy to apply and dry quickly. Therefore, if there is no experience in the manufacture of special compositions or there is no desire to tinker with them, but there is an opportunity to purchase a ready-made tool for such repairs, you can opt for a sealant.