How to replace a toilet with your own hands - instructions for replacing different types of toilet. Replacement and installation of toilets We change the toilet with our own hands
When the time comes to replace old plumbing equipment with new ones, there is always a choice: do it yourself or invite specialists. Changing the toilet with your own hands is not as difficult as it might seem at first. By doing it yourself, you can save a sufficient amount Money... We will show you how to change the toilet.
Where to begin?

People who are starting a new task for the first time wonder how to change the toilet for a new one. The first step is to buy a new toilet. The plumbing equipment purchased in terms of its dimensions should not differ from the previous one. Why is this needed?
Buying a toilet that is similar in size, with a similarly positioned outlet, will prevent any problems with installing a new toilet.

Plumbing of the same size does not take long to get used to. The new toilet will not take up too much space, it will be familiar and no less convenient: after all, the new one may be too large or high.
If you decide to purchase plumbing that is very different in shape from the previous one, you need to prepare for the fact that you will need a new mount, or even a new outlet of sewer pipes to connect to the toilet.
Tools for installing a new toilet
To independently change the old toilet for a new one, you may need the following tools and additional building materials:
- wrenches and screwdrivers, hammer, knife and chisel;
- silicone sealant and pipe gaskets;
- large adjustable wrench;
- water supply hose;
- toilet mounts (sometimes suitable mounts are supplied with new equipment, sometimes they have to be purchased separately with the toilet);
- corrugation for connecting the toilet with sewer pipe;
- bucket and a large number of old rags, a piece of durable plastic and scotch tape.
Dismantling of old plumbing

Immediately before changing the toilet, it is recommended to clean the pipes as much as possible with the help of special chemicals... This will significantly reduce pipe deposits.
When dismantling the old structure of the toilet, it is recommended to shut off the water and empty the cistern. You can start separating the old toilet from both the cistern and the drain. The easiest way to dismantle the cistern. And the bottom hole will have to work hard.
Expect a certain amount of water to spill when you unplug the toilet. To remove it, you will need a bucket with some old rags.
It is recommended to insulate the outlet sewer pipe with polyethylene and tape. Then proceed to cleaning the bathroom from the fragments of the old toilet bowl and other construction debris. In case of some cracking of the tiles or other construction defects, you need to immediately put everything in order, even before installation. new plumbing.
Installing a new toilet

Installing a new toilet will require an impromptu spacer between the floor and the plumbing to prevent tiles from chipping.
After that, the procedure is as follows:
- Set the toilet in its normal position, as it will be located in the bathroom later, with the connection to the pipes. Draw a pencil around the base of the toilet bowl on the floor, mark the places of attachments to the floor. If there is not enough height for the new toilet to be attached to the sewer pipe, it is necessary to organize a substrate under the base of the plumbing.

Mount the cistern and connect it to the toilet. To test all systems, temporarily connect the toilet bowl drain to the sewer pipe and carry out a test filling and draining.

- At the end of checking the work of the new plumbing, you need to prepare the holes for the dowels, focusing on the previously made marks.
- After that, you should attach the corrugation with one end to the outlet of the toilet bowl and carefully seal the joint with silicone sealant, and the other end to the sewer and also carefully carry out the sealing work.

- Finally, at the end of all the preparatory work, you need to install the toilet in the prepared place and carefully fix it. This completes the installation of new plumbing equipment.

It is recommended to carefully wipe off excess silicone with a damp cloth. Changing the toilet on your own is a completely accessible task even for those who intend to start this for the first time. All that is required is to carefully and carefully carry out all the necessary actions.
Video
This video will show you how to install the toilet.
Any technical means have their own service life and may fail, this also applies to plumbing, including toilets. When plumbing equipment breaks down, you have to think about replacing it. Such work includes the dismantling of the old toilet bowl and the installation of a new one, in the article we will analyze these processes.
The reason for replacing plumbing equipment in an apartment may be not only a breakdown of old equipment, but also its unattractive appearance... An old toilet bowl may not correspond to the visual characteristics of the interior of the bathroom, spoil the image of the entire home, nullify the funds and efforts invested in the repair of the room. Even if it regularly performs its functions, but looks unpresentable, it is better to replace it, although this will cause additional financial costs.
There must be at least 20 cm between the toilet and the side walls
Before buying a new device, you need to decide on the scale renovation works... Complete toilet replacement is not always necessary. For example, if the breakdown of an old technical device lies in a cracked cistern, you can simply replace the cistern itself, but do not touch the toilet.
If you need to replace the entire toilet, you should first choose a new plumbing, which should be as functional as possible, attractive and corresponding to the external parameters of the bathroom. Toilets differ from each other not only in visual characteristics, but also in the shape and direction of the outlet through which the device is connected to the sewer network. On the market you can find equipment with the following types of release:
All types of outlets have their positive and negative qualities, however, direct and oblique outlets are considered the most functional and convenient, therefore most modern toilets have just such connections. Before buying, you need to measure the bathroom. This information will allow you to choose a plumbing device that fits perfectly into the room, not only in terms of its visual characteristics, but also in size.
It should be remembered that it is necessary to place the toilet in the room taking into account some parameters. First, the device must be located at least 60 cm from the door. Secondly, there should be a free distance between the toilet bowl and the side walls - at least 20 cm. Compliance with these standards will allow in the future to use the bathroom as comfortably as possible. When buying, it is recommended to pay attention to the design of the old and new toilet bowls. It is not always the case that the hole connected to the drain channel is located in the same place, therefore, after installation, the new device may be located in a completely different way from the old one.
Replacing an old toilet with a new one is enough simple job, which the owner of the apartment can do with his own hands. To do this, you must first purchase or take from friends some tools, without which dismantling and installation is impossible. To replace plumbing you will need:
- hammer drill or hammer drill with special winder drills for working in concrete;
- a set of wrenches for assembling locking fittings and connecting water hoses to the device;
- pipe and Swedish adjustable wrenches;
- screwdriwer set;
- hammer;
- glue-cement;
- bottle with sealant.
In addition to tools for work, you will also need some materials. In particular, it is necessary to purchase suitable water pipes through which the cistern will be connected to the water supply system. Previously, metal pipes were mainly used to connect plumbing, but today the most popular products are made of metal-plastic and polypropylene. Such pipes are not as durable as their metal counterparts, but it is much easier to work with them - no special skills and tools are required for this.

During installation, pipe and Swedish adjustable wrenches will be required.
To work with metal products, you have to use welding, cut consumables manually, cut threads and perform other complex work, because of which previously replacing plumbing was a very difficult task that was beyond the strength of many owners. Installation is performed in a completely different way metal-plastic pipes, they are assembled with the help of special fittings, which makes it possible for people with no experience to perform work.
Dismantling the old toilet is the first stage of work, which is recognized by many experienced specialists as the most difficult and responsible of the entire replacement procedure. It is during dismantling that various difficulties and troubles can arise, for example, fasteners could rust and now interfere with removing the drain tank. From constant contact with water hardware become substandard and can be very difficult to unscrew.

Before installing a new toilet, you must dismantle the old
Difficulties can also arise when removing the toilet bowl, where the fasteners can also corrode. And even earlier, the discharge from the sewer from cast-iron pipes was fixed on the toilet and covered with concrete mortar. As a result, after many years it is almost impossible to disassemble the connection without damaging the old toilet bowl and fasteners.
If you do not wish to maintain integrity installed toilet, the bowl can simply be broken into several pieces with a hammer or sledgehammer. If it is necessary to keep the old device in good condition, it is better to refuse to dismantle it yourself. You cannot remove the toilet bowl from the cement base on your own.
The entire dismantling process will include the following steps:
- 1. Disconnecting the tank from the water supply. Just disconnect the pipe through which the water enters the tank using wrench and drain the remaining water in it.
- 2. Detach the cistern from the toilet. To do this, unscrew the nuts located on the back of the structure and slowly raise the tank.
- 3. Loosen the base of the toilet. If there is a set around the toilet tile, it must be dismantled, then unscrew the nuts securing the bowl to the floor, there can be from 2 to 4 pieces. If the socket seal is made of cement, it must first be beaten off with a hammer and chisel (use a thin chisel).
- 4. Plug the sewer pipe with a plug. The pipe should be closed so that sewer gases do not enter the apartment during further work.
- 5. Dismantle the old toilet. It is recommended not to spare the old plumbing fixtures and just beat off the toilet outlet with a hammer (in compliance with safety precautions) and release the sewer socket.
- 6. Clean the socket from mortar residues and ceramic fragments.
In some cases, it is extremely difficult to disconnect the toilet outlet and the sewer pipe. Over the years of operation, cast iron products can become overgrown with rust, which makes the connection with the toilet even more reliable. In this case, you can use a grinder to cut off the cast-iron flange from the toilet bowl outlet and finish the dismantling work.
There are several methods for mounting and fixing the toilet to the base. After purchase, it is recommended that you carefully study the installation instructions from the manufacturer, it indicates the preferred method of execution installation works... In any case, after freeing up space for the installation of plumbing, it is necessary to connect the clean outlet of the sewer pipe with a corrugated hose. Next, place the product and outline its contour with a felt-tip pen on the floor and mark on the floor the fixing points of the bowl to the horizontal plane.

There are several ways to attach to the base
Further work depends on the method of mounting the device on the base chosen by you or provided by the manufacturer. One of the most popular installation methods is dowel mounting. For such a fastening, it is necessary, according to the marks made with a felt-tip pen, to make holes in the floor with a drill or perforator. Next, the bowl is installed and fixed with dowels in the pre-made holes. After that, you just have to process the seam between the bowl and the floor with a special silicone sealant.
Popularity this method installation is due to its simplicity. Even a beginner can do such work without much difficulty. After installing the plumbing fixture, it remains only to assemble the tank according to the instructions, install it on the bowl, fasten the bolts and connect the drain tank to the water supply system.
If the hose connecting the tank to the water supply pipe is in good condition, it does not need to be changed, but if there are traces of corrosion, it is better to replace the product with a new one.
The second way to install the bowl to the base is to mount it on a solid gasket. This is a rather old method of installation, which involves placing the device on a special wooden spacer, which is fixed in a niche in the base. The gasket is placed in a pre-made niche and fixed with concrete mortar. The new toilet bowl is placed on the gasket and fixed on the board with screws, after having laid the connection with rubber washers. This is clearly an outdated installation method that is rarely used these days.
The third mounting option involves gluing the toilet bowl to the surface. The floor and the lower plane of the toilet bowl are abraded and degreased, after which they are lubricated with a thin layer of a special epoxy adhesive. After that, the bowl is pressed to the floor and left until the glue hardens for 12 hours. Gluing is rarely used, however, when using high-quality adhesive, this method allows you to achieve reliable fastening, but serious difficulties can arise with the subsequent replacement of the toilet.
We recommend installing toilets with wall plugs only. This method provides the highest quality connection, is simple and allows in the future to replace the device with a new one with minimal effort.
Do-it-yourself toilet replacement in an apartment?
Replacing the toilet - we install new plumbing correctly Any technical means have their own service life and may fail, this also applies to plumbing, including toilets. At
Replacing the toilet
Plumbing equipment has long been an integral part of any comfortable home. But as you know, "nothing lasts forever under the moon," and your toilet will sooner or later require replacement. In this case, you can contact your managing organization and, having prepared the money, wait for the arrival of a plumber, hoping for loyalty to popular wisdom " you can't drink experience».

You can go the other way and find "shabashniki" according to the ad, risking getting caught by unscrupulous performers who seek to get as much money as possible in the shortest possible time, while not bothering yourself too much. But if you have minimal experience with a drill and wrench, you should try to replace the toilet with your own hands.
What to foresee in advance
Of course, if your old toilet is thirty years old, it is connected metal pipe with an overhead tank, and to replace it requires welding with a tie-in of a new water inlet into the riser ( vertical pipe supplying water to the floors) at a lower height - you still have to turn to professionals. Replacing the "compact" toilet bowl (in which the cistern is mounted directly on the toilet bowl) with a similar new one is quite within the power of anyone who has read this article and read the instructions attached to the new kit.

First of all, of course, you need to choose and purchase a new set of toilet bowl, cistern and drain fittings... Toilet fittings, like drain fittings, are usually included in the kit - this is worth checking when buying and purchasing if necessary. In addition, you will need:
- plastic corrugation;
- flexible water liner - you can estimate its length by looking at the old one (usually a nut-nut liner with 1/2 inch thread is used);
- toilet seat shaped rubber gasket or silicone sealant.
If the old toilet is modern enough and was attached to the floor with standard fasteners (screws), you can try to find a new bowl with the same distance between the fastening holes so as not to re-drill the floor - this is especially true if the floor is covered with ceramic tiles that you not going to change.
Most modern "compacts", except for the cheapest models, have a bottom water connection - this means that water enters the tank through a hole in the bottom, and does not pour into the tank from above with an annoying murmur. Better to choose just that.
Other delights, for example, the shape of a special nut in the bowl ( so-called anti-burst) or microlift, smoothly and without knocking lowering the seat, you can choose to your taste and wallet. It is only necessary to pay attention to which release the old toilet has - straight or oblique, and to acquire a new unit of the same type.
Required materials and tools
After purchasing the "compact" itself and the materials necessary for the work, you can start preparatory work.

You will need the following tools:
- a set of wrenches (you can do with a pair of adjustable wrenches);
- perforator or electric drill with impact mode (if you cannot use the old holes for attaching the toilet to the floor) and two drills - special - for tiles and carbide - for concrete;
- water container - a bucket or basin and a rag;
- it will not hurt to disinfect the old toilet with bleach or a special agent;
- Replacing the toilet with your own hands must be done with gloves, and when drilling holes - with goggles.
Dismantling an old toilet
Before dismantling the old toilet, it is necessary to shut off the water supply to the tank using the tap located in front of the flexible hose. If this tap does not hold water, you must turn off the valve at the water inlet to the apartment.
It is worth noting that in old houses, the pipe can be diverted to the toilet cistern directly from the riser. In this case, if the crane malfunctions, it will be necessary to shut off the entire riser in the basement, leaving the neighbors above and below without water - you cannot do without the help of the workers of the housing maintenance company.
After closing the valve before connecting the tank, remember to drain the water from the tank. Then you can turn off flexible liner by disconnecting it from the union of the shut-off valve. A container placed under the disassembled connection is useful here, since a little water inevitably remains in the liner.

The main thing is not to accidentally damage the cast-iron tee, which is an integral part of the sewer riser, replacing it is a very time-consuming task, which you will not be able to cope with on your own. Further, by tilting the toilet bowl towards the sewer pipe of the apartment, it is necessary to drain the water from the siphon built into the toilet bowl (knee with water, preventing the penetration of odors from the sewer system into the room). After that, you can disconnect the old toilet by removing the corrugation from the tee.

It is better to cover the hole in the sewer pipe with a rag or plastic bottle suitable diameter. Dismantling is over, you can proceed to the main thing - the installation of a new unit!
Do-it-yourself installation of a new toilet
The installation site needs to be cleaned. The new toilet must be installed in place, taking into account the length of the corrugation and markup, circling the base and marking the places of the holes for the fastening. To prevent the ceramic floor tiles from bursting, holes in it must be drilled in a non-impact mode with a special drill, then replace it with a carbide one, switch the drill to impact mode and continue drilling in the floor slab.

The holes are inserted plastic plugs(dowels), into which the screws will then be screwed. It is also necessary to clean the neck of the sewer pipe. Installing the drain fittings in the cistern and attaching the cistern to the new toilet is quite simple if you read the instructions that came with the kit. Usually, the drain device is already mounted in the tank, and the installer only needs to screw the tank to the bowl using special gaskets. The corrugation is inserted at one end into the sewer pipe, and at the other end it is put on the outlet of the toilet bowl.
Sometimes you will find advice that the toilet is replaced using a corrugation sealant, although this is not necessary due to its design with external and internal membranes.

It is better to install the toilet on a rubber gasket in the shape of the base, this will prevent dirt from getting under it. In the absence of a gasket, silicone sealant can be applied by applying a thick layer along the inner perimeter of the marking under the base. The toilet bowl is secured with screws screwed into the plastic stoppers. It is important to tighten the screws firmly enough, but not to overdo it, otherwise the fragile faience of the bowl may crack.
It is not necessary to install the "compact" tank close to the wall of the room - this will complicate further maintenance, may lead to leakage of the junction of the tank and the bowl if it is slightly displaced, and also cause condensation to accumulate at the point of contact between the tank and the toilet wall. After the toilet is attached, you can start connecting the water supply to the tank. The nuts of the flexible line are provided with sanitary rubber or silicone gaskets, so that they additionally wrap threaded connections FUM tape or special thread is not required. The branch pipe of the water supply system to the tank is usually made of plastic, therefore, the eyeliner nut is screwed in by hand; you can only slightly tighten it with a wrench, being careful not to damage it.

Many modern eyeliners are equipped with a special plastic key that is put on the tube and makes it easier to twist. The toilet seat is installed last, this should not cause any difficulties.
Then, without putting the lid on the tank, perform a test run of the unit with filling the tank and draining the water, check the connections for leaks, and the tank drain fittings for correct adjustment. Leaks are easy to spot if you place an old dry newspaper on the floor under the joints in advance. The drain fittings must ensure complete filling of the tank, preventing overflow.

We connect the toilet to the water supply
If necessary, its simple adjustment is performed, the principle of which can be understood even without instructions. Once the connections and fittings are checked, you can install the tank lid and enjoy the work done.
Replacing the toilet - the cost of work
If, after studying our instructions, you do not want to face problems self replacement, then you need to use the services of a professional plumber. The price for work, depending on the city of your residence, will be from 750 to 1500 rubles.
Also, in most large stores, offer a turnkey service, i. e. delivery, dismantling, installation and removal of the old toilet bowl. Usually, it costs 2,500 rubles.
As you can see, in the general case, it is not difficult to replace the toilet with your own hands. It is quite possible that you will do this work better than hired workers, and at the same time save your family budget.
Replacing the toilet with your own hands: step-by-step instruction with video
Replacing the toilet: a detailed article on how to do this work yourself. The process of dismantling the old and installing a new toilet is described with Video comments
Replacing the toilet with your own hands
Sooner or later the time comes when the old toilet in the apartment becomes unusable, and you have to change it to a new one. Most often, replacing the toilet bowl for the average resident may seem like an expensive pleasure if there is a call to a plumber. However, armed with a certain set of tools and applying some skill, you can replace the toilet on your own, and the recommendations below will help you carry out this procedure efficiently and at minimal cost.
Before replacing the toilet, do not forget to drain the water!
First of all, you should decide whether this will be a complete replacement of the unit, or, say, a partial replacement of the toilet cistern. In the first case, it is worth starting with the choice of the model of the new toilet, namely, with the selection of the unit of suitable sizes and configuration. Just like the old toilet, the new device should provide users with conditions of maximum comfort, therefore, immediately before replacing and installing the toilet, it is necessary to measure the toilet, and taking these indicators into account, choose the model that will fit into the room correctly. Namely:
- distance from front door to the toilet should be at least 60 cm;
- the distance from the unit to the side walls must be at least 20 cm in both directions.
It should be borne in mind that when replacing a toilet in an apartment, some models will significantly move forward due to the fastening features.
In the event that only the replacement of the toilet bowl is required, it becomes impractical to purchase the entire set (toilet bowl plus bowl). One way or another, any plumbing store can offer cisterns of any configuration: built into the wall, installed on the toilet shelf, as well as installed under the ceiling itself. It is worth choosing from the presented assortment based on the characteristics of the room and your own preferences.
Now directly on the replacement of the old toilet. The whole process starts with dismantling the old unit. If we are talking about replacing a relatively new device connected to a sewer system made of plastic pipes, there should not be any special problems here. And if, for example, you have to replace the toilet bowl in the Khrushchev, then everything is much more complicated.
In this case, a variety of difficulties can arise. So, dismantling the tank can be complicated by the poor condition of the fasteners. Over the years, the fastening bolts will rust, making it difficult to remove them. When dismantling the toilet itself, as a rule, there are similar problems with fasteners, as well as difficulties in disconnecting the outlet from the cast-iron sewer. In those years, such connections were made by sealing with tow, followed by embedding with cement mortar. Of course, undocking such connections is a very time consuming process.
If, when replacing an old toilet with a new one, there is no need to preserve the integrity of the old unit, then the old toilet can simply be broken into several parts with a hammer. Dismantling the toilet bowl while maintaining its integrity can only be performed by a qualified specialist. After all the fasteners are disconnected, the most difficult task - disconnecting the outlet from the sewer pipe - has been overcome, you can start installing a new toilet.
So, replacing the toilet with your own hands at the stage of installing a new device includes the following steps.
The neck of the cast-iron sewage system is thoroughly cleaned, a rubber cuff is fixed on it with the help of silicone sealant and a corrugated hose is connected.
The new toilet is placed on the floor, its contours and attachment points are outlined. Holes for fasteners are drilled, the toilet is installed and secured using special powerful bolts.
After assembling the internal drain, the toilet cistern is attached to the toilet itself; for this, special bolts and O-rings are also used.
The final stage is to connect the device to water supply and sewerage systems.
Thus, this short guide with a photo on how to replace the toilet will help you not only to carry out the whole range of activities on their own, but also to save on plumbing services, as well as gain invaluable experience in replacing plumbing.
Replacing the toilet with your own hands: photo, video instruction
How to replace the toilet with your own hands? See the photo and video instructions for replacing the toilet with a new one. What features are there when replacing an old toilet in a Khrushchev? How to replace a toilet in an apartment? Replacing and installing a toilet is easy!
How to replace the toilet with your own hands
Toilet replacement may be required when changing designs toilet room or with a banal breakdown of a plumbing device. The work of professional plumbers is quite expensive. In addition, it is difficult to agree on the time of the operation. To avoid such problems, you can change the toilet on your own. How to do this, read on.

Self-change of plumbing in the toilet
Dismantling an old toilet
The toilet can be:
- floor, that is, installed on the floor of the toilet room;
- suspended, that is, attached to one of the walls of the toilet room.
The choice of dismantling method depends on the type of toilet installed.
Removing the floor-standing toilet
Before proceeding with the installation of a new plumbing product, it is required to dismantle the previously installed toilet. The work is carried out according to the following scheme:
- the water entering the flush tank is blocked. To do this, it is enough to close the valve on the water pipe;
- the water supply is disconnected from the toilet cistern. To complete the work, you will need a wrench of the right size or an adjustable plumbing wrench;

Disconnecting the line from the drain tank
- all the water is drained from the tank. Remains of liquid are soaked with a soft cloth to avoid spillage;
- the toilet cistern is removed. To do this, unscrew the fixing bolts located in the bottom of the drain tank;

Toilet cistern fixing bolts
- in the next step, it is necessary to determine the method of connecting the outlet of the toilet bowl and the sewer pipe. Currently, the connection is equipped with a rubber cuff sealed with a sealant. Previously, the joint was sealed with cement mortar:
- if the joint is equipped with a cuff, then for dismantling it is necessary to carefully cut the sealant layer and remove the seal from the sewer hole;

Plumbing connected to the sewer with a rubber cuff
- if the joint is covered with cement screed, then a hammer and chisel will be needed to disconnect the toilet from the sewer. Cement strainer with the help of tools, it is crushed into small pieces and gradually removed.

Cement-sealed connection
- after disconnecting the toilet bowl from the sewer, you can proceed to the direct dismantling of the sanitary ware. The toilet can be fixed to the floor:
- with fixing bolts. In this situation, a screwdriver and a wrench are enough to remove the toilet. Decorative caps are removed from the bolts, after which they are easy enough to unscrew;

Removing the bolted toilet
- using epoxy resin. In this case, it is practically impossible to dismantle the plumbing without damage. To remove the toilet, you need to slightly swing the product in different directions until the restraining adhesive seam is partially destroyed. When doing the work, you can slightly help with third-party tools, for example, a knife;

Dismantling a bowl installed on an adhesive base
- using taffeta (wooden spacer). Removing the toilet from the taffeta is quite simple. It is necessary to unscrew the fixing bolts. However, after dismantling the plumbing, it is required to remove the wooden gasket and fill the vacated space with a cement-concrete mixture.

After dismantling the wooden spacer
- the place of installation of the toilet and the connection of plumbing with the sewer pipe is cleaned of debris and other contaminants.
Removing the wall-mounted toilet
You can replace the wall-mounted type toilet with your own hands as soon as possible. To dismantle an old plumbing product, you must:
- slightly loosen the bolts securing the toilet bowl to the installation;
- disconnect the plumbing device from the drain tank and sewer;
- completely remove the toilet from the mountings.

Removing the wall-mounted toilet
Installing a new toilet
The method of installing a new toilet, as well as dismantling the old structure, depends on the type of sanitary ware.
Installation of a floor-standing toilet
How to change a floor-standing toilet and install a new product at the place of dismantled plumbing? The work process consists of the following stages, which are recommended to be carried out in the specified order:
- assembly of the toilet. It is necessary to attach a drain tank to the bowl and install its fittings:
- when installing fittings, one must be guided by the attached diagram;

Detailed instructions for assembling fittings with a bottom line
- the tank is installed on a rubber sealing ring;

Seal between bowl and toilet cistern
- fixing the tank is made with special screws included in the set of the sanitary ware. Each screw must be fitted with an individual rubber gasket to seal the connection;

Screws with gaskets for fixing the cistern
- a rubber cuff is attached to the outlet of the toilet, which is necessary to connect the plumbing to the sewer inlet. When installing the cuff, it is recommended to use a silicone sealant, which allows you to get a stronger and more durable connection;

Installing a cuff for connection to the sewer
- the assembled plumbing is placed in the selected place. The possibility of correct connection of the device to the sewer network is checked. Marking is made on the floor for fixing bolts;

Marking before installing the toilet
- in the marked area, holes are drilled for fasteners;
- dowels are installed;

Preparing to mount the toilet on the floor
- the final installation of the toilet bowl is carried out and the plumbing is connected to the sewerage and water supply. After installation, it is recommended to seal the joint between the floor and the foot of the toilet with a sealant.

Securing the toilet to the floor
Installation of a wall-mounted toilet
The installation of a wall-hung toilet, provided that the installation is pre-installed, is carried out in a few simple steps:
- the toilet is connected to the sewage system and the drain tank;
- the toilet is fixed with fixing bolts.

Fastening a wall-hung toilet to a previously installed installation
Knowing simple rules and the instructions presented in the article, you can easily replace the old toilet with a new one.
Replacing the toilet: step by step instructions
Quite often, it becomes necessary to replace the toilet in a residential area. You can entrust the work to the professionals or do it yourself.
Regardless of the reasons for installing new plumbing, a number of conditions must be met. Deviations from the instructions will lead to negative consequences and financial losses. Replacing the toilet in an apartment with your own hands is possible with the simplest skills and knowledge.
Before changing the toilet with your own hands, study the individual characteristics of the types of plumbing. Classification options include:
- tank design;
- material;
- the size;
- installation method.
The main selection criterion is the design of the upper part. Manufacturers offer four options:
Such an installation saves space, fits perfectly into the design - the project of all styles. It has two drawbacks: the tank is made of plastic; for repairs, an analysis of the wall structure is required.
Material
Before replacing the toilet with your own hands, it is recommended that you familiarize yourself with the characteristics. For manufacturing, 4 types of materials are used:
- faience;
- acrylic;
- porcelain;
- cast iron.
Faience in this group is the most fragile raw material with a low level of resistance to mechanical stress. The raw material base is white clay with special additives.
To protect against the effects of an aggressive environment, the faience is covered with a layer of glaze. The service life is 15 years.
Acrylic - lightweight, strong, durable, resistant to high temperatures... Service life 30 years. Manufacturers offer acrylic products, fiberglass reinforced... This gives extra strength.
Porcelain belongs to the premium price segment. Sanitary porcelain is a mixture of white clay and minerals. Dense structure, resistance to abrasion make porcelain products 10 times stronger and more durable than counterparts from faience and acrylic.
Cast iron in modern production used for the manufacture of individual orders citizens or businesses. Despite the increased strength and a 50-year operational period, mass production of metal products is not carried out.
The size
The criterion means three parameters:
- Width. The factory standard ranges from 30 to 37 cm.
- Length. The minimum values are 45cm. The maximum is 68 cm.
- Kit height. Measured from the bottom of the base to the top of the tank.
In the product description, the height of the bowl is also given on a separate line.
Installation method
According to the connection of the branch to the sewer, three installation methods are distinguished:
- vertical;
- horizontal (straight);
- transverse (oblique).
Vertical bends are typical for older houses in which the sewer system was run under the floor. A different principle has been applied since the late 1990s. Adapt the vertical bend with modern plumbing does not seem possible.
Replacing the toilet with your own hands in this case will require a major overhaul of the sewer system.
 The horizontal bend has been done since the beginning of the 2000s. The neck is installed parallel to the floor, and the sewer pipes are recessed into the walls.
When replacing a toilet bowl, a connecting corrugation or cuff is placed in a manner similar to the transverse one. The horizontal method is considered versatile and hassle-free.
Transverse (oblique). Also used for sewers located at the base of the floor. It was named so according to the 45 degree neck angle required by the standards.
Views
There are two types of bathrooms:
- Suspended - they are suspended using a metal frame located in a wall niche. Complex constructions... It is almost impossible to install them yourself.
- Floor - fixed directly to the floor with fasteners.
Preparatory work
Before you change the toilet yourself, remove the old one. If a product of a new sample is dismantled, then the process will not take much time. First, the water supply is cut off. Next, the bolts and the connecting tee are removed. The bowl and cistern are carefully removed.
Changing the old toilet will take patience and care. In houses over 30 years old, utilities are more complex. In addition, they assumed filling the joint with cement. Here they act step by step:
- Disconnect the drain tank, drain the water, remove the lid.
- Unscrew the corrugation, collect the remaining moisture inside the water seal.
- Use blows to break the junction of the neck and the tee, avoiding hitting the neck. The use of a hammer drill will speed up the process and improve the quality of work.
- Remove the toilet. Thoroughly clean the T-piece from the cement.
Installation
Before installing the toilet in the toilet, make sure you have the necessary tools for the operation. For dismantling / installation you will need:
- adjustable wrench;
- puncher;
- grinder (or hacksaw for metal);
- chisel;
- hammer;
- putty knife;
- sealant;
- corrugation.
The process of replacing an old toilet bowl includes two stages of development: assembly of the kit, installation.

Finished products are sold both assembled and disassembled. The assembly of the model is carried out in strict accordance with the accompanying instructions of the manufacturer.
- Installation begins with the temporary connection of the toilet bowl to the sewer pipe.
- After aligning the product, the drill points are marked with a marker. Plumbing is disconnected from engineering communications and retracts to the side.
- A degreased, dried floor is drilled in the marked places.
- Tiles are drilled with a thin drill.
- Equipment is being installed.
- The tank is connected to the water supply through flexible wiring.
- Operation with water turned on is tested in order to detect possible leaks.
- The fastening bolts are inserted into the grooves and tightened until they stop.
If the toilet is wobbly, then the surface is not properly leveled. Treatment of the base with a sealant will help to correct the defect.
Having understood the technology of installing a toilet, you can save on plumbing services and do the job as efficiently as possible. The toilet can be installed in the traditional way or more modern method- with installation. In the second case, the cistern will be hidden in the wall, which will have a beneficial effect on the interior of the room.
You are presented with instructions on how to complete each of the installation options listed.


| H | h | h1 | L | l | l1 | B | b | |
|---|---|---|---|---|---|---|---|---|
| With one-piece cast shelf, mm | 370 and 400 | 320 and 350 | 150 | Not less than 605 (by agreement between the consumer and the manufacturer, it is allowed to make toilets with a length of 575 mm) | 330 | 435 | 340 and 360 | 260 |
| Without integral cast shelf, mm | 370 and 400 | 320 and 350 | 150 | 460 | 330 | 435 | 340 and 360 | 260 |
| Baby | 335 | 285 | 130 | 405 | 280 | 380 | 290 | 210 |

Set for work
- Perforator.
- Roulette.
- Adjustable wrench.
- Fan pipe.
- Flexible hose.
- FUM tape.
- Fasteners.
- Sealant.
In the case of installing a toilet bowl for installation, the listed list will expand with a corresponding set. Everything you need is bought at any plumbing store.
Dismantling the old toilet

First step . We shut off the water supply and drain off all the liquid.

Second step. We unscrew the hose through which the tank is connected to the water supply.

Third step. We unscrew the tank fasteners. If they are rusted, we arm ourselves with a screwdriver or open-end wrench. Press the head of the bolt with the selected tool and unscrew the nut with an adjustable wrench. If it does not work out, pre-soak the nut with kerosene. We remove the tank.
Fourth step. We dismantle the toilet mountings.
Fifth step. Disconnect the toilet bowl drain from the sewer.

In old buildings, plums are usually fixed with cement plaster. To destroy it, we use a hammer and a chisel. We need to chop up the cement and gently rock the toilet to the sides. The drain should twist and loosen. We tilt the product, allowing the remaining water to drain into the sewer.


 If the toilet has a floor outlet, it is necessary to clean the wax ring
 Sixth step. We close the sewer hole with a wooden or other suitable plug.

Important! Sewer gases do not smell very pleasant. However, they are poisonous and flammable. Be sure to consider this point in the process of work.

Preparing for installation
The base for installing the toilet should be flat. There are several options for the development of events, namely:
- if the floor is tiled and has no level differences, we do not carry out any preliminary measures to level the base;
- if the floor is tiled and not even, we install the toilet with chopiks. To do this, holes are drilled in the floor, chops are hammered into them according to the level, and after that the toilet bowl is attached to the chops with screws;
- if a tile replacement is planned, we dismantle the old cladding and fill in a new screed, if the old one has level differences;
- if the toilet is installed in a new house or apartment without any finishing, fill in the screed and lay the tiles.
We pay attention to pipes. Sewer from debris and various sediments, we install a tap on the water supply (if it was absent before) to shut off the water supply to the tank.
How to install a conventional toilet


As a rule, when sold, the toilet and the cistern are disconnected. The internal reinforcement of the barrel is most often already assembled, which greatly facilitates the installation process.
First step. We put the toilet bowl in its place and make marks at the attachment points.

 Floor marks for fasteners
 Second step. We remove the toilet and drill the mounting holes in the marked places.

Third step. We drive the dowels into the mounting holes.
Fourth step. Install the bowl. We insert the fasteners through special gaskets. We tighten the fasteners. Do not pull too hard - you can damage either the fasteners, or even the toilet itself. We pull until rigid fixing of the sanitary ware to the surface is ensured. We close the fasteners with plugs from above.


Fifth step. We mount the cover and seat. The assembly manual usually comes with the toilet, so we will not dwell on this event separately.
Sixth step. We connect the toilet to the sewer. The procedure depends on how the toilet outlet is connected.

Video - Installing the Compact toilet bowl with wall outlet
Prices for components for toilets and urinals
Accessories for toilets and urinals
If the release is on the wall, we work like this:

If the release is set up on the floor, we do the following:

Helpful advice! If the connection of the toilet bowl to the drain pipe is made using a corrugation, sealing in most cases can be dispensed with, because the design of such a transition hose is itself capable of providing a sufficiently tight fit.
Seventh step. We carry out the installation of the tank. Drainage mechanisms, as a rule, are sold already assembled. If the mechanism is disassembled, assemble it according to the manufacturer's instructions (assembly order for different models may differ slightly).


We take the gasket from the kit and install it in the water opening in our toilet. Install the tank on the gasket and tighten the bolts.
The most convenient way to install fasteners is:

Eighth step. We connect the tank to the water supply using a flexible hose. We turn on the water supply and check the quality of the system. If it breaks in somewhere, tighten the nuts a little. The level of filling the tank with water is adjustable by moving the float lower or higher.

Let the tank fill up several times and drain the water. If everything is ok, we take the toilet for permanent use.

Modern version installation. A special wall installation is used, in which the cistern mechanism is hidden. As a result, only the toilet bowl and the flush button are visible.
We mount a wall-mounted toilet for installation
Video - How to install a wall-hung toilet on a Geberit Doufix installation
The first stage is the installation of the frame

We carry out installation of a metal frame with fasteners. We attach the tank to the frame. The position of the frame is adjustable with brackets at the top and screws at the bottom. The frames are sold separately, have the same structure and are suitable for use with any toilet bowl.
The assembled structure will have a height of about 1.3-1.4 m. The width must exceed the width of the tank.
The second stage - we hang the tank
The installation is carried out in compliance with the following recommendations:
- place the drain button about a meter from the floor;
- between the attachment points we maintain a step equal to the distance between the lugs of our toilet bowl;
- the drain pipe should be located at a height of about 220-230 mm;
- We hang the wall-mounted toilet at a distance of 400-430 mm from the floor. These are average values. In general, focus on the growth of future users;
- we maintain no more than 15 mm distance between the cistern and the wall.
The third stage - we mount the finished installation

We first check the evenness of the wall using a plumb line. If deviations are found, do the following:

The fourth stage - we install the tank
First, we connect the tank. The drain can have top and side outlets. Almost all modern models cisterns allow you to choose between the two options.
Important! When installing a toilet bowl on an installation, it is better to refrain from connecting the tank with a flexible hose. will last much longer than a hose. In the near future, would you want to destroy the frame skin for the sake of a five-minute replacement of such a hose? That's it!
The best way to connect is to use plastic pipes... All necessary fasteners are usually included with the tank. Separately, you only have to buy a panel for the drain buttons, and that is not always the case.

We connect the outlet of our toilet with the sewerage system. The most convenient way to do this is with a corrugation. We check the tightness of the structure. If everything is fine, turn off the water, temporarily disconnect the toilet from the drain and remove the bowl to the side.
Important! The procedure for connecting the tank to the toilet and water supply may differ depending on the product model. We clarify these points in a separate order and follow the manufacturer's manual.

The fifth stage - we cover the installation
For this we use moisture resistant plasterboard with a thickness of 10 mm. It is recommended to fasten it with a double layer. First, we do the following:
- screw the pins for hanging the toilet into the frame (included in the kit);
- we close the drain holes with plugs (also from the kit) so that they do not get clogged with dust and debris;
- we make holes in the drywall for pins, pipes and a drain button.
We fasten the sheathing sheets to the frame using special screws. Keep the fastening step at the level of 30-40 cm. The structure will be small in size and weight, therefore there are no strict recommendations regarding the distance between fasteners.
We cover the drywall with tiles or trim it in another way at our discretion.
Helpful advice! Before starting the tiling of the box, we install a plug and a cuff in the place of the future location of the drain button. They are usually included in the kit.
Video - Installing a wall-hung toilet
Sixth stage - install the toilet

To do this, we connect the outlet of the bowl to the sewer hole and hang the product on the pins (we installed them in the previous stages of work). These steps can be performed in reverse order, as you prefer. We tighten the fastening nuts.

Important! Previously, the tile that will be in contact with must be covered with a layer of silicone sealant (you can install a gasket instead).
You can turn on the water supply and use the toilet for its intended purpose.

The assembly instructions for the installation remain the same. Only the order of installation of the toilet bowl changes. Work in the following order.


First step. Fix the knee position firmly. Metal fasteners will help you with this.
Second step. Treat the outlet of the toilet with technical ointment.
Third step. Place the toilet in its designated place. Trace the outline of the sanitary ware and mark the holes for the fasteners.
Fourth step. Remove the toilet and install the included mounting brackets according to the markings.
Fifth step. Install the bowl, press its outlet into the waste pipe, and secure the plumbing fixture with bolts or other fasteners supplied.
Sixth step. Connect the tank to the drain. Installation and connection of this element is carried out in the same way as in the case of installation. wall model toilet bowl.


Seventh step. We bring the drain button into a pre-prepared hole in the casing, turn on the water supply and check the operation of the toilet. If everything is normal, we accept the product for continuous operation.

Read our new article - and also find out what the varieties are, how to choose and install.
Video - Installing a side-mounted toilet with a hidden cistern
Happy work!
Video - Do-it-yourself toilet installation
Installation depends a lot on the type of toilet you choose, so let's start with that. released today differ in many ways to keep in mind. These include: the design of the tank and bowl, the type of drain, the material of manufacture, the method of installation, and so on.
Table 1. Varieties of toilets
| Tank type, photo | Description |
|---|---|
| This type is the most common. His cistern goes separately from the bowl, and is attached to it with two bolts. These bolts are fitted with rubber gaskets to protect the ceramic from damage. This toilet bowl is easy to repair due to its design. It is very easy to replace the drain fittings or change the entire tank if necessary. | |
| As you can see, the tank and the bowl here form one whole structure. This structure gives the toilet more reliability - there will never be a leak between the elements, as is often the case with composite models. However, if the tank is damaged in any way, the entire device will have to be changed at once. |
| Installations are gaining popularity among users today due to their unique appearance. It comes with a rigid steel frame, which is hidden behind the wall decoration - usually it is sheathed with plasterboard. A bowl is attached to the frame, which at the same time remains hanging, and inside, just behind the finish, there remains a tank - only the drain buttons are brought out. The repair of such a toilet is accompanied by great difficulties. The fact is that the frame sheathed with plasterboard is pasted over ceramic tiles, which makes it difficult to get to the insides. As a result, you have to roughly dismantle everything at once, that is, the repair of one tank will pull along the repair of almost the entire bathroom. |
| In fact, the installation is a kind of a separate toilet bowl, in which the cistern is not rigidly tied to the bowl, but is connected to it only by drain pipes... Few people install such toilets now, but in the distant past they occupied a leading position. Of the advantages of the design, it is worth noting the powerful pressure of water when draining, however, this creates a lot of noise. It is not very difficult to repair the system as a whole, the main thing is to have convenient access to the tank. |


Varieties of drainage
The next feature that you should pay attention to when buying is the direction of the drain outlet, through which the toilet bowl is connected through a corrugation to the sewer pipes.
Vertical bends used mainly earlier, when the sewage system was installed strictly under the floor. Today, such a design is useful in private houses and cottages. It saves a lot of space, but it also requires plumbers to accurately calculate the position sewage, otherwise the new toilet may simply not fit.

Oblique releases used mainly in multi-storey buildings, where the sewer pipes pass in the corner of the toilet, and the neck coming out of them "looks" into the room at an angle of 45 degrees. The connection of the toilet bowl to the pipes is carried out using a corrugation, a cuff or an eccentric - they are selected in place when adjusting the position of the device.

Horizontal outlets became widespread not so long ago and today are actively used in various buildings - mainly frame houses, which are very popular in Europe and America and are gradually finding their fans here in Russia. With this connection, the pipes must run inside the walls, as shown in the picture above. Frame structures are allowed to hide pipes of almost any size in this manner.
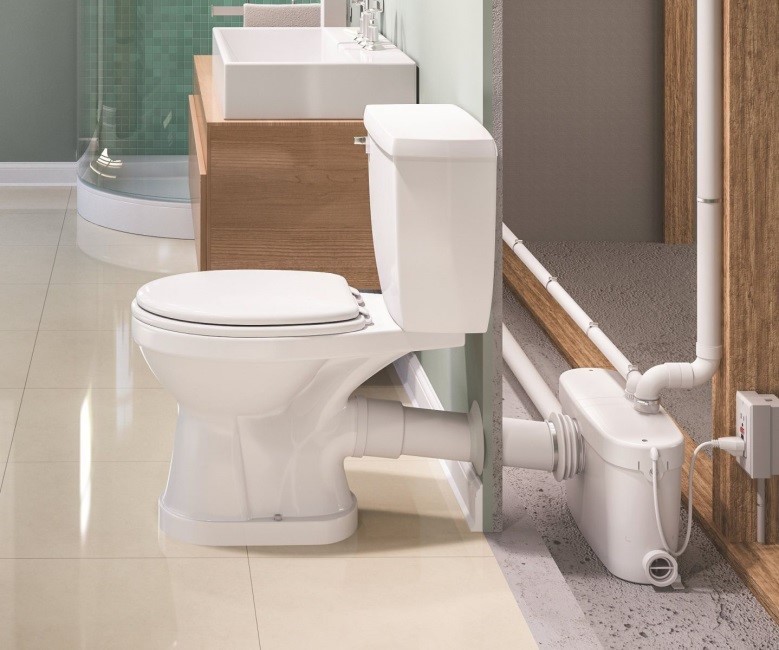
Interesting to know! The diameter of the toilet drain pipe is 110 mm. If the walls are not hollow, they can be replaced with smaller ones - 50 mm, but then in addition to the main device it is necessary to install a pump with a grinder, otherwise the pipes will very quickly become clogged with drains.

The horizontal outlet is connected in the same way as the oblique one - the same adapters are used. If necessary, such an output can be connected to other sewer outlets, but such a connection will definitely not be compact, so find out all the necessary information in advance so that you do not have to return the purchase to the store.
The toilet bowls differ in the way of installation, in principle, we have already touched on this issue when we talked about the installation. There are two options - hanging and standing. In both cases, metal bolts are used as fasteners. Sometimes they are replaced with glue or sealant. In the Soviet past, they used concrete mortar, with which they smeared the base, then painted it in the same color as the floor - in general, it's scary to remember. Dismantling such a connection often leads to the fact that the toilet must be broken. By the way, this is also possible if the device was glued.
The good thing about the suspended structure is that it saves a lot of space in the room, at least visually. Free access appears under the toilet, which means that cleaning the room will be much easier. It is not necessary to make the installation in the form of a whole false wall. Very often, people assemble a neat box in size, which, in fact, turns into a very convenient shelf on which it will be convenient to hold air freshener, paper and other accessories.
Prices for toilets, urinals, bidets
Toilet bowls, urinals, bidets
Toilet bowls manufacturing materials
If you think that all toilets are made of the same material, then you are mistaken. There is also a choice here.
- Faience- this material is the most inexpensive and of the lowest quality. Products made from it do not last more than 15 years. Soon enough, they begin to become covered with small cracks, which will spoil the appearance of the entire product, even if it is still capable of serving.

- Porcelain sanitary ware- the service life of this material is at least 30 years. It looks attractive, but it also costs more. Porcelain will also be stronger than earthenware and will better cope with mechanical stress - this parameter is especially important when choosing suspended plumbing fixtures.

- Metal- such products are made either from steel or from cast iron. They are very strong and reliable, but they have considerable weight, especially last option... Their appearance is not very attractive, so they are used in public toilets, where durability comes first.

- Acrylic- today a lot of things are made from this material, even sweaters are knitted. In order for the products to be durable, they are reinforced with fiberglass during the production process. They are warmer, very light and beautiful. At strong blow can deform, but not split. Among the shortcomings, it is worth noting the fear of abrasive cleaning agents - they can worsen the appearance of the product by scratching the glossy surface.

Prices for popular tile, plumbing and pipe cleaners
Cleaning products for tiles, plumbing and pipes
How to dismantle an old toilet
We seem to have figured out the choice of new plumbing, now let's slowly move on to the process of installing it, which will begin with dismantling the old product.
If you need to remove a modern toilet, which was fixed only with bolts, then you should not have any difficulties, but if it was fastened with an adhesive method, you will have to get down to business wisely.
So, if the toilet is set on silicone, then it just needs to be carefully cut from all sides with a sharp clerical knife, slowly loosening the product. If for cement, then we act like this.
Find out and also get familiar with useful tips, in a special article on our portal.
Table 2. Dismantling the old toilet
| Steps, photo | Description |
|---|---|
| First, the tank must be disconnected from the water supply. To do this, close the corresponding tap at the water outlet and unscrew the nut at the base of the tank manually or with a wrench. If you do not see the tap, then you may have to turn off the water in the entire apartment or even the entire riser - such situations often happen in old houses where there are no taps at all or they simply cannot hold water. Advice! In this case, after the overlap, the outlet can be muffled for a while so that there is water in the house. Drain all the water from the tank. |
| Next, the toilet needs to be disassembled. We remove the toilet seat from it, then the tank lid, which is usually held by a screw at the base of the button. Dismantle the fittings by undoing all fastening screws. Unscrew the two bolts that hold the reservoir in place, remove it and set it aside. This completes the easiest part. Advice! When carrying out all these manipulations, a lot of cold water will get on the floor and on you, so get ready in advance - dry rags, buckets, and so on. |
| Cement used to cover not only the base, but also the neck. It will not be easy to pull it out. You will need to hit it with a hammer near the connection to the sewer pipe. We beat until the neck breaks off. Hit the ceramics only, do not hit the pipe, as it may crack, which will add hassle. |
| Next, we take a chisel and a hammer and begin to free from cement mortar the base of the toilet. Try to shake the toilet from side to side - if you're lucky, it will budge. If it does not give in, then we intensify the blows and try to go deep under it, chipping off the adjacent tile. If you have a hammer drill available, then do the job with it. |
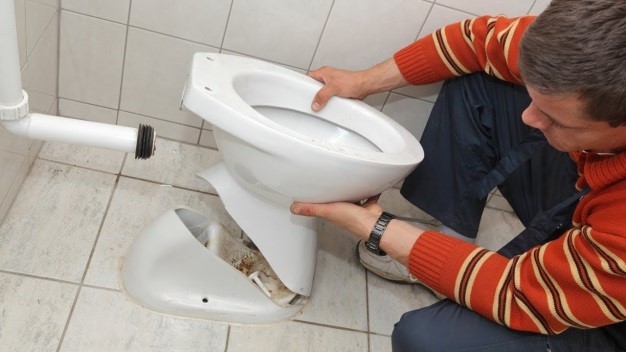
| Once the bowl is free, gently lift it up and drain the water into the bucket. To avoid accidental injury, clean the room. Look at the photo - it shows that a piece of the neck remains in the sewer, which must be removed. |
| The drain tee is cleaned with a screwdriver or chisel. Do this carefully so as not to damage the pipes, unless, of course, you plan to replace them with new ones. |


If the room is planned overhaul, then the tiles on the floor must be replaced with a new one before proceeding with the installation.
How the toilet is assembled and installed
Now that the room is completely ready, let's take a closer look at how to install a new toilet. We will consider the installation of a floor-standing and suspended version.
Floor option
Let's start with the classics. All work can be divided into two stages: assembling the cistern and the entire toilet bowl, and fixing it to the floor.
Table 3. Tank assembly
| Steps, photo | Description |
|---|---|
| When you open the toilet box, you will find many different parts inside. At first glance, it may seem that you had to graduate from university as an engineer in order to understand all this diversity, but everything is much simpler in reality. Sort the parts according to their intended purpose, and everything will not be so sad. |
| We start by installing drain fittings. Basically, it is assembled from the factory, so we only need to properly connect it to the tank. Take it in your hands and put on a black rubber gasket from the side of the thread. |
| Next, lay the tank neatly on the floor and push it into it drain device so that the thread goes through the hole in the base. Screw on the large plastic nut from the back. You can tighten it by hand or using a special wrench that comes with the kit. When doing this, hold the armature with your hand so that it does not twist. It is not necessary to apply silicone sealant under the gum, as it can destroy it. If the nut is tightened firmly, there will be no leakage. |
| Now we can connect the tank to the bowl. Such a gasket is placed between them. By the way, it may differ in shape depending on the model of the toilet, but the essence remains the same. Next, a tank is placed on top so that the mounting holes on it and the bowl exactly coincide. You also do not need to use silicone, since if necessary, you will then not be able to disassemble the toilet properly. |
| Now the tank needs to be secured. We will do this with two bolts, on which plastic washers are preliminarily put on, and then rubber cone-shaped seals. Then they are inserted into the holes and screwed from below with plastic nuts, which are tightened by hand. If the screws are twisted, then from the inside of the tank they must be fixed with a slotted screwdriver or wrench. |
| Next, we put the locking device. It is immersed by the threaded part into the hole in the bottom of the tank. Gaskets are mounted and the part is also fixed from below with a plastic nut. |


Table 4. Installing the toilet
| Steps, photo | Description |
|---|---|
| So, we put the corrugation on the toilet and put it in the way it should be installed. We outline its outline with a marker. We also mark the attachment points by pushing the marker into the holes all the way and twisting it slightly around the axis. |
| To prevent the drill from slipping on the surface of the tile at the beginning of drilling, the points must be punched. For this we use a special tool or an ordinary dowel, which need to carefully tap the marks, before chips form on them. |
| Next, we take a diamond-coated feather drill and drill the tiles with it. Attention! do not use the impact mode, as the ceramics may crack. After going through the thickness of the finish, we take a perforator with an ordinary drill for concrete and deepen the holes to the desired level. The diameter of the drill should be slightly wider than the included mounting dowels. |
| We sweep the floor and do a light damp cleaning so that there is no dirt left under the toilet. We carefully hammer plastic dowels into the holes so as not to break them. |
| We return the toilet to its place, connect it with a corrugation to the sewer pipe and fix it on self-tapping screws with a turnkey cap. First, you need to put on a special plastic spacer on them, which will protect the toilet from being squeezed. We tighten the screws until the device is completely fixed, and then we put decorative caps on them from above |


If the tiles on the floor are laid strictly according to the level, then the work ends there, the toilet will stand securely. But quite often the opposite is true. In this case, it is recommended to apply white or transparent silicone under the toilet. He neutralizes the differences and additionally connects everything. It is also reasonable to use it when, when drilling a hole, you fell into voids and the dowel screw cannot fix the device.
Video - Assembling and installing the toilet
Installing a wall-mounted toilet
Now let's see how the installation is assembled and assembled. There is nothing complicated, in principle, either.
Table 5. Installation of a wall-mounted toilet
| Steps, photo | Description |
|---|---|
| The work begins with unpacking the product and sorting its parts, as in the previous case. Next, the frame is assembled, which consists of several components. Parts are assembled using a coupling that is inserted into the posts and tightened with four bolts. Everything is simple here - you will not get confused. |
| The delivery set includes a tank and special fasteners for fixing it to the frame. We carry out their installation, tightly driving them into the seats. Light tapping with a rubber hammer is allowed for a tighter connection. |
| Next, a branch pipe is attached to the tank through which water will be supplied to the toilet for flushing. |
| We fix the tank to the frame, first fixing the drain, and then the tank itself. |
| Then a clamp is attached to the frame, which will hold the sewer outlet. Actually, at this stage it can be followed and installed. We also bolt the adjusting feet to the lower ends of the frame. This system allows you to quickly and efficiently set the desired height. |
| A fastening strap is inserted into the upper ends of the frame and fixed with 2 bolts. Two screw pins are threaded into it, onto the ends of which an assembly sole is screwed on the side of the wall. Such a system allows you to adjust the indentation of the entire structure. The studs are attached to the lintel using nuts and locknuts. Advice! All parts are tightened tightly and securely, since then there will be no access to them. We adjust the frame by setting the height and indentation. At the same time, it is guided by the level so as not to get distortions. |
| Next, we make markings on the floor and wall and remove the frame to the side. We drill holes required diameter for fasteners. We install the dowels, return the frame and fasten it to the screws until it is completely fixed. We will recheck the level again and, if necessary, make adjustments. |
| We attach a flexible hose to the tank and the outlet on the pipe. |
| We put on transition sockets on the pipe leads through which we will connect the toilet. Here there is already a real need to insure yourself with silicone. Two screw pins are screwed into the frame, over which a silicone seal is put on, which will protect the ceramics. |


Prices for wall-mounted toilets
Wall-mounted toilet
Then the tank is mounted inner part drain button. It is attached to it with two bolts.
The wall is sheathed with plasterboard and tiled. In this case, all leads and pins remain outside. An inspection hatch is made from above in the installation, although many people prefer not to install it, as it impairs the appearance. But don't forget that access to taps is always required. Otherwise, they should be taken to another location.
At the end, the toilet itself is hung and the button is assembled.
You always want to keep the plumbing in its original form, so if you use the toilet frequently, you should pay special attention to washing it. In we will consider the most effective methods for cleaning the structure from limescale and urinary stones, we will talk about popular and effective cleaning agents.
Video - Installation of wall-hung toilet bowls on installation systems