Computer table with your own hands. How to assemble a computer desk with your own hands table for a computer with your own trees
A computer table refers to specialized multifunctional furniture combining a desk, a place to accommodate PCs, storing documents and office, convenient placement of peripherals and lighting devices. Today manufacturers offer a wide range of models that meet all consumer requirements. However, industrial designs have one common drawback - unreasonably high cost. In this publication, we will tell you in detail how to make a modern corner computer desk With your own hands, consider drawings, sizes and popular assembly schemes for this functional furniture object.
For independent creation suitable model Practically any slab construction MaterialsWith sufficient strength and decorative qualities. Among the most popular can be allocated:
- LDSP;
- Phaneur;
- Natural wood.
Some models are collected from the combination of materials. For example, fake diamond Or tempered glass can be used to create a computer table table top made based on a steel frame or metal support elements.
Calculation of sizes
Depending on your capabilities and needs, you can make a straight, angular or combined computer desk.

The size and shape of the product depends on the set of factors:
- Dimensional dimensions;
- Choosing the location and configuration of the product (direct, angular);
- Functional features (selected location for installing a system unit, printer, lighting devices, distances between support elements, etc.).
As practice has shown, the special complexity in most home masters occurs when designing an angular table for PC. Consider the calculation rules in more detail.
Corner Design Table: Product Features & Installation

Before drawing a drawing, you need to decide on the design of the computer table. In classical execution, such a product consists of three modules:
- Reference box, which is additionally dedicated to the Systemist;
- Cutter with door or drawers. This element "part-time" is the second reference element;
- Corner countertop.
The computer table assembly circuit is characterized by its simplicity:
- Support blocks are set up on the edges of the design.
- In the role of a fixing element of the module, a countertop appears, which is installed on the support elements using the wanks or furniture screeds (ruffix, eccentrics).
- To give additional stiffness in the corner of the table top, a foot is mounted, made of LDSP or metal strips.
Terms of settlement
Before making an angular table for a computer with your own hands, you need to draw a drawing with the detailing and dimensions of all components. Sizes are calculated as follows:
- The length of the wing and depth of the countertop is determined for comfort;
- The width of the support structure is calculated, which will play the role of space under the system unit;
- The dimensions of the cabinets are calculated taking into account the depth of the table top and the necessary working space for the operator.
Important! For convenient use and assembly corner model It is necessary to envisage indents from the edge of the table top to the support elements.
Optimal table size

The production execution uses the optimal dimensions of this model. The standard dimensions of the computer table suggest the following dimensions of the modules:
- Countertop (d 1 cylinder * 2 wings * w) - 1344 * 1544 * 600 mm.
- Support box with place under the computer (d * w * c) - 510 * 250 * 734 mm.
- Supporting tube (d * w * c) - 510 * 450 * 734 mm.

Important! In this embodiment, an indentation of the edge of the lid is taken into account to the installation site of the support modules - 70 mm. LDSP thickness - 16 mm. The total height of the product is 750 mm.
Minimum size
When determining the minimum design dimensions, it is necessary to reduce the depth of the table top, the length of the first and second wing, indents from the edge, as well as the width of the reference unit for the system, from standard values. It looks drawing as follows:

- Dimensions of the countertops (d 1 cylinder * 2 wings * w) - 1104 * 1354 * 500 mm.
- Support block with place under the system unit (D * W * B) - 490 * 200 * 734 mm.
- Cabinet with drawers (d * w * c) - 490 * 450 * 734 mm.
Indents decrease from 70 to 50 mm. At the same time width working area It turns out 50 cm, this is enough for a comfortable operation of a teenager.
If you make a small table, make the compartment for the system unit open for better ventilation of the computer.
Instruction: how to make a computer desk with your own hands
After creating drawings with dimensions, go to the practical part of the product creation with your own hands.

From right choice The material depends durability, strength and decorative design qualities.
- Natural wood - environmentally friendly, durable and decorative material, perfectly processed. However, the workshop and a whole arsenal of a specialized tool are required to work with the tree;
- Laminated chipboard is an inexpensive analog of natural wood. Plates can have different thickness, sizes and color solutions that allow the master at home to create cabinet furniture of any configuration and complexity. The main deficiency of the chipboard is low moisture resistance;
- Moisture-resistant plywood is significantly superior to the chipboard. Nevertheless, this material is difficult to finish handling, which significantly reduces the decorative qualities of the finished product;
- MDF - available at cost, resistant to heating and very decorative material with two substantial disadvantages: low wear resistance and reduction of strength characteristics during operation.
The most affordable and easy-to-process material from this list is LDSP, which is used as the basis in the production of most cabinet furniture models.
Tools and preparatory work
An independent creation of angular computer tables involves the presence of a set of tools to the wizard that will be needed during the assembly process:
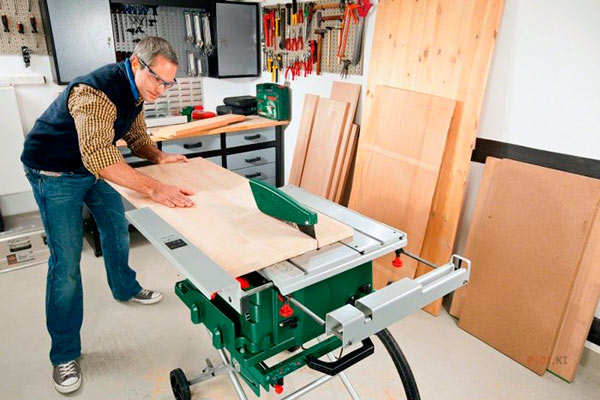
- Disk saw with a width equipment and an electric lobby for sawing LDSP in size;
- Drill, drills and cutters - based on the diameter of fasteners and method fixing parts.
In addition, a roulette should be prepared, a water-based marker for applying markings and a joiner's coal.
From materials will be required:
- LDSP (MDF),
- confirmates
- specialized drill and hexagon bits for screwing them,
- guides for drawers and retractable tray under the keyboard,
- pVA glue,
- wooden seats,
- self-adhesive PVC edge for decorating seats.
Detailing

Knowing the main dimensions of the future product, proceed to the creation of all parts of the design.


In the size of the internal parts (shelves above the system unit and false panels), the width of the LDSP 16 mm is taken into account.
Important! Based on the design and filling of the cabinets (boxes, storage shelves), the size of the internal parts, doors or elements of drawers are calculated
Additional elements:
- Retractable Shelf under the keyboard. If you use a laptop - it makes no sense to additionally fix the retractable shelf. In case the table is needed under PC - the size of the shelf under the keyboard 550 * 300 mm. It can be made independently or buy in Ikea.
- Retractable drawers. The size of the facade depends on the desired number of boxes and is calculated based on the size of the cabinet with the gap between the facades of 2 mm. With four boxes:
- the size of the facade (taking into account the gaps) will be 450 x 166 mm.
- Box height-100 mm.
- Depth - 450 mm (for the use of standard guide 45 cm).
- External Box Width 398 mm, taking into account the width of LDSP 16 mm and the gap of 10 mm on each side for fastening the guides.
- Guides. This scheme assumes the use of classic detachable guides made of two elements. It is the easiest and a budget option Organization of retractable structures (boxes, keyboard tray, etc.)
Additional elements are not mandatory. In some design solutions, the cabinet is completed with the door, without drawers.
Stages assembly
As noted above, the assembly of the angular model does not represent special difficulties. After sawing all the parts of the table, proceed to the creation of the design.

Now it is important that the height of these items is strictly the same. To do this, we substitute them near, and all the drops remove with the help of adjustable supports.
- We collect the corner "leg" with the help of the part of the confirm details.
- On the opposite side of the table, the frame is mounted with mechanisms for the keyboard tray.
- In the side of the table tops, holes (diameter 8 mm) are drilled under the sewage.
- At the top of the supporting modules, holes are drilled and the wrenches are installed.
- For fixing the cover of the table, the wanks are wedged with PVA glue.
- The countertop is installed on the regular place.

The angular foot and the supporting modules are connected to each other walp sheets or stripes of a 15-20 cm width strips. Next is set interior filling Blocks (guides, boxes), doors are hung, handles and fittings are put.
Finishing work

If laminated wood chipboard was used when creating a table, the finishing of the product consists in sticking the furniture edge to the scene. This material can be made of:
- melamine
- ABS plastic;
- natural veneer.
Today, acrylic edges with 3D pattern received wide distribution, which will add decorativity to your homemade and significantly increase its cost.
You can use T-shaped plastic profileTo install which it will takes the creation of a groove in the ends of the LDSP with a milling mill.
With independent finishing of the edge of the table from LDSP, some masters use a C-shaped plastic profile, which is fixed on the ends of the blanks using glue.
Important! All options have the right to life besides the melamine edge, which is unacceptable for finishing a computer table due to low wear resistance and a small thickness
If used to create a product natural treeT. finishing work Consistent:
- in putty and grinding structural elements,
- impregnated wood by antiseptic and verse,
- varnishing or reclamation of the finished product.
- Choosing LDSP, always pay attention to the quality of the coating, the leaf geometry. Pay attention to the graph indicating the formaldehyde emission class not lower than the E1-E2;
- Do not use the ribbon saws and the electrolovka for sawing. This tool practically does not give a chance of a smooth cut without chipping of laminate. The best option There will be an order cutting material, sticking edges and drilling holes (according to your drawing) at the manufacturer of cabinet furniture. This will slightly increase the estimate, but significantly reduces the time to assemble the table. In extreme cases, use a manual disk saw with a carbide-tungsten disk and the possibility of installing the parallel stop;
- Do not use standard height Computer table (750 mm), if you use a laptop without an external (remote) keyboard. With a high arrangement of hands, the back is more strained, which entails the increased fatigue of the operator. As practice has shown, the decrease in the height of the table is only 70 mm completely solves the problem of posture when working on a laptop.
With the widespread distribution of computers, there was a need for tables on which it would be normal to put a monitor, a system unit, keyboard and various office equipment.
Therefore, in our article we will look at the question of how to make a computer desk. This task is quite fulfilled for an ordinary person having small knowledge and joinery.
Having made a computer table with your own hands, you will not only save in finance, but will pick up perfect dimensions It is for your premises, as well as get aesthetic pleasure from the work done.
In contact with
Odnoklassniki.
Types of computer tables
There is enough a large number of Modes of computer tables and its varieties - a laptop table, which has a much simpler device and smaller sizes.
- Computer table of rectangular shape, which will easily fit into any interior. It is usually equipped with a retractable tabletop under the keyboard and a bedside table under the system unit.
- Folding tables. Designed for people using a laptop. Very comfortable portable structures made of plastic and metal.
- Corner computer table. If you have a free corner in the room, then it's time to put a corner computer table there. Thus, you will save space, and besides, it looks more compact than it really is.
- P-shaped computer table Allows you to feel like in the desktop, thanks to its form and, in addition, it is possible to place almost any additional devices. The main drawback is a large occupied area.
- Semicircular table Allocated to its design among other designs and the ability to place all additional attributes in it. But there is a disadvantage, as in the previous version, this is quite large space.

Laptop table
When buying a laptop, users arise a standard problem that can bring a lot of trouble. With a long work, this device begins to fly all parts of the body. In order to avoid this, special mini tables are made for laptops, which are much easier by design than tables for computers, but the price of them sometimes sometimes is very "bruises". Therefore, a table for a laptop with your own hands can be quite convenient output from the position.
Designs of tables
There are several basic designs of the tables that we will consider below.
- SAMI simple design comprises wooden countertops, usually manufactured from beech, and two legs, which are two boards. The bookboard is grinding fine and covered with a double layer of varnish.

- A table with folding legs is more convenient to use, as it can be folded after work, and it will take the minimum area in your apartment.
- A variety of the second design, but with an addition in the form of a cutout for a mug. Such a table is very convenient for watching movies in a lying position.
- Another option is a table with folding legs, a place for a mug and two armrests. His photo is presented below. This is a more complex design that, nevertheless, does not represent large difficulties in the manufacture.

With independent production of these products, it is recommended to use a beech board, a thickness of 1.8-2 mm. In this case, the table will serve quite a long time. As you can see, all these species are not too complex structures And they can be made by a person without special skills and knowledge in a joinery.
Instruments
Let's see which tool you may need to make a homemade table for a laptop.
- Hacksaw, preferably for metal. When using a cutting tool on a tree, you will have to spend additional effort and time for processing edges.
- and drill to it, small diameter.
- Measuring tools (ruler, roulette and, possibly, the square).
- Pencil.
- Smallozing sandpaper for processing countertops.

Computer table manufacturing instructions
The easiest option of the table will look like this. The table top combining the legs, which are two boards.
Note!
All these details can be chopped out of old unnecessary furniture and then such a product will cost you almost free.
The dimensions of the parts each selects, but, for example, for 15-16-inch laptop, the dimensions of the countertops can be 60 * 28 cm.
The sidewalls for such a table are made beveled and the length of this very bevelled side should be 28 cm. This side is attached to the tabletop. The most convenient tilt for such a table, when the back of the leg will rise by 29 cm, and the front is 21 cm. Such a tilt will be the most optimal for work in the lying and semi-core position.

Drinking table details
Computer desk
To make a computer desk with your own hands, you need to make much more effort than making a table for a laptop. The main task will be the manufacture of the table "for yourself", because the store option may not be at all for your complex. Before starting the manufacture of the table, you need to decide on its model. A rather common model is as follows.
The computer is located on the table, the system unit on the side under the table on a separate stand. Also under the table on the stand, only in the center, the printer will be and the place for disks and documentation, and the keyboard and the mouse will be located on the retractable shelf under the computer.

Detailed drawing
Computer table size
After you have decided on the model, you need to make a drawing with dimensions.
The main size of any table, including computer, is its height. For a man of medium height, it usually varies within 700-750 mm. For more convenience, you can provide legs with an adjustable height. It will be especially convenient if the table is intended for children who have a property grow. Then the stand-up legs will not allow to spoil his posture. The height of the printer shelf must be at least 20 cm, in which case you can also store discs in a standing position.

Computer desk with your own hands
Making countertops
The next stage we need to make a worktop. Moreover, its size should not be too small and at the same time not to be infinite. It should be compact on it to compact and, besides, the most comfortable conditions for work are created. Standard sizes of countertops vary in the range of 1-1.3 m, and the depth may be of the order of 60 cm.
Note!
For greater convenience, it is necessary to provide a side in the back of the table.
This will prevent the fall of items at the table, and its height is sufficient not more than 5 cm.
Completion of work
The size of the retractable shelf will only be slightly less than the countertop, and the depth must be provided with a size of 40 cm. The final step during the independent manufacture of the computer table, the shelf under the system unit will become. The height of the floor level may not exceed 10-15 cm, but the width should be provided for no less than 25 cm so that between the shelf wall and the system unit, the required distance for the normal operation of the computer. Thus, fulfilling all these requirements, you can without special efforts Making a convenient table for your computer. Well, a visual manual in the manufacture of such a table can be obtained by viewing the video presented below.
Computer table with your hands video:
In contact with
See inaccuracies, incomplete or wrong information? Do you know how to make an article better?
Want to offer photos on the topic?
Please help us make the site better! Leave the message and your contacts in the comments - we will contact you and make a publication better together!
The computer table today is almost in every home is an indisputable fact. This is not surprising, because the computer has not been considered a luxury for a long time and a modern person spends a lot of time after him. Consequently, the table on which the computer is located should be as comfortable as possible.
Of course, the current variety of furniture allows you to choose the desired model. But a high-quality computer desk from a tree is expensive and not everyone has the opportunity to purchase it.
There is a wonderful solution to this problem - make a computer table yourself.

The main start ...
The question "How to make a computer desk with your own hands" may sound frightening for people who have no experience. In fact, nothing complicated this process is not. First of all, you need to organize it correctly. For this you need:
Determine the list of elements that will be located on the table - its size and design directly depends on this. Standard Set - Monitor, Mouse, Keyboard and System Block. Additionally, there can be columns, microphone, printer, etc. on the table.
Select the material from which the table will be manufactured. Most often for this purpose choose chipboard, less often - plastic or MDF.

Decide with the location of the computer table. It will depend on it, you need an ordinary direct or angular computer desk.

You can make a combined table, but this idea will be embodied more difficult. When choosing a place, you must necessarily take into account the presence of sockets, intimacy of heating, the angle of falling light.
Determine the size of the future table. A small computer desk is neat, but it is more likely to be suitable for spending time on the Internet. But to work it is better to give preference to more solid table size.

When all these moments are considered, and decisions are weighed, you can proceed to the preparation of the project of the future product.

Computer table design
The fundamental stage of the design of the computer table is the choice of the most suitable design. At the same time, it is necessary to pay attention to such factors as:
- practicality;
- convenience;
- functionality;
- appearance.
Deciding with preferences, you need to make a sketch of the future computer table. Special artistic skills possess for this not necessarily. The main thing is to think over all the details and give the picture completed.

On the finished sketch, you can create a detailed drawing, indicating specific sizes. If this task seems impracticable, you can use the ready-made drawings of computer tables found on the Internet, improving them according to their wishes.

What materials are needed?
After the drawings of the computer table have already been brought to perfection, you can proceed to the definition of materials necessary for work, such as:
- the basis from which the table acts actually will be manufactured;
- fasteners;
- tubes, handles, wheels and other fittings (depending on the complexity of the design).
Fasteners, and the main material is better to take with a small margin, since during the assembly there may be a need to strengthen the table additionally. It is also not worth saving on the quality of materials, it is important to choose the optimal value for money.

"For" and "against" the creation of a computer table on their own
The idea of \u200b\u200bmaking a computer table independently has a lot of advantages, such as:
It is possible to make a product of the required length, widths and height, which is ideal for a specific room. Factory furniture usually has standard dimensionsThe placement of which often causes difficulties. The manufacture of furniture in the size of the customer - the pleasure is not cheap.
The design of the computer table made by its own hands will fully comply with individual requirements. It will have the right amount of shelves, drawers, its shape and height will be most comfortable for it.

A computer table made by your own hands will get cheaper than the purchase of a finished furniture item. The price of the factory table includes not only the price of consumables, and wage Workers, rental rooms, store surcharge and a lot of other factors.
Independent selection of accessories and parts for assembling the table. Frequently often furniture manufacturers save on these trifles, which as a result, poorly affects the quality of the finished table. Sometimes the quality is so bad that it can be seen by the photo of a computer table, even inexperienced person.

At first sight independent manufacture Computer table may seem an impracticable task. But this process is very exciting and creative, so it is likely that even a small computer table made by your own hands can become an incentive for creating another, more complex and intricate furniture.
Photo of computer tables do it yourself


A good computer desk helps to make a job on a computer more convenient, and more efficient. Modern models Tables have interesting designwhich harmoniously fit into any interior.
The selection of the model can be carried out on the basis of the set of devices that you want to put on the table. It all depends on the type of computer, you can put a laptop on the table, and you can install a stationary device. The latter takes much more space, and the existing printer needs its own corner on the table.

With a large set of computer literature, you must select the type of table with a plurality of shelves for books, or disks. The table may be an angular, and direct type. Before his choice should be decided on the place where the furniture will be delivered.


Types of computer tables
There are three main types of computer tables:
- direct shape;
- angular form;
- combined form.

The direct form table is a classic option for users who do not use the computer as often. This form is great for office work, it will not distract attention from work.

The corner shape of the table is suitable for those who spend a lot of time at the computer. It should be borne in mind that there is little space on this surface of the table. Therefore, to place various stationery and paper accessories on it will not work.
IMPORTANT! Located in the corner table badly affects the psyche. In offices, angular tables are not used.
The combined form combines two previous options for tables. The disadvantage is that the design requires a lot of space to accommodate. It has many shelves and boxes, for storing documentation, and other things.


Design and drawings
The species and sizes of homemade computer tables are limited only by fantasy, material, and place of their placement. Choosing a suitable form, you can start designing dimensions.

A comfortable table will turn out when it will approach the user's height. It should be multiplied by 75, and the resulting result is divided into 175. As a result, we have the desired height of the table.

Then, the diagram is made and the drawing for the manufacture of a computer table. Its complexity depends on the selected model. Therefore, if there is no desire, it's a long time with the design, you should choose the easiest type of construction.

The design of the simple table should include the following components:
- presence of a retractable shelf for the keyboard;
- space for the monitor;
- shelf for folding small items;
- the presence of boxes;
- several top shelves that you can put books.

In this embodiment, there is enough space for the entire periphery of the computer. The location of all parts of the table depends on the designer fantasy.


How to collect table
Having found the necessary instructions how to make a computer desk with your own hands, you should proceed to the preparation of the instrument:
- lobzik;
- electric drill, drill;
- screwdriver;
- pencil.

In the manufacture of a table from the chipboard, so that the edges turn out to be smooth, it should be carefully cutting the material. At the same time there will be a lot of sawdust, and the dust is better to prepare a vacuum cleaner in advance.

If there is no work skills with an electrolovka, then you can use the services of a furniture factory. They will make an even cutting, and the edges will turn out without chips.

The overall design of the table must have the following elements:

- two side racks;
- stand Central;
- table;
- rear wall;
- retractable type stand under the keyboard;
- several internal shelves.

After the cutting of the parts is over, you can start assembling. You need to do 2 holes in two side and central rack. They are needed for fastening the lower shelf, which is attached to the self-tapping screw or confirmants. The same method is mounted the upper shelf.

Next is set back wall. It is attached so that the upper corners coincide with the corners of the side racks and the central wall. They are also attached to the self-tapping screw. For the retractable shelf, guide rails are fixed to the table. The same action is done with the shelf itself.


The tabletop is attached to the side walls. They are drilled by holes in which the lubricated plows are mounted. Holes should be drilled in a tabletop, not through, but with sufficient depth. Holes of racks and countertops must coincide, otherwise they will not succeed.

If the shelves are not enough on top, then the installation of additional can be carried out on the sewage. Build table from wood can be considered completed. It remains to arrange it in the selected place.

On the Internet there are many different photos of computer tables. Each lover will find a suitable option.


Designs wooden tables - These are the simplest, and accessible to many products for handmade. Make yourself a table of metal and plastic at least many.

Photo of computer tables do it yourself


Almost every house today has a personal computer. And the special table for it, the convenient, equipped with the necessary shelves for each device, is also not rare for a long time. It would seem that it would be easiest to buy such a table in the store, the benefit of the choice is wide and allows you to find the appropriate option.
But in the store such a table can cost considerable money. In addition, the size of the finished product you liked may not coincide with the area and layout of the room. Yes I. color solution Sometimes you want to pick up to your taste, and not from the catalog.
There is a good opportunity to make a computer desk with your own hands. In this article we will tell you in detail about this process.
How to make computer desktop drawings
Of course, you can use a student desk or a standard office desk as a computer table, from those that stood in the cabinets for another 15-20 years ago. But taking into account the many additional devices, such as a printer, MFP, and a plurality of gadgets that are connected to the system unit or laptop, you will quickly understand that it is very difficult to set up on such a space for full-fledged work. In addition, the child will need to do lessons behind the same table, that is, draw, read, write.
It is necessary to make such a table so that it is as much a useful surface as possible, not occupied by technique. And all devices are the monitor, the system unit, etc., will be in their places, and at the same time do not interfere.
We will look at the option of a full-featured table for a computer, which you can make yourself without special costs.
First of all, you need to create a drawing in which the size of the entire design will be taken into account. Detailed drawing of a computer table You see in the picture:
As you can see, this is the simplest, classical shape of the table. Straight lines, conciseness, and at the same time complete functionality. Such a table consists of a tabletop, stands for the system unit, retractable keyboard, tumb and shelves.
Please note: the table size indicated on the drawing will help you orient the product in the room space. If you need a larger or smaller table, sufficiently observe the proportion on a suitable scale.
After you have determined with the necessary sizes of your computer table, applying the drawing, make a list of all necessary and proceed to shopping.
Materials and tools that you need in your work
After studying the scheme of the computer table, which we suggest you, you probably noticed that for the manufacture of such a furniture item, you will need a lot of components. Materials that will be required are specified for the sizes in the drawing:
- Board of 12 x 120 mm - 6.2 m;
- Paper emery different grainability;
- ½ Plywood sheet of 6 x 1525 x 1525 mm;
- Furniture shield 18 x 600 x 2000 mm, pine - 2.5 pcs;
- Shield furniture 18 x 400 x 2000 mm - 3 pcs;
- Shield furniture 18 x 200 x 2000 mm - 2 pcs;
- Matte varnish or glossy.
- 1 set of guides for retractable shelves, 400 mm long;
- 50 screws 5 x 60 mm;
- Sucks;
- Pens for boxes.
You will also need 3 sets of ball or roller guides for drawers, 500 mm long. It is these details that determine the quality, durability and strength of the original, so they should be considered responsible for their choice.
To note: the main advantage of roller guides before the balls is their cheapness. But the remaining parameters are significantly lower: roller guides are not fully extended, they are fragile and they do not have a reliable limiter. In the balls of telescopic guides, these shortcomings are absent.
In addition to the materials, immediately pour all the necessary tools:
- Meter line or roulette;
- Corolnic;
- Pencil;
- Chisel;
- Hacksaw;
- Screwdriver;
- Drill and swell to her;
- Sander;
- You may need a dust collector if you are going to work directly indoors.
After you got stuck with everything you need to make a computer table with your own hands, it's time to start work.
We make blanks for a computer table and collect lower frame
At this stage you need to pay special attention to which you make this piece of furniture.
- First of all, mark on the surface of the computer table on the surface: vertical walls in the amount of 3 pieces, the bottom of the table, the worktop, the bed cover. Drink them according to the scheme, observing the size.
- On the vertical walls, you will need to make cuts of the front upper corners, about 2 x 2 cm. Clean the space of sleep with the help of sandpaper.
- It is desirable that the table can be moved to the wall close. To do this, cut down the bottom rear corners of the walls so that the formed connector consistent with the size of the plinth. According to our scheme, the distance will be 4.5 x 5.5 mm.
- On the back side of the vertical wall located in the center, make a sample at an altitude of 265 mm above the floor level. Its width will be 200 mm, and the depth is 18 mm. At this place, you will secure the transverse panel, discharged from a 18 x 200 mm shield connecting the vertical sides. Screw it with self-buildings to the side walls in bulk.
- The rear wall of the table will replace the transverse panel, which will provide the design required stability and rigidity.
- After all the details are prepared, drill holes in the right places. It must be done in advance, otherwise when screwing the blanks can crack. Collect the frame and secure self-drawing.
Now you need to make a niche in which the system unit will be placed. If you are not a passionate gamer, a programmer or system administrator, and you do not need constant access to the component system, then the optimal option will be the standard stable niche on the self-drawing.
Drink a small side wall and horizontal shelf. The front top corner of the sidewall cut and clean the sandpaper. Bottom rear corner Treat the size of the plinth. A small sidewall is screwed to the shelf and rear panel, attach to a large side wall. Close the socket under the bedside table and shelf. Use the drums without.
We make a computer table superstructure
In order to make a full-fledged multifunctional computer desk, the instruction provides for the presence of not only the countertops and shelves under additional devices, but also the add-in, which will also perform the function.
- Follow and drink the side elements of the design, raguay using sandpaper Front upper sections. So that the sidewalls are smoothly fixed on the table top, make a pre-template, the thickness of which will be 18 mm. In his ends, drill holes. Attach made ends to the tabletop and make marking for fasteners.
- The opening holes should be drilled according to such a scheme: through - in the tabletop, the deaf - in the lower ends of the side walls. At this stage you will need a square, it will help you abide by the correctness of the corners. Install the side parts on the worktop, using the alignment kit.
- Under the tabletop, screw the screws, aligning the holes in the lid with sockets in the ends of the sidewall. After that, take a shield of 400 x 2000 mm, and cut it along the width along. Thus, you will get the top shelf 315 mm wide and fixing the transverse bar-side.
- The average vertical wall must be cut from a shield of 200 x 2000 mm. Attach it to the tabletop just like large side walls, controlling the compounds with the help of the square. Screw the rear side to the sides and put on the end of the central wall of the upper shelf. Align and screw the screws.
- Now you need to make a left shelf. It will take a shield with a width of 200 mm. This shelf is designed for a printer or MFP, it means that it should be strong enough and volumetric.
Computer table boxes and retractable keyboard panel
A computer table with drawers is a very convenient piece of furniture and a functional interior element. It is such a table that we are now masthers. Consider how to make it right.
- Drink out the bottom of the bottoms for the boxes, and from the board 12 x 120 mm - the side walls. Twist the blanks of 4 pieces and the bottom of the bottom. Adjust the width and depth of the drawer relative to the thickness of the guide and internal sizes of the bedside table.
- Guides need to be secured from below. Back from the front edge of the side elements 18 mm and screw the guides on the walls. In this case, follow the symmetry and the desired distance. An indent will be needed to attach the front panels on the front walls of the boxes.
- The shelf for the keyboard must be filled with the thickness of the guide retractable mechanism.
- Now disassemble the design of the table to the components of the elements, wash them and cover their lacquer. After the coating is completely dry, assemble the table again.
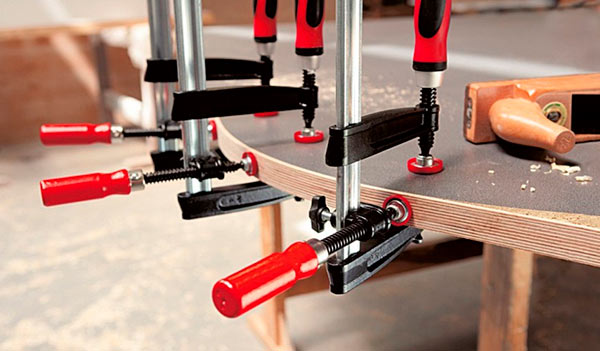
Tip: Do not twist the screws several times. This is very weakened by the nest. If it seems to you that fasteners are not sufficient enough, use carpent gland in order to enhance the connection.
Boxes and retractable shelf for keyboard are ready, the design of the computer table is collected. The final bar remains: set the front panels on the boxes.
- Drink facial parts in the number of three pieces, mark and drill holes for the handles. Screws, fixing handles, fasten the walls of the boxes and facing.
- Facing panels put in the face of the front side of the couch. Use clins to fix the gaps between the boxes. Drill holes for the handles.
- Set the handles and secure them with self-draws, tightening the facing and front walls. FROM inner Boxes screw some more screws to provide additional reliability.
Your computer desk is fully ready.
Video on the manufacture of a computer table with your own hands
As you can see, make a computer table independently not difficult. You will not only get a comfortable place to work and relax, which will be profitable to look in the room, but also acquire the experience of joinery for the manufacture of furniture. Perhaps one of our readers has already dealt with the design and creation of computer tables. Please share your experience in the comments, ask questions that appear during your reading this article. We will be happy to discuss with you the workflow and learn something new.
We wish you easy work And comfort your home!