Do-it-yourself house for a well. Do-it-yourself house for a well step by step instructions
The final stage construction of a well, or a pool for imported drinking water - the manufacture of a lifting drum with a gate and a canopy. Of course, there are ready-made designs with carved finishes on sale that are easy to install on the well neck. The question is how much do such products cost and whether you need to buy them if you can make a house for a well from inexpensive materials with your own hands. To simplify the task, we will provide drawings and tell you about the nuances of the work in the form of step-by-step instructions.
Choosing the right design
Ideally well house must perform the following functions:
- protect water from external pollutants - precipitation and debris carried by the wind;
- play a decorative role, ennobling the concrete head sticking out above the ground;
- serve for manual or mechanized lifting of water.
Reference. Similar buildings are also sometimes used to finish wells with manual columns that do not have a very attractive appearance.
In the vast majority of cases, canopies are made of wood, since metal rusts quite quickly from constant contact with water and its fumes. It is customary to sheathe roofing iron except for the roof of a wooden booth or horizontal doors that close the source of water supply from above. The simplest and at the same time beautiful option with clapboard lining and wooden covers is shown above in the photo. It is well suited for a shallow pool in the country, when water is simply scooped up with a bucket or pumped over with a pump.

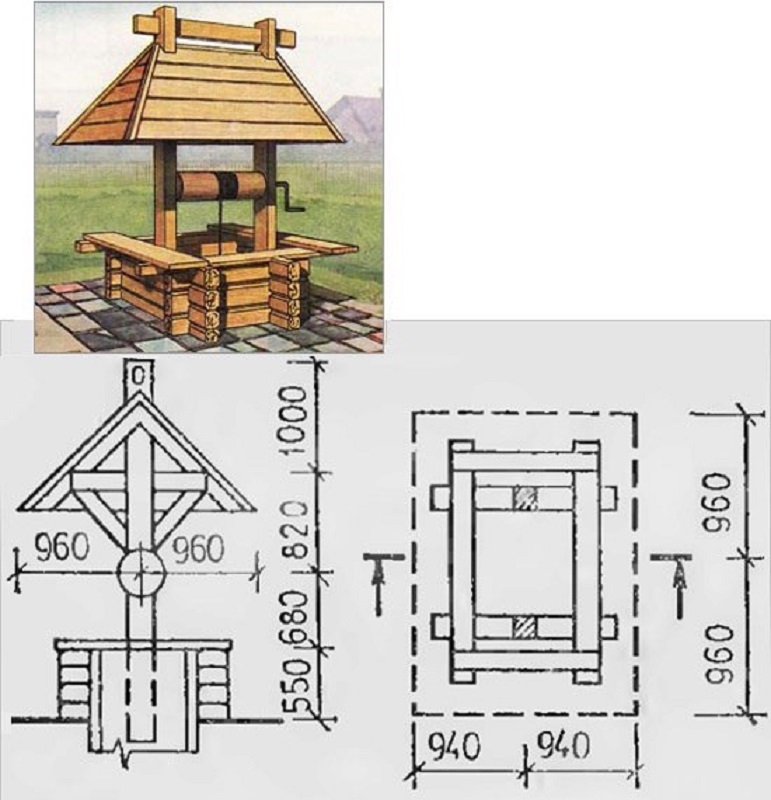
The following photo shows an open well house with a traditional design - a manual gate, a gable canopy and a log lining of the neck. If you still have logs from the construction of a log house or a bath, then this option is perfect. Also, the cylindrical concrete part can be finished with a bar folded in the form of a hexagon, or lined with stone.

The third variety is a completely closed house with sloping doors built into one of the roof slopes. How to build it yourself, we will consider further. More diverse ideas for decorating country wells are shown in the following video:
Preparation for work
To make a wooden house, you will need a standard carpentry tool kit, which includes chisels, a planer and a hacksaw. It is very good when you have a power tool at your disposal that facilitates and speeds up the work:
- manual frezer;
- electric jigsaw;
- circular saw with the ability to adjust the angle of the teeth.
If you don't have these tools, you'll have to do hand tool. There are no special requirements regarding materials: available on the farm wooden beam, logs or boards - feel free to use them for construction. The design of the canopy does not carry heavy loads, and the unsightly appearance of used material can be hidden under the outer cladding, for example, from siding.

Before you make a house for covering the well, take the dimensions of the neck - the height above ground level, the diameter and thickness of the concrete walls. If it is planned to sheath the above-ground part, it is necessary to level and compact the soil around it. In some cases, a small foundation is made, as will be discussed below.
Assembling an open well canopy
First you need to make a supporting part - a frame with uprights, shown below in the drawing. To fasten the gate, use a beam with a thickness of at least 50 mm or knock down several thin boards. Blocks for side mounting are made of the same lumber, and the frame is made of bars with a section of 4 cm.

Step by step the order of work looks like this:
- Cut the parts to the previously determined dimensions. At the ends of the future posts, make cuts at an angle of 45 or 60 ° and 2 holes Ø25-30 mm for the gate shaft.
- Cut grooves across the thick timber, which will include the frame elements. The latter are also filed at the ends to connect into half a tree.
- Assemble the frame with self-tapping screws and nail the side planks to it.
- Attach the racks in the center of the frame, then install the ridge board.
- Carefully treat all wooden parts with an antiseptic compound, and after final assembly, paint.
Advice. It is more convenient to assemble the structure on the ground, and then install it on the well together with an assistant. If you work alone, then mount the supporting part directly on the concrete head, but carefully control the horizontal with the building level.

The structure is attached to the well in any convenient way - through bolts or anchors. The next step is to install the gate from a log Ø20-25 cm, as shown in the diagram. To do this, the tree needs to be sanded, and holes for the shaft should be made on the sides, sticking to the center. Make a collar from a steel bar with a diameter of 25 mm. Then put the drum, attaching the washers to the ends and inserting the shafts on both sides. To prevent the wood on the racks from wearing out, steel sleeves can be hammered into the holes.

To mount the canopy, put together a simple truss system with two beams and braces, as shown in the drawing. Tilt angle and length rafter legs- arbitrary, but in fact the roof should completely protect the well target. And the last stage is the manufacture of flooring from boards nailed to the top of the frame and the installation of doors on ordinary hinges.
Note. To fasten the doors to the frame, you need to nail 2 crossbars from a bar, resting on the walls of the well. How to make and install hinged lids, see the video:
Concrete wall cladding
The simplest way to finish the above-ground part of the pool is lining with clapboard on a wooden frame. To determine the attachment points of the boards, you need to measure outside diameter neck and calculate the circumference using the school formula L \u003d 3.14 x D. Then divide the result by 6 and put this arc length on the wall of the well the same number of times using a tape measure.

- At the marked points, attach 6 vertical strips to the concrete walls with dowels, after cutting off their corners.
- Nail the lining boards to the frame horizontally so that their ends converge in the center of the planks, as shown in the photo.
- Close the joints of the lining with wooden or metal flashings.

Note. The outer surface of the frame bars should protrude so that the nailed lining does not touch the surface of the well. Therefore, to carry out the planks, use wooden linings.
As a result, you will get a nice hexagonal structure that needs to be coated with an antiseptic, primed and double-painted or varnished. See the video for details of the assembly process:
Another popular way of exterior cladding is to build a log house, which will require laying a small foundation around the pool. After all, wood is contraindicated in direct contact with the ground. Logs are sawn and stacked according to traditional technology, after which they are processed and painted in the desired color.
How to make a roof over a well
This work is also not difficult. Select bars with a section of 40 mm for the structure, and boards 10 cm wide for the base. To make a closed house for a well with gable roof with your own hands, use the step-by-step instructions:
- Cut 4 wide boards at an angle of 45 ° and connect them together on dowels to make a square base. Subsequently, it will lie on the concrete head.
- From the bars, make a gable truss system, fastening them together into half a tree at an angle of 30-60 ° (at your discretion).
- Sew up the ends of the house with clapboard, and the slopes of the roof with boards, as shown in the photo. Line the joints with decorative plastic corners.
- Lay the roof covering - shingles, painted corrugated board or other suitable material.
- Protect the structure outside and inside with two layers of paint or varnish.

Advice. When assembling the frame, try not to use common types of fasteners (various corners) made of metal. We remind you that steel elements without zinc coating will quickly begin to rust.

For beautiful design homemade canopy, it is appropriate to use all sorts of carved elements, which are also made independently, as described in detail. Doors in a well house of a closed type are usually made on one of the roof slopes. But there is another solution - to make an additional bay window on the roof, where to place the vertical sashes. How to implement this is shown in the last video:
Related posts:

D
an omic for a well is an important finishing element, it protects water from precipitation, direct sunlight (otherwise the water may “bloom”), a gate is equipped in it for collecting water (of course, if the water is not pumped out by a pump).
Content:
1.
2.
3.
4.
5.
6.
7.
Basically, for the construction of houses for wells, wood is used and it (the house) does not have to be made by hand, it can also be purchased or ordered, the range is extensive. Such a house can get off in almost the same way as an ordinary house and is done in almost the same way as, only in a smaller version.
Let's find out how to make a house for a well with your own hands, what kind of house you can make and what you need for this.
Materials for houses for a well
Materials for building a house are:
- Wood, incl. timber, board, lining;
- Natural and artificial stone, including brick (lower rings are made with stone);
- Bitumen shingles, used for roof cladding;
- Any other material, the flight of fancy is not limited.
After looking at a few photos and carefully examining the fasteners, you can already imagine how to make a wooden house for a well with your own hands.
Types (types) of houses for a well
The house can be open and closed, a closed house can also be insulated so that the water does not freeze in winter.
Let's start from the very simple option do-it-yourself house for a well. The process is well described in the video below.
This option shows the design of the house quite well and it is quite simple to do it yourself, let's move on.
An “open” type of a well made of boards, a fairly simple option, the final version is shown in the video below, having also considered the attachment points, you can build such a house yourself.
The video below shows the process of fitting and connecting parts of a simple wooden frame house. Such a frame is sewn up with moisture-resistant sheet material and in this case it is trimmed with clapboard and painted.
The video below shows a house for a well, decorated with wild stone, or rather, not the house itself, but its lower part, the ring.
Fixing the house to the well
First, the lower frame is assembled, the so-called. Mauerlat, when compared with the roof. The standard thickness of the rings is 80 mm. Bars or boards half a tree or at an angle of 45 degrees or end-to-end are fastened in the corners with self-tapping screws or metal fasteners, resulting in an even square. You can use what is available, there are many options. The main thing is to assemble a solid frame that will hold on to the rings. The frame can be attached to the rings, or not. It is important to make the mount removable so that it is possible to remove the house, because the well may require.

In the photo below, the frame rests with racks on the ring, and the lower belt is put on it. Practically at a thrust, such a house cannot be accidentally moved from its place.

Another option is when the frame is put on the ring and fastened on the sides with screws with dowels to the ring. The screws can be twisted and the house can be removed.

In the photo below, the frame is on the ring. If it is not fixed to the ring, the house can be moved by accident, with a blow. Such fastening is not reliable enough, it is still desirable to fix the lower belt on the ring using anchors directly to the ring from above, the diameter of the dowels should not exceed 6-8 mm, because there is a risk of damaging the ring during drilling. Or make a fastening frame from below that will hold the house on the ring, for example, as in the photo. Be sure to provide for the possibility of removing the house if you do not want to disassemble it during a possible cleaning of the well.

These are the main options for attaching a wooden house to a well, let's move on to the frame device.
Do-it-yourself frame for a well

It is important to make sure that the lower belt protrudes 2-3 cm beyond the border of the ring, so it will be more convenient to make the lining. We turn to the racks and rafters.
We cut and assemble racks and rafters, examples of designs are well shown in the illustrations, you can choose any one or come up with your own based on them. It is important to observe the dimensions and junctions to make out as carefully and evenly as possible. Be sure to check the evenness of the structure with a level and / or rail so that its shape is as ideal as possible, otherwise you may end up with a crooked house.
For fastening, we use self-tapping screws and metal plates and corners. Braces can be installed on the lower belt, which will give strength to the structure, as shown in the second photo. At the frame design stage, it is important not to forget to provide a place for a door through which we will take water and inspect the well.
Having assembled and installed the structure on the well, we begin the sheathing and finishing.
Sheathing and decoration of the house for the well
For sheathing, various wooden materials, such as: block house, lining, or edged board.
For better fastening cladding, it is necessary to make a crate, so that there is where to nail it and it does not bend under pressure. You can also initially veneer the frame with a moisture-resistant OSB (for example), and already attach, say, a lining to it.
Also, the house can be lined with a professional sheet or ordinary sheet metal, always galvanized. Under sheet metal, preliminary cladding with sheet materials is mandatory.
What you need to pay attention to. For the evenness of cutting materials. It is necessary to saw off boards and lining evenly.
From above it is necessary to install a skate. The ridge can be wooden or metal. It can also be decorative, curly. It is necessary so that water does not get inside, under the lining and into the well itself.
You can also veneer the house in the place where the ring will be. Make, so to speak, a table in which there will be a hole in the well. Or make a shelf for a bucket. The photo below shows what it should look like. Is not compulsory procedure, but perhaps in some cases it is convenient.
Facing is carried out on the frame that we have created. If sheathing with bituminous tiles or any other sheet material is used, sheet material - OSB or plywood - is first fixed to the frame. It is lined with it. If boards or lining are used, sheet material is not necessary, and in the case of boards, it is not needed.

The easiest option for finishing a house for a well is with edged boards
The door is a shield of boards, hinged to the house. It is not difficult to assemble such a door, the main thing is to calculate all the dimensions and pre-prepare the frame of the house for installing the door - on the frame of the house it is necessary to provide a frame of bars for installing the door.
The photo below shows various options doors and a frame for them, they are all made according to the same principle.
well on personal plot The usual thing. But in order to fit into landscape design you have to make an effort. Now on the market there are many houses for a well that are different in appearance and price, but it is much more pleasant to make such a house with your own hands. In addition to aesthetic pleasure, this building protects well water from sunlight, dust, dirt and serves as an obstacle for children and animals. In winter, the water in the protected does not freeze.
Before you start making a house for a well, you need to prepare a woodworker.
Depending on the type of house for the well, we store, edged boards, to your taste and wallet and for impregnation. The main thing is that the finished house is durable and consistent with the design of the site.
Let's prepare a beam with a section of 80mmx100mm, and an edged board with a thickness of 40 mm. These are the most optimal sizes of lumber, they will not make the structure heavier, and at the same time make it strong, then the house will withstand the wind load.
We prepare four racks from a bar that are suitable in size for the lower and upper strapping with a width of 120 cm. Having sawed off the boards in size, we begin to nail them to the racks. For fasteners, we use 10 cm nails, they will firmly connect the parts to each other.
To get an even and strong frame, we assemble it in a certain sequence. We connect the boards first from below and from above with two racks, then we do the same with the other two racks. Having placed them around the ring, we finally connect the straps to each other.
We begin to make a roof with the manufacture of construction trusses- this is the structure on which we will mount.

Choose the length of the boards yourself, the height of the house for the well will depend on it. For crossbars and jibs, we take boards 2.5 cm thick. You should get 8 jibs, 3 crossbars and 6 legs. Having cut the rafters at an angle, we connect the upper ends to each other. Fasten with self-tapping screws.
It is best to assemble this design on the ground.
We use crossbars for additional strength, placing them 30 cm below the top attachment point of the rafters. On the rafters, where they will be connected to the boards of the upper trim, we make a cutout.  We connect the frame and rafters using nails. We strengthen the installation of rafters by installing jibs.
They connect the truss trusses with a ridge, a construction of two boards. Next, the crate is attached with an interval of 15 centimeters.
The protrusions on both sides should be 10 centimeters. We cover the roof with either metal, covering the corner joints with wind boards. We make the cover of the house- this is a shield made of boards, which is made in a simple way. Having cut boards 20 cm wide and 85 cm long, we begin to fold one to one, fastening together using two bars, which we fix with self-tapping screws, one from above, the other from below.
It remains to treat the house for the well with an antiseptic and cover or
Timber house
On the support posts it is necessary to equip a wide structure. How to do this you saw in the previous instructions. Everything is done in the same way. The ends of the logs should protrude, this will protect the well shaft from precipitation.
They also complete the work with antiseptic impregnation.
We examined several types of houses for wells that you can do with your own hands.
You can decorate such houses in different ways.
 Implement any ideas for your well
 Carving decoration is very popular. Such a house will fit into any. Coloring is also a simple and popular type of decoration.
Modern impregnations can change not only the color, but also the texture of the material.
The building can be decorated with a figurine of some animal made of wood or ceramics.
Of course, each do-it-yourself well house is individual. It all depends on the imagination and skills of the owner of the site.
 Well house - device
It costs a lot of money. In this regard, for most people, information on how to make a house for a well with your own hands will be useful without spending a lot of money.
House functions
Before you build a house for a well with your own hands, it is important to understand its purpose. Its main function is to protect the water in the well from the effects of pollution and direct sunlight. Insects, debris, dust, precipitation, chemicals, or excess heat can render water unusable and roof house allows you to prevent this. Also, the proper arrangement of the house will protect the water from freezing in winter.
The house protects animals and children from accidents that can occur with open wells. In this sense, such structures can be considered as protective structures.
Another function of the house is decoration. garden. If you arrange it, focusing on the rest of the objects of the suburban area, you can achieve the creation of a holistic composition. Such harmony of the external environment always contributes to the appearance of internal harmony, which favorably affects human health.
Design Options
There are several options for the design of the house for the well. Their shape depends on the original design of the well and the materials used. According to the form, all the houses can be divided into several types:
- The easiest to build is a roof house, which is represented only by a gable roof triangular in cross section.
- More difficult to build are houses in the full sense of the word, which look like a quadrangular log house and a decorated roof. In the variant when the well is not made of logs, but of concrete rings, the base may have a round shape.
- The original buildings on the site can be houses - gazebos when the design is open and not completely closed. In this embodiment, the roof rests on two high racks. In this case, the door is made out at the very base, and not in the roof, as in the previous options. The basis of such a gazebo can be absolutely different shapes: the usual round ring, and the log house with a square base, and the octagonal house on the well look beautiful.
Even typical log cabins for houses can look completely different due to different roof shapes. They can be either gable (symmetrical or asymmetrical), or in the form of a pyramid with a different number of faces or in the form of a cone.
The drawing of the house for the well, as well as its further construction, will depend on the chosen configuration. The dimensions of the well house should always correspond to the structure of the well itself: a series of concrete rings or a log structure. Too small a roof will not protect the water in the well from dust, debris and other unnecessary things, and too large a structure can make it inconvenient to use the well.
- In some cases, apply stone for the foundation. It can be natural or decorative, and the roof in such houses is usually made of. The buildings take on a medieval look and blend particularly well with other similarly designed buildings on the site.
Some well owners prefer to use galvanized steel to create a house. Such buildings are carried out quite simply, but they are not always pleasing with their appearance. It should also be borne in mind that a galvanized house on a well without additional insulation will not be able to protect water from freezing.
Any well is worthy of decoration in the form of carved elements on wooden products, ceramic sculptures on stone buildings or an interesting pattern on galvanized structures.
Instructions for creating a house
When it was decided to build a simple house for a well with their own hands, step-by-step instruction will look like this:
- Structure frame. They begin to erect it after measuring the diameter of the well from concrete rings - this will become the distance between the sides of the frame. If the well is rectangular or square, the house will be a continuation of the walls. A base frame is made from a bar with a section of 80 * 100 mm. If the house is being built from the ground, and not from the upper ring, then it is necessary to make two identical base frames, which are fastened together using 4 racks of timber. It is better to use nails with a length of at least 100 mm so that they firmly fasten all the details of the structure together. From the center of the upper base frame, two racks of timber are erected, the height of which will become the height of the house. Next, install the rafters from the timber, cutting the ends of the bars at an angle of 45 ° and making cuts in those places where the rafters will be connected to the upper base frame. For the strength of the roof, crossbars and jibs are installed. It is imperative to provide a door in the frame, and it can be on the side walls of the roof (if there is no gate in the well), and on the slopes themselves. For the door, it is necessary to install two beams parallel to the rafters and two beams horizontally.
- Base sheathing. If, in addition to the roof itself, there is a base in the structure of the house, it is necessary to sheathe it with boards, which is easy to do thanks to the already installed frame. Further, the side triangular surfaces of the roof are sheathed with the same boards.
- Log gate. The gate in the well is needed to raise a bucket of water. It is made from a log, from which the bark is first removed, after which the surface is polished. The length of the log should be 30-40 mm less distance between racks. This is necessary so that the gate does not cling to the side walls when scrolling. Holes with a diameter of about 20 mm are drilled on each side in the center of the end of the gate (log). The same holes are drilled in the side walls. To prevent the wooden parts of the structure from coming into contact with the metal bars, on which the gate will then be held, it is necessary to install metal plates and bushings. Next, one rod is inserted into the wall on the left side, installing the gate, and one on the right, and on the right side, the rod must be bent in a zigzag for ease of use. After that, a chain with a bucket can be attached to the gate.
The only source of drinking water in country house often there is a well. A house for a well helps to keep the purity of life-giving moisture and give the building an attractive appearance. A template copy can be purchased ready-made, but it is much cheaper and more interesting to build a house for a well with your own hands. The design differs in size, configuration and finishing material. The proposed drawings will help you choose suitable option for making your own.
The purpose of the house
The main function of the well house is practical. The quality of water from a well is negatively affected by many factors:
- direct rays of the sun;
- precipitation;
- excess heat;
- animals and insects;
- wind blown debris
- chemicals sprayed on nearby plants.
A properly equipped house prevents foreign substances from getting inside. In addition, a competent design will prevent freezing of water during severe frosts. Throughout the year, the structure creates protection from curious children, preserving their life and health. In addition to the practical purpose, a house for a well made with a soul with a soul will be an excellent decorative decoration for the site.
Water is supplied from the well in two ways - with the help of a gate and a bucket fixed on it or with a pump. When choosing a house design, this factor must be taken into account.
One of the options for a professional drawing with dimensions is presented below:
Structure variations
The protective structure can be open or closed. In the first case, the probability of water freezing in severe frosts increases significantly. The insulation of the well ring with a polystyrene foam coat will help to save the situation, followed by decorative trim. Greater practicality, in terms of protection against frost, has a closed design. The air layer itself retains heat, and in combination with a heat-insulating material, it will cope perfectly with the functions assigned to it.
The choice of materials in the manufacture of a house for a well is based on the general architectural concept of a suburban area. If the main building is a wooden frame, it would be logical to use logs to finish the well ring and roof boards. If the exterior of the house contains elements of brick or stone, the appropriate material is used when assembling structures for the well with your own hands. The top is sheathed with a material identical to the roofing of the main structure. The proposed design is not an unshakable postulate and is relevant if the house is located within sight of the main building. A distant well at a distance allows you to expand the boundaries of the choice of finishing the house.
Comment! A wooden house, especially with carving elements, is incredibly attractive, but requires regular maintenance. Otherwise, the appearance will quickly lose its former gloss. Siding fixed on a metal profile frame is much easier to maintain.
Another example of a drawing with dimensions will help you navigate the choice of configuration:
Simple open house design
It is quite simple to arrange a structure for an open type well with your own hands. Main structural elements:
- 2 racks;
- canopy;
- gate.

Since the racks are dug into the ground next to the well, the installation of supports for the canopy is carried out after decorative design well ring.
The basic steps for making a canopy for a well:

The order of work may change. In some cases, the supports are first dug in, then the truss system is fixed, after which the roof is installed. It is more difficult to assemble the truss system of an open house directly on fixed supports. Sometimes the entire structure is first assembled together, and then dug over the well. The severity of the structure and personal experience tell you how to make it more convenient with your own hands.


The procedure for manufacturing a closed house
An open house does not give the well 100% protection from adverse factors. It is much more efficient to assemble a closed-type structure with your own hands. A detailed drawing with dimensions and a diagram in the assembled version is shown in the photo:
Frame design
For the manufacture of the frame will require timber and boards. As in the case of an open canopy, it is important for the structure to choose the right dimensions for the main elements. Excessively thin parts will lead to deformation or breakage of the structure above the well as a result of wind loads. A large margin of safety will also be redundant, so the structure above the well will turn out to be cumbersome.
The photo shows detailed drawing house roofs:

It is optimal for work to choose the material of the following sizes:
- Board thickness - 4 cm, width varies from 120 to 150 mm.
- The cross section of the beam is 80x100 mm, with a heavy roofing it is better to take 100x100 mm.
- For work, you will need 4 supports from a bar and 4 boards for holding the lower and upper strapping.
The boards are sawn in advance, taking into account the dimensions of the well, after which they are nailed to the support posts. 100 mm nails are used as fasteners. The algorithm of actions for making the frame of a house for a well includes the following steps:
- the first pair of supports is fastened with boards at the top and bottom;
- the second pair of riser is connected in a similar way;
- blanks are placed around the well;
- The elements of the frame of the house are connected by strapping.
The photo shows an example finished house above the well:

Roof installation
The design of the roof of the house over the well begins with the assembly of roof trusses. They represent a rigid structure, on which the crate is subsequently attached. For the rafter legs of the house, boards are taken that are at least 3 cm thick. The length is selected individually, depending on how high the house above the well you want to get. The next elements of the truss system are crossbars and jibs, board thickness from 2.5 to 3.0 cm will be enough. The set of elements of the truss system of the house above the well includes:
- jib - 8 pcs.;
- crossbars - 3 pcs.;
- rafter legs - 6 pcs.
The parts are cut at an angle, the upper ends are interconnected using self-tapping screws. The crossbars perform the function of additional fixation, their installation is carried out 0.3 m below the point of the upper connection of the rafter legs. The rafters are fastened to the frame with nails 120 mm long.
In order for the house for the well to have sufficient strength, the truss system is reinforced with jibs. When the structure is assembled, the crate is carried out. The fixing step of the boards is 15 cm. First, the crate is covered with roofing felt, then the installation of the finishing roofing is carried out. Places corner connections usually covered with boards.
Gate installation
Do-it-yourself decoration over the well of the house necessarily affects the installation of the gate. For its manufacture, a round log with a diameter of more than 200 mm is required.
Comment! How larger diameter gate, the easier the bucket of water rises.
The size of the gate depends on the distance between the two supports on which it is attached. It is optimal to choose a length 4-5 cm shorter. The approximate dimensions of the gate for the house above the well are shown in the drawing:
The main stages of manufacturing a gate for a house over a well:
- The desired length of the gate is cut off.
- After removing the bark from the log, it is carefully cleaned and polished.
- The edges are covered with steel wire, this measure will preserve the geometry of the log.
- Holes are drilled in the center of the ends to a depth of 50 mm. The diameter is 20 mm.
- On top of the holes, metal plates are mounted, on which the corresponding holes have already been prepared. This element will protect the wood from destruction.
- Similar holes are prepared in the supports, at the points where it is planned to fix the gate.
- The sections are covered with metal plates with holes.
- Metal bushings are inserted into the holes on the supports.
- The ends of the logs are equipped with metal rods. For the left side, a length of 200 mm is sufficient, the right element is represented by the letter "G".
- At the end, the gate is hung on racks.
The finished gate before fixing in the house for the well in the photo:

Arrangement of the door of the house for the well
So that over time the door does not lead as a result of deformation of the structure, the boards for the house must be chosen dry. The sequence of work on the manufacture of the door includes the following steps:
- As a door loot, 3 bars are fixed on the frame.
- Based on the parameters of the frame, the door is assembled on the ground. Its dimensions should be slightly smaller than the internal outlines of the frame. The boards cut to the desired size are connected at the bottom and at the top with bars. For rigidity, another bar is nailed diagonally.
- Carry out the installation of metal hinges on the door and frame.
- After hanging the door on the frame, a latch and a handle are fixed on the structure.
- Finally, the quality of the work performed is checked. The door should not touch the frame during opening or closing and jam.
The photo shows the finished door on the well structure:

Finishing
Usually the lower part of the well house is sheathed with wood. The choice of the master, who constructs the structure with his own hands, is presented:
- Block house imitating rounded logs. In this case, the well will resemble a log cabin.
- The wooden lining looks spectacular.
- An ordinary board represents the most a budget option designing a house for a well.
Attention! Preserving the integrity of the wooden structure for a long period will help the processing of the material with protective compounds. This includes antiseptic impregnation that prevents decay, means of protection against damage by pests. Lacquer is suitable as a finishing coat for a house for a well.
A neat and beautiful wooden structure for the well is shown in the photo:

Options finishing the roofs of the house for the well are many. As in the case of an open-type house, it is important to foresee the weight of the roofing in advance so that the entire structure does not deform under the weight of the material.
For larger slopes, the installation of a crate will be required. The boards are fastened in increments of 15-20 cm. The main material of the roof is stuffed onto the crate. Thus make out slopes and gables. If the well is of small diameter and the roof of the house has a compact area, the boards are mounted directly on the frame.
Advice! To protect the walls of the house from moisture, the slope boards go beyond the dimensions of the main structure by 10 cm.
In addition to the classic board, as a roofing use:
- euroruberoid;
- siding;
- corrugated board;
- metal tile;
- bituminous tiles.
Mounting roofing material goes exclusively to the slopes, the pediments are sewn up with wood treated with protective agents.

Conclusion
A competent drawing, taking into account the dimensions of the well, is the basis for the correct design of the house. It is important to correctly calculate the weight of the structure so that the frame can withstand the load and not deform. Appearance largely determined by the material chosen for the finish.


