An unusual house for a well. Well in the country: how to make a well house with your own hands
Currently, a well in the country is not a required attribute. If earlier it was the only source of water outside the city, today many owners refuse the well.
- It takes a lot of manual labor to equip wells., such work cannot be mechanized. In addition, it is currently very difficult to find experienced and professional craftsmen, and to communicate with amateurs - at a loss. They can dig in the wrong places where there is groundwater, stop working when dirty subcutaneous water appears, etc.
- Wells require periodic maintenance. Depending on the debit of water and its physical properties, the well must be periodically cleaned of silt and dirt, fallen leaves, branches and other debris. Before cleaning, the water should be completely pumped out, the dirt should be removed with buckets. The job is messy and unpleasant, taking a lot of time and effort.
- The quality of the water in the wells does not meet the requirements of the sanitary authorities. Why? For two reasons. First, the state of ecology is so depressing that many chemical compounds enter the upper aquifer. And it is from here that water flows into a traditional well. Second, the climate has changed dramatically, in many regions of our country there is a sharp decrease in the amount of natural precipitation, subcutaneous waters disappear.

In addition, modern household appliances are installed in the dachas, which work only with running water. Moreover, not only its consumption and purity are regulated, but also the working pressure. The solution to these problems is simple - to equip a small well. This gives a guarantee of high-quality water with almost unlimited debit, the well takes it from a depth of several tens of meters, and there are more underground rivers and lakes. Deep pumps are installed on the wells, they create the pressure and volume of supply necessary for the operation of household appliances.
Such features have become the reason that at present, wells are extremely rare near new country cottages. But they still exist, and they need to be ennobled.

Both traditional and modern roofing materials are used to cover the roof of the well.
| Roofing type | Brief description of physical and performance characteristics |
|---|---|
| Due to the low cost and high manufacturability, soft tiles are very popular with many developers. About 10-15 years ago, this material occupied a leading position among all existing ones on the construction market. Currently, the number of people who want to have a roof with such a roof has significantly decreased. The reason is that dust accumulates on the surface of the bituminous shingles; after 4–5 years, mosses and other vegetation begin to grow. It is very difficult to remove it from the roof; sometimes it is almost impossible. Plant roots destroy the integrity of the base of the bituminous tile and the waterproof layer, as a result, the tightness is lost, significantly deteriorates appearance structures. |
| Very popular roofing materials. Roofs over wells under metal tiles or profiled sheets are very common. All structures fully meet the expectations of consumers and are recommended by experienced builders. The main disadvantage of metal roofs is a lot of noise during heavy rainfall or hail. Noisiness can create certain troubles for those living in houses; for wells, this drawback does not matter. The light weight of the metal coverings makes it much easier to open / close the doors above the well, and this increases the comfort of use. |
| Traditional roofing material, despite the long-term and aggressive anti-advertising, asbestos-cement slate still holds a pretty good position. The roof under the slate has many disadvantages: heavy weight, ugly appearance, insufficient physical strength. Another drawback of slate is that it is difficult to work with it, there are difficulties in cutting and fixing. And the last thing. The surface of the cipher has a lot of nervousness, which becomes the reason for the rapid accumulation of dust with all the negative consequences. |


Prices for popular brands of shingles
Flexible roof tiles

Seriously considering rolled soft coatings, natural stone, piece ceramic tiles and splinters is impractical due to very rare use.
Step-by-step instructions for making a roof for a well
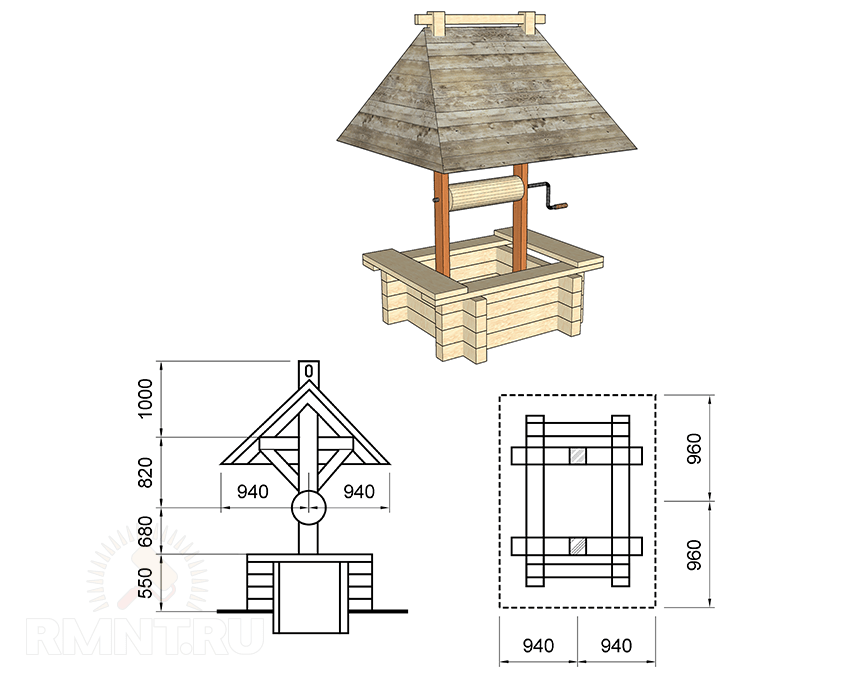
The roof is gable, the total area of the slopes is 2.4 m2, the strapping for fastening vertical elements from a board with a thickness of 50 mm. You need to start from the base for the roof (strapping).
Step 1. Measure the diameter of the reinforced concrete rings of the well, give a margin of 1–2 cm.

From a bar 5 cm thick and about 10 cm wide, prepare four segments, the length of each should be equal to the diameter of the rings along the outer circle.
Step 2. Shoot down a square from the segments.

It is recommended to first fix the boards with ordinary nails, and then try on the square on the well. The fact is that the concrete circles do not have an ideal shape, the base will have to be hammered into place with a hammer, the nails will allow the size to increase slightly. After trying on, you need to make marks of the position of the base and start increasing its strength.

Important. When strengthening the strength of the base, carefully monitor that the original dimensions are not violated.
Step 3. Fix the base to the well rings. This is a very important technological operation. The fact is that not only the weight of the roof will hold at these points, they must withstand additional wind and snow loads.

It is recommended to use strong concrete dowels for fixing. The diameter is at least 10 mm, the length should be 50 mm longer than the thickness of the laths. In total, you need to use 8 dowels, two on each side of the square. Once again, we draw your attention to the fact that the mount should be as reliable as possible. If doubts arise, then it is necessary to provide additional vertical supports in the lower part, fix them with dowels to the rings, and rest the upper end against the structure.
Step 4. Hammer in the upper surface of the support frame with boards approximately 20mm thick, align it in the same plane with the edge of the ring.

This completes the production of the base, you can proceed with the installation of the roof. The roof consists of several elements, each is done separately and according to its own rules.

Roof assembly
Step 1. Make vertical supports for the roof frame. The height of the elements is approximately one meter. They should be made from the same powerful beam as the harness. In the upper part of the supports, a cut is made at an angle of 90 °, 45 ° in each direction from the axis of symmetry. The frame slats will lie on the planes of the saw.

The lower part of the supports is fixed with metal squares to the base; to increase rigidity, you can drive in nails about 100 mm long on the sides. Carefully hammer in the hardware, do not allow cracks in the lumber.

Step 2. Attach the roof framing rails to the vertical supports. They must be of the same length, fixed with nails or self-tapping screws.

Step 3. Attach the batten to the roof ridge. It is installed in special slots between the side slots, and is also attached with self-tapping screws or nails.
Practical advice. After fixing each new element of the frame, the strength of the structure should increase significantly. Check it with your hands, make significant efforts from various sides.
As soon as wavering is found, you need to immediately identify the cause and eliminate it. There is no need to hope that the roof will then become stable by itself, miracles do not happen.
Step 4. Decide on the dimensions of the well doors, at the required distance, fix two thrust rails on the facade slope of the roof. On the reverse side, it is enough to nail one strip to fasten the roof lathing. Install it in the middle of the ramp.
Step 5. The roof of the roof will be made of bituminous tiles, a continuous lathing is required under it, we recommend using a moisture-resistant OSB board. Immediately cut out a piece and make a door, you will have to make a special frame for it. Choose the dimensions so that it fits freely into the opening prepared in the slope.

Practical advice. OSB boards have a smooth surface on one side, and an ordinary rough one on the other. Smooth surface considered moisture resistant, it is recommended to turn it to the roofing. For wells, such recommendations are not suitable.
The fact is that moisture constantly evaporates from the water surface; when the temperature changes, condensation appears on the roof slopes. Nail the board in such a way that its smooth lacquered side faces the well, and the rough side under the roofing. There is nothing wrong with violating the recommendations of the manufacturers; the lesser of two evils must be chosen. In the future, the rough surface of the slab is carefully and hermetically closed with bituminous tiles, this will not affect the duration of the structure's operation.


Nailed board over the door
OSB (Oriented Strand Board) prices
OSB (oriented strand board)
Installation of bituminous tiles
Buy packaging soft tiles... As a rule, it contains three square meters, and we need only 2.4 m2 for the roof of the well. It is easy to work with bituminous shingles; an ordinary assembly knife is used for cutting. In terms of manufacturability of installation, it surpasses metal coatings, it is in connection with this material that preference is given in our particular case.
Step 1. Open the package of shingles, take one shingle and estimate its position in the first bottom row. Prepare the first shingle. To do this, you need to cut off the petals from it, leave only an even strip.

By the way, then the same strip must be nailed to the ridge of our roof, you can immediately cut out two parts.
It is necessary to cut bituminous shingles under a metal ruler and preferably from the back side. The fact is that due to this position, the knife blade becomes less blunt, it does not constantly scratch on the stone dust.

Step 2. Start by installing the tiles according to the manufacturer's instructions, they are included in every package.
To increase the durability of the roof of the well, the base can be finished with any bituminous mastic. But if it is not there, then the roof will serve long enough, the main thing is not to violate the recommended technology.


Step 3. Sew up the gables with clapboard, take the dimensions for each board. The roof was made without much adherence to accuracy, deviations of 1–2 cm are permissible. During the trimming of the gables, the slots are closed and become completely invisible.

Step 4. Nail wooden wind bars at the ends of the roof.

It is advisable to close these places with metal strips and fix them before starting the installation of bituminous tiles. So the ends of the OSB are more reliably protected from negative impact moisture. If there are no metal strips, then you can use the slats, but before fixing them, you need to process the open ends of the OSB with any waterproof impregnation. It can even be plain vegetable oil.
Step 5... Paint wooden structures with durable exterior paint.

Painting lining and planks
Step 6. Carefully cut the cover along the contour of the door. Take your time, the cut should be as even as possible.
Step 7. Screw the handle onto the lid.

This completes the process of making an elementary roof for a well. We have given an example of the simplest execution. You can, of course, make a complex roof with decorative elements, high and large, from expensive lumber, etc. If the well is located in front of the house and plays an important role in landscape design, then such significant material costs are justified. And if it is located behind the house or household outbuildings, then the design can be paid secondary attention, and the primary focus should be on the cost and functionality of the structure. The article gives advice on making exactly the second version of the roof for the well.
Prices for popular models of screwdrivers
Screwdrivers
Video - House for a well with your own hands
The roof of the house should protect it from precipitation and look beautiful. Bituminous shingles can cope with such tasks, which have a number of advantages: an affordable price, a variety of shapes and shades of shingles, and ease of installation. On our website you can find out that it will serve for more than one decade.
How often the attention of neighbors in the country is attracted by such a seemingly ordinary thing as a garden well. Nevertheless, there are times when this particular item becomes the object of close attention and admiration. In this case, we are talking about the external design of the well.
Most owners country houses does not attach much importance to the design side in this matter. Usually their "fantasy" is limited to digging a well and installing concrete rings.

But if someone really wants to transform the gray routine, he can easily turn his garden into a real fairy tale. This will require careful thought over garden landscape and install a beautiful well house as one of the garden design elements.

The need for construction for a well
What is the need for such a building? Is it a common decoration that could well be ignored or is its construction and installation really important.


The main task that such a structure performs is to create a protective effect for clean well water from dust, various debris, fallen leaves.

In addition, it is customary to spray the garden and vegetable garden in the spring and summer. Some summer residents prefer to use chemicals for this. At the time of treatment, spray can fly into the open space of the well.

All of the above factors are taken into account when there is a need to build a house on a well. Among other points, it is noted that if the well is closed, then the water in it does not freeze even when severe frosts begin.

After repeating, you can add the already well-known opinion that the construction on the well can become a decoration of the site, if you apply a creative approach to the work on its manufacture.


Well house installation options
Of course, the easiest way is to buy such a house on the construction market. The range of such structures is replete with its own assortment. From the simplest ones, sold at fairly low prices, to the expensive ones, representing a real artistic creation.

If the market is not attractive with its choice, you can make an order according to the corresponding catalog of wooden garden structures... Among the colorful pages with views, you will surely find a photo of a house for a well that you like, which can later be transformed into reality.

At the request of the client, craftsmen working with wooden structures can decorate the structure with beautiful carved figures, decorate using natural stones as decoration, ceramic tiles or other finishing materials.

It is the original forms of such structures and other exotic buildings that often become objects that attract everyone's attention with their originality, which naturally distinguishes the area on which they are located.

Independent work
No less often, the idea of buying or ordering a wooden structure is replaced by a completely reasonable decision to build a house for a well with your own hands.

All that is needed for this is to make a drawing and purchase the necessary tools and materials. The main building material will naturally be wood. It is easy to handle, looks great and will last a long time.


From building materials for the house you will need a certain amount timber, edged board, block house or wooden lining... Any of the latter two materials can be a great finishing touch.

The roof can be made of metal, polycarbonate or roofing material. As a coating, many use siding, profiled sheet, euro slate and other types of roofing surfaces.

The requirement for the top covering is that it must be light so that the installed support legs can freely support it.

Among the rest of the materials, you will need a log and a metal bar to make a gate. For wood processing, you will need to purchase antiseptic compounds, varnishes and paints. Next, you need a door and door hinges To her.


For a firm grip, short metal corners will be needed. Additionally, you will need metal bushings made from pipe trimming (2 pieces). A metal chain is required to lift the bucket.

The construction of the house begins with a detailed study of the drawing. Moreover, most of those who are going to build a well on their own, find drawings on construction sites. And of course they require detailed study. You can also find on the Internet there detailed technology performing such work, starting with the installation of the frame and ending with finishing work.

It's not that difficult if you approach the matter in good faith. As a result, a wooden miracle will be created with your own hands.

Photo of a house for a well


More recently, any piece of land on which people lived had a well. To this day, they are dug in plots to provide themselves with water for household needs. They are indispensable for summer cottages where water is centralized and supplied in limited quantities on a schedule. But even with the construction of a country house and the arrangement of a well, wells do not lose their relevance. By lowering a submersible pump in them, it is convenient to use water for irrigation, especially when there is a high level in the area. groundwater... It is important not only to protect children and animals by closing it with a lid, but also to give it aesthetics. The article will discuss how to make a head for a well with your own hands.
What is the head at the well for?
- The head is designed not only to protect household members from accidental falling into the well, but also to prevent debris from entering the water.
- If the well is planned to be exploited, and not turned into an art object, then it is necessary to provide for a convenient cover and a lifting mechanism. Thinking over a project, it is worth considering ease of use, and not just design and combination with the surrounding landscape.

- Manhole head designs can be closed or open. Their cost will depend not on the type, but on the materials used. But in an open well in winter, water can freeze, so for year-round use it is recommended to build in the form of a closed and insulated house.
- If desired, the open head of the well can also be made warm. In this case, not only the walls of the well itself are insulated, but also its cover. Choosing for this a moisture-resistant heat-insulating material, such as polystyrene or polystyrene foam.
Types of material for the head of the well
Traditional and modern finishing materials allow you to create not only functional, but also beautiful wells. They fit harmoniously into any landscape design, becoming his decoration.
- Stone... This is a time consuming and costly method for finishing a well head. But the result is very beautiful and solid. In addition, such a finishing material does not require any maintenance and will remain in its original form for many decades. A whole wall can be made of stone around the well, or it can only be used to decorate the head of the well made of concrete rings. In the second case, the cost will decrease several times, and the appearance will not lose.

- Wood... It will fit especially well into the landscape if there are already wooden structures on the site, for example, wooden house or a bath. Like stone, wooden tops can be of two types:
- made of real timber or logs, like the walls of a house;
- simply sheathed frame with imitation of a bar or block house.
- Regardless of the material chosen, a number of requirements are imposed on the head:
- Strong and reliable walls... To strengthen them, boards are attached along the upper perimeter, which simultaneously perform the function of an armored belt and a stand for water. In addition, they will protect the wooden cladding elements from water ingress.
- Cover presence... This will keep debris and insects out of the water. And it will save small children or animals from falling into it. Conveniently, if there is a hole in the lid for a hose, then you will not need to keep the hatch open to pump out water using the pump.
- Thermal insulation... It is needed if there is a need to use a well when the temperature is below -20 ° C. If in winter the temperature does not drop below 15 ° C, then there is no need for insulation.
- Vorotok. Even if the head of the well is needed only for decoration or it is planned to pump out water submersible pump, it is recommended to provide a functioning lifting mechanism. There is always a chance that it will come in handy.
The device of the head of the well in the form of a house
Why is a well house needed:
- it will protect the water intended for drinking from dust, leaves, insects, branches and other debris;
- the water will not bloom or evaporate from the summer heat;
- when using spraying chemicals in the garden, they will not settle on the cover of the well and will not get into the water;
- on frosty days the water will not freeze;
- when creating a beautiful head on the well, it will become a decoration of the site. To do this, it is decorated with carved or forged elements, which you can not only do with your own hands, but also buy ready-made ones. And in the decoration use natural stone and high-quality wood.
Having made a design and created a project on it, you can get to work.
Required materials tools
- The easiest way to work with wood, moreover, it is a natural material that will always fit into the garden landscape.
- Therefore, first of all, you need to purchase required amount timber with a section of 50x50 and 100x50 mm.
- For finishing, an edged board, block house or lining is used.
- Any roofing material is suitable for the roof, but it is good if it matches the roof on the gazebo or house. The lighter it is, the better - this ensures that the supports can withstand even heavy snowfalls.
- For the lifting mechanism (gate) you need a rounded log and a strong metal bar.
Well head drawing

- Considering that all wooden elements will be outdoors all year round, you need to stock up on special protective equipment.
- To fasten wooden parts in places where the greatest load will be on them, you need to buy metal corners.
- Hasp, handle, door hinges and fasteners (screws or nails).
- Bucket and chain.
- Saw or jigsaw, level, tape measure, screwdriver or hammer, pencil.
Stages of work to create a well house
- Depending on the chosen design, the frame of the walls and roof is made. He will carry the entire load. It is easier to assemble it on the ground and, ready-made, to be attached to the well.
- To calculate the size of the head around the concrete rings of the well, you need to measure their diameter. Based on the results obtained, a frame is assembled from a board with a section of 50x100 mm. When fastening parts, it is necessary to constantly check the vertical and horizontal with a level to avoid skewing.
- At the corners of the frame, vertical bars are attached, equal to the height of the head house. In addition, 2 more vertical bars are attached to the frame from two opposite sides and connected horizontally with a board from above, resulting in the ridge of the future roof. All vertical posts are also connected with bars with a section of 50x100 mm.

- From the ridge to the side harness, rafters are attached from a bar of 50x50 mm in increments of 40-50 cm. For a reliable and beautiful fastening, at the points of attachment to the ridge, the bars are cut off at an angle of 45 degrees. This can be done with a miter saw. For added strength, these places are fixed with metal corners. The excess rafters are cut off, not forgetting to leave the take-out.
- On the side where the door will open, you need to nail a strong and wide board (at least 300 mm). In the future, it will be convenient to put a bucket filled with water on it. For the rest of the sides, you can use narrower and thinner boards. Their function will be to securely fix the head on the well rings. This completes the assembly of the frame. It must be flat and solid.
- If the head of the well provides for insulation, then sheet moisture-resistant material is attached to the frame. To it, in turn, a slab insulation with high moisture-resistant characteristics is attached. It is desirable that they have a tongue / groove connection, which will exclude cold bridges and through freezing in these places.
- The next step is to mount a mechanism for lowering and raising a bucket of water. It is most convenient to make it from a piece of rounded log, the diameter of which should be 15-20 cm (the larger it is, the easier it will be to lift a full bucket). The length is selected individually, and depends on the size of the head of the well. On average, it should be only 5 cm shorter than the inner spacing between walls or posts. This will allow the collar to rotate unhindered.

- If there is no rounded log, then they take a simple one and clean it from wane, remove all irregularities, knots and grind it. The resulting workpiece is shortened to the desired size, and the edges are tightly wrapped with steel wire.
- Holes of 20 mm in diameter and 50 mm in depth are drilled from the ends. To protect the wood in these vulnerable places from decay, metal plates must be screwed on. The holes on them must match in diameter and location with those already drilled on the log.
- On the racks to which the lifting mechanism will be attached, similar holes are made with protection from metal plates. The only difference is that on the side with the lever you need to make a through hole.
- Metal bushings are inserted into both holes on the posts. And metal rods are driven into the log from the ends, the diameter is slightly smaller than the bushings. One will simply fix the log, and the second has an L-shaped handle for rotation. Then they attach and wind the chain, tying a bucket to the other end.

- The finished frame is sheathed with finishing material. If it is a block house or lining, then they have a tenon / groove connection, which ensures their snug fit. When using edged boards, even with the most careful fit, the formation of gaps cannot be avoided due to seasonal shrinkage of the wood and its cracking.
- Special stains or antiseptic impregnations will help protect wood from decay. It is also allowed to apply varnish, but only intended for use with sub-zero temperatures, otherwise it will all crack and begin to crumble.
- Alternatively, you can use plastic or metal siding. The latter not only completely repeats the appearance natural material but even has a similar texture.
- Next, they make a crate on the roof and be sure to attach a vapor barrier fabric. It will protect the roofing material from high humidity and condensation.
- Then the door is fixed. To do this, you need to choose dry wood in order to avoid deformation and curvature during further drying. Boards are nailed onto the frame, which act as a door frame.
- Having measured the size of the resulting hole, the frame of the future door is assembled on a flat surface, which should be slightly smaller. It must have right angles without curvature. The canvas is made from the same material as the house itself was sheathed. To give the frame rigidity, a rail with a section of 20x20 mm or more is screwed diagonally from the inside.
- Door hinges are attached to the wall and to the door, then it is hung and leveled. It is necessary to ensure that it closes easily and does not jam. After that, a handle and a lock are attached to it.
- The final stage is decorative finishing, if such is provided by the design.
Make a head for a well from stone
- Consider a method when the walls are laid out of brick, later revealing it with natural stone. In this case, the walls of the head will be erected according to the same principle as the walls of the house.
- The concrete ring protruding above the ground is cut down with a grinder to the desired level. And the foundation is poured along its perimeter.
- On concrete base put waterproofing, for example, roofing material. They start to do on top brickwork in the traditional way in 1 brick, with bandaging of the seams.

- After finishing the construction of the walls, they are covered with a film and left until the mortar sets. Thus, the base of the head on the well is done by hand. Now it's time to install the gate. If the posts of the supports for the lifting mechanism are also planned to be lined with decorative material in the future, then they are made from hollow bricks, cinder block or foam concrete.
- If the well is made of modern concrete rings, then lining it will be difficult. The fact is that factory concrete is more dense than with independent mixing of the solution, therefore, its surface is smooth, without pores and roughness.
- To give the necessary adhesion, it will have to be anchored on its own. WITH outside holes with a diameter of 5 mm are drilled in a chaotic manner to half the thickness of the concrete ring. The distance between them should vary between 10-15 cm.
- If you go deeper, then over time, the anchor can be exposed in this place. Then you need a masonry (reinforcing) mesh with a mesh size of 4-5 cm. It must be completely rounded around the ring, and the resulting allowance must be folded. But it should not fit snugly, the gap between metal mesh and leave 1 cm with a concrete ring. In the prepared grooves, bent pieces of wire with a diameter of 5 mm are driven in. A mesh is tied to the resulting anchors. This preparatory work will ensure that the base will withstand any weight of cladding material, from slab sandstone to boulders.

Cover a concrete well with wood
- Due to the heat-retaining properties of wood, there will be no problems with condensation in winter. It is thanks to these properties that since ancient times, wells were made from logs.
- First you need to make a frame around the concrete ring for fastening wooden planks... A solid shield is made on each side of the future well. For this, the frame is assembled. They are nailed to it tightly edged boards 25 mm thick. When all 4 shields are ready, they are coated with 2 coats of primer.
- They are applied to the well and the points are marked where the shields are in contact with the base. In the marked places, holes are made using a perforator and wooden blocks are fastened.

- Place the shield and screw on one top corner. Then, aligning it horizontally, screw the second side. Thus, the entire frame is attached. The resulting voids can be filled cement mortar with shavings. This guarantees protection even from severe and prolonged frosts.
- The finishing material begins to be attached to the resulting frame. Its choice is not limited by anything and depends only on the style of the site or personal preferences.
- Easily and quickly make an imitation of logs or timber using wood panels block house.
- It is better to start installation from the top. Since it is made of natural wood, the panels that are identical at first glance, during their installation, may be of different widths. This may be a very small difference, but asymmetrical joints form at the corners. Therefore, it is necessary to slowly adjust the panels, trying to avoid skewing in the drawing.

Siding or metal well head
- Unlike a wooden block house, plastic panels have ideal sizes and always connect exactly at the joints. But it must be remembered that the richer the color of the panel (for example, dark wood), the higher the likelihood that it will fade in the sun. When the well is in the shade of trees it is not scary, but for sunny areas it is better to choose light colors material.
- The frame for the cladding is prepared according to the method described above.
- Attach the siding from the bottom. First, the starting bar is screwed on. Its horizontal level must be checked with particular care. If there is a slight bias, it will immediately affect the appearance.
- Further, corner external profiles are attached to self-tapping screws. Their vertical is checked by level.
- Now I came through the fastening of the strips themselves. They are coming standard size 3 m, therefore, first measure the desired length and cut off. At the same time, do not forget about allowances of 1.5-2 cm, which will be inserted into the corner profiles. The first bar from the bottom clings to the starting bar, and from above it is screwed on with self-tapping screws. The next one is inserted into it and snaps into place, which is held from the bottom by the previous bar, and from above it is attached with self-tapping screws. So the whole well is sewn up. The top is finished according to the intended design.
Sewer well head
- Most country houses have autonomous sewerage, and often its installation provides that the upper part sewer well remains above the surface of the earth. In this case, he also needs decoration.

- The principle of wall cladding remains the same. The only difference is that it is not required to make racks for the lifting mechanism, and the height of the walls is much smaller.
- Sometimes it is enough to overlay it with large stones and make a decorative cover.
- Or they make circular brickwork, and a factory-made sewer hatch is laid on top.
In any case, it is not only beautiful, but also functional, as additional insulation is made.
Well head design
When choosing a well design, it is worth relying on the stylistic direction that is already on the site.
- Russian style. The most characteristic of this style is the head of the well in the form of a tower. For him, only real logs are used, and not their imitation. Carved wooden elements can be an additional decoration. It is better to put the same roofing material on the roof as on the house itself.

- Modern style... Its main feature is the use of modern, not traditional materials. Such a head of the well will be appropriate only if the house itself is made in high-tech style. Tiles are used for cladding, and the racks are made of metal.
- Chalet style... This is a European country style, so a combination of natural wood and stone works best for a well head. All materials should be deliberately rough, thick metal, stone boulders, textured wood. To make the design lighter, you can use forged lightweight elements.
- East style... The most popular among landscape designers are wells decorated in a minimalist Japanese style. The main feature is the head with hipped roof... Large stones and wood are selected to decorate the well. And here chinese style opposite, it is filled large quantities luxurious and exquisite jewelry. Therefore, for the walls of the head, choose bright colours, and the racks are made in the form of carvings of mythical characters.

In addition to traditional style solutions, there are many design options for the head of the well. They are distinguished by their versatility, which allows them to look good in any landscape design.
- Fairytale towers... It is deliberately bright, practically doll houses... They may be unusual shape decorated with bright finishing materials... You can strengthen associations with the help of spaced garden figurines gnomes or fairies.
- Sea style... To create it is quite simple, for this you need to take self-explanatory attributes, such as: a rope, a barrel (which can be instead of a bucket), an anchor, an aged tree, a steering wheel instead of a handle of a lifting mechanism. For decorative finishing figurines of anchors and sea animals are perfect.

- Painting with paints... This is the most a budget option, which is not limited in artistic motives. It is enough just to prime the concrete rings of the well with white and paint them. Or paint a brick or wood head with white paint and paint over.
But no matter how beautifully the head of the well is made, so that it looks harmonious, it must be surrounded by plants. To do this, around it, you can plant undersized flowering shrubs or create new compositions of flowering annuals every year. In addition, flowers can be arranged in large flowerpots. In this case, they can be rearranged several times over the summer. Plant compositions are suitable for a well made in any style.
The well house above the water source performs protective and decorative functions. Let's talk about what constructions are, how to make wood with your own hands and beautifully arrange a well house in the country. We have accompanied the article with drawings, photo and video materials.
Wells are fresh, cool water, as well as decoration of the site, especially if the headband is decorated beautiful house or a canopy. When choosing a design, you should build on other structures: a house, a fence, paths, gazebos, etc.
Types of well houses
The house above the well can be open or closed.
Closed - all sides are protected by walls and ceilings, preventing accidental ingress of precipitation, leaves or other into the water foreign objects... Access to the gate and water is closed by a door, which can be locked if desired. Such structures are sometimes insulated from the inside, especially if the winters are harsh and the water level in the well is high.

The open structure is a canopy with open or partially open sides. For safety and protection of water from debris, it is advisable to cover the well mouth with a removable cover.
Design and finishing
Various materials are used to make well houses:
- wood, straw, bamboo;
- metal;
- stones;
- decorative tiles;
- polycarbonate.
Often several materials are combined in one structure. If after the main construction there are facing, building or roofing materials, then their use will not only make it possible to save money, but also unite the buildings on the site into one ensemble.
See the photo for some compatible songs:
 The roof of the house and the shed are made of the same material
 Holistic composition with a paved platform
 Rustic version, unpainted wood in all buildings
 Imitation of a log house
 Tikhvin Assumption Monastery of the Theotokos
 Such a well needs a castle in the background.
 Consistent colors and style
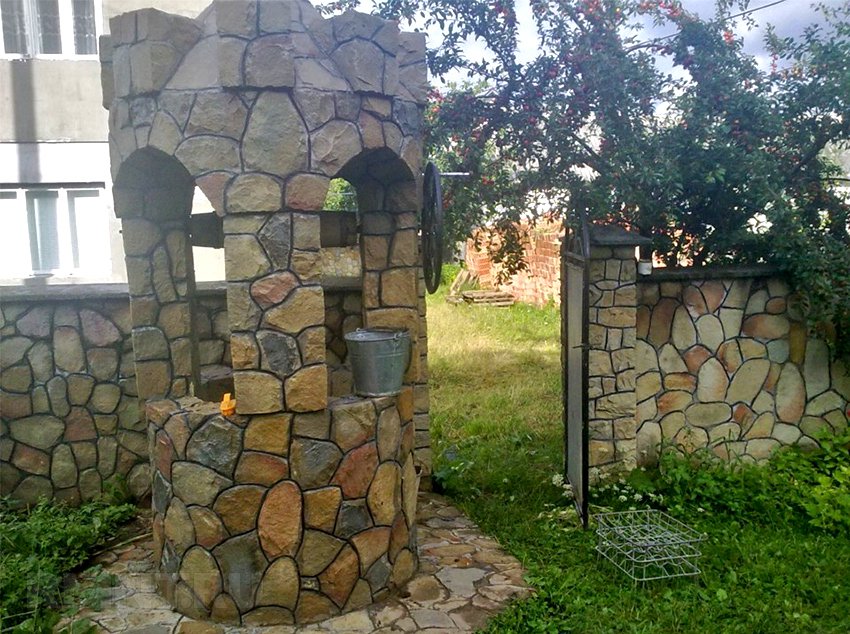
Main material - stone
Most often, the headband is trimmed with a stone, and the canopy is made of wood and metal. In this case, the stone can be natural and artificial, as well as imitation of a stone made of concrete. Sometimes the well tower is entirely made of natural stone such as sandstone.


Wooden houses
Wood well houses are the most common and fit into most home gardens. For their construction, lumber, logs, driftwood and branches without bark can be used as decoration. Wood is hygroscopic, so it will be correct to treat such materials with some hydrophobic agent and anti-decay agent.


Well houses made of metal
To decorate the well, you can use forged, openwork structures or sheet metal - galvanized, stainless or varnished. Not every owner will have forged products. country house, but a closed house made of sheet steel is quite simple to make yourself.


Polycarbonate for well houses
Polycarbonate is appropriate for use when garden gazebo, the veranda or awning above the car is made using this material. It goes well with metal frame, and can create a certain mood due to its color and relative transparency.


Original well houses
The fantasy of designers and craftsmen is sometimes simply amazing. We have prepared for you a selection of the most unusual well houses.


Specific style
If the entire site is designed in a certain, rare style, it can be difficult to find a well house to match it, because most often you can find ideas for the Russian or European style. We will provide some design options that would be appropriate for such specific styles.
 "Provence"
 "Japan"
 "Middle Ages"
 "Africa"
 "Greece"
 "Fairy Tale" (concrete, Anapa)
Gate construction
Russian shaft wells are equipped with a gate with a bucket attached to a chain or rope with an offset center of gravity (for easy scooping). The movement of the gate is transmitted by a rotating handle or a wheel. Also, the log can be supplemented with "fingers" - protrusions on its surface that serve as levers for turning. How bigger shoulder leverage, the less effort it will take to pull out a full bucket.
For deep wells, it is advisable to equip the gate with a band brake that controls the speed of lowering the bucket.
 Gate with a handle (a) and "fingers" (b)
A collar with a handle is made of a thick log, not less than 20 cm in diameter. On the one hand, a hole is drilled in it exactly in the center along the axis for a blind rod fixed to the support, and on the other, a deeper hole for a metal pin connected to a wheel or with a curved handle. The ends of the log can be reinforced with metal strips that are attached to opposite rods. The log should be firmly planted on the axle.
 Metal parts of the gate with a handle
 Metal parts of a gate with a wheel
 Photo with handle assembly
Making a well house with your own hands
You can make both an open and a closed well house with your own hands. Let's consider some simple constructions to manufacture.
Open house
When building an open house, it is important to remember that the canopy should be wider than the hole in the well and protect it from atmospheric precipitation, which may not be as clean as in the old days.
 Asymmetrical tent over the well
 Symmetrical tent over the well
Consider the device of a canopy over a stone well, representing the supports that are laid during the construction of the head, and the rafter structure, reinforced on the bases with spacers. The larger the canopy area, the larger the cross-section of the lumber you need to choose when manufacturing. The structure is covered with a layer of waterproofing in the form of roofing material and finishing or roofing material taste.
 Dimensional drawing - tent over the well: 1 - foundation masonry; 2 - rafters; 3 - rafter strapping; 4 - clamp for roofing material; 5 - struts; 6 - sheathing of rafters; 7 - roofing material; 8 - tiles; 9 - skate; 10 - end post; 11 - end coupler of rafters; 12 - double rafters under the brace; 13 - columnar support
Closed house
We will make a closed house with a simple gable construction, with minimal finishing. To do this, consider a drawing.
 Wireframe drawing with detail
First you need to prepare all the details, then we proceed to the assembly of the frame according to the attached diagram.
 Assembled frame: 1 - supports made symmetrically (see the previous drawing); 2 - jumpers (2 pcs.); 3 - strips forming a square platform (8 pcs.); 4 - skate (pay attention to the cuts)
From the ridge to the corners of the site, we mount the edges of the future gable roof. Having assembled the frame, we install it on the head.

Sewing up the central part, leaving a hatch for access to water. We mount the assembled gate on the supports.

We sew up the end walls with a board first, and then the roof slopes, in one of which we mount a rectangular door with a handle on hinges. We protect the edges of the roof with a waterproofing material.

We decorate the house with carved overlays. You can cover it with some other suitable material.
 Ready house
Somewhat more complex construction and decor during the construction of a fabulous well house in the video below.
Part 1
Part 2
D
The omik for the well is an important finishing element, it protects the water from atmospheric precipitation, direct sunlight (otherwise the water can "bloom"), a gate is installed in it for collecting water (of course, if the water is not pumped out by a pump).
Content:
1.
2.
3.
4.
5.
6.
7.
Basically, for the construction of houses for wells, a tree is used and it (the house) does not have to be done with your own hands, you can also buy or order it, the range is extensive. Such a house can be finished in almost the same way as an ordinary house and is done in almost the same way, only in a reduced version.
Let's find out how to make a house for a well with our own hands, what kind of house you can make and what is needed for this.
Materials for houses for a well
Materials for building a house are:
- Wood, incl. timber, board, lining;
- Natural and artificial stone, including brick (the lower rings are decorated with stone);
- Bituminous shingles, used for roof cladding;
- Any other material, the flight of imagination is not limited.
After looking at several photos and carefully examining the attachment points, you can already imagine how to make a wooden house for a well with your own hands.
Types (types) of houses for a well
The house can be open or closed, the closed house can also be insulated so that the water does not definitely freeze in winter.
Let's start from the very simple option house for a well with your own hands. The process is well described in the video below.
This option shows the structure of the house pretty well and it is quite easy to do it yourself, let's go further.
An "open" type of a well made of boards, a fairly simple option, the final version is shown in the video below, you can also build such a house yourself after examining the attachment points.
The video below shows the process of fitting and joining parts of a simple timber frame house. Such a frame is sewn up with moisture-resistant sheet material and in this case it is finished with clapboard and painted.
The video below shows a house for a well, decorated with a wild stone, or rather, not the house itself, but its lower part, a ring.
Fastening the house to the well
First, the lower frame is assembled, the so-called. mauerlat, when compared to the roof. The standard ring thickness is 80 mm. Bars or boards in half a tree or at an angle of 45 degrees or end-to-end are fastened in the corners with self-tapping screws or metal fasteners, resulting in an even square. You can use what is available, there are many options. The main thing is to assemble a strong frame that will hold on to the rings. The frame can be attached to the rings or not. It is important to make the mount removable so that it is possible to remove the house, because the well may require.

In the photo below, the frame rests with stands on the ring, and the lower belt is put on it. Practically in space, such a house cannot be accidentally moved from its place.

Another option is when the frame is put on the ring and attached to the ring with screws and dowels on the sides. The screws can be tightened and the house removed.

In the photo below, the frame is on a ring. If it is not fastened to the ring, the house can be moved accidentally, with a blow. Such a fastening is not reliable enough, it is still advisable to fix the lower belt on the ring with the help of anchors directly to the ring from above, the diameter of the dowels should not exceed 6-8 mm, because there is a risk of damaging the ring during drilling. Or make the frame of the mount from below, which will hold the house on the ring, for example, as in the photo. Be sure to provide for the possibility of removing the house, if you do not want to disassemble it with a possible cleaning of the well.

These are the main options for attaching a wooden house to a well, let's move on to the structure of the frame.
Diy frame of a house for a well

It is important to make sure that the lower belt protrudes 2-3 cm beyond the border of the ring, so it will be more convenient to make the facing. We pass to the racks and rafters.
We cut out and assemble racks and rafters, examples of structures are well shown in the illustrations, you can choose any one or come up with your own based on them. It is important to observe the dimensions and places of abutment to draw up as carefully and evenly as possible. Be sure to check the evenness of the structure with a level and / or rail so that its shape is as perfect as possible, otherwise you may end up with a crooked house.
For fastening, we use self-tapping screws and metal plates and corners. On the lower chord, you can install braces, which will give strength to the structure, as shown in the second photo. At the stage of designing the frame, it is important not to forget to provide a place for the door through which we will take water and inspect the well.
Having assembled and installed the structure on the well, we begin the sheathing and finishing.
Sheathing and finishing of a house for a well
For cladding, various wood materials, such as: block house, lining, or edged board.
For better fastening facing, it is necessary to make a crate, so that there is where to nail it and it does not bend under pressure. You can also initially revet the frame with a moisture-resistant OSB (for example), and already attach, say, a lining to it.
Also, the house can be revetted with a profiled sheet or with ordinary sheet metal, necessarily galvanized. For sheet metal, preliminary cladding with sheet materials is required.
What you need to pay attention to. For even cutting of materials. You need to cut off boards and lining exactly.
Above you need to install a skate. The ridge can be made of wood or metal. It can also be decorative, curly. It is necessary so that water does not get inside, under the lining and into the well itself.
You can also revet the house in the place where the ring will be. Make, so to speak, a table in which there will be a hole in the well. Or make a bucket shelf. The photo below shows how it should look approximately. Is not mandatory procedure, but, perhaps, in some cases it is convenient.
The veneer is done on the frame that we have created. If sheathing with bituminous tiles or any other sheet material is used, sheet material is previously fixed to the frame - OSB or plywood. Cladding is performed on it. If boards or lining are used, sheet material is not required, and in the case of boards, it is not needed.

The easiest option for finishing a house for a well is with edged boards
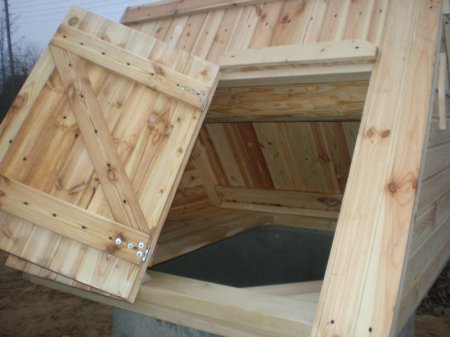
The door is a board made of boards, hinged to the house. It is not difficult to assemble such a door, the main thing is to calculate all the dimensions and first prepare the frame of the house for installing the door - on the frame of the house it is imperative to provide a frame of bars for installing the door.
The photo below shows different options doors and a frame for them, they are all made according to the same principle.