How to make a staircase to the second floor. A ladder with your own hands is easy (step-by-step instructions for making) How to make a wooden ladder correctly
The material from which the stairs are made can be different - wood, iron, concrete, or a combination of these materials. But most often, wood is used to build stairs.
Any structure must be safe to move on it. To do this, before building a staircase, it is necessary to perform its calculations, based on what type of staircase construction is supposed to be.
To calculate a wooden staircase, you should do the following:
- Determine the height of the interfloor space, from floor to ceiling, taking into account interfloor overlap, and determine the area that will be allocated for the stairs.
- Determine the number of steps in the staircase, based on their tread depth, riser height, and the angle of inclination of the staircase. Typically, the riser height is 150-200 mm, and the optimal riser width is usually 250-320 mm.
- It is also necessary to take into account the height of the clearance between the horizontal plane of the steps and the lowest part of the ceiling structure, this is necessary so that a person, going up or down the stairs, does not touch the ceiling structures with his head.
General examples of drawings for a wooden staircase
Before making any drawings in dwg format, you need to select the type of stairs.

It is necessary to perform certain measurements and calculations, and determine the general parameters of the stairs:
- The angle of elevation of the stairs, this parameter is usually in the range of 23 - 37 degrees.
- The minimum height between the ceiling and the steps must be at least 2 m.
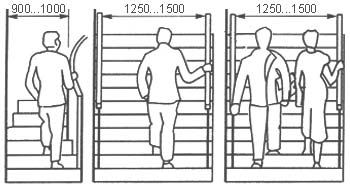
- The width of the staircase itself must be at least 1 meter.
After determining all the parameters, you need to draw a floor plan, on which it is necessary to mark the location of the staircase and all its dimensions with reference to the floor plan. Separately, it is worth making a general drawing of the entire staircase for a better understanding of all the necessary parameters.
All drawings can be done manually, but in order to avoid mistakes, it is best to make all drawings online using a special calculator.
If a person finds it difficult to independently create a drawing of a ladder, you can use ready-made drawings and ladder diagrams, print them out, and choose the most optimal option. But, this must be done even at the stage of building a house, since under finished building picking up a drawing will be difficult.
Detailed and general description of the online calculation of wooden stairs
To calculate all the necessary parameters for creating with your own hands, you need to remove all dimensions, such as the height between the floors, the area that will be allocated for the stairs, the angle of its inclination, the length of the opening, the number of steps.

To calculate a ladder made of wood, it is best to use special online calculators or with special utilities:
- Various utilities also allow you to calculate, view, including in 3D format, and, if necessary, edit everything and redo all diagrams and drawings. You can even create a diagram of the whole house in such utilities, as well as draw a staircase and see how everything will look on a virtual model.
- When, it is necessary to decide on the type of staircase, it can be one-flight, two-flight, spiral, staircase with a 180-degree turntable, etc. and for each type of ladder, its own calculation is required.
That is why you should use special online calculators or special utilities, which is much more profitable and easier even for novice builders.
Drawing base for a staircase made of wood
The main advantage of a wooden staircase is its relative lightness, environmental friendliness, besides, wood is easy to process, and a wooden staircase will look optimal in a country wooden house.

But, before making a staircase to the second floor of the house, it is necessary to make a drawing of the staircase, on which all parameters will be taken into account:
- Based on the drawings, markup is made wooden blanks, from which the staircase will subsequently be assembled. All dimensions that will be on paper are transferred to the blanks, and they are sawn according to the markings applied.
- But, before making drawings and cutting the material and the subsequent assembly of the stairs, you should evaluate your strengths, since not everyone can correctly draw up a drawing and correctly cut all the material.
Before making a drawing, it is necessary to measure the place in the room where the stairs will be located. This is the height from floor to ceiling, the width of the overlap, you should also take into account the type of stairs, the angle of its inclination, the fastening system, etc.
Without these data, it will be almost impossible to make a drawing of a staircase, and even more so, to make it.
The principle of drawing up a drawing of a wooden staircase to the second floor
Houses are built two-story, three-story, and, in order to move between floors, it is necessary to equip a staircase.

The manufacture of any staircase begins with determining its type, it can be:
- Spiral or spiral staircase, one-flight classical staircase, two-flight staircase with a turn, etc .;
- Also, a staircase, in addition to its main function of ascending or descending, can be almost invisible in the room, or, on the contrary, stand out in the interior, and even serve as a decorative decoration.
Therefore, before you start, you need to choose its type, after that it is worth sketching a plan of the house, the staircase itself and see how this or that type of staircase will look on the diagram. If the person is satisfied with everything, you can start creating detailed drawings of the stairs.
When creating a drawing, one should take into account all previously made measurements, the angle of inclination, the width and height of the steps, the width of the staircase itself, if it is supposed to make a fence, then it should also be depicted in the drawing.
Diagrams and drawings for making wooden stairs with your own hands
The ladder is required element houses, it provides a connection between floors, and the staircase must ensure comfortable movement along it, be safe and fit into the interior of the room. The stairs should be planned and built based on building codes, and accurate calculations and drawings are also required, since if this is not done, then later, during manufacture, errors may be detected.

Nuances that will prevent reworking the entire structure, unnecessary consumption of materials and time:
- Before creating drawings, you need to decide on the type of stairs, look different examples, and choose the one that most fully meets all the requirements. After that, you can start creating drawings, and plan the arrangement of the stairs in one place or another in the house.
- Before creating a drawing, you should first measure it, this is the height from floor to ceiling, taking into account the interfloor partition. And also calculate the number of steps, their width, height and angle of inclination of the stairs, etc.
- In the drawing, you should not only display all the dimensions of the stairs, but also indicate the railing, their height.
It is also worth drawing a general diagram of the house, which will display the location of the stairs with an indication of the occupied area.
Such a scheme will allow you to better understand how the finished staircase will look like, and will allow you to double-check all the calculations before making the staircase.
Based on the drawings, it is best for a novice builder to start making the simplest staircase using a load-bearing beam - a kosour. Their number in the stairs can range from 1 to 3.
Diy ladder made of wood: calculations (video)
When building a multi-storey building, it is necessary to arrange stairs so that you can get from floor to floor comfortably and safely for the health of residents.
If you have already built two-storey house or you are the owner of a two-level apartment, then the topic of building a staircase on the second floor will be of interest to you.
In order to acquire a comfortable and high-quality staircase system, you have only three ways: buy a ready-made structure in specialized store, order the necessary model to the master of carpentry, make a ladder with your own hands.
For those who have chosen the third option, this article is devoted. In it you will recognize the mass useful information about the staircase, and also get acquainted with the step by step detailed instructions for making stairs in photos and videos.
For owners of a two-level dwelling, a staircase on the second floor is a necessary attribute of the interior.
What are the stairs - a little theory
Before you start building a staircase with your own hands, you need to decide on the type of construction that will be most suitable for your home.
Types of stairs by design type
We will choose a system of three types:
- Marching.
- Screw.
- Combined.
Let's figure it out a little with each of them.
Marching
This type is the easiest to manufacture and therefore, if you decide to make a ladder with your own hands, then this option will be the most suitable for you.
 Single-march designs, despite their apparent simplicity, can be beautiful and effective
 Marching stairs, in turn, are divided into types:
- one-march;
- two-flight;
- multi-march.

Both the first and the second type are considered not difficult to manufacture and are in greatest demand.
Screw
These staircases are like a spiral going up to the second floor. This type saves a lot of room space, but it is laborious to manufacture.
 The spiral staircase is original and beautiful, but it is better to entrust its production to professionals
 Combined
These systems combine the two previous types. Their manufacture is the most difficult and therefore not suitable for self-erection.
 Combined systems are more complex in production and it will be quite difficult for a beginner to mount them.
 We make a ladder with our own hands - instructions for making
First, we will decide on the material of manufacture and prepare the tool necessary for work.
Material selection
For the production of a staircase, you can choose:
- wood;
- stone;
- concrete;
- metal;
- plastic.
 A variety of materials can be used to make stairs.
 The most suitable material for self-made stairs is definitely natural wood... Its advantages are obvious:
- environmental friendliness and safety;
- non-toxicity;
- ease of processing;
- relatively economical price;
- long service life.
Therefore, we will choose natural wood for the construction of our staircase. Best of all, if it is pine wood - spruce, pine. You can also use ash, beech, maple, oak, birch and other species.
 Natural wood is the most the best choice for making stairs with your own hands
 So, we have decided on the type of structure to be erected - this is a flight staircase. We also chose the easiest to process and environmentally friendly material - natural wood. The next point is to prepare the necessary tool.
Cooking the tool
To make a wooden staircase with our own hands, we need:
- Measuring devices - tape measure, ruler, level.
- Hand-held electric drill.
- A hacksaw for woodworking.
- Screwdriver.
- Hammer.
- Electric planer.
- Sandpaper.
 Optimal set necessary tools
 Cooking basic elements
Before installing the ladder system, the following parts must be prepared:
- Processed boards of the required dimensions (in accordance with the drawing).
- Bars for the production of steps.
- Boards for steps.
- Bowstrings or stringers (depending on the type of construction).
- Railings, balusters, handrails - these parts can be bought ready-made.
- Fasteners - screws, screws, bolts.
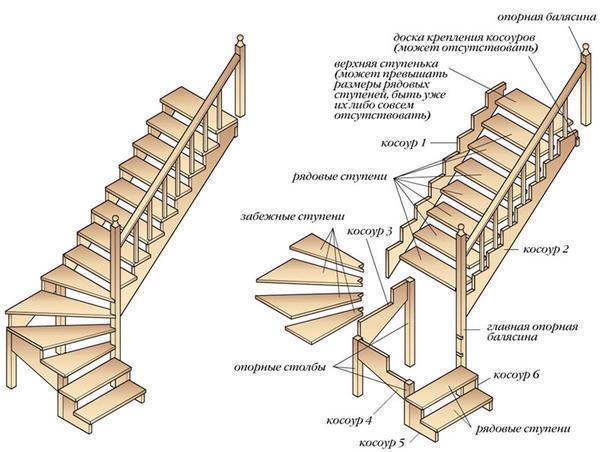
 This figure shows in detail all the components of the structure.
 The main stages of installation
In order to make a high-quality staircase with your own hands, use the following manufacturing instructions in photos and videos.
Stage 1. Schematic drawing
Let's draw a drawing in which we will designate the main elements of the future structure.

Stage 2. We carry out the necessary calculations
Performing design calculations is probably the most exhausting process, but it still needs to be done. This can be done in a few steps:
- we determine the height of the structure - to calculate it, measure the distance from the plane of the floor of the first level to the floor of the second floor. This will be the length of the march;
- we determine the height of the steps - usually the most optimal height for a person of average height 17 centimeters;
- we will calculate how many steps and risers are needed - for this, the height of the stairs, which we have already measured, is divided by the height of the steps (17 cm);
 Before making a ladder, it must be calculated.
 - step width - for ease of walking smallest value this parameter should be 22 cm, and the largest should be 40 cm.

Stage 3. Making a kosour
We cut the beam prepared for this part to the required size and cut out the notches of the required size for installing the steps.

Stage 4. Checking the stringer
To do this, we attach it to the place where the stairs will be located, if necessary, we make adjustments to the part.
 This diagram shows detailed calculations of the kosour
 Stage 5. We fasten the stringers
We attach the stringers and fasten them together to the upper beam using anchor bolts.
 We fasten the stringers securely with anchor bolts
 Stage 6. Installation of risers
The risers are attached to the stringer using self-tapping screws.
Make a ladder with your own hands.
You can do everything with your own hands if you have hands where you need to, there is a set of tools and, most importantly, you want to make wooden stairs with your own hands. In this case, this article will allow you to try making stairs with your own hands and make a simple staircase to the veranda, which will cost as much as a budget staircase, when you make a simple staircase, a spiral staircase with your own hands will also be within your power. During the DIY ladder process, you will have to decide whole line questions: technical calculation of the staircase, it would be nice to sketch a simple diagram of the staircase with your own hands, a drawing of what you will do when you decide to make wooden stairs with your own hands. To make a ladder yourself, you will need tools: a hacksaw, a building level, a plane, sandpaper, a metal ruler, a pencil, a hammer, paint brushes, drill, screwdriver. From materials for the process "do-it-yourself stairs in the house" you will need: wooden planks 100x20x2.5cm, timber 150x25x5cm, timber 100x5x5cm, to make balusters with your own hands, nails 10cm, 7cm, screws L = 10.15cm, drying oil, stain, varnish, anti-decay impregnation, impregnation against woodworms. In the course of work, you may need some more tools, but a very complex and special tool is not used in the construction of a staircase, so there will be no special problems with finding it (not provided) If you cannot make a drawing for the construction of a concrete staircase yourself and a concrete staircase is "too tough for you", use the projects of wooden staircases in Kiev, with their help you can make wooden staircases with your own hands, including you can get a wonderful modular staircase.
Photo stairs.  So, we are building a staircase with our own hands. First of all, you need to calculate the stairs, think over the size of the stairs, the design of the stairs and define the terms. The calculation of a staircase for a wooden house is needed so that it is convenient to climb it, in addition, the staircase must meet very specific safety requirements, which are spelled out in regulatory documents... We will not bother you with the study of these documents, and we will give the basic requirements along the story as make a ladder with your own hands... Now about the terms. Here are the main components that any staircase has a detail: degrees, under steps, kosour, handrails. Kosour is the main bearing part of the staircase, it is on it that the main load occurs when people walk on the stairs, there are staircase options without steps, but this greatly weakens the structure, so we will consider the option DIY stairs in the house (photo) under the steps. More clearly about the elements of wooden stairs in the photo below, you can immediately see the approximate design of the stairs.
Photo stairs.
We have defined the terms. Now we need to set the dimensions stairs made of wood hands (photo): the width of the stairs, the width of the step, the angle of inclination and the height under the steps. If we talk about the width of the stairs, then they usually take a width of at least a meter, this is necessary so that furniture, household appliances, and so on can be brought into the house. In our case, the width is set by the overhang of the terrace or veranda. We recommend reading the article on bathroom design.
Calculation of the angle of inclination of the stairs, the width and height of the steps DIY wooden staircase (photo).
Determine the height of the stairs. To do this, we fix a straight board on the terrace, like the beginning of the staircase in the photos below, check the horizontal, adjust the horizontal if necessary and measure the height of our staircase. To prevent the level from falling, it is fixed with tape on the board. In our example, the ladder height is 145 centimeters.
Making stairs with your own hands 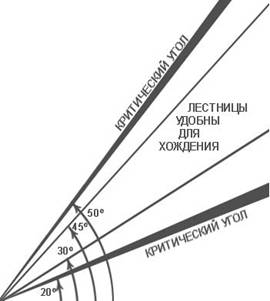 About the angle of inclination of the stairs. The angle of inclination of any staircase is regulated by the norms and has a range of angles from 30 to 45 degrees. If you begin to deviate from these rules, then when you make the stairs, you will notice that the angle is less than 30 degrees, it is dangerous to walk, the angle is more than 45 degrees, the stairs will take up a lot of space. The angle of inclination of a particular staircase is determined individually, depending on the number of steps and their height. The approximate ratio is summarized in the staircase table for the house.
Go see the similarities.
As practice shows, lestnica with a step height in the range of 140/170 mm and a tread width of 300/370 mm is the most convenient and safest for movement. This is explained by the following. The width of the step is taken along the length of the foot of the average person, and the height of the step corresponds to the step height of the average person. The higher you make the steps, the wider its width will be and vice versa. But there is a rule - width 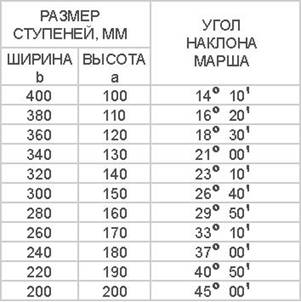 the minimum step corresponds to its height.
If you get very narrow standard round steps, then this is not very good for safety, but you can add another 20/40 mm to their width due to the projections. Do not forget that we said at the beginning of this article about the width of the entire staircase, the most comfortable width is 1 meter, but if conditions do not allow you, you can reduce it to 70 centimeters, usually this is done for house projects in a narrow area, make the width no less recommended. Our staircase has seven steps, the eighth step of the staircase in DIY cottages is the surface of the terrace.
Diy ladder, photo diagrams and drawings.
Making a kosour DIY stairs in a wooden house.
 We need to see how you will attach the braid to the terrace. Mono support it on the beams of the terrace, or make the beams fly out from under the platform. This should be done locally. In addition, the best option for a platform on which a wooden staircase will be supported is concrete. Need to take wooden bar, mark it as shown in the first photo, and cut out the grooves under the steps, in no case cutting them, the notch points will be stress concentrators, along which the staircase can collapse. First, make one braid and then, using it as a template, mark the rest, in our example, four braids. As you can see from the photo, the more braids, the stronger the structure will be. Seating corners
 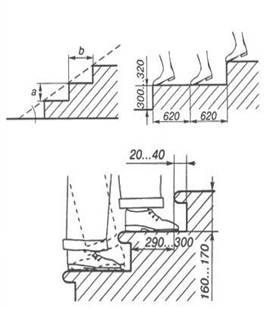 under the steps, knock down with a plane 4/5 mm. This is necessary for a good fit of the steps and under the steps to the braid. Having installed the kosoura in place, you can mount the steps into the house, not forgetting about the overhangs of the steps, if they are narrow.
Ladders clip art.
Installation of balusters.
Wooden balusters drawings sizes of options, of which there are a lot and mount the handrail last, you can make metal balusters, but that's another topic. How do-it-yourself bolasins are very clearly visible in the second photo of the article, there is also a diagram of the installation of balusters.  Finally, I note that it is necessary to impregnate all the wooden parts with impregnation from woodworm, decay, treat with a plane and sand the surfaces, soak them with linseed oil and, after installation, open them with varnish. Wood under the kosuor, under the steps, handrails - pine. Under the steps and balusters and pillars, the best way- oak board and beams. The scope of our article cannot include different options wooden stairs in the interior photos can be viewed on the net.
Consider such a simple and unpretentious thing that is in every home like a wooden ladder. Many people make it on their own, and almost everyone has encountered a situation where it failed.
Most makeshift stairs are unsafe. It is good if the crossbar comes off, and the leg slides to the next, lower one. But in many cases, a fall from a height can cause serious injury. To prevent this from happening, consider how to make a do-it-yourself ladder made of wood correctly.
What are the parts of the stairs called
To make it easier to cover the topic, here are the generally accepted terms that denote its details.
There are only two of them:
- the rungs on which we step or grasp with our hands are called steps;
- the long bars to which the steps are attached are bowstrings.
Attention. It is more correct to climb the stairs holding on to the bowstrings, not the steps. Although a ladder is used by one person, many fire escapes have the exact same design. When, in an emergency, several people move along the stairs one after the other, then the one who holds on to the bowstrings does not risk falling off, because the one above will press his hands.
Why Most Ladders Are Wrong

Almost every wooden staircase is constructed as follows:
- They find bars and slats or even poles of a suitable section.
- Cut the material to size.
- Everything is knocked down by nails.
The worst case, shown in the photo above, usually looks more beautiful. This is a dangerous and wrong approach. The nail that secures the step can break from time and corrosion, or push through the wood, which will lead to the destruction of the joint.
Fastening with several nails, the use of screws, through bolts and nuts does not save the situation. Also, if the section is chosen incorrectly, or the material is defective, then the step or bowstring, especially near a long staircase, may break.
Ladder requirements

Wooden stairs used in production must comply with regulations.
Here are the names of several of them:
- SNiP 12 - 03 - 2001: Labor protection in construction.
- POT RM-012-2000: Labor protection rules for high-altitude work.
- GOST 24258 - 88: Technical conditions on means of paving.
We will not invent anything new, we will apply them to our home construction. Our attached wooden ladder, drawings and materials for it, the assembly method will fully correspond to them. Let's list the basic requirements.
Requirements for materials
- Steps and bowstrings of stairs must support a weight of at least 120 kg.
- Elements of stairs are made of pine, in extreme cases, the steps can be made of hardwood (birch, beech, ash, oak).
- The inclination of the fibers is not allowed more than 7%.
- The wood must be free from defects violating its strength characteristics - cracks, knots sawn along the axis, curls, resin pockets. There should be no core tubes in the bowstrings.

- Staircase elements are made from solid pieces of wood... As an exception, it is allowed to be made from strips glued to the full length. At the same time, glued laminated timber should not be inferior in strength to a solid mass, and should not have delamination and swelling at the joints.

- Outside surfaces must be looped and have no bumps and scuffs.
Construction requirements

- Wooden stairs are not made longer than 5 meters.
- On the upper outer edge of rectangular steps, a chamfer of at least 2 mm must be removed.
- The bowstrings should be tied before the first and after the last step, as well as every 2 meters of length between themselves with steel ties with a diameter of at least 2 mm on nuts with washers.
- The minimum section of the steps is 2x4 centimeters.
- Step steps no more than 0.35 meters.
- The assembly of steps and bowstrings is made into a thorn. Connection with metal fasteners is allowed, with the deepening of the steps into the grooves selected in the staircase array. When assembling into a thorn, use a glue that is resistant to moisture.


Safety requirements
- There should be no protruding wooden and metal elements, all parts are buried flush.
- If the ladder rests on the ground, then a forging with metal spikes is installed at the bottom of the bowstrings to prevent slipping. With the same purpose for working on hard surfaces (concrete, parquet, ceramic tile) at the bottom, install rubber shoes or pads.
- When supporting the upper part of the ladder on pipes or similar parts, metal hooks are installed at the top to ensure reliable fixation and prevent overturning.

If you comply with all these requirements, then your ladder will be reliable - but in addition, be sure to carry out a test (we will talk about the method a little below). But if you have the desire and ability, you can additionally carry out the calculation of the structure.
Stair strength calculation

We will try to make our calculation instructions understandable even to people without technical education, who are not familiar with the basics of strength of materials and theoretical mechanics. We give the terms, but this is to make it clear to specialists (or so that they do not swear). Just take your measurements for the calculation. We carry out the following steps.
Preparing the initial data
- Determine how our wooden ladder will look like, do-it-yourself drawings, it is not necessary to make drawings, just sketches (sketches or as they are called by the engineers "crocs"), which will have all the dimensions. We get the cross-section of steps 3.5x5 cm, length 50 cm.Cross-section of strings 4x9 cm, length 240 cm.

- For pine with a moisture content of 15% (average value under normal operating conditions), the tensile strength is taken to be 100.8 kgf / cm2 (10.08 MPa). If other breeds will be used, then this value can be found in reference books or on the net.
- The modulus of elasticity of pine wood is 100,000 kg / cm2.
- We take the load that we will apply during the test and which the standards require (the average person is much lighter) - 120 kg.
We calculate the steps

- We calculate the gross moment of resistance for this, we multiply the width of the section of the step by the square of its height and divide by six: 3.5x5 2/6 = 14.58 cm 3.
- We calculate the maximum bending moment. To do this, we divide the static load (weight) by eight and the resulting number is multiplied by the difference between the double step length (50 cm) with the subtracted length of the section on which the load is applied (this section is equal to the width of a person's sole 10 cm): x (2x50-10) = 1350 kg x cm.
- We determine the design stress from bending, for this we divide the maximum bending moment by the gross resistance moment: 1350 / 14.58 = 92.59 kgf / cm2.
The resulting value is 92.59 kgf / cm2, less than the tensile strength of pine wood 100.8 kgf / cm2, which means the step will withstand.
We count the bowstrings
For bowstrings, the load is applied pointwise, at the point of attachment of the step, we also take only half of the weight of 60 kg (two strings).
- We calculate the gross moment of resistance: 4 * 9 2/6 = 54 cm3.
- We calculate the maximum bending moment: = 3600 kgf x cm.
- Determine the design bending stress: 36000/54 = 66.67 kgf / cm2.
It also turned out less than 100.8 kgf / cm2, which means that our bowstrings will not break. It is also advisable to additionally calculate the deflection, for steps it is in any case insignificant, and for bowstrings it is important.
- To do this, we calculate the moment of inertia of the cross section. It is equal to the width of the section multiplied by the cube of the height and divided by 12: 4x9 3/12 = 243 cm4.
- According to SNiP, it must be greater than that determined by the formula:. In this formula: P - applied load (60 kg), L - length (240 cm), E - modulus of elasticity - 100,000 kg / cm2. We consider = 108 cm4.
243 cm4 is two times more than 108 cm4, which means that the deflection of our bowstrings corresponds to SNiP.
We make a ladder

After we have decided on the requirements for a safe ladder, determined its dimensions and even calculated, we can start manufacturing. We need a minimum set of materials, the price for them is also small.
- A bar for steps and strings.
- Tie wire or even better long studs with ready-made threads.
- Nuts and washers.
- Rubber shoes, rubber chunks, or pre-fabricated spiked bottom fittings. If you need hooks on top, then they are accordingly.
- Screws.
- Assembly adhesive.
- Drying oil and paint.
A set of tools can also be minimal, especially if the timber we already have the desired section, but it is more convenient if there is a circular saw and a planer nearby. We need:
- Marking devices - pencil, ruler, tape measure, square.
- Hacksaws for wood and metal.
- Plane.
- Mallet or rubber mallet.
- Chisels and chisels, or better a wood milling machine.
- Drill.
- Spanners.
- Dies with a knob.
- Sandpaper.
- Brushes for applying glue, varnish and paint.
We will describe the manufacture of a wooden ladder with our own hands according to the operations:
- We process blanks for the desired section.
- With the help of a planer or machine, we make their surface smooth.
- We mark the required length of the bars, while, if our staircase narrows slightly towards the top, we take into account that the steps will be of different lengths.

- We cut the material to size.
- We mark holes (if assembled into a thorn) or niches (if assembled with a notch) under the steps in the bowstrings. At the same time, if we are going to install steps in a thorn, then two options are possible - to cut them into the bowstring over the entire cross-sectional area (easier and faster) or make a thorn a little smaller (more laborious).
- If we plan to cut the steps into the thorn not with the entire cross-sectional area, then we prepare the thorns on them. This is the most laborious and time consuming process. It is necessary, strictly in accordance with the shape of the holes on the bowstrings, to remove the material from the bars of the steps, the process becomes more complicated if the staircase has a variable width (tapers upwards). The easiest way to do the job is to use ready-made holes on the bowstrings as templates. Take this operation especially responsibly, the spike should enter the hole without backlash.
- We join the steps with the bowstrings. If we do it with a tie-in into the groove, then we install them in the grooves and fasten them with screws or nails. For reliability, we use two fasteners for each joint. Additionally, you can grease the joint with glue. If we assemble into a thorn, then we immediately install the steps in one string (for glue, in addition, you can also use a nail or a screw, the main thing is that it does not split the material). Do not use blades, cloth, or other material for a snug fit. If the spike comes in with a gap, then we redo it. When the steps are glued into one string, we also join them with the second in the same way.
- After joining the steps with the bowstrings, we drill holes for the ties, and their diameter must match the diameter of the wire or studs. Having drilled them, with a drill with a diameter equal to the size of the washer, on the outer sides of the bowstrings, select a hole in order to drown the washer with a nut. Its depth is equal to the sum of the thickness of the latter.
- We cut the studs or wire to size for the screeds. On the wire, using a die, we cut a thread from both ends, turning it into a hairpin.
- To prevent corrosion, we paint or varnish the studs. You need to do this in advance, because this part of them will be hidden in the array of the tree. At the same time, we do not touch the thread.
- We install the screeds in place. We put a washer under each nut. We tighten, controlling the effort so as not to push the tree and not create unnecessary pressure on the steps (the main task of the screeds is to prevent the spontaneous opening of the bowstrings).
- Using a hacksaw for metal, remove the protruding parts of the pins. We carry out the same operation with the ends of the steps. Additionally (not metal, of course), the joints can be processed with a plane.
- We install rubber shoes or pads, spikes and, if necessary, hooks. We attach them to screws.
- Finally, we finish the surfaces with a plane and sandpaper (if possible with a grinder), you can use a cycle.
- We cover the surfaces with varnish or paint, the tree can be simply polyfilled.
Our ladder is ready, but in order to be sure of its reliability, you need to test it.
Videos in this article:
Ladder test

In production, this operation is carried out with each staircase after manufacture and every six months (it is not bad to do this at home), especially since the operation is simple.
- The ladder is installed at an angle of 75 degrees (plus or minus five), this is its working position.
- In the middle of one of the steps of the middle part, a static load of 120 kg is applied (the load is hung). Moreover, it should be suspended through a rigid pad covering 10 centimeters of the step width (imitation of the load from the foot).
- Examine the stairs.
If there is no loss of strength and no damage is visible, the ladder is considered to have passed the test.
Advice. In production, the test result is recorded in a special journal. It indicates the date of the test, the inventory number, affiliation to the unit and the date of the next test. The record is certified by the signature of the responsible person. Take note of this if you are responsible for the safety of your employees at work.
I hope in our article we have given an exhaustive answer to the question - how to make an attached wooden stairs? The ladder made in accordance with our recommendations will be truly reliable and safe. Enjoy working on it.
A wooden staircase with your own hands is quite simple to make. However, there are a number of nuances on which the convenience and even safety of movement depends. I will tell you about all the intricacies of building a wooden structure so that you do not make mistakes in the process.
All work on the manufacture of stairs can be roughly divided into two main stages:
- Design;
- Assembling the structure.
Design
Ladder is enough complex construction, therefore, it is simply impossible to make it with high quality without a detailed project, especially for a beginner. The design process can be broken down into three main phases:

Stage 1: defining the type of construction
All existing types of stairs can be roughly divided into two types:
- Screw. The peculiarity of such structures is that they contain only end-to-end steps located around the central pillar. It is advisable to use them if there is a minimum of space in the room.
Keep in mind that such ladders are inconvenient to operate and also quite difficult to manufacture. Therefore, I would not recommend that beginners take on the construction of a spiral staircase;

- Marching. These stairs have straight flights (flights of stairs). They are more comfortable and safer to use. However, be aware that marching stairs take up more space in the room.

Marching stairs, in turn, are divided into several subspecies:
- Single-march. Consist of one straight flight of stairs;
- Swivel with winders ... They can have several flights of stairs, between which there are rotary (run-in steps);

- Swivel with landings. Level platforms are established between the flights of these stairs. Such stairs are more convenient to use, but take up more space in the room;

- "Duck step". The peculiarity of these ladders lies in the paddle-shaped steps, which are installed in pairs in the opposite direction. As a result, one step can be only one foot, hence their name.

Such stairs are less convenient, but they can be very steep, i.e. the tilt angle can exceed 40-45 degrees.
The type of construction should be chosen depending on the conditions in the room and your requirements. If there is not enough space, you can make a "duck step" staircase, which requires a minimum of floor space on the first floor. If pensioners or small children live in the house, it is better to sacrifice space, but make a swing staircase with marching platforms.
Stage 2: calculating the stairs
At this stage, you need to decide on such important parameters of the stairs as:
- Number of treads;
- Riser height;
- The angle of inclination of the stairs;
- March length;
- The area that the staircase will occupy on the first floor.

Any staircase must be comfortable and safe. To do this, when performing calculations, the following rules must be observed:
- The dimensions of the steps. The height cannot be made more than 190 mm and less than 160 mm. The tread width should not be less than 220 mm and more than 330 mm.
Keep in mind that all steps must be of the same height and width, otherwise the staircase will turn out to be traumatic; - The number of steps in a flight of stairs. The most comfortable value is 11-15 steps. If there are more of them, it is advisable to divide the flight of stairs by a platform.
In addition, it is desirable that the march has odd amount steps so that a person ends the descent or ascent with the same leg with which he began to move up the stairs; - March width. Must be at least 90-100 mm;
- Railing height. Not less than 90 cm.
Calculation of the number of steps. Before proceeding with the calculation of the stairs, you need to measure the height between the floors, as well as the area allocated for the stairs. For example, the height between floors, i.e. the height of the stairs in our case is 3 m.

Now you can start calculating the number of steps and the height of the risers. These two parameters are interrelated.
To calculate the number of steps, you need to divide the distance between the floor of the first floor and the floor of the second floor by the height of the steps. The latter can be any in the range of 160-190 mm. For example, take a height of 180 mm, in which case the number of steps will turn out to be 300/18 = 16.6 pieces.
Since we need an equal amount, we will correct the height by dividing the total height by the number of steps - 300/17 = 17.6 cm. In fact, the staircase will have 16 steps, since the last step is the floor of the second floor.

Calculation of the width of the tread. There is a formula for calculating a comfortable ladder - a + b = 470 mm, where:
- a - riser height;
- b is the width of the tread.
From this formula, we get the tread width 47-17.6 = 29.4. This size is completely within the permissible range.
Calculation of the length of the march. Now it remains only to calculate the length of the march, i.e. the length of its projection onto the floor. To do this, multiply the tread width by the number of steps - 29.4x17 = 499.8 ~ 5 m.
Since the staircase will turn out to be quite long, it is advisable to make it swivel, consisting of two flights. In this case, the first flight will have eight steps, including the landing, and the second flight will have nine steps, taking into account the floor of the first floor.
The width of the platform should be equal to the width of the march, i.e. not less than 90-100 cm.
If necessary, you can adjust the parameters of the stairs for the conditions in the room - change the height of the risers and the width of the tread. The main thing is that these parameters remain within the acceptable range.

Calculation of the length of the stringer or bowstring. The calculation of the kosour is performed according to the Pythagorean theorem - the length of the ladder in a square + the height of the ladder in the square = the length of the kosour in the square.
Stage 3: draw up a drawing
Now you need to prepare a drawing, according to which you will make the details of the stairs. To do this, first consider the details that include the construction of a staircase made of wood:
- Kosour. Carrying beam on which the steps are laid. As a result, the kosour takes on the entire load when moving up the stairs;

- Bowstring. It is also a load-bearing beam. It differs from the kosour in the absence of cutouts for the steps, as a result of which the treads are connected to the beam with their butt ends.
To attach the treads to the bowstring, recesses are milled in it or bars are attached on which the tread is placed;

- Steps. They consist of two elements - treads (horizontal board), riser (vertical board, which is located under the step). I must say that the construction of a wooden staircase may not have risers, especially if it is based on bowstrings.
What is the best way to make a ladder - on stringers or bowstrings? The design on bowstrings is faster and easier, since there is no need to make cuts under the steps, however, a ladder on kosoura can withstand a large load.
Making stairs
Consider how a do-it-yourself staircase is made of wood. This process can be conditionally divided into several stages:

Stage 1: preparation of kosour
The work is done like this:
| Illustrations | Description of actions |
 |
Materials. At this stage, prepare boards with a section of 40 x 300 mm. |
 |
Preparation of beams. Cut the boards 40x300 mm to the length of the stringer according to the design calculations. |
 |
Kosour markup. Use a construction square for marking. Use it to mark the location of the steps and risers as shown in the photo. Keep in mind that the angle of the tread and kosour should correspond to the angle of inclination. In order not to make a mistake in the calculations, you can do the following:
|
 |
Cutting the stringer. Carefully make the cuts with a hacksaw, jigsaw, or other tool. Make all the other stringers in the same way. |
To make the paired stringers exactly the same, use the first stringer as a template - attach it to the board and circle it with a pencil.
Stage 2: assembling the frame
Now we need to make the rest of the stair frame elements and install them. The work is carried out as follows:
| Illustrations | Description of actions |
 |
Materials. In addition to kosour for assembly you will need:
|
 |
Fastening the stringer to the wall:
|
 |
Support post installation:
|
 |
Post markings. Mark on the post the place where the second stringer joins. To do this, you can use a laser or water level. |
 |
Installation of the second stringer:
|
 |
Installation of the stringer of the second span. The beam is attached to the post according to the same principle as the stringer of the first span. |
 |
Assembling the frame of the site:
|
This completes the installation of the frame. If your staircase is straight and without a platform, then all the work on assembling the frame comes down to installing two stringers.
Stage 3: staircase sheathing
Ladder sheathing is carried out as follows:
| Illustrations | Description of actions |
 |
Materials. At this stage we need:
|
 |
Layout of steps and treads:
|
 |
Cutting out parts. Use a jigsaw or other tool for these purposes. In addition to treads and risers, you will also need boards to cover the staircase.
|
 |
Drilling holes:
|
 |
Processing of joints of parts with glue. Use wood glue for this. |
 |
Installation of steps and risers. Secure the parts with self-tapping screws. |
 |
Sheathing of the space under the stairs:
|
 |
Sheathing of the upper flight:
|
Stage 4.installation of handrails
Now you can start installing the railing. It is more expedient to buy balusters and handrails ready-made, since it is difficult to make them beautiful without the appropriate equipment. At the same time, the price for them is small - the cost of curly pine balusters starts on average from 100 rubles per piece.
The process of installing balusters and railings looks like this:
| Illustrations | Description of actions |
 |
Materials. To equip the railing you will need:
|
 |
Installation of dowels for balusters:
|
 |
Installation of balusters. The instruction looks like this:
|
 |
Preparing the balusters for the installation of the handrail. Cut the top of the posts at an angle equal to the angle of inclination of the flight of stairs. |
 |
Fastening the handrails to the outer posts:
|
 |
Fastening handrails to intermediate balusters.
|
The process of making a wooden staircase is almost complete. Now all that remains is to complete the finishing.
Stage 5: finishing
Usually in the process finishing do-it-yourself wooden stairs are varnished, stained or impregnated. This operation is carried out in the following sequence:
| Illustrations | Description of work |
 |
Materials. For finishing you will need:
|
 |
Puttying:
|
 |
Grinding:
|
 |
Dust removal. Vacuum the surface of the stairs or wipe with a damp cloth. |
 |
Varnishing:
It is advisable to cover a wooden staircase with matte varnish or impregnation. Coated with glossy varnish can be slippery and unsafe to move around. |
As you can see, stairs to the second floor are quite simple to make, so you only need to have basic woodworking skills to make them.
Output
We examined the process of making a staircase with all its main nuances and subtleties, and now you can start working on your own. I recommend watching the video in this article. If in the process of work you encounter any difficulties - write comments, and I will be happy to help you.