Door opening device in a drywall partition. How to make a doorway from drywall: basic principles
Our today is a wall with a drywall door. We will find out what and how to assemble the wall frame, at what point you need to install the door block into it, how to ensure maximum stiffness of the design and qualitative sound insulation between premises. Let's proceed.
What do you need to build a partition?
Frame
The frame of any plasterboard design can be made of galvanized profile produced by this purpose, and from a slightly cheaper bar.
What to stop your choice? We strongly advise you to stay on your profile.
There are several reasons for this:
- Its perfect geometry. The bar often has noticeable irregularities, "propellers", bends and other defects, so part of the material purchased without sorting will inevitably go into waste;

- Its zero hygroscopicity,from the practical side, the constant shape of the frame is regardless of the humidity and temperature of the air. The tree swells into crude weather, which often leads to the deformation of the wall and the appearance of cracks in its decoration;
Notice: this lack of wood is leveled by its impregnating oliff or other hydrophobic material. However, the price of impregnation negates the difference in the cost between the bar and the profile, and the time of its drying will make you tighten the renovation for several days.
- Its resistance to biological influences (rot, mold, insect). High humidity couple with hungry stalls are quite capable of completing their career wooden carcass over a dozen years.
What kind of profiles need to be purchased for assembling the partition frame with the doorway in it:
| Picture | Description |
| Rack. It forms a hard frame and strapping of the door block. The height of the vertical walls of the P-shaped profile is unchanged and is equal to 50 millimeters, but its width can vary from 50 to 100 mm. The width is selected depending on the requirements for the strength of the wall (a wide profile provides greater rigidity) and its soundproofing qualities (thick noise absorbing material will miss less sounds into the adjacent room). The profile length should be at least equal to the height of the wall, and the number of profiles is selected for the step between the racks of 600 mm. |
| Guide. It is responsible for fastening racks to capital designs - ceiling, adjacent walls and sex. The width of the guide profile must correspond to the width of the racks. The total length of the guides is equal to the perimeter of the partition with a margin of approximately a meter on the strapping of the door block. |


Auxiliary materials
In addition to the profile, the installation of a drywall wall with a door will require procurement of additional materials:
- 9 mm metal screws. They are part of the frame connected to each other;
- Dowel screws (60x6 mm for concrete and 80x8 for bricks). They are attached to the adjacent designs of the guides;
- Self-tapping screws for carcass plasterboard. With a single-layer trim, their length should be equal to 25 millimeters. If the covering is a two-layer, the second layer is fastened with 40-millimeter screws. The quantity of fasteners - about 70 screws on a sheet of GLC;

Tip: two-layer plating is desirable in rooms with high load on the walls (read - with large patency) - hallways and interroom corridors.
- Self-tapping screws for mounting the door block to racks. Their length is determined by the thickness of the door frame and varies from 16 to 40 mm. In most cases, you can use a 25-millimeter fastener for GKC;
- Gypsum putty for filling the seams and fasteners;
- Serpianki (width of 5-8 cm wide with adhesive layer on one side) for reinforcing seams;

- Dampfer tape for acoustic junction frame partitions with overlaps and walls;
- Actually drywall. In dry rooms, a wall 12.5-millimeter GKC is used, in wet (bathrooms, bathrooms and kitchens) - moisture-resistant plasterboard of the same thickness. The amount of material is calculated on the area of \u200b\u200bthe wall, taking into account the double-sided skin and reserve on the clip of about 15%;
- Acrylic primer. Progressing precedes a finishing finish of HCL.

Instruments
For assembly partitions will be needed:
- Perforator with a brown under the size of the dowel-screws;
- Screwdriver;
- Scissors for metal for cutting profile;
ATTENTION: Galvanized steel to cut with grinder is urgently not recommended. With abrasive cutting, anti-corrosion coating burns out, and with high humidity profile starts rust.

- Bucket for the preparation of putty volume of 3-6 liters;
Please note: the volume of one-time portion of plaster putty usually does not exceed 3 liters. The supply of the mixture container is useful when mixing, but inconvenient when spitting.
- Knife, hacksaw or electrolovka for cutting plasterboard;
Tip: curvilinear parts are cut from HCL narrow knocked or electric jigsaw. According to direct lines, it is better not to cut it, but to break, after having finished with a knife according to the line 1/4 - 1/3 of the thickness: so in the room there will be much less plaster dust.

- Pair of spatulas (narrow and wide) for putty;

- Grater or grinding with grinding grids №100 - №120;
- Roulette, ruler, plumbing and pencil for marking frame and wall sheat.
Mounting order
First and main: What is first - doors or plasterboard on the walls? The door block is more conveniently assembled at the frame assembly stage. How exactly - we will tell now.
The video in this article will help you more clearly get acquainted with how the plasterboard wall is mounted with the door.
Frame
Here step-by-step instruction By assembling:
- Follow the line of the future wall. The markup is primarily applied to the floor or the ceiling, then transferred to the second overlap with a plumb and only then, is performed on the walls;
- Fasten along this line guide profile. The distance between Dowel Shurupami is 40-50 centimeters. The holes for fasteners are roaming right through pressed to the ceiling, wall or semi profile. In the bottom guide, make a break on the width of the doorway (door web + box) at the installation site of the door;

Tip: Do not forget to put under the guides of the damper tape. If you did not find it in the nearby construction stores, you can cut the tape from the foamed insulation or a thick foam substrate under the laminate.
- Position the position of the racks on the floor and ceiling. Marking is performed strictly on a plunder. A 600 mm step is measured between the middle of the profiles: in this case, the joint of the adjacent sheets of plasterboard (its width is 120 centimeters) will turn out to be there;

- Cut the rack profiles along the length, set them down on the labels and secure the metal screws on both sides of the guide.
Tip: Do not be lazy to measure the distance between the floor and the ceiling for each rack. The overlap height difference often reaches several centimeters, and the rack sliced \u200b\u200bby the total measure has a nonzero chance to go into waste.

In pursuit of rigidity
What if the small area of \u200b\u200bthe apartment limits the thickness of the partition, and the passability of the premises places the strict requirements for the strength of its framework?
Here are some possible solutions:
- Reduce the step between racks up to 400 or even 300 millimeters. The main thing is that the width of the leaf of plasterboard remained a multiple step;
- Connect the rack profiles of two (in the form of the letter "H" or investing them into each other);


- Insert the wooden mortgage profiles into the rack profiles - the cross section of 50x50 mm.
Noise insulation
In the general case, it is performed by a mineral wool laid between the frame racks.
Tip: It is more convenient to use a non-rolled insulation, and the cocked plates with a size of 1000x600 mm. They do without trimming in widths between racks with a standard step and do not be pleasant, leaving the top of the wall without soundproofing fill.

If you need high-quality noise insulation (for example, between the bedroom and the living room in one-bedroom apartment), Fill the frame insulation is not enough: you need to acoustically unleash the walls of the wall on both sides. The fact is that the framework perfectly transmits low-frequency oscillations on one side of the partition to another.
How to do it?
Having gathered two independent frames with a centimeter gap between them. Each of them is filled with mineral wool and is trimmed with plasterboard on the one hand.

a door
As we have already written above, the swing door is installed at the frame assembly stage.
This is done like this:
- Set one of the racks, adjacent to the doorway;
- Put the door block close to it (the box with the butt in it);
ATTENTION: If you do not separate the door in the box, after installation, it can rub the shoals. In the role of Kliniev, you can use pieces of organity or sinters.
- Take the door frame by screwed on the side of the rack with self-draws. Step - 20-25 cm;
Tip: The adjoining of the door frame to the rack will become hermetic, and the connection itself is more durable, if you pre-apply a strip of the mounting foam.
- From the opposite side of the door block, fasten the second rack in the same way;
- Screw the second rack to the guides;
- Connect the racks adjacent to the door with a horizontal jumper from the guide profile. It is attracted to the crossbar of the door frame with the same self-drawing.

A special case
How to install sliding doors on plasterboard walls? If you want the door to open up, went to the wall - you will need a serious refinement of the frame design.

- The frame of the deaf area above the door must have a maximum thickness - 100 mm;
- Under it, a wooden mortgage is installed in the frame - a sequence with a cross section of at least 50x100 mm. He will have to perceive the vertical load from the door canvase;
- Below the mortgage is formed two frames with a lumen between them. Since the wall thickness is limited to the width of the 100mm profile and timber, the ceiling profile is usually used for their assembly: the height of its side walls is only 27 millimeters.

Sheaving
So, the frame is ready, the door is installed. The next step is the walls of the wall with plasterboard. Here are the simple rules for its installation.
- The sheet is installed so that its edge accumulate exactly on the middle of the rack;
- Starting from the top of the sheet - then you do not have to hold it with your hands;
- Self-tapping screws are screwed in 150-200 millimeters;
Tip: If you do not rely on your eye - use the span instead of the line. This is the name of the old length of the length, corresponding to the distance between the tips divorced in different directions of the index and thumbs. In the Units of SI, the span is recalculated as 17.78 cm, in practice its length varies from 17 to 19 cm.

- The distance between the point of attachment and the edge of the GLC should be at least 20 mm. Otherwise, the self-tapping screw will cut the edge when screwing off;
- The self-sufficiency hat is token by about 1 millimeter, while the shell of the sheet should not break through. In this case, the strength of the attachment will be maximum, and the putty will easily hide fasteners;

- The sheet is screwed to all profiles that it overlaps, including guides.
Shpalian
The seaming of the seams begins with their greeting: the edges of the chase sheets are cut off with a stationery knife for 2/3 of the thickness of the sheet at an angle of 45 degrees (see spike of seammalls of drywall: how it is done). The extension allows you to fill the seam when putty on all its depths, which will reduce the likelihood of cracks in the future.

Captain obvious suggests: the semicircular factory edges are not needed.
Now the turn is the preparation of putty. It is locked with water at the rate of 1 liter by 1.6 kg of dry mixture.
In the tank for kneading, water is first poured, and only then the plaster is falling asleep: otherwise, dense lumps are formed on the day, which will leave the furrows during shtcloth. After 3-5 minutes, the putty wipe was mixed with a spatula or a drill with a wedge, and after another 5 minutes it is ready for shtcheck.

As with your own hands, put the seams that remain between the sheets when attaching drywall:
- Stick along the seam Serpianka;
- Fill the seam putty right through its cells;
- After drying the putty (at least after 6 hours), apply a wide spatula of the second, covering the layer of putty. He must hide the relief of the glassyette.

By the way: hats of self-tapping screws also have to put 2-3 times. Putty (even the so-called crawl) in practice still gives a small shrinkage when drying.
Do you need to put the wall over its surface?
This is done in two cases:
- Under the wallpaper, which are currently planned to be changed. The separation layer between the wallpaper and the shell of the GLC will allow you to remove the finishing coating without damaging the plasterboard;
- If the seams between the sliced \u200b\u200bsheets are highlighted with thickness. Thin (in 1 mm) layer of putty will help align the surface.
Puttailing throughout the area of \u200b\u200bplasterboard is performed by a wide spatula, to which putty is superimposed with a narrower tool. If you do not have much experience of the relevant work, it is easier to apply not one millimeter layer, but two thin layers "on the Sadir" perpendicular to each other.

ATTENTION: And spatulas, and dishes for putting off putty need to be washed immediately after making another portion. Otherwise, the next time the clutched lumps will spoil the finish, falling under the spatula.
Finishing
It starts from grinding the wall with grinding or manual grater.

Several tips:
- Use points and gauze bandage or respirator. Gypsum dust is pretty annoying eyes, and the mucous membranes of the respiratory tract;
- At the time of grinding, close all the doors to the adjacent rooms and plug the remaining slots. It will save you from the need to miss the repainting in white color Furniture and other homemade utensils throughout the apartment;
- Grind the wall with bright light that falls on it under the oblique angle. Lighting will emphasize all irregularities.
The wall is then wrapped from the remaining dust and is grounded with a brush, roller or sprayer.

Painting and wallpaper sticker are quite standard (see decoration of plasterboard under the wallpaper). There is only one subtlety here: you can paint the wall of any water paint at least after a half-month after the shtocking of the seams when the gypsum hydration processes are completely completed. Otherwise, they will stand out with a tint, regardless of the number of paint layers applied by you.
Installation of trimming
Cashbar are put after the completion of the finishing finish. The method of fastening depends on whether you are planning to take them into the future.
If dismantling is possible - use brass or copper nails without hats, bleeding them with Dobochnik (so as not to leave dents); Otherwise, launch platbands on liquid nails or sealant (silicone or acrylic).

Separation of the opening
How to close the opening in the wall of plasterboard, if the door became unnecessary?
Very simple: Introduce the guide profile at its perimeter, picking it up in such a time so that after the covering of plasterboard (single or two-layer), the GLC surface turned out to be at one level with the surface of the main wall.

Tip: If the edge of the opening is uneven, use direct suspension to attach guides.

A further action scheme is already known to you: after installing one or two racks, the frame is sewn with the subsequent shtocking of the seams and fasteners.

Conclusion
We hope that we managed to answer all the questions accumulated from the reader. Successes!
Do it yourself change appearance His housing is the favorite case of many owners. And plasterboard - material that in repair issues is a multifunctional means. It is known which unusual, luxurious ceilings can be made of drywall, as the partitions from the GLC one room are converted into two, as plasterboard sheets are used to construct shelves and niches. So you can shelter GLC and do it budget, beautifully and, most importantly, do it yourself.
How to make a doorway from drywall do it yourself

Record with plasterboard doorway most often in the process of redevelopment of the apartment. The easiest option is a rectangular form of the opening, but more and more often the owners prefer to make a highlight to the interior and give the door to the cricaronal form.

The first stage of repair - disassembly old door. The hammer and the nail-breed will be suitable at this stage. First, the door is gently removed from the loops, platbands are extracted and, in fact, the door is dismantled. If shoals are fixed on the floor, they are angry and carefully removed.
After that, the stage comes the most important - covering of the opening sheets of plasterboard. This process is not necessary without some technological features.
Installation of a doorway from plasterboard

Work on the construction of the doorway from plasterboard are performed in several stages:
- Hard frame. This is the basis of the future opening, the design on which shears of the sheath are attached. To get such a frame, you need to consolidate the partition from the profile systems UW and CW. The UW profiles are fixed at the base of the ceiling and floor are the parts of the base, and the vertical racking systems of the CW profile will be skipped on the sides of the opening.
- To fix the upper dimensions Opera, you need a transverse plank - it will be placed at the top.
- Height and width The door opening will determine the parameters of the box.
- Cutting plasterboard and preparation of material. Considering the dimensions of the door block, as well as the rooms, the GLCs are rebuilt. If there is a need for sound insulation, get mineral Wat or glasswater.
- Fix lists Hypzartone is needed on the self-tapping screw, lowering screws of self-tapping screws into a base of 2 mm.
- Installation ends In the fact that the sulfur ribbon is stuck, putty, and completes the work of the primer.

When the surface is driving, the opening is waiting for the finish decorative finish.
Creating a doorway from plasterboard (video instruction)
Interior gypsumboards - option arches
Arched interroom opening - a favorite version of the interior solution for many compatriots. This is explained by the geometric perfection of the structure, as well as the fact that installation and finishing are not complicated, and thus modify the doorway with your own hands.

Arched opening structure:
- Project development. The height and diameter is determined. The easiest way to make a small sketch on paper, which will then be the basis of the template in full size.
- Installation of metal profile. P-shaped profile will be better decision. It is also hard, and durable, and suitable for making an arched arc. The length of the profile is calculated, cuts (step - 1 cm) are made on the cut part with special scissors) to give a shape of a frame. According to the template, the profile bends.
- Installation of plasterboard - preparation. On the one hand, continuous cuts with a centimeter step are made to be bent. The strip is then reduced by cutting, the ability to give it the desired shape appears. The bottom of the arch should be the side where the plaster is glued. And from above will be a side with cuts.
- Installation arch. The surface of the doorway is pre-aligned, metal profile is strengthened on both sides of the opening. The sidewalls arches are cut with the template. The sideline of control is applied to the place. If one sidewall approached, the second is preparing. That is, in this place the template will be the first sidewall. Next, you need to attach a curved earlier profile to the installed direct.
When you screw the screws, they don't press a screwdriver on the handle, otherwise the metal profile can progress, and the design will lose its form.

Distribution of the doorway in the form of the arch: Types of Arch
Interroom openings that can be turned into beautiful arches, there are different. Someone closer to the classic, someone needs exotic or originality.

Types of arches and their features:
- Romantic. The angles of such an arc are rounded, and the upper part is straight. Not too common option, but if there is a task to save on the material, this type of arches of this goal corresponds.
- Classic. The arches of the rounded upper part are distinguished, the arc radius is half the doorway width. Be careful be those who build this arch in space with low ceilings - such a design is even more "eating" space.
- Half a day. This is either a very small circle radius, or only one rounded corner. Gets around in any modern interior.
- Modern. Suitable for the design of thick floors. Large radius of rounding.
Video instructions: how to make a plasterboard arch
What should I do if you decide to close the doorway with plasterboard?
Door opening of drywall: Option "Cecisive"
It is done in several stages, not such complex so as not to cope with their own hands.
Step process:
- Dismantling the old door and door box.
- Stripping opening.
- The profile is installed on the ceiling of the opening.
- Two side racks are installed along the edges of the doorway, one - in the middle (vertical).
- A strip of the sample size of the frame is cut out of the GLC, it is attached to the metal cage by self-drawing.
- In the same way, act on the other side. It turns out that the sheath is conducted on both sides.
How to close the doorway with plasterboard (video)
And installation, and dismantling the doorway is not as complicated. The main thing is to take the right measurements, not be lazy to make a pattern, and all the necessary cuts do high quality and neatly.

The doorway from the drywall is a lot of "pluses", the mains are reduced to the fact that this design is made on their own, and the material is used inexpensive. Try and you transform your dwelling with such a simple, but spectacular way.
During redevelopment, they are trying to highlight the living space by transferring intercommmary partitions. After the destruction of the old construction, the new simpleness is easier to make plasterboard sheets. Mandatory between rooms are equipped. Manufacture door Piece The drywall consists of two stages: a frame assembly and its skin.
In the construction of plasterboard (GLC) is considered universal material. From GCL, you can build new designs or use cladding sheets instead of plaster. It is impossible to build a carrier wall from drywall, but for interior partitions, the material is perfectly suitable. Lights are used with the zoning of the room, the manufacture of falseland for sliding doors. The arrangement of the doorway in the drywall partition can be performed with a fantasy, making the army of a classic, asymmetric or other form.
Walls from GLC have a lot advantages:
- creates a minimum load on the bearing elements of the building due to light weight;
- build a partition for one person;
- available cost of materials;
- if necessary, simple dismantle is easy.
In offices, plasterboard walls can be set temporarily to create a separate cabinet or other purposes. Designers use the design with the arrangement of decorative passages of unusual configurations.
Necessary materials and tools
To equip the discovery from drywall in interior partitionThe following will be needed instruments:
- rocking plans for the processing of CCL Circulation;
- edge plans for cutting chamfer at an angle;
- a sharp knife or special hacksaw for cutting plasterboard;
- scissors for metal;
- drill;
- screwdriver;
- screwdrivers, level, simple pencil, roulette.
Of materials For work prepared:
- galvanized steel profiles;
- if the sash is envisaged to strengthen the doorway needed wooden barcorresponding to the cross section profile;
- assembly of the frame and fixation of the sheathing is carried out by self-drawing;
- if it is necessary to increase sound insulation or warming up simpleness, basalt wool plates are used.

The main material in the manufacture of partitions with the doorway is plasterboard.
- Standardly use 12.5 mm thick wall thickness.
- The curved elements of the arch are made from sheets with a thickness of 6.5 mm.
- To go to the bathroom or the kitchen is better to take moisture-resistant plasterboard. It is easy to distinguish in blue or green color.
- There is a refractory GLC. Such material is rarely used in apartments. An exception can be a kitchen where there is a chance of severe heating of partitions from household appliances.

How to make a doorway from drywall?
In front of the manufacture of a doorway from drywall, with their own hands, dimensions, the design form. Defined in advance whether the sash will be hung.
We change the dimensional dimensions
When installing a non-standard door, it is not necessary to destroy the partition. It is enough to simply resize the doorway. To reduce height or width, build a frame from a rack and starting profile. At the end stage, do not forget about the sash. Galvanized profile will not stand heavy door leaf. If it is decided to hang the doors, the wooden timber is laid inside the rack profile.

When the passage offset is scheduled to one of the sides, part of the wall is first cut out. It is better to use the grinder, as the blows of the perforator are able to disrupt the integrity of the entire partition. After preparing the circuit, the starting profile is fixed from below, the starting profile is fixed, the vertical elements are put on the edges, as well as additional racks from the wall. Starting and rack profile are connected by self-drawing. The rigging frame is supplied with additional cross.
When it is required to reduce the passage of the passage, only wall profiles are put. They will be the support of the upper cross.
After the framework of the frame is cut off GLC. All fragments are connected so that the joints are located in the middle of the profile. Fix the skin with self-draws.
Straight frame design
To make the wall of drywall with the doorway from scratch, the project is pre-made. Calculate design dimensions, location of the passage, shape. The easiest way to build a rectangular classic way. When calculating the dimensions, it is important to consider that after decoration the thickness of the partition will increase.
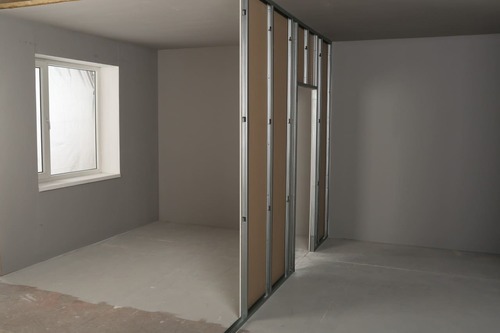
It is starting to build the wall and the discovery from the plasterboard. The location of the starting profile mark on the ceiling. From it, the plumb is made by an accurate projection on the floor where the lower starting element is installed. Charge the location of the rack profile. Put vertical elements after 40 cm. Be sure to fix the extreme racks to the adjacent carrier walls. Additionally, install racks forming the door passage. Between themselves, vertical parts of the frame are enhanced with horizontal cross.
When the frame is ready, inside laid insulation from basalt wool. The design is crushed by GLC, fixing the sheets by self-draws.

Arch
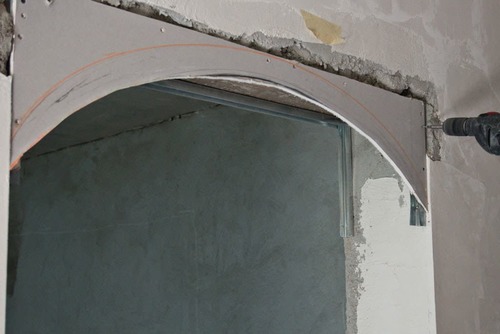
Making the arch is difficult. It is important to generate elements equally to obtain a symmetrical design. Arches are there different shapes, but when lacking experience, it is better to stay on the classic semicircle. The process is from the following actions:
- The new partition is built on the principle of direct frame design. If the simpleness is already there, there will have to be expanded to expand that the base of the frame does not prevent the arched curved elements. From above and side of the passage, a wall profile is fixed.
- The frame of the semicircle of the arched doorway is made from the guide profile. The side shelves of the workpiece at a distance of 3 cm are cut off by metal scissors. Cuts should be located strictly opposite each other. Prepare two identical elements
- Cropped profiles bend the semicircle. Details should be symmetrical. Billets are better bend at the same time.

- The bent elements are fixed with self-drawing at the top of the loot to the side racks and jumper. Next steps Aimed at strengthening. Scissors cut pieces of profile, put struts, connecting a semicircular element with the base of the carcass.
- The doorway is trimmed from the front side. Two identical fragments are cut out of GCL. It is important to make an oval correctly. It will be impossible to align the latter lablems then. Finished facial fragments of the doorway are fixed to the profile by self-draws.
- For the manufacture of the curved part of the roulette, the width and length are measured. The second indicator is better to take with a margin. Measures are transferred to a thin sheet of ceiling GLCs, cut off the strip.
- The back of the fragment is rolled by a needle roller, wetted with water. When a punctured cardboard is splashing, the band from the GOC will be easily bent semicircle. The fragment is fixed to the frame of self-drawing. It is advisable to perform it with an assistant.

After plating the corners of the Arch reinforce perforated corner. Further actions are aimed at the finishing of the doorway: primer, shpial, grinding, painting, or wage.
Finishing plasterboard
When only the passage of the passage is required, it is easy to simply align the doorway with plasterboard without a framework of a galvanized profile. Fragments of the desired dimensions are cut out of the sheets. GLCs on the slopes and in the inner part of the opening are glued with special glitters for drywall, shp can or fixed with self-draws. Corners are protected by a perforated corner.

Finish finish
After the trim, the drywall is subjected finish finish. Works are carried out in the following sequence:
- The doorway from GLC is ground. Before complete drying, no action is performed.
- Sickle and glue process joints, hats of selflessness. A perforated corner is glued to the corners.
- The surface is equalized by the starting layer of the putty, glue the plastic grid.
- On top of the frozen layer, the design is covered with finishing splock. After drying, the first layer is performed by grinding grid or sandpaper.
For better adhesion, the ground surface can be treated with primer. After its drying, a new door passage is painted, covered with wallpaper or other material like.
It is so easy to work with GLCs that even the most difficult door pass for 1-2 days can be equipped.
As soon as the repairs in secondary housing begins, the owners are thinking about redevelopment of the premises. Often you have to demolish one or more partitions, and elsewhere. And there is a question here, how to make a doorway from drywall? Is it possible to make this work yourself, or you have to hire a brigade.
 Installation of a doorway from plasterboard
 Materials for a lot, but the most popular and popular is plasterboard. This material is universal. First, it costs it inexpensively, secondly, you can make the doorway from drywall with your own hands, thirdly, easy to finish. But do not think that applying drywall for mounting the doorway is easy, as it has its own characteristics, and they should not be neglected.
Despite the fact that GVL, when building a doorway from drywall, attached to, the design under horizontal loads can lose strength and begin to break out. Especially if the door canvas will be heavy.
 An example of a drywall door opening
 Important! When building a partition with a doorway, the design must be strengthened at the mount stage. The main positive moment in the arrangement of plasterboard structures is the ability to perform everything yourself.
Installation partition with doorway
If you need to sew the doorway with drywall with your own hands, then the step-by-step instruction below will help embody it into life.
This method may be needed not only in repair. old apartmentBut in the new, since they often give up with one room in which the layout must be made independently.
But it is worth noting that all redevelopment work must be agreed. Before the start of work, you need to plan the partition, as it is not possible to build a design at first, and only then equip the opening - everything should be performed in accordance with a specific work plan.
 Scheme with sizes to install partitions with doorway
 And in this case it does not matter, you want or a full-fledged doorway. The main task to build a solid and stable design.
Planning and marking
Installation is produced in stages. It is important to observe a strict sequence. You need to start with planning:

Note! If you can lend from professionals laser levelYou can use this device for marking - it is much more convenient and faster.
Materials
 Design and fastening frame of plasterboard partitions with doorway
Tool
For mounting, you need the following tool set:
- perforator for punching holes in surfaces. In the event that the house is wooden, it will not need;
- screwdriver - the most necessary tool, since spinning screws will have to be very much;
- sharp scissors for metal, for profiles;
- level, pencil and roulette, for measurements and marking;
- construction knife and metal ruler, for quick and accurate drywall cutting.
Montage Karcasa
The frame is an important design in the construction of a partition with a doorway, it is necessary to execute it according to the instructions:

Doorway
How to lay the doorway with plasterboard? Consider in more detail. Perform this design is easy:

Plasterboard and Soundproofing
- How to shelter? At the beginning one side of the plates of GKL. To use for this you need black, the step of which should not exceed 20 cm;
- In the intervals between the profiles to install Minvatu, trying to not have large gaps between the material;
- As soon as sound insulation is mounted, you can fully sew the design. If the doors are installed, then inner side The opening is not necessary. When the empty opening is arranged, the material strips are installed on the sides.
The video shows a step-by-step instruction on the installation of a doorway from drywall.
Finish finish
How is the doorway finish? With the subsequent installation of the door cloth, you can simply stick on the seams of sulfyans and sharpen the septum on both sides. Facing material is selected based on the overall design of the room. When empty, the opening is additionally installed. Separate door openings from drywall can be by any materials.
Alignment of opening plasterboard
Most. simple decision To align the contours of the doorway is the use of GCL. The work is simple, but has its own characteristics. We need to prepare:

The process of alignment of the opening
This process must be made in stages:

This is an inexpensive and simple option, sealing the doorway with plasterboard, allowing you to make the opening perfectly smooth, but it has one big minus - it is impossible to install the door to such a design.
Installation of the doorway using a metal profile
 The mounted frame of a plasterboard partition with a doorway from metal profile
 If the opening for the door is in a deplorable state or need to be reduced, then metal carcass It will be the most right solution. First, it will make it even, secondly, the design will be tough and durable. This method combines the above described, as it will be constructed to be attached to the concrete base.
Door opening technology
Before building a design, you need to decorate how you will reduce the opening, on the one hand or from two.

Arch made of plasterboard on a metal frame
The above methods involve the installation of a rectilinear doorway. But if it is decided to make the arch of drywall in the doorway, then the upper part needs to be made arcuate. The technology of arrangement of direct opening is the same in all cases, so consider the arrangement of only the arched element.
Technology arches arches
Need to make the following actions:

On the market building materials Plasterboard appeared relatively recently. 15 years ago, partitions and simpleness of structures were built of foam blocks or bricks. Today, plasterboard is gaining increasing popularity.
To the main advantages of drywall, compared with other finishing materials, It should be attributed:
- ease of installation, as any owner can cope with the installation of plasterboard;
- the ability to make a varied shape;
- preservation of optimal humidity in the room. Due to its porous structure, the material misses couples and moisture, the costs of which delays in themselves;
- thanks to some types of impregnation, drywall can be used in rooms and structures with high humidity;
- the material is very a light weightthereby not overloading the design to which it is attached;
- plasterboard is much cheaper than similar materials;
- the material is environmentally friendly and does not harm health.
Door openings from drywall are installed using a profile of a width of 50 to 100 mm. At the same time, it is cut to your own hands to the desired size.
Required tool
To make the doorway from drywall do it yourself, you need to have such a tool:

- building level;
- screwdriver or drill with nozzles;
- roulette;
- perforator;
- mounting foam;
- plumb to carry out the installation of guide profiles;
- pencil;
- cutter.
Even with the minimum set of tools, you can high quality and quickly make the doorway with your own hands.
Installation of the doorway
Before putting into the installation of the doorway, it is necessary to prepare a framework for it.

Mounting frame for opening is done in this way:
- the ceiling and floor profiles are installed on the installation of the doorway;
- at a distance of about 50 cm from each other, intermediate racks are mounted on each other;
- a P-shaped segment is formed from drywall, after which it is fixed to the horizontal crossbar above the door;
- the design is bonded by self-drawers;
- in case the construction needs to give additional stiffness, in the doorway, you can insert a timber bar.
After the frame is ready, start laying the solid sheets of plasterboard. Make it very simple if you follow these rules:
- the gap from the installation site of the self-edge to the edge of the sheet should be about 1 cm;
- the optimal distance from one fastener to another is 15 cm;
- sheets placed in the neighborhood should be located on one profile;
- the fastener hat is taken into a sheet of no more than 0.8 mm;
- the length of the screws used should be within 2 cm;
- next, you need to close all the joints and carry out other cosmetic works.
Thus, fastening the sheets of plasterboard on the prepared frame, you will get aesthetic and beautiful doorway.
How to reduce the doorway with plasterboard
During redevelopment of housing, the hosts sometimes face a situation where the dimensions of the doorway require a decrease. Make it very easily with your own hands, but before sewing the doorway with plasterboard, you need to apply the layer of plaster on the wall near the door corresponding to the thickness of the plasterboard sheet.
With the help of drywall, the doorway can be reduced in this way:
- 10 cm from the edge of the doorway removed plaster;
- on the walls and the floor is made marking;
- according to a predetermined markup to the floor and the ceiling is mounted starting profile;
- on the finished starting profile are point profiles, which are further connected by self-drawing;
- after full installation framework It is necessary to reduce the initial dimensions and cut fragments from plasterboard for the future design;
- on the sections of the walls that were previously cleared of plaster, special glue is applied (it is better to do it in gloves). Plasterboard sheets are attached to the glued glue and after its polymerization of the edges of the sheets are recorded by self-draws;
- the slopes of the doorway should also be reduced in size, after which they are sewn with a strip of drywall, and all the joints need to be elapted with their own hands.
Doorway, especially if it concerns entrance door, you can not only reduce, but also inspire or isolate from outsided sounds. Do it before covering plasterboard, after the framework is installed.
The insulation is better to choose a polyster or mineral wool slabs.
Installation of doors in the opening of drywall
To install the door to the plasterboard partition, it is necessary to install the door frame, after which you can hang the cloth.
To make the box, built in your own hands tightly held, it is fixed with special wedges of wood. After the finish attachment, the wedges can be easily removed.

All parts of the box are checked on the installation of the construction level. If all the parameters are in order, you can fix the door frame with the help of screws in the opening.
The gap between the box and the rack must necessarily close the special mounting foam. So that the form of the opening is completely preserved, it is necessary to insert spacers for the installation.