Complete repair sequence. The sequence of apartment renovation
Repair in an apartment raises a lot of questions, especially for those who first decided to do such a responsible job, relying on own strength... Our recommendations will help you plan your work correctly so that you do not correct mistakes later.
Renovation preparation - planning and design selection
Correctly chosen sequence of repairs in the apartment will help to do it in a short time, without unnecessary worries. Initially, you should decide what kind of repair is to be done. Perhaps it will be cosmetic: it will be limited to changing wallpaper, painting and other individual operations. If necessary overhaul, planning is essential. After all, it may touch windows, doors, walls, floor and ceiling. Maybe you want to do the redevelopment of the premises, remove the partitions.
The planning and design of the premises requires careful thought. For each room, think over what material will be needed for walls, ceilings, floors. You may be changing windows or wanting to rearrange furniture. It is impossible to keep everything in your head, so you need to make a plan. We measure all the rooms and make drawings on separate sheets. Each room will need six of them: one for the floor and ceilings, four for each wall separately. On the plan, indicate the location of windows, doors, sockets, switches, lamps.
On each sheet, write down what materials will be used. For example, the floor in the kitchen: linoleum with insulation - 12 m 2, brown. Ceiling: 12 m 2, water-based paint, white. First wall: 6.1 m 2, align - starting, finishing, priming satengips. Painting: water emulsion, peach color, colorex, primer. Replace the door with a new one, leave the finish. It is advisable to indicate how much of what material will be needed, based on the consumption rates, it would be good to indicate the price. If you do not undertake any work, you will attract a specialist, indicate this in the plan. This is only approximate planning, you can fix whatever you think is necessary. A start has been made - the work has been planned.
Continuation of preparation - furniture is moved, unnecessary elements are dismantled
Ideal if it is possible to completely free the apartment from furniture and interior elements for repairs. But, most likely, it will have to be moved to one of the rooms so as not to interfere with work. We put it compactly, pack it with stretch film. Renovation starts with other rooms. When at least one room is ready, the furniture is transferred there, placing it as soon as the rooms are ready.
The next step is to dismantle the elements to be replaced. If the repair is cosmetic, remove the layer of old linoleum, remove the wallpaper. During major repairs, it may be necessary to remove interior doors, remove partitions, change the installation location of doors, create special niches in the walls, remove plumbing, etc. If you are not going to change the floor, but only renew it, do not forget to cover it with plastic, so as not to damage it.
Time to dismantle old windows if you intend to install new ones. After installing windows, do not remove from them protective film... Let it remain for the duration of the repair and protect the glass from scratches, dirt, dust, which are inevitable during repairs. If a redevelopment is planned, there is a desire to start from scratch, we demolish non-load-bearing partitions.
Water, heating, electricity - we repair, install a new one
After finishing dismantling, step by step. We start with communication systems. Overhaul time is the most suitable for replacing electrical wiring, heating radiators, pipes, installing an exhaust hood, an air conditioner. Communications should be planned in advance, especially wiring. If you are going to build new partitions, the work should be done before laying the wiring, pipes, so that you do not have to break and redo them later. V frame house wiring, pipes are best hidden in the walls. On the walls of a different material, strobes are made, where the wiring is hidden.
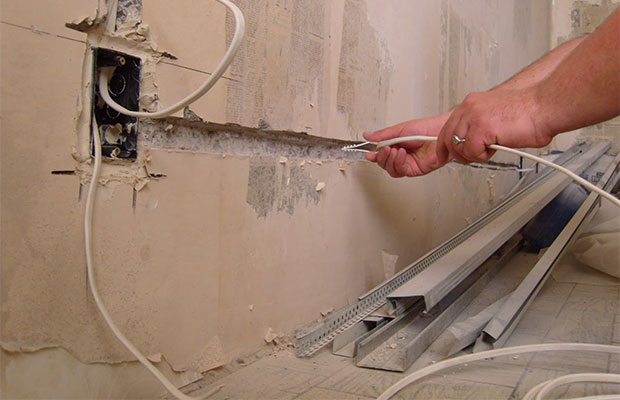
Residents panel houses it should be borne in mind that the walls in such houses can only be channeled in the vertical direction. We distribute the wiring under the ceiling or in the place where the walls and floor meet. We hide the wires under or behind the skirting board. Do not forget to lay cables for the Internet, television, intercom along with the wiring. We do not install switches, sockets, lamps immediately, we only prepare places for them. Installation of devices is carried out after the end of all work.
We are engaged in plumbing: we install pipes for supplying water to washing machine and output to the sewer. We also make leads to mixers, bathroom, shower, dishwasher, toilet. Already now it is important to know the dimensions of the bathroom and shower, the water and sewer connection points. It's good when they are already purchased, but you can also find out specifications at the store where you are going to buy equipment.
Finishing work - space for a flight of imagination
We carry out the finishing, starting from the top - from the ceilings to the walls and floors. This sequence eliminates damage to repaired parts when working with others. Stretch ceilings are an exception: they are made last. If you need to make a floor, we start by leveling with a screed. We use an economical method - a cement-sand mixture. Whenever possible, we use self-leveling floors. They are more expensive, but the result is worth it. If you are going to install a floor heating system - it's time.
Let's start leveling the walls. The duration of work, the amount of material depends on the condition of the surfaces. You may need several layers, or you can get by with one. The walls are aligned mainly with their own hands. Using machine leveling in conditions an ordinary apartment impractical. Manual alignment is performed in two ways: visual and by beacons. We align the walls that are being prepared for painting with beacons, which ensures the best quality.

Having finished plastering, we proceed to the final work - putty. The putty should be carefully to close up all the irregularities, the places where the communications are wired. Finally, we prepare the surface for finishing. The choice of a primer is important - a high-quality one will avoid problems with puttying, painting, pasting. If you are going to install decorative items such as stucco, do so now.
Then we proceed to the wall tiles. It is important to plan which tiles on which wall we will use. If possible, we make an installation diagram on a computer or draw on paper. So we will find out exactly how many tiles will be needed, how many will have to be cut in order to reasonably plan the purchase of stock. Variety of colors, patterns, finishing materials allows you to make the apartment unique. In addition to ceramic tiles, decorative mosaics, bamboo tiles, 3D elements and much more are used at this stage.
Close to the finish line - final important touches
We install the plumbing - all the carts were completed earlier - and proceed to laying the flooring or decorating the walls. Most builders prefer this order: first, start laying the final floor: laminate, parquet, linoleum. Next, we are installing interior doors... We select the door in advance in order to prepare, if necessary, doorways of the required height and width. We install the boxes, we hang the door leaf. We cover the clean floor with foil and deal with the walls. Options at your discretion: painting, wallpaper.

It is not necessary to fix the platbands right away, it is better to do this after we paint the walls or glue them with wallpaper.
We complete the process by installing lamps, switches, sockets, fixing the baseboards.
Summing up - sequence of actions
So, summing up all the tips, we outline the sequence renovation works in the apartment:
- 1. We consider what kind of repair is needed: cosmetic or major, we choose a design. We draw drawings, indicate materials.
- 2. We take out, take out furniture and everything that will interfere with the repair, dismantle unnecessary elements on the floor and walls.
- 3. We are engaged in dusty work: we remove old windows, install new ones, demolish partitions and install new ones. We bring communications - electrical wiring, pipes for connecting household appliances and plumbing.
- 4. Finishing works:, we plaster the walls, we make a rough floor. We putty, primer, lay the tiles. We make a clean floor, decorate the walls.
- 5. We install plumbing and appliances, hang the door. We fix the plinths, platbands.
We start repairs from the most distant room so that debris and dirt are not applied to the repaired premises. The corridor is the last to be repaired. Garbage, building materials are carried through it and there is a great risk that the walls, floor and ceiling will be accidentally damaged. We close the repaired room, hang the door with construction film. In this way, we will protect the ingress of dust, debris, building materials from premises in which repairs are ongoing.
If you are going to make major repairs in a separate room or apartment as a whole, you should draw up a complete work plan and cost estimate, including items such as dismantling old equipment (batteries, window sills, lamps, switches). If you have to replace windows and doors, include cleaning and removal of construction waste in the list of works. In most cases, this is a significant cost item, especially in apartment building in the city.
It is very important to determine the real scope of work and relate them to your financial capabilities. It is highly undesirable to make adjustments after the start of repair and finishing work - for example, after painting the walls, you wish to lay parquet instead of laminate or instead of decorative plaster stick the wallpaper. Therefore, all design decisions must be made before the beginning the actual renovation work. Redoing is expensive, long and sometimes impossible.
Where to start renovating a room?
Having coped with the preparatory process and finding yourself in front of the bare ragged walls, you still do not fully imagine the entire volume of the forthcoming expenses and work. However, you can already find out where and what will be located, what colors are optimal in a particular room and where the computer and other electrical equipment will be installed. Be sure to pay attention to the location of the windows and the need for additional lighting rooms. What for? Because repairs should begin with equipment or re-equipment of the electrical network, including the location of the lamps - basic and additional.

This should be done both in old apartments that are being completely renovated and in new buildings. It's no secret that in new houses, wiring is installed without taking into account the wishes of the owner. Each newcomer invariably has a desire to adapt housing to their needs as much as possible. The abundance of electrical technology requires an optimized, high-power grid with many branches. Very uncomfortable in new apartment unwind all kinds of extension cords and install additional sockets.
In parallel with the electrical network, the air conditioning system and fasteners for the heating network devices should be installed. It is also necessary to perform work requiring chiselling, drilling, grooving, grooving, recesses and other disfigurement of walls, floors and ceilings, accompanied by the formation of dust and fragments of brick, concrete and plaster. Then we calmly remove the debris and start preparing the foundation of the future floor. There are several options:
- installation of a rough plank floor;
- pouring a concrete screed;
- preparation for the installation of a warm floor;
What's next?
The next stage of renovation work concerns the windows. If replacement is required, we change. If the windows have already been installed and satisfy your request, then we skip this stage, not forgetting to inspect the condition of the slopes, the presence of thermal insulation, and the sealing of the cracks. It is worth checking how the doors open and close, if there are any distortions, what are the vertical and horizontal levels. It is very difficult to eliminate these seemingly obvious imperfections after plastering and painting walls or pasting wallpaper. It is also advisable to install internal window sills. A plastic wrap will help protect them from splashes of paint and putty.
Of course, this work can be done later, when installing interior doors, but this option is more practical.
If the walls in the room require additional leveling and a significant amount of work before painting, then calculate the total amount of building mixtures required to process all the walls to be repaired. Building materials, despite their high cost, should always be taken with a small margin. It is very inconvenient to run after a bag or two of putty, which, as a rule, ends at the most inopportune and crucial moment.
The sequence of work on the repair and decoration of the room: frequently asked questions
What comes first: floor screed or plaster / putty on the walls?
The answer to this question is unambiguous - before starting the wall decoration, it is necessary to complete all preparatory work with the floor. It should be ready, after cleaning, to install decorative flooring.
The floor covering is installed last, whether it is laminate, parquet or a self-leveling 3 D effect floor. The prepared base of the floor is covered with cardboard or foil - this will make it easy to remove traces of plastering work, which are inevitable.
Before starting the putty and plastering work, you need to complete all the manipulations with the drywall, if any. All partitions, niches, decorative and functional details must be done before the start of the "wet" finishing phase. All work of this kind, including leveling the ceiling, must be performed in one technological cycle, so as not to return to them, remembering, for example, that “somewhere here” a niche for storing skis or installing a safe has been conceived.
Which comes first: flooring or installing doors?
Any type of flooring must be installed prior to installing the interior doors. This will help to avoid mistakes during their installation and to achieve a minimum gap between the threshold or floor plane and the door leaves. Door installation is a clean and precise job that does not require the use of mortars, glue or other substances that can stain a clean floor. The tools used in this case cannot damage it, with careful work.
But this applies directly to the door. The door frame can be installed earlier - before leveling the walls. This will remove all cracks and irregularities near the opening. If the walls and openings are initially ideal, you can postpone the installation of the box until later.
When installing the box ahead of schedule, it is important to take into account the height of the future floor covering!
What comes first: to glue the wallpaper or lay the laminate (parquet, carpet)?
Any type of wallpaper is glued to the prepared walls prior to the installation of the decorative flooring. This is also true for painting walls.

True, there are different opinions on this issue. Supporters of the second option answer this question in the same way as the question of what first: paint the ceiling or glue ceiling plinth... According to their position, the wallpaper is glued after the floor and ceiling plinths are installed, because the wall decoration can be replaced at any time without touching the plinths either from the bottom or from the top. And the edges of the wallpaper are just enough to cut exactly to the level of the plinth.
The ceiling is painted after the installation of the upper plinth. In this case, it is very convenient to eliminate all irregularities and leaks in the connection, and then the plinth and ceiling are painted in one step and look monolithic.
What comes first: stretch ceiling or wallpaper / painting?
The specificity of stretch ceilings allows them to be installed at the final stage of repair work, after wallpapering. This is a very clean job and it is difficult to damage walls or floors while doing it.
The top-down priority principle does not work in this case. It concerns mainly traditional renovation work. New technologists are making their own adjustments. The experts themselves, who mount stretch ceilings, recommend inviting them to the end of the repair.
If you compose a short a list of the sequence of repairs in the room, then it will look like this:
- wiring;
- heating and air conditioning system;
- preparation of the sub-floor;
- dismantling / installation of windows;
- preparation of walls for wallpaper or painting;
- ceiling (all works);
- painting walls or wallpapering;
- clean floor;
- installation of doors;
- thresholds and floor plinth;
- stretch ceiling.
This order is not an axiom. Each master chooses the sequence that is convenient for him. But in general, the order looks something like this.
To draw up a repair plan, you first need to decide on the future design. If repairs are planned throughout the apartment, it is important to select building materials, plumbing, pipes, electrical wiring and elements for other communications.
Types of apartment renovation
- Unplanned renovations. It is carried out in case of an unforeseen situation (flooding by neighbors or burst of pipes). Such a repair can be prompted by the replacement of the bathtub, because in this case it will be necessary to replace pipes, renew tiles.
- Scheduled renovation. In terms of complexity, it is divided into cosmetic and capital. The first option is cheaper and is carried out if the water supply is in good order and the plumbing is in working order. The second version of the work is more serious and requires thorough preparation from the masters.
Interior Design
Before renovating an apartment, it is important to decide on the interior solution in each individual room that you plan to change. For recommendations, you can contact a professional designer who will draw up detailed diagrams and drawings for repairs, determine the sequence of the steps to be performed.
The first diagram shows the view of the rooms from above, and the rest - the view of each wall separately. Drawings complement step by step instructions to avoid omissions or inaccuracies in installation.
When drawing up sketches of an apartment, plan the arrangement of furniture. Pay close attention to those walls that are free of furnishings, and use high-quality finishing materials here: wallpaper, ceiling plinths. Consider where to place chandeliers or other lighting fixtures after renovation.
Indicate the locations of sockets, switches, household appliances in order to correctly design the procedure for installing electrical wiring. Decide where you will place the decorative elements.
Important! To divide the room into zones, the masters recommend painting one wall plane in a different color in order to accentuate and visually separate one part from another.

The order of work
First, finishing is carried out in those rooms that are further from the entrance. The work in the passage room and the corridor is being completed, since building materials and tools are constantly brought in and out through them. This is important in order to protect walls, skirting boards and not damage the finish of an already made wall or just an installed one. flooring.
To prevent dust from getting on furniture and doors, get cellophane wrap to protect them from accidental damage and paint.

List of materials for repair and installation
it important point, because the amount of work and the methods of their implementation depend on their quantity and cost.
Select decorative elements in a separate list: shelves, mirrors, ceiling plinths. It is better to start shopping with these details. If they are not on sale, you can always draw up another design plan for apartment renovation.
It is also important to compile the list of tools for work correctly. To choose everything you need, it is better to contact sales consultants or professional repairmen.

Where to start?
The first stage is the most dusty work. This is the installation of a double-glazed window in the apartment, the implementation of slopes, the installation of purchased new window sills. So you will avoid dust entering the room during the repair, especially during painting works, an increase in humidity, the appearance of drafts. After installing new windows, they are covered with plastic wrap so as not to damage them.
If you need to carry out welding in the apartment (replacement of batteries), perform it at once in all rooms. This is a dusty job, sometimes requiring wall breakdown to accommodate pipes.
Before proceeding to the stage of repairing walls, ceilings, floors, carefully check their condition: whether there are voids, cracks, to what extent the surfaces correspond to the level.
After preparatory phase proceed to the rough finishing of surfaces, processing them in a certain sequence: the ceiling, then the walls and floor. Initially work with cement mortars, and then proceed to the mixtures of plaster.

What to do: paste wallpaper or install a stretch ceiling?
To complete the finishing, it is important to decide what materials will be involved, and whether these works interact with each other. Any of the processes can negatively affect the finished finish. Or, the completed renovation of one surface in the apartment may interfere with the rest of the work. Therefore, before starting the installation of stretch ceilings and the installation of ceiling plinths, it is important to identify the effect of one work on another.
Sticking wallpaper on the wall
To begin with, level the surface of the walls by installing drywall sheets or putty. if stretch ceiling already mounted, then there is no need to talk about leveling the walls with a plaster mixture. Working with mortar during repairs, you can heavily smear PVC film and ceiling plinth. Therefore, the walls are first aligned, and then they begin to work with the ceiling. Yes, and they cannot be leveled with drywall if the ceiling is already in place.

An even wall is required for attaching the moldings and skirting boards. But how, then, to glue the wallpaper? To do this, you need to prime the surface, this will help to enhance adhesion, and the wallpaper will not fall off. The primer is carried out close to the ceiling, but you cannot smear it, in this case you will have to use masking tape.
When to glue the wallpaper, before or after the installation of the stretch fabric? It directly depends on the structure of the wallpaper. In some types of canvases, they are not smeared with glue, but fixed dry, the glue is applied to the walls, which means that the composition is in contact with stretch ceilings. Here again, masking tape will come to the rescue. The remnants of wallpaper near the ceiling and floor are cut off with a clerical knife, and the work is finished by attaching a decorative plinth.
 Sticking wallpaper on the wall
 Installation of stretch ceilings
It is produced after the completion of work with the walls. The ceiling has points of intersection with the wall surface - this is the installation of the mounting plinth and the heating of the canvas. To decide what work to do first: the ceiling, and then the wallpaper, or vice versa, you need to consider all the points of contact.
In metal or plastic skirting board special holes are drilled. But this does not affect the finish, since this area will be covered with a decorative plinth. In this case, the stage of working with wallpaper should begin.
Heating the film with a gas gun can ruin the finish, including the wallpaper that is on the walls. But they can also be damaged when rearranging furniture. In this case, a lot depends on the professionalism of the master. Even thin wallpaper does not deform from the effect of this temperature, if you do not aim the gun purposefully at the wall.
It is important to weigh the pros and cons before making a decision and starting work. In many cases, wallpaper is used first, and then a stretch ceiling is installed.

To consider all the arguments and make an informed decision, watch the video:
Have you finally made a decision to renew the interior of your home? Then the knowledge of what stages of apartment renovation await us and how to observe their sequence will come in handy. So many, at first glance, imperceptible nuances can arise.
If you determine the sequence of actions in advance, the result will only please.
- This is a chance to significantly save your budget, because you don't have to redo anything and buy in a hurry, while overpaying.
- The duration of the work will be reduced. Self-organization always contributes to a faster completion of the case.
- The repair will be really high quality.
The first mistake of the owner who decided to start construction works, - thoughtless purchase building materials... Often, due to haste, he buys a lot of excess, but what is actually needed, on the contrary, remains on the shelves. After all, even for groceries, it is better to go with a well-thought-out list.
Read on where to start your renovation.
It all starts with an estimate. In this case, it is advisable to invite a specialist for consultation, even if only independent work is planned in the future.
 Before starting the repair, it is necessary to develop a project and draw up an estimate
 With a well-defined plan and a competent list of everything you need, you can start.
Work order
We draw your attention once again: in order to avoid mistakes, alterations and downtime during the repair process, be sure to adhere to finished plan.
 Step by step renovation
 Dismantling the old interior
It all starts with total preparation. Such jobs include:
- removing old wallpaper;
- dismantling of plaster;
- destruction of walls and partitions not provided for in the new project;
- removal of floors;
- dismantling of surfaces intended for replacement.
Skip the dismantling stage and go directly to the next step.
 Dismantling the interior
 Installation of communications
First of all, they carry out work on the installation of communications. Before making repairs, you need to do all the operations that can destroy new coatings: installation of windows, doors, wiring and ventilation. Also, pipe wiring can be attributed to this stage.
Read more about this in our articles:
All old electrical wiring is removed and a new one is installed. The safety instructions for the placement of outlets will help you to position the electrical components correctly and use wires with a sufficient cross-section. For example, you should take care of the presence of thick wiring and grounding at the point to which the washing machine will be connected. 
Creating partitions
At this stage, you can change the entire layout of the apartment, bringing novelty and additional comfort to the interior. 
With the help of partitions (especially if the extra walls are removed), you can create an office, a nursery, divide a bathroom.
Most often, bricks or foam blocks are used for such purposes, less often drywall. Cover new wall soundproof plaster, you can achieve greater comfort. When creating partitions, it is important to take into account the squaring of the premises, sometimes it is better to leave one large room than doing five little ones. In addition, the creation of unnecessary partitions can lead to a violation natural ventilation apartments. So when erecting additional walls, be sure to consult with professionals.
Articles on our site on the topic:
Plaster
For plastering work, it is recommended to use a ready-made cement-sand mixture (DSP) or gypsum plaster that will get rid of possible mistakes in self-mixing proportions of sand and cement. If there is not enough experience in such work, it is still better to hire specialists. Firstly, it saves time, and secondly, you do not have to redo unsuccessful work.
More details:

Screed
Pouring concrete, equalize the floor. The quality of these works will affect the subsequent placement of furniture in the room. Probably more than once faced with the problem of leveling a table, chest of drawers, armchairs and, more significantly, a washing machine. A good screed will help avoid such difficulties in the future.
More details:. 
Plasterboard installation
At least a week should pass between the screed and the installation of drywall for the room to dry out.
We install the iron sectional base, leveling the surface of the ceiling. Then we mount the drywall sheets.
More detailed articles on this topic.
Repair, especially overhaul, is a multi-stage and complex process, and you can significantly simplify any repair using correct planning the sequence of processes and the sequence of stages of work, regardless of the type of premises and whether the work will be carried out by hand or with the help of specialists on a contract basis.
In this article, we will consider the issues of the procedure for carrying out repairs in an apartment - in an operated house and a new building.
General rules and procedure for performing repairs in an apartment
The sequence of work when renovating an apartment should be determined before the start of all events... Every repair, especially a major one, should begin with drawing up detailed plan, which includes:
It is very important to be competent - this will allow not only to heat your house or apartment, but also to feel safe at the same time, to avoid unjustified problems and waste.
Complete instructions on dry floor screed knauf - read. Product features, advantages and disadvantages of using Knauf dry floor screed.
When planning a repair, pay attention to some points that will help you organize the process correctly:
- repair work must be started from the "far corner" - the farthest in relation to the entrance of the room;
- dismantling of old finishes, as well as installation, are carried out from top to bottom - from the ceiling to the floor;
- if some of the materials (for example, high-quality parquet in good condition or ceramic tiles) you would like to use it as a finish after renovation, then it is necessary to involve specialists in the dismantling work and think over a place in which the materials could be stored until the stage of finishing;
- proceed to finishing possible only upon completion of work related to wiring engineering communications.
Repair procedure in an apartment
Repair in an apartment in an operated building can be of two types - cosmetic and capital.
The peculiarity of cosmetic repairs is that it can be carried out in short stages - one room at a time, while it is better to plan major repairs simultaneously for all rooms of the apartment. The sequence of apartment renovation plays a decisive role in the success of your plan.
Redecorating:

How important is it? Is it right or wrong to carry out all the work moving "from top to bottom"?
Read about materials for internal insulation walls and choose your own, the best and most reliable option for internal wall insulation.
Overhaul:
- Complete dismantling of the room - all furniture, decor items, lighting fixtures, sockets and switches, decoration, window and door openings, as well as the floor screed, plumbing are removed.
- Cleaning and garbage disposal. Actions starting from point 3 are also the current procedure for repairing an apartment in a new building.
- Diagnostics, disconnection and dismantling of utilities - heating, water supply, sewerage, electricity. As a result, only the "bare box" should remain - the base of the ceiling, floor and walls, that is, everything is dismantled down to the plaster.
- Redevelopment of the premises, if necessary - dismantling of walls and floor slabs, cutting or relocating door and window openings, installation of windows.
- Wall chipping and electrical wiring.
- Leveling of all surfaces (primer, putty, plastering).
- Floor screed device.
- Layout of pipes for heating, sewerage systems and water supply systems.
- The embodiment of the design project - the device of insulating layers, the installation of plasterboard structures, Finishing work(in the following order - ceiling, walls, floor, ceiling and floor skirting boards).
- Installation of doors, lighting fixtures, household appliances, furniture and decor items.
The given procedure for repairing an apartment can be adjusted if necessary, but it is advisable to follow the steps, as well as the sequence of the described processes, since with the help of proper planning and adherence to the procedure for repairing an apartment with your own hands, you will reduce the costs of unforeseen situations and optimize the time of work.