How to make a greenhouse yourself - ideas for homemade greenhouses in the country and balcony. How to make a greenhouse at home with your own hands? Which greenhouses can be made by hand
Having even a small plot of land, it is difficult to do without a greenhouse. Seedlings grow, get early yield, cover them from possible freezing, from the heat, to make plants on flourishing earlier - all this can be done with the help of this device. And make a greenhouse with their own hands easy. There is at all simple designs, there are more complex, but the manufacture of any of them does not require special education.
Frame for a greenhouse can be made of wood (boards), metal (corner, profile pipe or fittings) or from PVC pipes (round or square). Shelted the greenhouse the same materials as : film, spunboode (called still agriched or nonwoven underflowing material), polycarbonate and glass. Since the size of the greenhouses is less (plants in greenhouses are served outside), then the requirements for them are not so tough: even a strong wind is unstable.
Dimensions of greenhouses
Since in the greenhouse plants are serviced outside, its width is selected at the calculation to be comfortable to handle plants landed towards the middle. We define it with an experimental way: please yourself, and you are trying to reach some kind of hand. Measure the distance. Get a width of a greenhouse with a unilateral approach. This is if the greenhouse is located so that from the second side it is not to get to him (at the wall, for example). If you can come from two sides, you double this result.

The distance for each person it turns out different: affects growth and physical condition. Do not chase savings, making it wider than necessary. You will have a lot of time to spend on weeding, loosening, fertilizer, other works. A couple of hours in an uncomfortable position, and no strength remains. Therefore, it is better to make a greenhouse a little already, but to work it is convenient: getting pleasure from work, you spend less strength.
And the length of the greenhouse is chosen based on the planning of the site. She is arbitrary.
Simple greenhouse from arcs under the film or spunbond
This greenhouse is made of several boards, knocked down by the required dimensions, arcs from PVC pipes that are attached to a wooden base. The tops of these arcs are connected at the top of the timber or the same pipe. If it is a bar, it needs to be processed well, rounding the edge so that the film does not rush.

How to fix the arcs
How to fix arcs from PVC pipes on a greenhouse frame. Most often using a metal perforated tape. Take a small piece of centimeters of 5-6, self-tapping screw and screwdriver. And fix from two sides. For reliability you can double.

In exactly the same way, you can fix them from the inside to keep stronger, add bars.

Another option: near the carcass, drive the segments of the reinforcement, and on them to put the pipes and only then fix it with clamps to the frames of the frame. This option is more reliable.
How to mount a film
It is possible to mount the film to PVC pipes on bilateral scotch. But only if the film was used inexpensive polyethylene: it is impossible to tear it off without fail, and the polyethylene serves no more than a year. So for a seasonal greenhouse, this option is from the discharge "cheap and angry". The second method is special clips to fix the films and all that they can replace - a piece of the old hose, cut along, the fixator for pipes that are used for mounting pipelines, stationery binders, etc.

It makes sense from two sides along the edges of the film to fix the bar. To do this, the film is cut off more than it is necessary in length, the lumps wock the bar and fastened the film on it. Now you have a piece of film, for the short sides of which bars are attached. One leave on one side, the second throw on the other. Now you do not need to press the film to the ground with stones: it is not bad for a bar. It is also convenient to open a greenhouse to ventilat with it, screwed the film, put up.

You can use small carnations for fastening the film, but under the hats to put the washers. Faster work with a construction stapler with brackets. So that the film does not break into the places of fastening, they are packed with something. It is possible - a dense braid or just a strip of fabric, and already clog fasteners.

More powerful option
If there is a need to make a greenhouse with PVC arcs more reliable, to the base of the short-sided board, wooden racks nourish. The board is attached to them on the edge, in which the holes in diameter are previously drilled than the outer diameter of the pipes.

When installing the pipe is done through the hole. It is possible to fix it on the sides as proposed above, or to do something else: in the bars to install the studs, and to wear a pipe.

The easiest greenhouse
The good PVC pipes are that they are easy to bend. Another thing that weigh little. An ideal option for a lung portable greenhouse, especially if you combine it with spunbond. This material can be sewed. Take a piece of density from 30 kg / m2, with a step of 50 -60 cm made snacks in it. For the scene, tumble across the strip of the same material with a width of about 10 cm (it is stitched from two sides). Inside insert sliced \u200b\u200bon the desired pipe cuts.

Now all this can be installed on the bed: sticking the pegs in two rows from one and the other side of the bed, they are planted with a pipe. Immediately it turns out a ready-made greenhouse. And what is still convenient: open and close the plants simply by collecting or installing spunbond on the arc. This is a very convenient temporary greenhouse: as soon as he is not needed, in a couple of minutes it can be removed and folded.

Greenhouse is easierless
This guy is good for seedlings, but you can do it for pepper, eggplant. In the middle of the base, a rack is nailed. To her - two inclined boards. In the section it turns out a triangle. If the greenhouse is needed long, approximately each meter is installed the same design. All tops are connected by a long bar or pipe. Simple and comfortable design of this greenhouse.
Cucumbers are grown with it only until they start to melt. Under the cucumbers, the covering material is removed, they nourish the sidewars (screw) the racks, between which the twine is tightened.


Greenhouse "Lubacle" and "Butterfly" - Photo
This design is called "Lubble" due to the fact that one in one is similar to the plastic container for bread. Her lid also rises up, hiding behind the second half. If you look at the photo, you will understand everything.

There are two types of such products: opening with one or both sides. If he is shallow, it is possible to work with a lid opening on one side. If the width is more than a meter, it will be easier to work if access is available on both sides. This design with two opening parties has its own name: "Snail".
On the manufactured frame stretch the film, spanbond, but polycarbonate is more popular for this design.
The second design is characterized by the type of door opening. Its arch is also made on arcs, but opens on the loop up (see picture).

They can be installed directly on the soil or on the prepared base of bricks or timber. In some cases, the lids open not immediately from the ground, but there is a small side of 15-20 cm.
From girlfriend materials
To turn unnecessary things into useful products - there is no equal in this people. Make greenhouses from such things that never think.
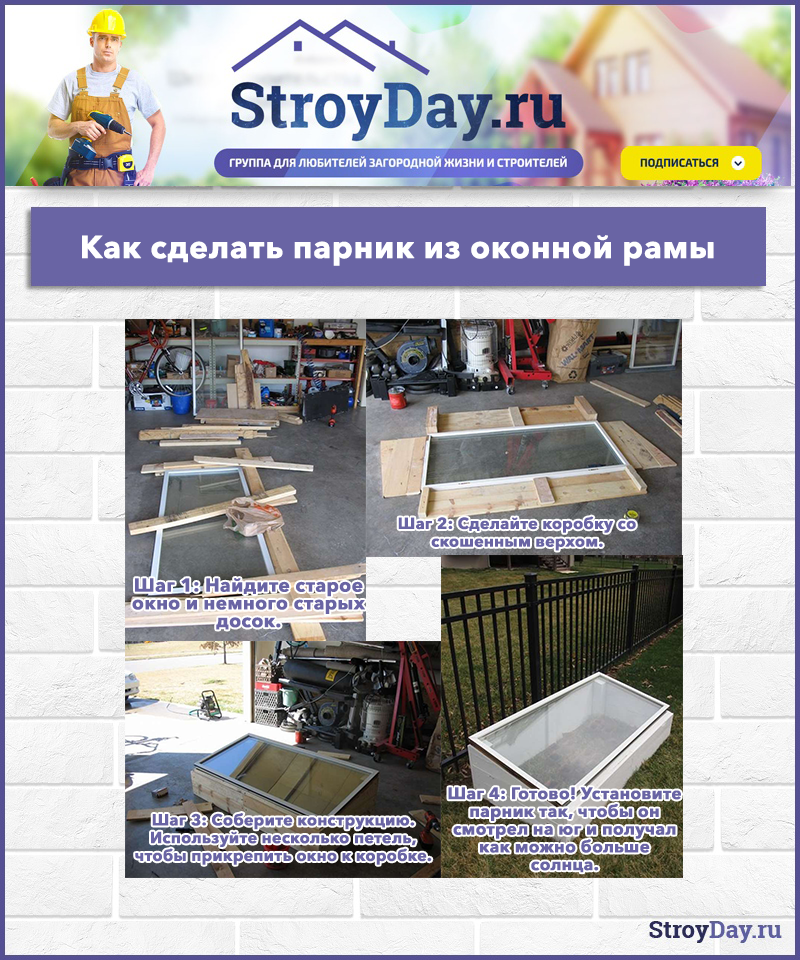
For example, it is easy to make a greenhouse with your own hands from old window frames. When replacing windows, do not hurry to throw them out. Of these, you can make an excellent greenhouse. And the designs can be different. The easiest is the housing, shot down from the boards to which the window frame (with glass, naturally), is coming from above.

In order for the plants to receive a maximum of light, one of the sides of the frame makes higher (which is facing south or east). Frames exist different, any of them can be used for these purposes. In the proof - the photo gallery of greenhouses from the frames that were made with their own hands with the laundric owners.
Make greenhouses from barrels. Cover the old umbrella from the transparent film or cropped plastic water canes.


A homemade greenhouse can be made of a plastic or foam box. Although "make" - it says loudly. Total then you need to pull the film.


Mini-greenhouses for seedlings
For those who grow seedlings for their own garden or flower bed, large volumes of anything. Looking small guy. Moreover, many grow seedlings on the balconies. All the above designs can be used for a balcony in reduced sizes. For all minor landings, you can generally take plastic trays for eggs. On the one hand, it turns out a container for the soil and, and the lid will be instead of shelter. Other ideas consider in the photo.
 Using plastic bottles Already familiar, non-standard only form. A bottle is only caught in and inside the glass is inserted with a seedler, and you can plant right into the lower part ... And this is a portable mini-greenhouse for plants
Greenhouse with your own hands can be collected in a few hours. No complex structures will not have to build. Everything is very simple, economically and practical.
We invite you to familiarize yourself with 3 most popular and simple ways Make a greenhouse with your own hands: option of manufacture of pipes, polycarbonate and budget method of manufacture of remedies. To each method there are photo instructions and detailed description manufacturing process.
To diversify your diet, provide seven real natural vitamins earlier than the new yield will appear on the market, and with the right approach - even to deliver fresh vegetables and berries to the table round year, It is necessary to build
However, before proceeding to work, you need to thoroughly think over all the nuances of the future process, to thoroughly understand the question:
- First you should immediately decide which area can be appointed under it.
- The second thing to decide is the functionality of the structure - whether the greenhouse will work all year or it will begin to be used only in the spring. The year-round option will require much more and effort, and materials, as the installation of heating, lighting, water supply and good ventilation will be required.
- The next step - the type of greenhouse design and the material from which it will be built is selected.
And in order to, decide which their structures to erect, you need to consider some of them.
Types of greenhouses
There are many kinds of greenhouses, and besides, on the basis of the general principle of their device, many craftsmen come up with own Options for greenhouses or individual elements of this agrotechnical structure. Greenhouses can be divided into different criteria, such as a form of construction, material manufacturing, Stationarity or temporary construction.
Greenhouse designs
- A greenhouse frame can be arranged from boards, and useful volume is protected by a lid in the form that have the opportunity to open. This type of greenhouse is suitable for growing seedlings or greens, for its early receipt to the table.

- Other temporary view of a greenhouse that It is established only at the spring-summer period, it is arranged from a wooden frame, fiberglass fittings and a plastic film.
 The most simple - temporary tent guys
 Such a greenhouse can serve for many years if during the winter period to disassemble it on the details and clean it in a closed room. Change the film to a new - special work and high costs will not submit.
Video: The simplest guy on the fiberglass frame
- Some craftsmen arrange a greenhouse in a big old barrel - it is also usually used only in the spring, but you can not clean it for the winter from the site, but to apply as an open bed or flower beds.

- More difficult view of a greenhouse that It is amenable to forced heating, and it can be started to use immediately after the snow. Such a design is made of boards, metal-plastic reinforcement and a dense polyethylene film or. The advantage of this greenhouse is that in order to track and care for plants, it is possible to enter the structure.

- Capital Greenhouse, which is equipped with all the necessary equipment to ensure the desired microclimate, allowing it to use it throughout the year. For him, you need to make a shallow foundation, brick basis and good insulation.

This version of the greenhouse can be attached to the wall of the residential building - then it will be easier for all communications. It will be more convenient to care for plants at any time of the year - the entrance to such a greenhouse can be made directly from the house.

- In order to save on in the winter, often arrange the so-called greenhouse thermos. For it, it rotates a depth of 1700-20 mm, which is then covered with a transparent roof. In this versa, the greenhouse is very important. proper installation Ventilation system.

Although the work on the arrangement of such a greenhouse is quite laborious, but this design will help to save well for payment for energy resources.
Roof shape
When choosing a form of a greenhouse, you need to be able to understand the question, which of the roof designs will be the most effective for growing plants.
- Double roofs
The greenhouses with a two-tie roof are quite popular, as they are spacious, and they are comfortable, not only plants, but also gardeners. With proper design, installation and selection of the material, the room will be covered all day with sunlight.

Such greenhouses are often used as a winter garden, placing them not only and not even so much vegetable crops, but exotic plants. However, it will be possible to implement this option if all necessary conditions have been created - there are reliable heating systems, irrigation and lighting.
- Arched roof
This variant of the arched shape is simpler in the installation than a greenhouse with a two-tie roof. In addition, such a form, closed by polycarbonate or polyethylene film, perfectly dispels the sunny rays according to the coherence, which allows plants to obtain a maximum of natural light.

Highly an important point It is also the fact that due to the arc-shaped form, precipitation in the form of snow does not accumulate on the roof, and therefore, the risk of deformation and damage from high load during the winter period is eliminated.
Single roof is well suited for greenhouses, which are adjacent to one wall to a more massive construction - to the house or high stone fence, be sure to from the south side.
On the construction of this greenhouse, you can save, as one of its sides will be the ready wall, to which it will be adjusted. In addition, the greenhouse will be easier to spend all communications.

Designing a greenhouse with a single roof, you need to choose the slope slope correctly so that the snow does not delay on the roof surface, since an excessively high load can damage the coating.
Greenhouse coating material

For different design designs, various materials will be required, but there is always one common feature - the material for the coating of the walls and the roof should be transparent, transmitting daylight sunlight.

This table contains information on the characteristic physical, technological and operational qualities of the three most used materials, such as polycarbonate, polyethylene film and ordinary silicate glass.

| Technical and operational parameters | Cellular polycarbonate | Glass | Film |
|---|---|---|---|
| Mounting complexity and weight | Easy weight, self-supporting material. It makes it possible to reduce the number of parts of the frame and even completely abandon the foundation. | Glass is a heavy material, so if it is chosen for the coating, the construction must have a durable frame and reliable base (foundation).. | Very light material that needs reliable strengthening on the frame. |
| Durability | Proven practice Operating period of the coverage - about 20-25 years, the manufacturer gives a warranty for 10 years of its service. Polycarbonate due to its rigidity itself is an element of power construction. Once pinned, it does not give strain and distortion. | The material is durable if protected from mechanical exposure and large loads (snow and hail). | The life of the film is very small, at best - two or three years, as it is destroyed under the influence of ultraviolet rays. |
| Noise insulation | Material, thanks to its cellular structure, the wind noise is good. | With poor installation, the wind can penetrate into the greenhouse, and the glass is ringing or the rat. | Almost does not create noise insulation, and with a strong wind, shershet brushes in the wind. |
| Appearance | Aesthetic and modern appearance of the material will make a greenhouse even to a certain degree decorative element of the country site. | Glasses have a sufficiently neat look, if installed in all the rules. | The material looks neatly only in the first year after it after fixing, then the film is purre and destroyed, especially if it is left on the frame for the winter period. |
| Safety | Polycarbonate is safe, not broken when falling. It is 200 times more stronger and at the same time - 15 times easier for fragile and sufficiently heavy glass. | Shards of glass are very dangerous when entering the soil, as they can be very seriously injected. Therefore, for safety reasons, the installation of glass should pass with strict observance of all precautions. | From the point of view of injury - is completely safe. |
| Care | On the surface of the material, dust almost imperceptible, and with severe contamination it is enough to wash with water from the hose. | Rain drops can be delayed on the surface of the glasses, and then hanging, they leave muddy trails. To wash off these divorces from the surface, you have to make a lot of effort. | The film is not recommended to wash, as the turbid divorces will remain on it, which will prevent the penetration of light. |
| Created microclimate | Polycarbonate perfectly heat the room. Educated as a result of condensation of upstream evaporation drops, flow along the walls of the greenhouse, and do not fall on the plants or on the head of the gardener. The material skips very well and dissipates sunlight. The heat released by plants and soil does not go through the coatings of the greenhouse, therefore the necessary greenhouse effect is formed. | Glass does not give the same high thermal insulation as polycarbonate, so the greenhouse effect is significantly reduced. The material misses the light well, but does not smear it, and poor glass often begins to work like a lens, which is undesirable for the leaves of plants. | A new dense film creates good thermal insulation, but, after working on one season, it thinks and more, so loses its property to fully retain heat and skip light. |
Given all these parameters, you can choose the material suitable for a particular greenhouse, which will mostly match the design of a particular greenhouse.
Prices for various types of greenhouses and arcs to them
Greenhouses and Arcs
Preparing for the construction of a greenhouse
Location on the site
 It is very important - to choose the right place for the greenhouse
 Expert opinion:
Demidova O.V.
Florist. Landscaping designer.
In order for the planting in the greenhouse, the light needed for their development as long as possible during the day, you need to position correctly and orient the structure on the site. From how long the beds will be covered with natural light, the yield of plants is largely dependent. So most often greenhouses install On the fully open space or the transparent surface to the south.

By choosing the desired version of the greenhouse, having found a suitable place on the site for it, having correctly calculated your strength and opportunities, you can proceed to drafting a sketch and a small drawing.
Project of Greenhouse

It is not necessary to draw all elements on the line, adhering to the strict rules of drawing art. If the owner plans to build everything on his own, and makes the project for me and his assistants, it will be enough to draw a greenhouse in such a projection, in which it would be possible to see all the parties to build and put on them the size of all the main elements.
Marking of the territory
After the project is drawn up, you can start the markup of the territory. This is especially important if you build a greenhouse thermos or a winter greenhouse on the foundation, as in that, and in another embodiment, a considerable amount of earthmoving works are supposed.
Marking is made with the help of rope and pegs, which are driven around the perimeter of the future pit.
Kotlovan and Fundam
- If a single-year-thermose variant is selected, which can work all year round, then before starting the digging of the pit, it is necessary to safely remove the upper fertile layer of the soil from the placed area. This soil is postponed into a separate bunch, as it will then be necessary for bookmarking in a greenhouse.

In the deepening of the pit, if the clay layers were caught, it is also folded separately from the mixed soil under the fertile soil. Clay can come in handy for the manufacture of saman bricks that can be insulated with a greenhouse.
The depth of the pit should be at least 1700 mm, but it usually deepens to 2000 mm. Exactly at such depth Natural geothermal heat is maintained, ascending from the ground, since the soil is never freezing. (Of course, provided that the greenhouse is not satisfied in the northern regions of the country, where the permafrost permafrost is prevailing a relatively shallow against the surface).
The recommended width of the pit from 2000 to 5000 mm, and the length is chosen at will. It is not worth making a greenhouse wider, as it will quickly get out, and on its heating and lighting is needed much more electrical or other energy.
In addition to the pit itself, a smooth descent is discarded, where the entrance door to the greenhouse will later be installed.
- If there is a place for the all-season version of the trunk, then the trench is placed on it under a ribbon foundation of a width and a depth of 300 mm.

Such a depth is quite enough, as the structure is not heavy and does not give a large load on the foundation. Height, over the ground, the foundation can be lifted by 200 ÷ 500 mm, although sometimes poured only 100 mm, and the remaining wall is subsequently raised from the brick.
Further, the sand is covered in the trench and the sand, layer of 50 ÷ 70 mm, then crushed stone, the same layer. After that, along the trench, with a small deepening in it, a formwork is established, which is subsequently filled with a solution. Must be tracedSo that the concrete be on tightly, without leaving the air cavities, it is possible to avoid this "pin", a plug-in freshly lined with a bayonet shovel.

In some cases, reference racks made to the foundation of CP AZU metal pipesTo which the other elements of the greenhouse will be attached.
- The third version of the base for the greenhouse is a wooden frame from a bar, which impregnate with antiseptic compositions and installed on a sandy pillow.
 The simplest base of the greenhouse is a wooden frame on a sandy pillow
 Installation of greenhouses
Having understood with the basis of the greenhouse, you can move to the installation of the selected option.
Rating of greenhouses for making with your own hands
| Photo | Name | Rating | Price | |
|---|---|---|---|---|
| #1 |
|
Greenhouse on a wooden frame | ⭐ 70 / 100 | |
| #2 |
|
Greenhouse thermos | ⭐ 84 / 100 | |
| #3 |
|
Greenhouse on foundation | ⭐ 96 / 100 | |


3. Greenhouse on wooden frame
- no concrete foundation is required;
- easy to make with your own hands.
- strong wind can destroy the design.
A greenhouse for which the device is not required of a concrete foundation, and a durable wooden frame is the basis, mounted the easiest.
- Made from a timing section of approximately 200 × 150 mm box base is laid on a smooth prepared platform, covered with sand. The basis should fit tightly to the surface of the earth with all its area. Therefore, if when placing the frame between it and the soil surface, the gap will be detected, it will be necessary to close it with the help of stones. It is necessary to align the frame at the level, otherwise the greenhouse will stand uneven and unstable.
- After the box is aligned, it is 700 mm long in its inner corners into the ground. This measure is needed to fix the base in place.

- The next step along the box along its long side to the ground is hampered by the segments of the reinforcement, which should go into the soil by 700 ÷ 800 mm, and 600 ÷ 700 mm should remain above the surface.

The reinforcement is driven at a distance of 500 ÷ 700 mm from each other and exactly opposite the same rods driven on the other side of the box, as they will become the basis for fastening the pipes.
- Further, the fittings protruded from the ground are put on pre-prepared metal-plastic pipes required. It turns out a peculiar arcade, which will be the basis for a transparent coating.

- In order for the pipes tightly in one place, they are recommended to fasten with metal loops that are screwed by self-drawing to the box.
 ... and their fixation to the box
 - If the design is obtained volumetric, then it must be reinforced by the end parties, as they must stand rigidly. This frame will not only give stiffness, but also will form a doorway.

For this, vertically set the bars, a cross section of 50 × 50 mm, and then in several places fasten them with horizontal cross.
Sometimes, knowing that without transverse fasteners could not do, the pipes for the arches are bonded by the cross adapters in which horizontally segments are installed.
Prices for greenhouses

Another option for giving the stiffness design is the fastening of the entire arcade in the top of the vault of one common pipe.
 Sometimes one central "konkova" pipe
 Fastening is carried out with wire, plastic clamps - "ties" or a construction tape.
 Bonding pipes with a plastic clamp - "Tip"
 - Next, the framework from the pipes is covered with a very dense polyethylene film. It is placed on 200 ÷ 250 mm. At the bottom of the film is fixed to a wooden box with a construction stapler and bracket.

First, the film is stretched to arcade, and then attached to the end sides. IN doorway Film bends inside the greenhouse.
- The door to the greenhouse should be light, but at the same time have a tough design. It is mounted from a bar of 50 × 30 mm, and one or two rails are fixed to exclude its deformation diagonally. Then the resulting "door leaf" is covered with a plastic film.

The door is hung on the corresponding prepared for it Open with loops. Just like the door, the guide holes are mounted, which have closer to the ceiling on the opposite side of the front side of the greenhouse. This should create a flow of a natural circulation of air.
Video: simple version of compact seasonal greenhouse
2. Greenhouse-thermos
- the ability to grow cultures and collect harvest to deep winter;
- long service life.
- high cost of materials;
- long and labor cost construction process.
Foundation under the walls
- After the boiler is ready for the greenhouse, it is necessary to create on its perimeter. There is a trench for this, and then all actions are carried out similar to those described above, where the foundation is considered under the winter greenhouse.

- When the foundation is completely ready, you can move to the wall masonry, not forgetting to install one or two ventilation pipes. They are mounted at the bottom of the end side of the structure opposite to the inlet door, at a height of 500 mm from the floor.
- Pipes, after installing the roof, raise the height over the soil, about 1000 mm.

Laying of walls
The masonry can be made of saman bricks, or from a non-removable formwork from polystyrene foam blocks, whose cavities are filled with conventional cement mortar.
- If the last option is selected, then you can immediately get insulated walls, but in this case the resulting structure will need to be separated from the soil with a polyethylene film.
After the construction of stone walls, the gap between the soil and masonry must be fill in the clay, which should be good to ravibly. The thermosa greenhouse scheme is well shown in the figure.

- The walls rose from the foundation above the soil by 500 ÷ 600 mm. If a non-removable formwork was not used for the walls, then they need to be insulated to the depth of the primer of the soil (taking into account the climatic characteristics of the region where the greenhouse is erected).
- The insulation can be laid on the outside of the wall, that is, between it and the soil. Therefore, the gap between them will have to expand and separate the insulation from the soil with a waterproof film.
If the insulation is chosen by polystyrene foam, and it will rise above the surface of the soil from the outside of the structure, it is necessary to close it with waterproofing, and then the outer decorative coating. Best of all, if it is a material that is not subject to rotting when moisture gets into it. For example, plastic lining is suitable.
- The closing of the insulation can be carried out and differently - it is falling as far as a clamzite outside, and on top covered roofing material. For this, professional flooring is well suited, which is fixed below polycarbonate or glazing. In this case, the polyethylene film for the roof cover is not suitable.
Installation of carcass
The next step is to install the framework for the wall covering and the ceiling by polycarbonate, as it is mounted - much easier and safer.

The framework is erected from wooden bars or hard metal profiles.

- At first, on the walls raised from the pit, are stacked and fixed by anchor mounts of the bars having a section size of approximately 100 × 150 mm. The rafters and the ski bar must have the same size in the section as the bars installed on the walls.
- A rare suit is attached to the rafter, about two ÷ three bar on the skat. In this case, it is necessary to ensure the stiffness of the structure.
- Next, polycarbonate sheets are fixed on the crate. They are screwed with special self-drawing with a large hat (press washer) and rubber gasket.

- Having finished the installation of the roof covering, the ground side of the greenhouse is coated with polycarbonate, and then the ready door is installed. It is desirable that she also had a glazed part.
- In addition, the upper part of the ventilation is mounted almost under the roof itself - the hole is satisfied and the pipe is installed.
Warming structure
- It must be said that it is very important to leave open to sunlight That the slope of the roof that comes out on the south, since the sun there are longer during the day.
- The second slope of the roof from the inside of the greenhouse is covered, which will reflect the light falling on it through the transparent part of the roof. For this purpose, foamed polyethylene thick 5 mm thick with a foil surface.
 Approximate scheme of greenhouse thermos - 2
 Fasten it to the rafters of the roof using self-tapping screws with a wide hat. At the junction, the insulation is bent on the wall.
- Further, all the walls of the greenhouse are insulated in the same way. The insulation on the vertical stone surfaces is fixed on "Liquid nails", or the lamp is satisfied on the wall and the polyethylene foam is attached to them with self-draws.
 Insulated greenhouse thermos - view from inside
 The task that foil coating should perform is not only in reflection of lightinward premises, but also saving Carbon dioxide, moisture and heat, which are vital for photosynthesis processes occurring in plants.
Providing heating
To keep warm inside the greenhouse for a long time, you must install the doors on the ventilation holes.
The room can be heated in different ways - electrical system "Warm floor", convectors, and if the greenhouse is close to the house, then you can spend water heating and from the gas boiler.
- If the "Warm floor" system is installed, then before it is placed the bottom of the greenhouse needs to be prepared so that the energy does not go into the soil. The system is usually mounted only under the beds, although if necessary, sometimes it is placed under the tracks between them.

Preparations passes as follows:
- The soil is placed insulating coating. Better if it is foil;
- top of the sand imposes a reinforcement grid with cells of 30 × 30 mm;
- the heating cable is fixed on it;
- he falls asleep with a sandy pillow of 50 mm;
- on top of it replaced the reinforcement grid;
- It will fall asleep 300 ÷ 400 mm of soil.
All these layers are placed in the shaped beds, whose boards serve as boards or brick.
Most often arrange along the walls, but if the greenhouse is very wide, then one more, additional, can be installed and in the middle. It is advisable to make a bed at a low angle so that the soil surface is slightly rotated to the transparent southern slope of the roof.
Prices for polycarbonate
polycarbonate
- Recently, convectors are installed in the greenhouses in the greenhouses.
 Convectors - efficient maintenance of the desired air temperature in the greenhouse
 They have a number of significant advantages that are ideal for greenhouses and greenhouses:
- they are much less dried air than any other heaters, since they are arranged in such a way that they create artificially circulating warm air;
- Easy installation - convectors are hung on the brackets mounted in the wall, are included in the outlet, and the desired temperature is installed on the thermostat;
- Big plus - automatic switching on and off the heater according to the selected temperature regime - and this is a considerable energy savings;
- Convector compact and has aesthetic modern appearance.
Before buying big roomYou need to view the characteristics of the device and its power - only after that it will be known how much the heaters will need to specific area.
- Another option of heating can be a pig-iron boiler for long burning with water circuit.
 Greenhouse Heating Water Contour - Approximate Scheme
 To establish such a system, you will have to work well:
- It is necessary to install the boiler itself. Its installation is made in the greenhouse itself or in the adjacent room.
- It is necessary to carry out a chimney pipe that is needed to raise about 5000 mm.
- To pass the pipe through a hole arranged for it, it is necessary to isolate the combustible materials of the greenhouse from high temperatures With the firebox of the boiler.
- Fill the system with water, set the temperature sensor in the greenhouse room.
Installation of this system can be called probably the most difficult of all other options, including compared with the heating converter system.
Heated greenhouse, you need to know that for the normal development and growth of plants, it is necessary to maintain the air temperature within 25 ÷ 30, and the temperature of the soil is about 20 ÷ 25 degrees. In addition, an optimal level of humidity must be created in the greenhouse.
1. Greenhouse on the foundation
The greenhouse installed on can safely function yearly, if all the conditions necessary for this will be created.

In this case, the build assembly must be carried out with special care, as the structure should be, in fact, hermetically, except, of course, installed system Ventilation.
- the longest service life;
- resistance to strong winds and hurricanes.
- high cost of materials;
For the frame of such a greenhouse, it is best to choose wood, as it spends a lesser cut, rather than metallic profilewhich will be guaranteed to create "cold bridges".

The frame for this type of greenhouse is mounted as follows:
- On stone or sacred, plastered walls, erected by 500 ÷ 700 mm above the surface of the soil, waterproofing material is stacked. As a rule, this is an ordinary ruberoid.
- In anchors of thick wooden bars are fixed on it. Their width depends on the width of the walls, and the height can vary from 50 to 150 mm.
- The gaps between the wall and bars (or metal profile) must be elapsed by assembling foam.
- Next, work passes depending on which greenhouse material is chosen - it can be the installation of finished metal-plastic frames or the construction of a wooden or metal carcass.
- Then, in the frame from metal plastic, double or even triple glass windows are installed, in a wooden frame - rama From wood, with glass already installed in them, or also with double-glazed windows, and polycarbonate is most often fixed on the metal frame.

The foundation, the floor and the bottom of the wall of the greenhouse should be very well insulated. Therefore, in this case, you can take the system "warm floor", the device of which is described above, but in addition to it is recommended to establish convector heating. It will well maintain the desired room temperature.

If the greenhouse is placed in the regions with very snowy winter, then when cleaning the yard from snowdrifts, the snow is recommended to add to the bottom of the greenhouse walls. Snow is a very good insulation and will help to save on the heating of the structure in the winter.
For walls, you can choose a thick glass in 5 ÷ 7 mm or cellular polycarbonate In 10 ÷ 15 mm thick. The cellular material has between the two main planes of the air layer, which will work as insulation.
Greenhouse lighting
Any greenhouse used in the cold season must additionally light up to create a "spring" condition, since the length of the daylight, and the intensity of winter solar radiation will be clearly not enough.

In order to save electricity as lighting devices, lamps with LEDs (LED) are used. They can have a different form, but they are recommended at the highest point of the greenhouse ceiling. Of course, if you wish, you can equip the room and lamps that are most often fixed on the junction of the roof and walls or high on the walls themselves.
You can for the hour, put the control unit with the timer and program the time when light in the greenhouse should turn on and off. Such a system will help save electricity and create the most comfortable conditions for plants.
If the greenhouse is used only in the spring-summer period, then it is completely easy to build it, as it does not require creating some special conditions of insulation and lighting. The Winter Option T The Eplitsa is quite complicated in the calculations and in the construction, and in everyday service, and usually such complexes are arranged those owners of sites that are professionally engaged in flower growing, vegetable growing or growing exotic plants. In this case without
Greenhouse thermos
0 % ( 0 )
Greenhouse on foundation
0 % ( 0 )
To see the results, you need to vote
It is necessary to make a lot of physical efforts with their own hands, the low cost can be attributed to the obvious plus. Well thought out project and materials for carcass In terms of its effectiveness, absolutely nothing will be redeemed by purchased costly options.
What are the greenhouses?
- Warm (heated).
- Half-tempered (Warmed due to additional shelter of walls and soil, installation of infrared lamps).
- Cold.
- East. Heat-loving, southern plants and seedlings perfectly feel on the eastern side of the land plot, especially if the long side of the construction will be addressed in this direction of the world. Skat greenhouses in this case should be with south side. However, this location is relevant to the most part in the spring. East is ideal for spring-type greenhouses.
- South. For a summer greenhouse, the south side of the land plot will be perfectly suitable, where the long side of the greenhouse will be located south, and the scope of the design on the north side. In this case, the morning and evening sun rays will be as best protect building.
- West. Winter greenhouse installed on the west side has the opportunity to receive sunny energy from morning to evening. Such a location is able to significantly reduce the cost of in the greenhouse and lighting in the winter season.
- North. In this case, the plants planted in the greenhouse will receive the maximum light statement in the afternoon of the day, and this is at all undesirable. The accelerated growth and development of culture should occur in the early morning hours, so this location is undesirable.
Planning homemade design gernik, It is necessary to determine the types of crops that will be grown. For example, for giving suitable made by your own hands. Little greenhouse For seedlings, you can make any good owner.
Despite the fact that all fruit and vegetable crops are suitable for greenhouse growing, the need for greenhouse dimensions and natural conditions for optimal development for each plant has its own.
If the seedlings of cabbage, peppers and other low-layer plants are suitable low greenhouses, for tomato or curly cucumbers need more high premises.
Despite the fact that the parties of light are only four: south, north, east, west, the factor should be thought windiness and approximate To household buildings or at home.
Setting greenhouse Right near the wall of the house or shed, you can significantly reduce the likelihood of through wind. On the other hand, on an open area, surrounded by solar energy from all sides, that is, in an open, outdoor place, it is possible to obtain the maximum heat transfer, which will have a positive effect on landed crops.
Perfect place taking into account the parties
ATTENTION! Beds and plantings intended for open soil also more expedient to plant on south side Groomed.
Choose perfect locationwhich would completely fit all the parameters is very difficult. This will especially be concerned with small sites, in addition to the greenhouse, most likely there are other buildings and plantations. In this case, you need to install done by your own hands outstanding place away from buildings and trees.
Greenhouses and greenhouses do it yourself - photo: 

As you can see in the photo homemade greenhouses and greenhouses It looks very beautiful and are done easily! Why not place such a greenhouse in your country?
Project
So do it greenhouse do it yourself. The design of the structure can be collapsiblehaving the ability to move on the site as well permanent (with an in-depth wall variant).
Greenhouse on Smell Hand - portable, very convenient because it can be transferred late spring for seedlings in one place, and in the summer for seedlings to another, but unfortunately it is a purely summer option. Constant The option is warmer and suitable for exploiting even early spring.
In-depth wall version is nothing but - foundationwhich can be made of bricks, logs or concrete blocks.
Perfect height and width
There is an opinion that the larger size gernikMoreover, it can be used, but in large structures there should be a place for the passage, and this will noticeably steal the territory. Length of the greenhouse, can be absolutely any (2, 4, 6, meters), and the width and height of the greenhouse provides a certain type of culture.
Assembly
How to make a greenhouse with your own hands? Step-by-step instruction:
- preparation of the site K. montau Greenhouse. Align the surface to the maximum without slopes and pits.
- marking borders foundation (for permanent design).
- digging trenches For the foundation, taking into account the equality of the angles (90 degrees), installation and processing.
- assembly Greenhouses. Walls can be made of metal frame, plastic pipes of window frames, etc.
- sheaving carcass Any observer material (film, polycarbonate, glass, plastic bottles).
- when designing a future greenhouse, we should consider ways air ventilation: windows, windows, doors.
How to build a greenhouse with your own hands - Drawings: 
In form, there are many options for greenhouses:
- arched. How to make a greenhouse? Most often made of arcuate aluminum or metal pipes, polycarbonate or film is used from the underfloor material;
- double. Such greenhouses can be done;
- polygonal. Such construction of greenhouses is more complicated. The design is made of metal or plastic frame. The heat insulating material can be selected at its discretion;
- used;
- greenhouse "Pyramid" do it yourself. For frames are applied wooden bars Or plastic pipes, glass sheets are perfectly used as a covering material.
You can also make a simple greenhouse with your own hands, and.
How to build greenhouse? Describe a greenhouse with your own hands, you can from handicraft materials available. It can be metal corners or reinforced rods, the main thing that would fit in quality. Prepared framework, later glazed or covered polycarbonate, film, spandbondom.
Now you know how to make greenhouse do it yourself. Remember what material and method of manufacture you would not have chosen, the benefits of him is a huge set.
Useful video
Watch a video about how to make a collapsible greenhouse:
There must be no man who would not want to save on achieving the result. That is why the fans of garden and gardening skillfully invest their resources into the equipment, whether it is hand-made, or bought in specialized store. Such equipment is often a greenhouse or a greenhouse. How to build such structures that will be carelined into an unfavorable climate?
Greenhouse and greenhouse do it yourself, photo
Theme of this article - greenhouse and greenhouse do it yourself. Photos and advice of specialists will help you build up cottage plot Construction for growing vegetables, greenery and berries.
How to make a greenhouse with your own hands?

Unlike greenhouses, the main design of the greenhouse are arcs. Precisely because of them the frame may have different form: arcuate, triangular and in the form of a house. Material for pipes of future arc stands of different types Armature - metal and fiberglass. Also used polypropylene pipes. If they are made from window frames, it is usually put as a covering.

Most likely each dachnik will choose a greenhouse with an arcuate form, it is best exploited. The easiest greenhouse you can present bent polypropylene tubes stretched by the simplest polyethylene film. Film can be secured with ordinary bricks. The optimal distance between the arcs will be half meter. The base can be made of wood or is generally absent. For greater stiffness, it is necessary to bore all arcs with a horizontal beam.

If the greenhouse is needed for growing seedlings or greens, then you should pay attention to the wooden structure. The greenhouse itself is not a high and triangular form. Its plus is excellent strength and stability.
Greenhouse - where to start?
If in your greenhouse there is already lacking space for growing plants, then you should think about the construction of the greenhouse. If the construction of the "greenhouse" design was not particular problems, then it will take an effort to create a "greenhouse" to obtain a solid, sustainable result. What is the algorithm of actions for the construction of the greenhouse with their own hands?

The most simple in the manufacture of a greenhouse - arched shape. Among its advantages:
- Penetration of sun raysand therefore - good growth Plants and abundant harvest.
- Minimum manufacturing materials. The main raw materials for the construction of the greenhouse are PVC pipes, a ram for the base and for the door frame, a fastener bracket, a dense polyethylene film.
- Small size. For the construction of the design, a large area will not need.

How does the construction of a greenhouse or a greenhouse begins?
Stage 1.First you need to choose and prepare a plot where the greenhouse will stand. It is advisable to take it.
Stage 2. After there is a base consisting of dried around the perimeter of boards and disinfected by antiseptic. In each of the angles of a knocked design, it is necessary to insert the reinforcement (in the ground). Of the same reinforcement, it is now necessary to furnish around the perimeter of the base at a distance of no more than 50 cm. Wrinking the reinforcement into the Earth it is necessary to half or less. Length of reinforcement is at least meter.
Stage 3.Sliced \u200b\u200bPVC pipes must be inserted into the valve in the same opposite ends of the pipe. Secure pipes with metal loops with a screwdriver.
Stage 4.. The next step is to collect the door design, which will also strengthen the previously done work. It is necessary to take a bar of this size: one 130 cm, two at 170 cm, two to 60 cm and two to 140 cm. Of the 170 centimeter and 130 centimeter, the doorway is constructed. Next, at a height of 140 cm, 60 cm bars are driven. To the last, from the bottom, the remaining timber is nailed.

As a result, a design with one main frame and two sides should be obtained. It must be said that the dimensions are taken at the rate that the greenhouse parameters will be 3 by 6 meters. Ready frame should be strengthened by connecting with wooden foundation, bars. The last step is the covering of the structure with a dense polyethylene film, consolidate which can be ordinary long bar or with a bracket.
So, we hope that our topic is a greenhouse and a greenhouse with their own hands, photo - It will help you to build a quality, reliable design on your territory, which will allow you to grow rich harvest.

See also Video:
The greenhouse is the necessary construction for all owners of country sites, since this design allows not only to grow strong seedlings, but also to receive an early harvest vegetable crops. In addition, it can grow demanding plant to care, as such a building allows them to cover them from frost and pests.
To build a greenhouse with your own hands is easy, as it is much less greenhouse, and its design is simple, so you can not buy special building materials for the construction, but to use those that are already in the farm. In this article, we will consider the technology of greenhouse construction with their own hands, as well as consider the basic materials that can be used for this purpose.
Greenhouse do it yourself
Before building a greenhouse, it is necessary to determine what it differs from the usual greenhouse. Based on this, you can not only choose suitable option Designs, but also to choose inexpensive, but strong enough materials for construction.
The greenhouse is different from the greenhouse in the following features:
- The greenhouse is a temporary construction in which only seedlings can be grown and early vegetable and fruit crops, while the greenhouse can be used yearly;
- In greenhouses do not install equipment for heating, and support for the optimal temperature is carried out by the Sun or with the help of compost and manure, which are in the ground;
- Greenhouses are usually low, therefore, they are only suitable for growing low-spirited crops, while shrubs and even trees can be grown in the greenhouse.
It should also be borne in mind that the greenhouses differ from the greenhouses in the fact that they can be stationary and portable, and for their construction you can use almost any infringement materials.
Note: As a rule, arcs are used as a frame for such structures, which are covered with film, but it is possible to build a similar building from undergraduate materials.
Preparations of greenhouses from undergraduate materials are quite a lot (Figure 1). For example, for this purpose you can use old window frames. They can be fixed horizontally on wooden drawer, or set up vertically, creating a triangular design. A simple model can be made from a conventional old barrel, covering its upper part of a cropped plastic canister or film.
 Figure 1. Options for structures from infirred materials
 As a small portable greenhouse, the usual wooden or plastic boxes can be used: everything you need to do is cover the top of a dense polyethylene film.
Selection of material for assembling a greenhouse or greenhouse
Despite the fact that such a building can be made from the girlfriend, it is better to use more durable and reliable materials, especially if you want the design to serve for several years.
Next, we consider the basic materials that can be used to build a frame and as an outdoor building. Using this information, you can choose the most suitable option yourself.
Polycarbonate
This material is considered one of the most modern and widely used for the construction of greenhouses. The technical and operational characteristics of the polycarbonate completely justify its value. The fact is that the sheets of such material are much more expensive than the usual film, but the finished design will have high strength and will last for many years, and thanks to the transparency of polycarbonate inside will be enough light. In addition, this material makes the construction of hermetic, so plants inside will develop more evenly (Figure 2).
Note: If you plan to use polycarbonate as a coating, it is better to use a thickness of 4 mm thick. They are strong enough, but the lungs are suitable for installation on any framework.
 Figure 2. Polycarbonate designs
 The size of the sheets can be any: polycarbonate can be easily chopped into pieces of slices, depending on the features of the frame. However, it should be borne in mind that for fastening the material you need to use special self-tapping screws and thermoshabs that not only ensure the reliability of the attachment, but also prevent the cracking of sheets.
Profile trumpet
Recently, profile pipes have become actively used to build greenhouse frames. This is explained by the fact that this material can be freely cut into any parts and create a design of any shape and size.
To build a frame from the profile pipe you will need a roulette for removing the necessary measurements, level and plumb, as well as scissors for metal and screwdriver for cutting and fastening of parts.
The construction of the frame from the profile pipe is carried out like this:
- With the help of screws to the foundation fasten the guide profile.
- The upper beam should be located so that all side sections are distributed evenly. At the same time, the beam should be securely fixed and not shifted.
- Side beams are fixed to the central, sticking to the step in one third or fourth length of the polycarbonate sheet.
Design elements can be copped with self-drawing, but if you are going to use the design for a long time, to increase their strength better to cook.
Polypropylene or PVC pipes
If you need to quickly build a closed bed, or you do not have to buy and correctly cut the profile, you can always use polypropylene or PVC pipe As a framework of a frame.
The advantage of using such pipes is that they can be given almost any form with minimal physical efforts. In addition, there is a relatively inexpensive material, and if you have recently conducted construction work in the country, it is possible to use pipes (Figure 3).
Note: Pipe flexibility and simplicity of their installation allow you to create not only stationary, but also portable models, since the finished design can be easily dismantled and recalled in the new season.
The construction technology of the frame of plastic pipes looks like this:
- On the prepared area, metal pins are bought, adhering to the area of \u200b\u200bthe future design and arc location scheme. At the same time, each such pin should perform above the surface of the soil by about 30 cm.
- On the protruding edge of the pin, the pipe is put on and bend it, giving the right shape.
- The second end of the pipe is put on the pin, located at the opposite end of the future building.
- After that, you need to fix the arcs with each other, attaching them to the central pipe, the length of which should correspond to the length of the whole building. If you do not have a suitable length of suitable length, you can use two pieces of material, but they need to be securely combined with each other.
 Figure 3. Assembling frame of plastic pipes
 The final stage of construction will be the coating with a dense polyethylene film or polycarbonate sheets. The instructions above shows the technology of building the simplest arched model, but if desired, you can build a triangular design.
Greenhouse from window frames
Small, but functional greenhouse can be built from old window frames. However, it should be borne in mind that such a design will not have the tightness of the model from the film or professional flooring, but it is quite suitable for growing a small amount of seedlings, early vegetable crops and greens.
With minor disadvantages of designs from window frames, they have several important advantages. First, you significantly save on construction, as you do not have to buy any materials for the construction of the construction. Secondly, the construction of such a premises is quite simple, and even beginners will be cope with this task (Figure 4).
Note: If there are glasses in old window frames, they can be left as a coating. If the frames are empty, after installation, they can be covered with a film.
For the construction of a model from window frames, you must first build a foundation. To do this, you can simply mount the frame from wooden boards or BRUSEV. The optimal is considered a timing with a cross section of 50x50 mm or a boards, 40 mm thick. Frame frame form with racks, upper and lower strappingMade from the boards of the same size. At the same time, the step between the strapping should accurately correspond to the size of the window frame.
If you plan to build a triangular design, additionally, you should install a central rack from a bar, the length of which should correspond to the length of the closed bed. Such a bartal design will prevent the destruction of the building under the weight of snow.
 Figure 4. Drawings of constructions from window frames
 The window frames themselves are attached to supports with conventional nails or screws. To increase the strength of the structure, the frames are fixed in four corners, and not only outside, but also inside. The resulting gaps seal by mounting foam.
Film
Despite the fact that the film is considered obsolete material for the coverage of greenhouses, it is still popular due to the low cost and ease of installation. In addition, the film models do not need a foundation, and the low weight of the film does not carry a serious load on the framework.
It should be borne in mind that the film buildings do not have a long service life. Even with the careful circulation and absence of serious negative influences Atmospheric precipitation, such a building will serve at best one or two seasons. However, such structures are often used to grow seedlings and early greenery. You can use as a frame wooden beamsTo which the film is fixed with nails or screws. In addition, it is possible to build a simple arched model by setting support from thick wire or plastic pipes, which then you can simply pull the film.
Greenhouse drawings and projects do it yourself
If you do not have skills in building the drawings, but there is a desire to get a private greenhouse, you can always use ready-made drawings and projects of such structures.
 Figure 5. Ready drawings of models of various types
 Figure 5 below shows a few simple variants of small designs of the closed soil, which you can easily build with your own hands.
How to collect a greenhouse for video yourself
Many dackets refuse the idea of \u200b\u200bbuilding a greenhouse with their own hands, fearing that the design will be not sufficiently durable and hermetic, and the plants inside will die. To master the necessary practical skills on the construction of such structures, we recommend reading the video in which all stages of construction are shown in detail.