Alexander shepelev - how to build a rural house. Start
Thoughts on how to build a rural house can be visited like an ordinary city dweller who has country cottage area far outside the city, and a business person who wants to enjoy the beauty and solitude in his own country cottage. And if in the latter case everything will cost by contacting a professional developer, then an ordinary city dweller should strain himself to build a house on his own. In this regard, a number of questions are natural: how to start work, what is needed for this, what are the stages of work.
Log or brick?
Cottage in Bor
One of important points in the construction of a rural house is the choice of material. Recently, log houses have gained particular popularity. Generally the topic wood construction you can devote a few lines separately, since today it is a rather popular type of building a rural house.
Log houses look natural in the countryside, are environmentally friendly and extremely comfortable. In addition, this is the most inexpensive way get a country house.
You can buy logs almost everywhere. In the Russian hinterland, there are no problems with this material, since there are many forests. Erect wooden log house- this is not just a tribute to fashion, but a whole philosophy. It is also quick way construction. Wooden house we cannot imagine without a basement and a high roof, therefore, regardless of the number of storeys and design characteristics of the future house, it must correspond to the main purpose - to be comfortable, cozy, warm, to become a family.
The brick, unfortunately, cannot meet the listed characteristics, although it has practicality and reliability. Therefore, you will have to decide what to prefer: a log, a brick or something else.
Where to start and how to end?
In order to learn how to build a rural house on your own, you need to highlight for yourself the main points in construction:
- Decide on the place of construction of the future house. This can be a purchased lot with a vacant lot or an old building with a garden. From here depends the preparation of the site plan, according to the building rules. Each region has its own. As for the price, it is necessary to consult with specialists, since a plot with a house can cost less than an undeveloped area. It is enough just to demolish the old building;
- It is imperative to make a layout of the proposed development. The main drawing should include all residential and non-residential buildings. It is important to determine their location and area. If an existing house is being settled, you need to paint every centimeter for an estimate;
- It is worth deciding in advance on the improvement plan and functional areas of the site.
Selection of materials and calculations

Wooden house
Next comes the selection building materials for construction in accordance with the issue price and architectural solutions. The volume of the material is calculated, the price and delivery methods are determined. Usually material for construction on their own comes down to the main components: sand, gravel, cement, brick, fittings, metal, finishing materials.
Experts recommend not stocking up on materials, but purchasing them as construction progresses. However, the price range as a whole must be determined in advance. In the selection of material, you should not make hasty decisions. You can walk through several centers, visit more than one special shop... This will allow you to ask the price and finally decide on the type of house.
Indeed, in the construction of a rural house with your own hands, it is important to embody the original grandiose ideas. However, you shouldn't dive into eternal repairs. Here, measure and prudence are important so that the construction takes place within the framework of the available capital. In addition, the final costs will depend on the choice of building materials (whether brick, concrete or wood). The choice of material is also influenced by climatic conditions.
When all preliminary work completed, you can proceed directly to construction: masonry, screeds, finishing works... It is important to follow the technology for the manufacture of binding elements (mortar, concrete). Building a house with your own hands is a painstaking and responsible business.
The time factor is also important here. If construction is delayed for some reason, additional labor can be attracted. The main thing is not to turn the construction of a house into an eternal process. construction works.
When building a house, a set of tasks is solved, including the laying of channels for gas and water, electrical work. The main thing here is safety. Therefore, at this stage of work, it is better to use the services of specialists. In addition, when installing gas, professional gasmen are indispensable. Don't skimp on security.
Otherwise, all work will become meaningless. For example, if the gas outlet is incorrectly installed, a leak can occur. Gas can accumulate in the ground and at one point lead to irreversible consequences.
After the main work, you can start plastering. For this, it is important that the surface has an almost perfect appearance, without dirt, dust and roughness. The cladding process is a significant stage in home decoration, so it can take place in several stages. It is also important to follow the rules of technology here.
Plaster mortar is usually used in three types: lime-sand (or gypsum), cement-lime and just cement. Plastering work is done first from the ceiling, then goes to the surface of the walls (from top to bottom). The thickness depends on the material of the masonry at home.
When erecting the foundation of a rural house, the quality of the masonry of the walls and supports, the materials used, is taken into account. For the right foundation you need to create a good platform and wireframe. Strength and durability are the main points here. Therefore, when calculating the total cost of work, the share of the foundation accounts for about 20 percent.
The choice of the foundation is influenced by almost the same factors as the choice of building the entire house as a whole. Here, the main attention is paid to the problems of soil, groundwater, the degree of frost resistance;
Floors, floors in the house depend on the type of building being built (log house, brick or cinder block). Log walls or timber-framed walls play a special role here.
Finishing touches - roof erection, site improvement

Home device
The final moment in building a house with your own hands is the construction of a roof. It is interesting that in addition to its direct functions, this element also carries a decorative load. An aesthetic roof can sometimes become the main focus of a new home. By its shape, it is possible to distinguish a single-pitched roof, a mansard or a hipped roof. The formation of the roof also depends on the number of storeys of the house, for example, for a two-story building, the construction of the roof must take place simultaneously with the construction phase of the whole house.
For a modern person, the lack of comfort, connection and convenience is akin to disaster. Therefore, it is already difficult to imagine new house without satellite dish, internet and TV. You should also pay attention to this point, find out the possibilities of transferring communication through local channels.
The final touch in the construction of a rural house is the arrangement of the territory. A plot without a garden or flower bed cannot be called a home. The improvement of the adjacent land is an integral part of the construction of your own rural house. There is also enough work here. Therefore, this business can be dealt with in parallel with the construction of the house. You can do concreting paths, build a fence and a well, make a place for waste, uproot stumps, drain the site if necessary, break a front garden or a flower bed.
There are no limits to fantasy
Information on how to build a rural house can be found in many sources. It is important that in the end it turns out to make for yourself and your family a cozy corner with your own land, where you want to hide from the endless bustle and problems of city life.
Advantages country house obvious. This is ecology, absence stressful situations, beauty and solitude. Sometimes it is so necessary just to contemplate the beauty of nature, sitting in a sun lounger on your site. Especially when the work on the construction of a rural house is over and you can enjoy the result.
In subsequent years, of course, it is necessary to carry out preventive work so that the house, made by hand, retains its original appearance for as long as possible. And also it will not hurt to make some adjustments in terms of design over time. And it's not about fashion trends. You can not change anything in general, but add new accents from time to time. This will be an incentive to improve your home.
To take stock and decide for yourself how to properly build a rural house, you should not reinvent the wheel. It is enough to follow the chosen construction technology, be creative and not drag out the process for many years. To avoid this, it is important to initially determine the type of building. For example, you can get by with improvised means and not rack your brains over unnecessary costs, deciding to design wooden house.
But there are no limits to imagination. It is important to follow your dream of arranging the site, be patient, and knowledge and skills will tell you everything else.
Building your own home is a rather demanding and difficult undertaking. However, there are advantages here as well. Self-built housing will be of higher quality and more comfortable. And what could be better than this, especially in a country house, when this city bustle is so tired.
DIY instructions for building a wooden house
- The first thing you need to decide on is the material from which you will build your house. That is, we choose one of the two, either wood or stone. Wood is a cheaper material, and most importantly, living in such a house will be much more comfortable.
- We make special grooves in the hewn logs. This will allow, by laying them crosswise, to obtain a strong connection. We fold them until we get the required height. But at the same time, it is also worth noting the fact that even though you get really reliable styling, there will still be gaps between the logs. They can be caulked with any fibrous material. That is, you can use tow, and straw and dried moss. This way you can close all the cracks.
- The next step will be to build a roof. It is recommended to make it gable, since it can take much less effort to create it, and most importantly it will cost you much less compared to more sophisticated roof options.
- We cover the space between the walls with logs, after which we make the roof slopes. Smooth beams from the ends of the walls must be strengthened in such a way that they close with each other in the middle of the space. Now we need to make the flooring. We choose the material to taste and lay the floor for the attic.
- The slope must be made steep and even, which will allow the water to drain freely during rain, and there will be no drifts in case of snow.
- We install the windows of the door. This work can be done depending on your preferences. But in any case, they must be strong and sturdy.
- You should also not forget about the basement, as in winter period it will be warm enough for storing vegetables, as well as preparations, and in the summer period it will be quite cool, which will allow you to keep refreshing drinks and perishable food here.
Alexander Mikhailovich Shepelev - the author of more than three dozen books on various types of construction work. Their circulation in Russian alone exceeded 8 million copies. Many books have been translated into the languages of the peoples of the USSR, and were published in English, Bulgarian, Romanian, Spanish and other languages. Among them are textbooks and teaching aids, books for workers.
But perhaps the greatest fame came from A.M. Shepelev books for an individual developer.
As you know, writing a book in a simple language accessible to a non-specialist is not an easy task. The fact that Alexander Mikhailovich possesses the "secret" of popularity is evidenced by the fact that his book "Renovating an apartment on your own" was published seven times, "How to build a rural house" - four times, and at the same time they disappeared from the shelves of bookstores with lightning speed.
For 60 years of work in construction, he has mastered more than 10 construction trades. Having started his career as a worker, A.M. Shepelev, in the role of a foreman, technician, work manager, construction manager, took part in the construction and reconstruction of such facilities as the Moscow Hotel, the All-Russian Central Executive Committee school in the Kremlin, the Lenin, Concert Hall. Tchaikovsky, in the restoration of the Manege and the Ostankino Palace Museum, etc.
In our country great attention the focus is on increasing housing construction in the countryside, which is mainly carried out by industrial methods, according to standard designs. However, at present, individual construction is also developing. The state provides loans for these purposes and in accordance with the Basic Directions of the Economic and Social Development of the USSR for 1981-1985 and for the period up to 1990, provides assistance to individual housing construction in small towns, urban-type settlements and in rural areas.
In construction in the countryside, parts made of reinforced concrete and other similar materials are successfully used. But traditional materials such as brick, natural stone, tiles, timber, reeds, straw, clay are still used quite widely, especially in individual construction. From time immemorial, from local materials in the village were built, and now they are building strong, beautiful, warm and durable residential buildings and other buildings. When building a residential building or utility room, rural builders (and above all individual builders) often need not only materials and tools, but also qualified advice.
The fact is that during construction you have to do a lot various works- earthen, stone, concrete, carpentry, joinery, stove, roofing, plastering, painting, glass. And only their correct implementation guarantees a long service life of the built house. Revealing the technological "secrets" of various construction works is the goal set by the author of this book.
Thoughts on how to build a rural house can be visited by both an ordinary city dweller with a summer cottage far outside the city, and a business person who wants to enjoy the beauty and solitude in his own country cottage. And if in the latter case everything will cost by contacting a professional developer, then an ordinary city dweller should strain himself to build a house on his own. In this regard, a number of questions are natural: how to start work, what is needed for this, what are the stages of work.
Log or brick?
Cottage in Bor
One of the important points in the construction of a rural house is the choice of material. Recently, log houses have gained particular popularity. In general, the topic of wooden construction can be given a few lines separately, since today it is a rather popular type of building a rural house.
Log houses look natural in the countryside, are environmentally friendly and extremely comfortable. Besides, this is the cheapest way to get a country house.
You can buy logs almost everywhere. In the Russian hinterland, there are no problems with this material, since there are many forests. To build a wooden log house is not just a tribute to fashion, but a whole philosophy. It is also a quick way to build. A wooden house is inconceivable without a basement and a high roof, therefore, regardless of the number of storeys and structural characteristics of the future house, it must correspond to the main purpose - to be comfortable, cozy, warm, to become a family.
The brick, unfortunately, cannot meet the listed characteristics, although it has practicality and reliability. Therefore, you will have to decide what to prefer: a log, a brick or something else.
Where to start and how to end?
In order to learn how to build a rural house on your own, you need to highlight for yourself the main points in construction:
- Decide on the place of construction of the future house. This can be a purchased lot with a vacant lot or an old building with a garden. From here depends the preparation of the site plan, according to the building rules. Each region has its own. As for the price, it is necessary to consult with specialists, since a plot with a house can cost less than an undeveloped area. It is enough just to demolish the old building;
- It is imperative to make a layout of the proposed development. The main drawing should include all residential and non-residential buildings. It is important to determine their location and area. If an existing house is being settled, you need to paint every centimeter for an estimate;
- It is worth deciding in advance on the improvement plan and functional areas of the site.
Selection of materials and calculations

Wooden house
Next comes the selection of building materials for construction in accordance with the issue price and architectural solutions. The volume of the material is calculated, the price and delivery methods are determined. Usually, the material for construction on its own is reduced to the main components: sand, gravel, cement, brick, reinforcement, metal, finishing materials.
Experts recommend not stocking up on materials, but purchasing them as construction progresses. However, the price range as a whole must be determined in advance. In the selection of material, you should not make hasty decisions. You can walk through several centers, visit more than one specialized store. This will allow you to ask the price and finally decide on the type of house.
Indeed, in the construction of a rural house with your own hands, it is important to embody the original grandiose ideas. However, you shouldn't dive into eternal repairs. Here, measure and prudence are important so that the construction takes place within the framework of the available capital. In addition, the final costs will depend on the choice of building materials (whether brick, concrete or wood). The choice of material is also influenced by climatic conditions.
When all the preliminary work is completed, you can proceed directly to the construction: masonry, screeds, finishing work. It is important to follow the technology for the manufacture of binding elements (mortar, concrete). Building a house with your own hands is a painstaking and responsible business.
The time factor is also important here. If construction is delayed for some reason, additional labor can be attracted. The main thing is not to turn the construction of a house into an eternal process of construction work.
When building a house, a set of tasks is solved, including the laying of channels for gas and water, electrical work. The main thing here is safety. Therefore, at this stage of work, it is better to use the services of specialists. In addition, when installing gas, professional gasmen are indispensable. Don't skimp on security.
Otherwise, all work will become meaningless. For example, if the gas outlet is incorrectly installed, a leak can occur. Gas can accumulate in the ground and at one point lead to irreversible consequences.
After the main work, you can start plastering. For this, it is important that the surface has an almost perfect appearance, without dirt, dust and roughness. The cladding process is a significant stage in home decoration, so it can take place in several stages. It is also important to follow the rules of technology here.
Plaster mortar is usually used in three types: lime-sand (or gypsum), cement-lime and just cement. Plastering work is done first from the ceiling, then goes to the surface of the walls (from top to bottom). The thickness depends on the material of the masonry at home.
When erecting the foundation of a rural house, the quality of the masonry of the walls and supports, the materials used, is taken into account. For a proper foundation, you need to create a good platform and frame. Strength and durability are key points here. Therefore, when calculating the total cost of work, the share of the foundation accounts for about 20 percent.
The choice of the foundation is influenced by almost the same factors as the choice of building the entire house as a whole. Here, the main attention is paid to the problems of soil, groundwater, the degree of frost resistance;
Floors, floors in the house depend on the type of building being built (log house, brick or cinder block). Log walls or timber-framed walls play a special role here.
Finishing touches - roof erection, site improvement

Home device
The final moment in building a house with your own hands is the construction of a roof. It is interesting that in addition to its direct functions, this element also carries a decorative load. An aesthetic roof can sometimes become the main focus of a new home. By its shape, it is possible to distinguish a single-pitched roof, a mansard or a hipped roof. The formation of the roof also depends on the number of storeys of the house, for example, for a two-story building, the construction of the roof must take place simultaneously with the construction phase of the whole house.
For a modern person, the lack of comfort, connection and convenience is akin to disaster. Therefore, it is difficult to imagine a new home without a satellite dish, Internet and TV. You should also pay attention to this point, find out the possibilities of transferring communication through local channels.
The final touch in the construction of a rural house is the arrangement of the territory. A plot without a garden or flower bed cannot be called a home. The improvement of the adjacent land is an integral part of the construction of your own rural house. There is also enough work here. Therefore, this business can be dealt with in parallel with the construction of the house. You can do concreting paths, build a fence and a well, make a place for waste, uproot stumps, drain the site if necessary, break a front garden or a flower bed.
There are no limits to fantasy
Information on how to build a rural house can be found in many sources. It is important that in the end it turns out to make for yourself and your family a cozy corner with your own land, where you want to hide from the endless bustle and problems of city life.
The advantages of a country house are obvious. This is ecology, absence of stressful situations, beauty and solitude. Sometimes it is so necessary just to contemplate the beauty of nature, sitting in a sun lounger on your site. Especially when the work of building a rural house is already over and you can enjoy the result.
In subsequent years, of course, it is necessary to carry out preventive work so that the house, made by hand, retains its original appearance for as long as possible. And also it will not hurt to make some adjustments in terms of design over time. And it's not about fashion trends. You can not change anything in general, but add new accents from time to time. This will be an incentive to improve your home.
To take stock and decide for yourself how to properly build a rural house, you should not reinvent the wheel. It is enough to follow the chosen construction technology, be creative and not drag out the process for many years. To avoid this, it is important to initially determine the type of building. For example, you can get by with improvised means and not rack your brains over unnecessary costs, deciding to design a wooden house.
But there are no limits to imagination. It is important to follow your dream of arranging the site, be patient, and knowledge and skills will tell you everything else.
Current page: 1 (the book has a total of 32 pages)
A. M. Shepelev
HOW TO BUILD A COUNTRY HOUSE
In our country, much attention is paid to increasing housing construction in the countryside, which is mainly carried out by industrial methods, according to standard projects. However, at present, individual construction is also developing. The state provides loans for these purposes and, in accordance with the Basic Directions of the Economic and Social Development of the USSR for 1981-1985 and for the period up to 1990, provides assistance to individual housing construction in small towns, urban-type settlements and in rural areas.
In construction in the countryside, parts made of reinforced concrete and other similar materials are successfully used. But traditional materials such as brick, natural stone, tiles, timber, reeds, straw, clay are still used quite widely, especially in individual construction. From time immemorial, from local materials in the village were built, and now they are building strong, beautiful, warm and durable residential buildings and other buildings. When building a residential house or utility room, rural builders (and above all individual builders) often need not only materials and tools, but also qualified advice.
The fact is that during construction you have to perform a lot of different work - earth, stone, concrete, carpentry, joinery, oven, roofing, plastering, painting, glass. And only their correct implementation guarantees a long service life of the built house. Revealing the technological "secrets" of various construction works is the goal set by the author of this book.
GENERAL INFORMATION ABOUT THE CONSTRUCTION OF THE HOUSE
It is best to build a house according to the project. When creating projects, architects provide maximum comfort for the people living in it, they offer the most progressive designs, that is, durable, cheap, durable and easy to carry out. Various house designs can be found at local Councils of People's Deputies, building organizations and libraries.
Projects provide for the construction of a house from any one material, for example, brick, concrete, cinder concrete, wood, etc. But it can be built from any other material.
Consider the project of the Central Institute of Standard Projects of the USSR State Construction Committee, recommended by the Department of Architecture under the Executive Committee of the Moscow Regional Council of People's Deputies for individual construction in the Moscow Region.
A three-room house (Fig. 1, 2), cut from logs, with a terrace and a storage room, a basement under the kitchen, stove heating and a portable toilet. Building area of a house with a terrace - 71.4 m2; living area - 31.0 m2; useful - 39.2 m2; utility room - 9.5 m2; cubic capacity - 182 m3.
The house has three rooms with a size of 8.13; 10.29 and 12.56 m2; kitchen - 5.76 m2; entrance hall - 2.45 m2; canopy - 4.4 m2; storage room - 4.72 m2 and terrace - 12.54 m2. These figures are rounded in the plan.
The project provides for a house plan, its sections, a foundation plan, sections of walls, ceilings, an attic, a basement, a floor, details of platbands, decoration of a terrace, cornice, etc., as well as an option for building a site.
The building plan indicates the location of the house, a utility shed, which can be a garage, restroom, green spaces, etc.
On the main facade of the house and in the sections there are arrows with pluses, minuses and numbers denoting meters or centimeters. An arrow with a plus and minus 0.00 stands at floor level and is called the zero mark. The numbers going down from this mark are called minus, and up - plus.
Rice. 1. The main facade and plan of a residential building (dimensions in cm and m) z 1, 6, 7 - rooms; 2 - kitchen; 3 - corridor; 4 - pantry; 5 - terrace

Rice. 2. Courtyard and side facades, foundation and site plans (dimensions in cm)
The minus 0.60 mark indicates the distance from ground level to the top of the floor or foundation; minus 1.30 indicates that at this level, counting from the floor, pillars are laid under the foundation; minus 2.40 shows the laying of the basement walls.
The mark plus 0.80 defines the level of the window sill, which is 80 cm above the floor. The level of the upper part of the window opening is indicated by the mark plus 2.20. If we subtract plus 80 cm from this mark, then we get the height of the window opening, equal to 1.40 m.
The ceiling level is indicated by plus 3.15, and the upper part of the dormer is plus 3.75. The level of the roof ridge is at 5.35 m and the top of the chimneys is at 6.05 m.
In the sections, other marks are also given. For example, the height of the terrace is 2.40; ceiling height from floor 2.90 m, etc.
The sections of the house are shown in Figure 3. For the house, the rafters are made with a section of 18X6 cm, the floor beams are 18X8 cm, etc.
Consider the individual parts of the house.

Rice. 3. House sections (dimensions in cm and m)
The foundation for the outer walls is made of rubble stone in the form of pillars 60X60 cm in size with a depth of 70 cm (with a high standing groundwater, the depth can reach 120 cm). Internal pillars can be deepened by 50 cm. Pillars made of rubble do not reach the ground level by 10 cm. Above this mark, a basement is laid out - brick pillars of 2X1.5 bricks and between them - a wall of one brick, called a pick-up. For ventilation of the underground from two opposite sides, two holes of 14X14 cm are provided in the zabirka, but more often 25X25 cm. In the spring they are opened, and in the fall they are closed and insulated. WITH inside the basement is insulated with slag, sand, earth, but not clay.
The top of the plinth is leveled cement mortar, insulated with two or three layers of roofing felt or roofing material (preferably on mastic). An antiseptic heat-insulating material (tow or felt) is placed on the waterproofing, then two layers of roofing roofing or roofing felt and on top of all this lining is an antiseptic (antiseptic or bitumen mastic) dry board 5 - 6 cm thick and 20 cm wide.The lining protects the lower logs from decay , and it can be changed when destroyed.
The walls (fig. 4) are chopped, wooden, made of logs with a diameter of 22 cm in a cut and hewn by one edging. Insulated from the foundation with a lining, a layer of tow, felt, etc. (2 cm), the lower (flashing) crown is made of thicker logs with two edging edges (the width of the lower edging is at least 15 cm). From the inside, a thermal bar is reinforced to the lining board; the space between it and the lower crown is filled with tow. Heat-insulating material is placed on the first crown, the second crown is placed on it, etc. After laying the five crowns, the assembly of the walls is provided, on which the subsequent crowns are then laid. Window and door openings should have a settling gap and be higher (more) than the height of the window or door frames by 1/20 of their height, that is, by 7 - 8 cm.If this gap is not there, then the crowns over windows and doors over time due to precipitation (wood shrinkage, thermal insulation compaction), they will sag, forming large gaps above the walls. The gaps are filled with tow or felt, and only after complete settlement it will be possible to insert a bar into the gap. In Figure 4, the settlement gap is 7 cm.

Rice. 4. Section of the wall (dimensions in cm):
1 - sedimentary gap 7 cm; 2 - antiseptic lining board 5 cm thick; 3 - thermal bar; 4 - floor, boards 4 cm thick and 16/2 cm log; 5 - antiseptic lining board with a thickness of 4-5 cm in two layers of tar paper; brick pillar ir 25X25 cm; 6 - crushed stone spilled with lime mortar 12 cm thick on the compacted soil; 7 - brick base, 8 - compacted crushed stone for clay preparation; 9 - rubble pillar; 10 - accepted felt or tow; 11 - thermal bar
The attic floor is shown in Figure 5, a. The height of the premises in the house is provided for cleanliness of 290 cm, but, taking into account the draft, ceiling beams section 8X18 cm should be cut 5-10 cm higher. Beams are laid strictly horizontally, at a distance of 100 cm from each other. On the sides, bars ("skulls") with a section of 4X5 cm are nailed to the beams, on which a roll of 8 cm thick plates is laid. The cut ends of the plates should lie flush with the lower sides of the beams, forming an even overlap. Instead of plates, two-layer boards with a thickness of 8 cm are sometimes used. The roll is covered with slag, dry earth (with a layer of 15 cm).
To prevent the backfill from waking up, the slots of the reel should be covered with clay. If sawdust is used, they must first be mixed with fluffy lime and gypsum, and then covered with a layer of slag (3-4 cm).

Rice. 5. Details of the floor, attic and above the basement (dimensions in cm):
a - attic floor: 1 - bars 4X5 cm; 2 - beams 8X18 cm every 100 cm; 3 - roll from plates d = 16/2 cm; 4 - clay grease 2 cm; 5 - backfill 15 cm; b - floor of the first floor: 1 - clean floor 4 cm; 2 - lags from plates d = 16/2 cm; 3 - lining - tarred board 4 cm in tar paper in two layers; 4 - brick pillar 25X25 cm, L = 15 cm; 5 - crushed stone spilled with lime mortar 12 cm; 6 - compacted soil; c - detail of the basement overlap: 1 - clean floor 4 cm; 2 - sand 5 cm; 3 - rolling into the undercut d = 14/2 with clay grease 2 cm; 4 - hatch cover (boards - 2.2 cm, felt - 2 cm, boards - 2.2 cm); 5 - binding 6.4 cm; 6 - beam 8X18 cm; 7 - cranial bar 4X5 cm
The terrace with the storage room has a cold slab made of planed wood or planks, which are nailed to beams, hewn to one edge, or planks of the desired section.
Underground. To keep the underground dry and clean, the soil must be leveled, compacted, covered with a layer of gravel or crushed stone (at least 12 cm) and filled with lime or cement mortar. If the soil is not dry enough, it is necessary to put a layer of oily mint clay (25 cm), tamp it well, cover it on top with a layer of gravel or crushed stone (at least 12 cm), tamp and pour it with lime or cement mortar, the latter is more durable and waterproof.
Floors (Fig. 5, b). In the preparation of the underground, brick pillars 25X25 cm in size were laid out, insulated on top with two layers of roofing paper, on which a tarred or antiseptic lining (dry board 4 cm thick) is placed, and lags made of plates are placed on it. It is on them that a clean floor is laid from boards 4 cm thick, with selected dowels or quarters. The boards are pulled together tightly, nailed and, if required, painted.
The basement (Fig. 5, c) is located under the kitchen; its walls were laid to a depth of 240 cm, counting from the level of the finished floor. With a high level of groundwater, basements under the house are not recommended, since it will always be damp there. If the developer wishes to have a basement, then it must be especially carefully insulated (see "Premises for storing food products").
The roof is covered with asbestos-cement tiles on a continuous crate.
The partitions can be clean, grooved or plastered on both sides.
Doors are provided with single-floor paneled doors, but they can be panel doors. In the vestibule there are planks, on dowels. Size - 200X85 cm-
Double bindings, opening in different directions, with vents in each room. Size - 140X100 cm. In the annexes, the windows are filled with single bindings.
Heating is provided by stove. One stove heats three rooms. Since the front wall of the stove, which opens into one of the rooms, may not heat it enough, a shield with three channels is additionally put forward from the stove there. You can arrange water heating.
The terrace can be made after building a house, but its draft should be taken into account.
The blind area serves to drain water from the roof from the house. Arranged from oily clay with a layer of 15 - 20 cm (with a stone coating), concrete or other materials. Its width is at least 1 m.
After the construction of the house, but not earlier than a year, they begin to excavate it, and after a year or two, after complete precipitation, to finish: sheathing with planks, plastering and painting, arrangement of platbands, cornices, pediments, etc.
The decoration of platbands, cornices and terraces is shown in Figure 6.
For the construction of a house according to the considered project, the following materials are required: logs of the required length with a diameter of 22 - 24 cm - 40 m3; different lumber - 20 m3; rubble stone - 10 m3; red brick - 7.5 thousand pieces; crushed stone, stone or gravel - 6.5 m3; boiling lime - 2.1 tons; building gypsum (the old name is alabaster) - 2.5 tons; mountain or river sand - 12.6 m3; flat asbestos-cement tiles (for roofs) - 1100 pcs.; staples and bolts - 116 kg; different construction nails - 101 kg; window glass - 17 m2; roofing felt or roofing material - 105 m2; roofing steel - 30 kg; drying oil - 68 kg; whitewash and other paints - 42 kg. If the house is not painted outside, then drying oils and paints will be required less.

Rice. 6. Platbands and their details, roof framing and terrace fencing
All materials should be stored so that they do not get wet, rotting and deteriorating.
Logs and sawn timber are stacked on pads, so that there are gaps between them for blowing air, which accelerates drying. Cover them on top.
Boiling lime, gypsum and cement are stored in dry sheds in barrels, bags or boxes, raised from the ground level by at least 50 cm.
Roofing felt, roofing felt, roofing tiles, nails, glass, metal are stored in sheds. Roofing felt and roofing felt - always in an upright position, drying oil and grated paints - in a closed container.
Bricks are stored in stacks, gravel, crushed stone and sand - in heaps, protected from various contaminants.
CONSTRUCTION AND IMPROVEMENT OF THE SITE
An individual developer usually has to deal not only with the construction of a house, but also with the planning and improvement of his site.
At the same time, he must fulfill the architectural, fire safety and sanitary and hygienic requirements that create best conditions for living and recreation.
DEVELOPMENT AND PLANNING OF THE LAND
The building and layout of the site can be different (Fig. 7). Usually, the width of the plot does not exceed 25-30 m, and the length is 50-60 m. Houses are often located on the plot so that their facades not only face the street, but also come very close to it, which is not entirely true. The house should be placed no closer than 2 - 3 m (and preferably 5 - 7 m) from the edge of the street, or the so-called red line. In this case, green spaces can be planted in front of the house, but no closer than 5 m from the house, otherwise a lot of shadow is created and dampness may appear in the room. The fruit garden can be located both around the house and in the back of the estate. The garden is best placed in the depths of the site.
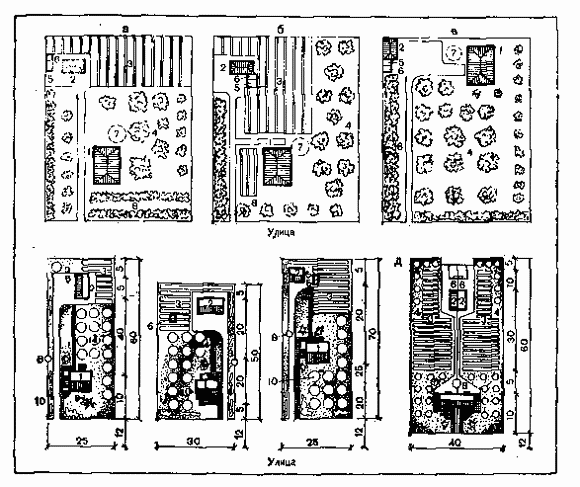
Rice. 7. Examples of construction and planning of a farmstead plot (dimensions in m): a - the usual version; b - with a vegetable garden along the long side of the site; c - without a vegetable garden with the placement of a house in the depth of the site; d - with a garden, a vegetable garden, a berry bush, a flower garden and a well; d - a plot for two houses; 1 - residential building; 2 - utility shed; 3 - vegetable garden; 4 - garden; 5 - restroom; 6 - compost heap; 7 - playground for children's games; 8 - well; 9 - berry bush; 10 - flower garden
Each house has various outbuildings (for transport, fuel, livestock, poultry). They are recommended to be carried deeper into the site, and those that are visited more often, on the contrary, are brought closer to the house.
Each section should have rain-proof roads with turn-arounds for motor vehicles and narrower paths for people to pass through.
If there is a water supply system, water columns are placed near the house. The well is also brought closer to the house.
A few words about the location of the rooms in the house. The dining room, or common room, should face the street; the veranda is on the north side, and the kitchen windows are on the utility yard and the playground for children (without looking up from work, the hostess can see what is happening in the yard and on the playground). Fire regulations require that the distance between buildings to be burned is at least 15 m; between semi-combustible (walls and roof are non-combustible, and ceilings are combustible) - at least 10 m.
A residential building and all other buildings on the site must have lightning protection. Flammable materials should be stored away from combustible buildings or in non-combustible rooms built for them.
IMPROVEMENT OF THE SITE
The site is first of all leveled (pits and bumps are eliminated) and, if necessary (if it is in a lowland and close groundwater) are drained. During drainage works (around the entire site or just a house or other buildings), they dig channels with a slope to drain water and arrange drainage. The depth of the channel depends on how much the groundwater needs to be lowered; its width is 50 - 70 cm. However, with a deep canal and weak soil, its width can be even greater.
The drainage should be at a distance of 2 - 3 m from the foundation of the house, and its bottom should be at the same level with the bottom of the foundation. The bottom of the ditch is insulated with a layer of clay 15 - 20 cm, smoothed out, arranging, as it were, a tray. It is recommended to put large stones in this tray, and it is even better to arrange bumpers of stones along the walls of the ditch, cover them on top with large stones, making a vault. A layer of coarse gravel or crushed stone (25 - 30 cm) is poured onto these stones, and on top of it is the excavated soil. Water, filtering through gravel or crushed stone, enters the tray and drains in the desired direction. You can lay twigs or large brushwood on the bottom of the ditch with a layer of 50 - 60 cm, clearing it of foliage, pour a layer of gravel or crushed stone, then soil.
Drainage works can also be carried out using special drainage pipes.
To collect melt and rainwater, a pool (well) is built at the lowest point of the site. The size of the pool depends on the size of the site. So that water does not go into the ground, the bottom and walls should be well insulated. The floor of the pool is covered with oily soft clay with a layer of 20 - 25 cm and carefully compacted. Then, with an indent of 20 - 25 cm from the ground, brick, concrete, wooden (from logs, boards, bars, tightly adjacent to each other, with well-dug and tarred grooves) walls are placed. The space between the walls is covered with oily clay, carefully compacting it. The floor is made of the same material as the walls. Brick walls and the floor should be plastered with cement mortar 1: 3 (for the preparation of mortars, see further), dry well, cover with bitumen in one, or even better, two times. The pool is covered from above with boards or concrete slabs and fall asleep with earth, leaving only a hatch for water intake. It can be left open to waterfowl, but in this case the water will evaporate.
Part of the landscaping work on the site is the construction of roads. For construction, you can use stone, concrete, brick-iron ore, cement soil, soil asphalt, etc. The width of roads is 2 - 2.5 m, paths (sidewalks) - 0.5 - 1 m.The base for them is usually densely compacted soil ... If the soil is sandy, it only needs to be leveled and tamped, if it is clay or other, so-called preparation is done. So that water does not linger on the ground, roads and paths are given a convex shape or a slope of 2 - 3%.
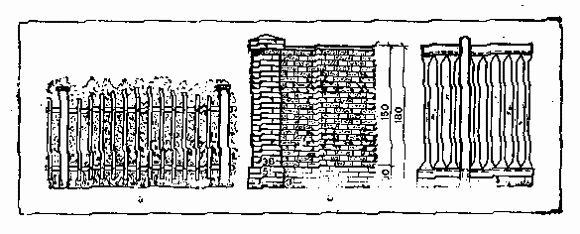
Rice. 8, Guardrail (dimensions in cm):
a - from a picket fence with a bush planting along it; b - made of bricks; c - from reinforced concrete
To drain water on both sides of the road (paths), groove ditches are dug with a slope to one side. Place the ditches from the road at a distance of 40 - 50 cm, from the tracks - at a distance of 25 - 30 cm.
Preparation for the road (if the soil is not sandy) is prepared as follows. First, coarse gravel or crushed stone is poured in a layer of 8-10 cm, rammed, a second layer of finer gravel or crushed stone 5-7 cm thick is poured, again rammed, and a layer of sand 2-5 cm thick is applied to it, which is also rammed. After that, the road is laid out with a large stone, iron brick, concrete slabs, covered with concrete, cement or soil asphalt.
The same preparation is required for the paths as for the road, but less in thickness. In addition, it is not recommended to lay stones, bricks and other materials directly on the ground (it does not always filter water) - a sand bed is required. It is recommended to use a stone of different colors for the construction of paths.
Plots are usually surrounded by a fence (Fig. 8). A fence made of picket or brick, made in a cage, made of reinforced concrete (solid or lattice) is always quite beautiful. It is recommended to paint wooden and metal fences with oil or any waterproof paint.
OUTBUILDINGS
The location of outbuildings near the house is unhygienic. Usually, premises for animals and birds are built no closer than 15 m from the house. Depending on the purpose, they can be of different sizes: barns - 8 - 10 m2 with a height of 2.5 m; pigsties - 3 - 5 m2 (for a sow - 6 m2) with a height of 2.2 - 2.6 m; for one sheep or goat - 1.5 - 2 m2 (the height is the same as that of a pigsty, but it can be more).
Near the outbuildings, a walking area should be made, fenced off so that animals do not walk around the entire estate.
Options for outbuildings for keeping various animals and birds are shown in Figure 9.
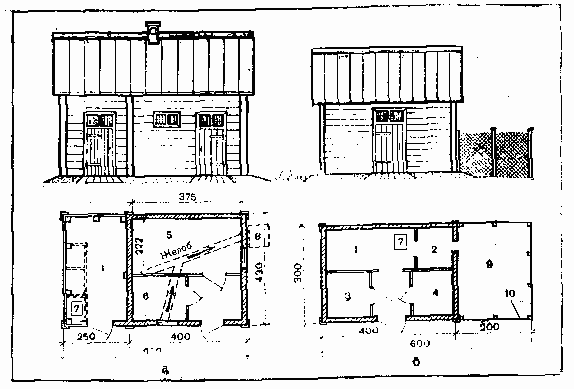
Rice. 9. Variants of outbuildings (dimensions - in cm):
a - with a stable for cattle; b - with a stable for small livestock and poultry; 1 - utility shed; 2 - poultry house; 3 - a room for a goat; 4 - room for a pig; 5 - barn; 6 - sheepfold; 7 - hatch into the cellar or glacier; 8 - - slurry collector; 9 - walking area for poultry; 10 - wire mesh
Inside or outside the premises, a slurry collector is arranged, the walls and bottom of which are well insulated with soft clay or made completely concrete.