Scene from brick around the house. Proper basement of the foundation - Long life at home
Scene is a single continuous coating, a stuffing house or other construction around the perimeter. The arrangement of the scene is one of the final stages of construction, i.e. She is done after the construction of the building. If the developer planned the trim of the base with plaster, tile, brick or other material, the scene is constructed after the complete completion of said event.
Helpful advice! With the performance of all tasks associated with the arrangement of the scene, it is necessary to cope before the arrival of the cold.
For the manufacture of the design under consideration, a variety of materials can be used: paving, asphalt, tile, etc. The greatest distribution among private developers received a celestation from concrete. This material is characterized by a long service life, high performance and technical characteristics and a relatively affordable cost.
 SCHOOLS AROUND ACCOUNT
  Breakfast concrete
  Scene from stone
  Krikovka from bricks
Many owners are not fully aware of the importance of the breakfast, considering it exclusively decorative element of the landscape. Along with this, such a coating performs a number of significant practical functions. After reading the information below, you will learn why you need a scene, what materials can be used for its arrangement and how to make such a coating own forces.

As noted, the decorative function of the scene is one of the main, but far from the only one. With information about the purpose of the design under consideration you can find in the following table.
Table. Functions of the Gamesost
| Functions | Explanations |
|---|---|
| Decorative | The scene makes a general view of the construction more attractive, solid, thoughtful and completed. |
| Protective | It is properly equipped with a reliable barrier on the path of melt waters. This structural element does not allow moisture to contact with the supporting structure of the house, due to which the risk of filling the foundation will be significantly reduced. The design is equipped so that the waste and other water is immediately discharged into the sewer system or other suitable place, for which the desired slope of the surface is set. |
| Heat insulating | At this moment, few people pay attention, and in vain. The presence of a properly equipped scene contributes to a significant decrease in the degree of soil freezing and, as a result, foundation, and with it, the whole structure. |
| Preventing the intake of soil | As noted, the presence of a scene allows to reduce the degree of drainage of the soil. Along with this, the intake of the soil will also be significantly reduced. This will ensure good protection of the foundation of the construction of shifts in the ground, which will exclude the risk of violation of the integrity of the supporting structure and the deterioration of its characteristics as a whole. |


Features of the design and requirements for the breakfast
The design of the scene includes 2 main layers. The first is the underlying. Its main feature is reduced to creating a dense reliable base for the overlying layer. The underlying layer can be performed under or without a slope. For the manufacture of this bowl of construction, it is allowed to use rubbank, gravel, sand. The recommended thickness of the underlying layer is about 2 cm.
Sometimes the ground around the structure is additionally processed by special chemicals - Herbicides. The use of such excludes the growth of roots of plants and grass in the future, so that the risk of disrupting the integrity of the supporting structure of the house is minimized.
Upper layer - Coating, providing decorative function and protection of the foundation from water. Thickness - up to 100 mm. For the manufacture of the top ball used asphalt, paving, concrete and other materials.
In addition to the above, the scene includes other important layers. The design features of the structure can be found in the following image.

To fully coped to the fulfillment of the tasks mentioned earlier, in the process of its arrangement, it is necessary to ensure compliance with a number of important requirements.
- First, the width of the scene must exceed the similar indicator of the roofing sweep. When the site is arranged on the sandy ground, its width is recommended to do a 25-30 cm more cornice (total width, and there must be more than 60 cm). In most cases, the total width of the scene does not exceed 80 cm, but when working on the soils of a bunched type, said the indicator increases an average of up to 100 cm.

Ski: a - clayoshibnebnee; b - concrete; in - asphalt; g - cobbled; 1 - rammed crushed stone 20 mm; 2 - clay; 3 - cement screed 15 mm; 5 - concrete preparation of 100 mm; 5 - asphalt 15-20 mm; 6 - rubble 10 mm; 7 - cobblestone; 8 - Sand preparation of 50 mm

- Secondly, the breakfast should be done with a bias in the direction of the territory of the site. The specific value of the slope is selected taking into account the features of the finishing coating. For example, in the case of a concrete breakfast make a 3-10 degree bias from the walls. The minimum allowable slope value, regardless of the material used, should be 1.5 degrees.


- Thirdly, the scene must be a solid, slimming structure throughout the perimeter. The gaps are strongly not recommended - the overall quality of the design will significantly decrease.

- Fourthly, the breakfast cannot be associated with the foundation - these systems are characterized by varying degrees of precipitation. In view of this, a minimum of 1-1.2-centimeter compensation seam should be settled between the supporting structure and the slotting surface. It can be pledged to the bitumen, close the sealant, fill with geotextiles and similar materials or fall asleep with sand.


Varieties of the scene and their purpose
Depending on the material of the manufacture, structural features, service life and a number of other indicators All existing varieties of the scene can be classified into 3 main groups. Information about them is presented in the table.
Table. Types of ottostok.
| Group of satellite coatings | Description |
|---|---|
| This group includes monolithic constructions from concrete, asphalt breakfasts, as well as coatings, equipped with a bulk method (cement mortar) for rubble with subsequent fill iron. The monolithic design will serve at other things that will serve no less than the building alone. A significant disadvantage of such a system is the high cost and complexity of the arrangement. This is also relevant for asphalt: the use of tar, which is a binder element, appropriate financially exclusively when performing large-scale road asphalting work. Important! If the warming insulation is planned, the rigid system is the only possible option - to insulate soft and semi-rigid coatings meaningless. The additional disadvantages of harsh beds should include their low decorative indicators - a concrete or asphalt pad can hardly be called very beautiful. |
|
| The functions of the underlying layer here performs a multilayer pillow, the upper - paving slabs or a pavement. In addition to tiles and paving groups (most popular options) can be used reinforced concrete plates, cobblestone, porcelain stoneware, etc. Self-leveling coatings are relatively simple in arrangement, they require much smaller labor and financial investments compared to monolithic systems, but are not suitable for use on the soils of a bunched type. |
|
| A multilayer pillow is equipped, a layer of rubbank is covered on top. Are the least financially costly and time consuming. The disadvantage of soft deficiency is the low service life, which is an average of up to 7 years. Along with this, such a design can be used without any concerns in any climatic regions, without paying, at the same time, attention to the type of soil. Yes, and disassemble the failed soft deficule in order to repair it or replace it is easy. Practice shows that it is advisable to use it only as a temporary solution in the presence of problems with finance, time or labor resources in the presence of problems with finance, time or labor resources - you are unlikely to like every 5-7 years. |
The most optimal variety of coatings on the ratio of cost indicators, quality and appearance are semi-rigid germinals. They serve until 20-30 years, suitable for use in almost all climatic zones, except for permafrost, are characterized by high maintainability and require relatively small costs of resources to their arrangement.
An additional advantage of semi-rigid messages is attractive appearance. For example, by making a coating of paving slabs, the owner turns at its disposal a very beautiful platform, which is no different from traditional garden tracks. At the same time, semi-rigid messages are placed in the same order - only the material of the finish coating (usually it is a paving or paving slabs).

Passage Tile Prices
paving tile
The underlying layer (pillow) is made in the same order, regardless of the chosen variety of the scene (the exception is except the monolithic concrete system, the associated issues will be considered separately).

As can be seen in the image, the pillow consists of soil, clay and sand. In the case of a soft crushed stone scene, a layer of rubble is covered on top. If a semi-rigid germy is placed on the cushion demonstrated on the image, the cushion layer and an additional sand layer are covered, and the tile / paving slabs are stacked. In the case of filling the tough area, a sand-gravel pillow is placed, sand and crushed stone are filmed, the insulation is stacked, reinforcement is carried out and a number of other activities preceding the fill of the concrete mixture are carried out, which will be separately described in the appropriate section of the manual.
 Sandy cushion
  Crouching pillow
The order of arrangement of the pillow is described in the table.
Table. Pillow for the scene with your own hands
| Stage of work | Description |
|---|---|
| On the perimeter of the future, a trench is digging. Depth is determined by the type of soil. The minimum recommended indicator is 15-20 cm. When working on bunched soils, the depth should be increased at least up to 30 cm. For more convenience, you can pre-mark the markup by taking the basis of the recommendation from the article on the establishment of the foundation, or go the simplest way: Wheel into the ground in the corners of the future cesspool, metal rods or wooden peasants; VBE intermediate pegs; Tension between the guidance cord (or other similar rope) and dig in accordance with the prepared markup. At the same stage, you can ask the previously mentioned clearance between the foundation and the deficiency, using any of the following materials for this, for example, it is very convenient to work with damper ribbon and polyurethane sealant. Depending on the selected type of scene, at the same stage you can set the desired construct slope. To do this, it is fairly simply to pull the trench to different depth at the points of the tilt. The bottom of the trench is thoroughly tamped. To do this, you can use an ordinary log: you take it in a vertical position, raise up, omit down with a downgrade down, and continue until the whole earth is tamped. |
|
| Vertically, lean the intermediate pegs into the soil, if it was not done at the markup stage. At the same time, they will perform the function of the backups for formwork. Bruks are suitable in a cross section of 2-3 (up to 5) cm - no longer makes sense. Points Install the half-meter step. The principle is demonstrated in the image. Armed with the level, mark the height of the formwork on the carriages. By label will navigate the board. |
|
| For the formwork facilities, the boards are 3-4 cm thick. Pick the height of the elements according to the parameters of the scene. For greater convenience, you can pre-apply on the board of the tag at the height of the future layers that are part of the pillow. Corners of the design can be shy outdoor side Corners. To fasten the elements, it is preferable to use bolts - this fastener is easier to dismantle. Bolts with a diameter of up to 1 cm will be enough. Important! If you do not plan to dismantle formwork in the future, pre-process its wooden composite elements with an antiseptic and wrap in front regteroid or other insulating material - Unprotected wood will soon begin to rot, which will not be better reflected in the quality of the scene. Note first. In the image demonstrated reinforcement. I do not pay attention to it. Note second. The image shows an option with inclined backups. If you wish, you can give preference to this method - does not have a fundamental value. In general, it is possible to do without such backups, ensuring the stability of the boards using bricks / blocks installed on the reverse side. Important! The temperature seam is made not only at the junction of the scene with the walls of the house, but also across the design of the design. Failure to comply with this Recommendation will lead to extremely unfavorable consequences: as a result of grounding of the soil at the temperature differences, the scene is cracking over time. Transverse seams are average with a 2-meter gap. To provide the required gaps, install boards with a thickness of up to 2 cm with the specified step, as demonstrated in the image. Important! All wooden structural elements before use need to be impregnated with an antiseptic. If the device is scheduled to be a device that does not intend to fill concrete, you can easily do without formwork - it is simply more convenient with it. |
|
| Put a 10-15-centimeter into the trench (depending on the initial pocket depth) of the sand layer. If possible, use river sand shallow fraction. This layer of the pillow will take the functions of waterproofing. Failure is carefully tamped. You can use the same way as for the ground of the soil. For a better seal, we swipe sand with water. Important! Thickness at the level of 10-15 cm should turn out after the tamping, and not the primary backfill of the material. Crushed stone falling asleep with a 5-10-centimeter layer, again, depending on the initial depth of the trench. It is best to use a varinfraction sand so that the amount of emptiness in the backfill is minimal. Instead of rubble you can fall asleep gravel or brick fight. This layer of the pillow will ensure the diversion of moisture penetrated through the sand, from the overlying structures. Important note! If at the venue construction work There is a high arrangement of groundwater, be sure to route between sandy and crushed stone layers geotextiles for additional waterproofing. Make small (in the conditions under consideration there are enough 5-10 cm) adhesions on the walls of the formwork. Do not forget to withstand a given slope of the surface (if provided) when sanding sand and rubble. |
Pillow is ready. Further order of action is determined by the features of the definition of the disposal chosen by the developer. We suggest familiarizing yourself with the instructions on the arrangement of the most common options for the design.
Soft christseed solester
In fact, the above-described pillow can be viewed as a soft scene from rubbank. In order to expand the horizons, we suggest you familiarize yourself with an alternative embodiment of such a design with the involvement of an additional waterproofing material.
Pre-dry the trench and pour the sand layer, aligning it and setting the required slope, as in the above instruction, followed by the following provisions.
Table. Soft slut
| Stage of work | Description |
|---|---|
| The layer of waterproofing material is stacked over the sand. Many developers use runneroid, but we recommend to give preference to Rubimast - it is worth it more expensive, but it serves much longer. In the considered example, the formwork is equipped with a width of 80 cm. The width of the Rubimast roll is 100 cm. In order not to engage in the cropping material, simply bend it over and glue to the wall using a molten bitumen or other suitable composition. |
|
| On top of the waterproofing material, a 10-centimeter layer of a mixture is covered, which includes an equal amount of sand and gravel / crushed stone. Failure is thoroughly tamped and smoothed with the observance of a given slope. | |
| On top of the sand-gravel backfill, you can pour out an additional 3-5-centimeter (or to the top) layer of rubbank and it is good to compact it - so the gentleman will definitely not be suitable during walking along it. |
Temporary soft crushed stone gothic. If you wish, you can hide the formwork boards using decorative borders.

Prices for rubble


Basic information
As noted, the technology of arrangement of the decoration with the finish coating in the form of a paving and tiles remains the same. The choice of a particular material remains for the owner, but there are several important comments.
Thus, the application of the pavers is permissible only if the foundation was pre-waterproof. Among the shortcomings of the pavers can be noted except for a relatively high cost.

Tile - one of the most popular materials widely used in the arrangement of the scene. This option has a number of significant advantages:
- the tile is much cheaper than concrete in the amount required to fill the site;
- the material is presented in a huge range of dimensional variations, colors and forms, which allows you to get this option to finish, how the owner wants to see him;
- tile can be laid on its own, spending on it relatively little time - wait 3-4 weeks until the concrete is free, it is not necessary.

Prices for brooming
bruster
What tile to use?
Choosing a tile for the scene, follow the councils below.
Council first. To perform the work under consideration, the tile made according to the method of vibropressing is best suited. Buying such a material, you significantly reduce the risk of acquiring a fake, because Production of this finish in handicraft conditions is impossible - for the production of tiles of this group, serious expensive industrial equipment is used.

The vibrating tile (the second popular variety) is relatively easily manufactured in an ordinary garage. It should be cheaper, but the real quality of such products usually remains a mystery.

Council second. Pre-prepare the plan of the future location of the tiles on paper or in a special computer program - so you can choose the most like drawing to you and facilitate further work. If you wish, you can use one of the finished options presented in the images.


Council Third. Pick to pave the breakfast to such a tile that will be well combined with other tracks and other areas with similar finishes located in the site.

Power technology
You have already done a pillow for the scene. Further work is performed in the sequence shown in the table.
Table. Skostka from tile do it yourself
| Stage of work | Description |
|---|---|
| How could you see on one of The above-mentioned images, Pillow for cessation Tile has additional top-layer in the form of sandy backfill. Pour 8-10 cm sand over Crushed stone. Recommendations B. The ratio of I. Tamping material are similar Previously equipped layer. |
|
| Start the pavement of the scene. Stop styling from any comfortable angle. Move towards yourself. Elements place on the principle brick masonry. With displacement of seams in nearby rows. Specific laying option can choose from previously described illustrations or invent yourself. |
|
| To ensure a tight fit tile / paving, a rubber cynica is used to base. Working with the tool is carried out in the following order: Stacked tile; On top of it is a wooden plank; The performer is carefully tapping on the table, trying hard enough, but gently press on the tile of the Cyans through the mentioned gasket. Each tile is stacked in such a sequence. |
|
| Using the level, check the smooth styling of tiles relative to each other and the ratio of the series. Under the seeding elements of the finishes, plucked the sand, the protruding parts of the tile are deposited by the Cyanka, following the above-handed guide, withsting the necessary slope of the unit at the same time. Package in accordance with the above sequence the entire platform. If there is a need for a narrow tile, do it with the help of a grinder. |
Important note! Many developers insist on stacking pavers / tiles to cover a cement screed layer. We advise putting the finish right on the rammed sand - in this case, a more efficient removal of water will be provided through the gaps between the tiles down. In the case of the arrangement of cement fill, the system's patency will decrease, and this threatens to the emergence of a land in the cold season and all associated troubles.
If, in view of any circumstances, the device of the unit without the use of a cement screed is not possible, after filling the sand layer, do the following:
- prepare a mixture of 1 stake of cement (from M400), 3 fractions of sand (sainted, fine-phrase, river) and pure water in an amount sufficient to obtain a homogeneous plastic solution of medium thickness;
- spread the solution on the surface of the cylinder site using a cell or any other suitable tool, then crumpled it with a mop or long straight rail (rule). The total thickness of the cement layer must be 30-40 mm.

After waiting for cement drying, proceed to laying tiles. It is the most convenient to use for this glue, designed specifically for fixing the considered finishing materials. The order of cooking I. proper use Adhesive in the manufacturer's instructions - for different compositions, these moments may differ.
Some developers and at all take construction with cement pouring without subsequent finishes as a finished scene.
This option is possible, but its appearance satisfies not everyone. If desired, special coloring pigments can be added to the cement - the surface will take a more attractive view.
Breakfast from concrete
Option for owners who are accustomed to doing all overhau and for a long time. Spending once a relatively significant amount for arrangement concrete GameshetYou will receive at your disposal durable, reliable and most strong design.
We will talk about the order of arrangement of a warmed reinforced concrete unit. The presence of the heat-insulating layer will beneficially affect a number of key operational and technical characteristics of the foundation, base and the whole structure as a whole. If you wish, you can exclude the steps affecting the insulation device from the manual and use the same instruction, but it is not strongly refused to refuse heat insulation.
 Concrete Globe Insulated - Photos of Layers
  Scene from concrete - scheme
Ideally, the width of the insulated scene must match or exceed the depth of the soil freezing. In practice, the device of a similar design, firstly, will require very large financial investments, secondly, takes the useful area of \u200b\u200bthe site. In view of this, the developers adhere to the "golden middle", component of 700-900 mm.
Before starting work, you need to choose the appropriate thermal insulation material. To choose as much as possible and correct, it is necessary to take into account a number of significant moments.
- First, this is the ratio of the cost of the insulation and its characteristics.
- Secondly, operating conditions (in the ground, outdoors, i.e. material should not rot).
- Third, the climate is in the location of the structure.
Given the above criteria, the most optimal material for the insulation of the scene is a foam. An extruded polystyrene was shown even better, but it costs it more. For most regions of the Russian Federation, a 5-centimeter layer of insulation is sufficient. In particularly cold zones, this indicator can be increased to 10 cm. In this case, the insulation is better equipped in 2 layers.
The composition of the cushion for concrete slaughterhouse remains similar to previous designs, but the sequence of actions undergo certain changes.
First of all, you need to deal with the nuances of the lateral insulation of the design. If the lack of the subsequent dismantling of the wooden formwork you does not confuse (for example, the subsequent decoration of the visible elements of the design by special borders or other suitable elements) can be simply glued to glue the insulation plates to pre-mounted boards using a binder designed specifically for polystyrene foam materials.
Along with this, available alternative option: slate sheets turn into a plastic film and deepen into the ground along the scene. Such a design if it remains in deploying after the event under consideration, it will disguise it much easier than the wooden elements. Looks like this system in the following way.
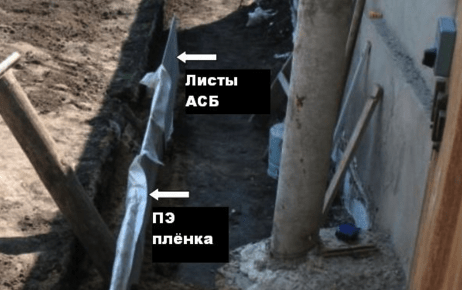
The improvised formwork with thermal insulation material is installed along the entire length of the breakfast. As a backup, you can use bricks or building blocksBy setting them to the ground from the reverse side of the formwork. Will be shown in the following photos.

Polyfoam and so it will be quite confidently standing at a pre-compacted basis, while it will be folded further materials. For greater confidence, you can bury the plates into the ground for a couple of centimeters or glue the insulation to the sector. It is not necessary to use mechanical fasteners - each hole in slate leads to a decrease in its strength, and in the foam - to the formation of cold bridges.
From the insulation, in this case, you can make a damper interlayer between the base of the house and the breakfast. With the help of the separation layer, you can ensure compliance with the formwork: for this, it (damper) must have a greater height in relation to the opposite wall.
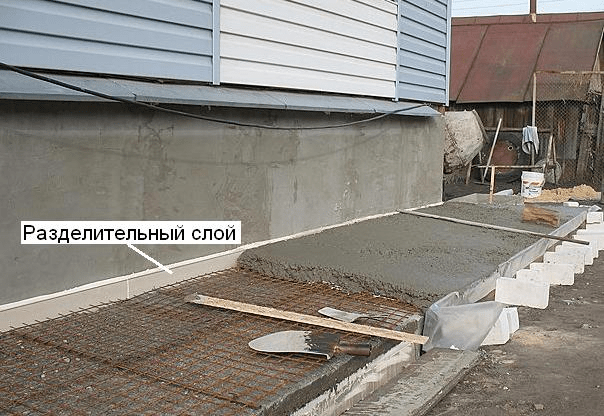
By installing side heat insulating plates, make a previously discussed pillow. Its composition will be the same as with the arrangement of the scene, followed by paving paving tiles.
Table. Concrete Globe do it yourself
| Stage of work | Description |
|---|---|
| In this case, it was decided to use two-layer thermal insulation from ordinary foam and extruded polystyrene foam. First, the layer of polyfoam is placed. Plates are laid as closely to each other as much as possible. Bricks are used for temporary fixation. Having postponed the whole platform, blend the available gaps mounting foam. Give it to dry, cut the spokes up with a sharp knife and proceed to laying the second insulating layer. The plates of extruded polystyrene foam in most cases are equipped with end grooves, the presence of which eliminates the likelihood of the occurrence of cracks between the elements laid next to the elements. Important! The thermal insulation layers are stacked with the dressing of the seams, i.e. The joints of the upper row should be shifted towards the shakes of the bottom row. If you need to trim the plates, you can use an ordinary sharp knife for this. |
|
| For reinforcement, you can buy a ready-made grid or make it yourself from the reinforcement with a diameter of 8-10 mm. The rods are assembled into a grid with 150x150 mm cells and bonded in places of intersection with the help of knitting wire (cheaper) or special fixtures (faster and easier). The grid must be laid with an indent from the base. Special backup fixators are used to ensure it. In the absence of a sufficient budget, you can walk with stones, brick fighting, etc. Provide a 5-centimeter indent how to fill the foundation in this case it will not work, because This will lead to an inappropriate increase in the height of the scene. Try to withstand at least a 5-10mm gap. |
|
| Concrete is prepared according to a standard recipe: the share of the cement of the brand is not lower than the M400 mixed with 3 pieces of sainted sand and 4-5 shares of gravel or crushed stone. Water is added in such a quantity so that a plastic homogeneous mass of normal lugs was obtained at the output. The pouring of the finished solution is carried out in the same way as the cement-sand mixture, i.e. The composition is unfolded over the base and rolls up with a mop or other suitable fixture, for example, rules - long straight rail. The function of the beacon in this case will take the side walls of the formwork. After the fill, pour the concrete to the reinforcement rod in several places to release excess air, close the resulting deepening with a solution, sprinkle the surface with a thin layer of dry cement and leave the design to gain strength. According to GOST, it takes 28 days. To protect the design from atmospheric precipitation, cover it with a polyethylene film. Periodically (every 1-2 days) raise the film, spill the concrete with a small amount of water and hide back - thanks to this, the maximum amount of cement will enter the reaction, which will ensure a higher final quality of the concrete structure. |
Helpful advice! Before the fill of the concrete mix, cover the part of the insulation of a fiberglass mesh protruding over the soil. To fasten it with foam, the ordinary glue PVA is suitable. The presence of the grid will protect the insulation from possible damage.

In this case, it was decided to abandon intermediate transverse damper partitions from the boards (described earlier). The design is insulated in 2 layers and on the sides, in view of which the thermal insulation simultaneously assumes the function of the dampers, and the reinforcement is better not to break - the strength will decrease.
Concrete mix prices
concrete mix
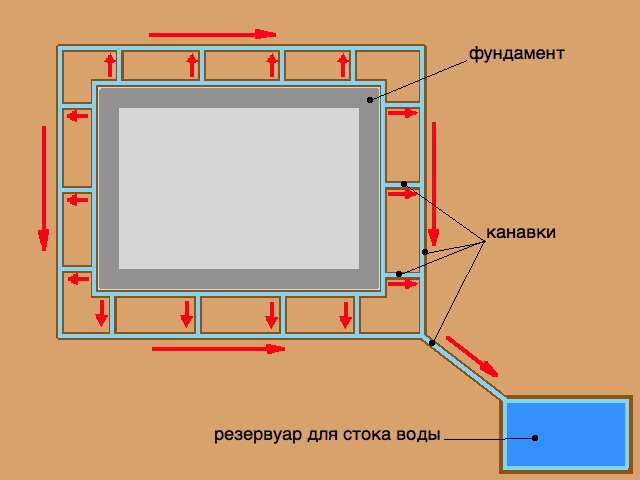
Drainage questions
To ensure an effective leading of atmospheric precipitation, the cabin is equipped with a drainage system. The design is elementary in its version:
- asbestos-cement pipe with a diameter of 10 cm is cut along into 2 parts. Bulgarian is suitable for cutting;
- the obtained halves of the pipe are stacked around the perimeter of the scene close to it;
- in the corners of the scene in the joints of the joints mentioned above the pipes are located solid drainage. The same asbestos-cement pipes are suitable. To place them, trenches are digged. The sizes of the pit choose so that the sides and on top of the pipe remained at least 5 cm of free space. At the bottom of the trench, pre-float the 5-centimeter layer of sand and confuse. The pipes themselves turn into geotextiles and are discharged in the direction of construction for wastewater collection. The specific option depends on the individual characteristics of the area.
The described drainage looks as follows.

To improve the appearance of the concrete breakdown, it can be littered with tiles or decorate another material to choose from the owner.
Good job!
Video - Downtry do it yourself
Scene is a simple element that can significantly extend the life of the construction. It is also an indispensable part of the decoration of the local area.
Presentatively looks at the breakfast around the house with their own hands, combining or coinciding with the materials, from which the pavement and the entrance to the garage are paved.
Answering the question how to make a break around the house with their own hands and for which it is needed at all, it will be worthwhile to list the functions of this structure.
- Protective. Properly constructed gallery protects the foundation from long-term contact with the foundation. The design provides for the removal of water immediately into the sewer.
- Decorative. The scene around the house gives the structure completed and solid look.
- Prevent soil intake. Reducing the freezing of soil will avoid soil intake. What is the benefit? There will be no soil shifts around the foundation, which means its integrity will not be disturbed.
- Heat insulation. The house of the house significantly reduces the freezing of the soil and the foundation as a whole. Thanks to which the floors are warm and warm will not leave the house.
- Protects the base from dirt.
Where maybe you need a scene
The breakfast must be built not only near each capital structure, but also in small buildings. This will create a bias for water supply and protect the foundation. Its importance is not exaggerated at all, since this construction created from concrete and bulk materials has already established itself as reliable protection foundation for many years. This means that I learned how to make a break around at home, you will not once again spend money on the repair of the base, and the walls do not crack from the constant impact of moisture.
What are there solesteps
The scene is based on how you are going to exploit it in the future. First of all, it is necessary to decide, it will only perform a decorative function or used as a pavement. In the first case, the slope can be made large, and in the second - minimal. Depending on its features, there are different categories.

Types of scene:
- multilayer and two-layer;
- cast, prefabricated and bulk;
- soft and hard scenes.
Materials can be used:
- wood;
- tile;
- concrete;
- reinforced concrete plates;
- bricks;
- cobblestones;
- asphalt.
3 Terms of Efficiency
In order for your home scene to the home effectively in terms of protecting the foundation from excessive water, it is necessary to take into account the following conditions.
- The first and most importantly rule - the scene must be made with a bias towards the site. The type of coverage affects the magnitude of the slope. Reliable concrete breakdown should have a slope of at least 5-10 degrees.
- In the width, it should exceed the sink of the roof for 30 centimeters. On the bunched soils, it is not already one meter, on sandy - at least 0.6 meters.
- Correct ottost Constructed around the whole house without intervals. Since the sediment at the breakfast and the foundation is different, it is necessary to build a compensatory seam that falls asleep with sand, poured by bitumen or filled with sealant.
Popular Methods Device Games
When covering the facade panels, siding or cladding with a stone, a malnimate role is played by the scene, as it is the basis for installing the trim.

In its absence, a noticeable slot appears between the skin and the level of land. This is probably not even to talk, because no one will finish its facade without previously constructed messages.
Concrete - the easiest option
The technology implies the creation of 2 layers. The first layer is underlying. It is necessary to create a smooth compacted base. For this, such materials can be used: small crushed stone, clay and sand. The choice of materials for creating the underlying layer depends on which materials will be used for the second layer. The coating must be waterproof and have resistance to moisture.
- Marking. About the required sizes of the structure said above. The earth is removed and compacted throughout the perimeter of the structure. The Earth is preparing exactly the width. For concrete structures, the Earth is removed to a depth of at least 25 cm.
- Formwork. To create formwork uses a board with a thickness of 20 mm. A layer of clay is placed on the rammed Earth, which is also compacted. After that, the 10-centimeter sand layer is set. To qualitatively make a seal, it is spilled by water. Now the layer of rubble in 60 mm is stacked.
- Reinforcement. The use of the reinforcement grid increases the stretching of the flap to stretch and compression. In addition, it will be quite difficult to destroy it - maintainability and vandal resistance increases. A reinforcement grid is bought with delivery to the object. The grid is usually sold with 2x6 meters sheets, which is very convenient. You can dissolve it in half so that the width makes 1 meter, it is ideal for reinforcement. Pouring the grid can be an ordinary grinder on fragments of 1x2 meters. You can cut on 3 meter slices, but because of the high weight to carry them very uncomfortable. The network is mounted in the formwork so that the distance from it to the chicted pillow can be 2 cm. It is done in order to arrange the grid inside the concrete, And not on the pillow. There should be no difficulties there should be no difficulties, because there would be no pillow, pebbles will always remain over the surface. Cutting grid fragments must be laid in bent. Excessive wires are bend or trimmed with a grinder. Reinforcement is the fastest and simplest stage. For this, there are enough 2 people.
- Pouring concrete. When pouring with concrete, the grid can exhaust greatly - the concrete will begin to squeeze it out. You will need to quickly rub the site or after the frozen to wear out of unnecessary fragments. It should be noted that this is a difficult procedure.
POWER QUALITY OPTION
If you plan to make a drainage system, then it is suitable for the production system. This is the easiest option. A geotextile material is stacked in the rammed trench, which is stacked by clay, pebbles, gravel or crushed stone.

Geotextile material is used to prevent the crushed stone in the base. By choosing such a blindstation, you must be prepared for the fact that it will have to be regularly corrected, and it is not very convenient to walk.
Using paving slabs
To create a solid layer, crushed stone can be used, on top of which the tile is stacked. It is not necessary to do without creating a drainage system. You can also create waterproofing with a waste of water in the sewage.
- We prepare the base. The land is digging to the depth of the tile size + 10 cm. To create the effect of waterproof, clay is used, which is placed under the tilt to a height of 10 cm.
- A layer of waterproofing from PVC, stacked on top of clay. Waterproofing is mounted with a metal plank. Next, sand layer 4 centimeters, which is leveled and tamped.
- Only now you can start laying paving slabs. The solution should consist of concrete and water in proportion of 1: 4. The solution should be very thick. Tile begin to lay out the corner. After laying, 4 tiles are removed and a solution of a layer of 4 centimeters is placed on their place. Paving tile set to place using spacers and hammer.
- Setting all the tiles and removing all the wooden pads. It is necessary to fill the seams with sand. For the maximum dense filling, the tile is watering water. Even a qualitatively made seam during operation must be periodically filled with sand.
Concrete Game Repair
In the question, how to make a break with your own hands we have already figured out, but what to do her breakdowns? When damage is detected, repairs must produce as soon as possible to prevent the spread of the design. Repairs should begin with determining the boundaries of the damaged place.
Several significant choseli can be combined in 1 damage. A damaged asphalt coating is cut into full depths with wedges and cleaned from dust. The edges, walls and bottom are lubricated with a discharge bitumen and poured concrete. The new coating is stacked slightly higher than the old one that will ensure the best connection of the plots.
To repair the cracks of peeling and selecting are used:
- fine-grained concretes;
- cement-sand solutions;
- sealing pastes;
- revurbitume mastic.
In order to prevent the blur of the soil around the house with rain and thawed waters, as well as to remove the precipitation from the foundation, they make a break around the house. These works must be carried out until the final finish of the base. More specifically - define yourself. But it is undesirable to tighten: leaving the house or a bath without a breakfast, you can have several cracks in the foundation in the spring.
Skosting around the house is a simple structure. Nevertheless, it extends the time of operation of buildings. Water during the autumn weather is seeping to the foundation. In the frost, it freezes, increasing in volumes than the overpressure creates. As a result of this load, cracks appear in the foundation, which also penetrates water. Freezing she is even wider. Some time without a breakfast - and the foundation requires a serious expensive repair. Sometimes the destruction is so serious that it is impossible to correct them.
But these are not all functions that can perform a protective coating around the house. In some cases, it is used as a track. Sometimes, putting the insulation and waterproofing layer under the device, it is possible to improve the operational characteristics of the building and correct some shortcomings allowed during construction to heat and. In addition, in terms of decor, it serves as a logical conclusion in the design of the house.
What makes a break
The cheapest option is from concrete solution. But the time for the device of such a design is more. Especially on bunchy soils: a special pillow and reinforcement are required. All the time, until the solution gains strength, it is impossible to walk on it, and this is at least four to five days.

Other types of covering the protective belt around the house are paving slabs, blocks, bricks, natural stone, porcelain stoneware, etc. Options today mass. The main thing is that they possess the following properties:
- did not let the water;
- did not crack during freezing / size;
- had high resistance to abrasion;
- possessed aesthetic attractiveness;
- have a long service life.
There is another material for the scene, but in private house-building it is rarely applied - the asphalt is placed around the house. As for attractiveness (as in the case of concrete), the question is controversial, and the remaining characteristics are simply excellent.
But the protective coating is not all. We need more other materials. What exactly - depends on the option chosen to implement the option. You can say for sure that sand and crushed stone will be required. It may be necessary for waterproofing and slab insulation.
Dimensions
Since the main task of the scene to remove the melting and rainwater, its width should be at least 20 cm more than the sink of the roof. But less than 60 cm make her specialists do not advise - moisture can leak to the foundation.
The width of the protective belt depends on the type of soil. If these are normal soils that are well removed, then 60 cm is sufficient. If the house stands on loams, other bunchy or unstable soils, the width must be up to 1 meter.
 The main parameters of the scene for normal water removal from the foundation
 But the scene must also go deep. Its depth depends on the type of soil, from the functions that it will be performed from the thickness of the upper finishing layer.
If the house stands on normal unoccupied soils (not clay or clay-containing soils), and they will not walk on the surface, it is enough to make a submissance from the sand with a thickness of 10 cm. From above, you can lay the tile, stone, etc. from above. It means that the depth of the trench will be about 10-20 cm - it depends on the thickness finishing material. Only for coating, which is compiled from fragments, a curb is necessary. So get the edge stones around the perimeter, strengthen them, only then pour on the bottom of the trench of the sand.
If the formwork will be used as a pedestrian walkway, more serious, distributing weight, substrate. At the bottom of the ditching, the crushed stone of a small fraction is first 15-20 cm, and there is already sand on it, and only then finishing coating.

What else is required - compliance with sludge: the decline comes from home. So moisture will be drained into a drainage system or soil located around. The magnitude of the slope depends on the type of protective coating used. For concrete and asphalt bias 3-5% (per 1 meter drop of heights 3-5 cm). When laying a stone, tiles, porcelain stoneware - a bias make 5-10%.
Order of work
After the sizes are selected, proceed to the device itself. In general, this happens in several consecutive stages.
Marking and ground removal
The selected width is delayed around the perimeter of the building. Here it is necessary to say that in those places where they will go, make it can be wider.
Place, usually, driven pegs. Stretching the twine or cord between the pegs, outlines the front of the work. On the whole area it will be necessary to remove the turf and part of the soil. At the same time remove the roots of plants. It is often carried out by treatment with chemicals that prevent germination of plants. If this is not done, sparkling, they will destroy the coating.
Device of compensatory seam

It is very important when performing to remember that the scene and the foundation should not connect. To do this, around the perimeter of the foundation, it is necessary to leave a compensation seam, about 2 cm wide. In practice, this or a strip of foam plastic 2 cm thickness, or in two layers folded rubberoid attached to the foundation.
The compensation seam is necessary that when driving under the movement, it did not press the foundation. If this is not done, instead of preventing destruction, it will create a pressure that sooner or later will lead to the appearance of cracks in the walls.
Running and finishing coating
If you follow the "folk" technology, the clay layer is poured on the bottom of the trench. It will prevent moisture leakage. Her trambet, already at this stage creating a bias from the foundation. Such a backfill is suitable for any kind of soils. Let it hard and long tram, but it will not carry water. If for the breakfast of the house, standing on clay soils, use sand - most of the water will be just under the foundation.

Faster it will go, if you use a wheeled machine. If there is no such, they take a log diameter log, sculpt 80-90 cm. The height should be such that you do not have to be touched - your hands should be free to the upper edge. On the one hand, they are stuffed - the handle. This deck and trambet, lift and lowering it.
Then pour the sand layer. It is shed water and also thoroughly compacted. With normal soils, and if you walk along the breakfast, you can lay paving slabs or a paving. When used as a protective coating of concrete, it will be necessary to still pour and compact a layer of rubble, arrange a formwork and compensation seams, decompose the reinforcing belt and only after this is to fill the solution. So the manufacture of a concrete track takes a lot of time.
Warming Gamesost
If the gentle is made around the house with a basement or basement, it is necessary to make it at the same time its heat and waterproofing. It is necessary to insulation for any slab foundation - it will prevent the frost of the soil under the stove.
Some experts claim that in the middle lane of Russia and in the north, insulation is needed in any houses with seasonal accommodation. The fact is that in a heated house, heating itself prevents the freezing of the foundation. And if there are insulation of the scene, then only in order to save fuel. In the house with seasonal accommodation, additional measures must be taken to extend the life of the building. And that's why. Any material can make a certain number of freezing and defrosting cycles. After that, he begins to collapse. In the absence of insulation in one season, the foundation will freeze and squint so many times as the weather will change - in the fall and in the spring often alternately it is warm, then cold weather. What will cause such a state of affairs is clear: after some short time, destruction will begin.
For thermal insulation, the heat insulating layer is attached to the base of the ditch (and better foundation). It also stacked on a protective coating. The following materials are used to insulate the scene around the house:
- polystyrene foam;
- foamed polyurethane;
- styrofoam.
Warming with extrusion polystyrene foam
This material is one of the best for insulation of foundations. At the same time, it remains warm, and does not miss moisture: its hygroscopicity is close to zero. His minus - he easily melts. But for the insulation of the foundation and formwork, this lack is insignificant.
It is desirable to spread the plastic film to horizontally decomposed plates - it will protect the joints of the slabs from the water flow.

The polystyrene formwork is made in this way:
- The rammed coarser sand with a layer of 15 cm.
- Ruberoid. At the same time, it must be started on the walls by 15 cm.
- Polystyrene plates, joints are sampled sealant. The layer thickness is 10 cm. It can be either one plate, or two to 5 cm. If two plates are needed, it is necessary to glue with seams - so safer will be protected from moisture penetration.
- Polyethylene film 200 microns.
- Sand layer. His carefully tram, trying not to sell the plates.
- Protective material.
Any film is used as a protective material. But under concrete additionally put the reinforcing mesh (metallic with a cell 10 * 10 cm) and only then the solution is poured under the slope.
Foamed polyurethane
It is sprayed from special devices. It does not rot, practically does not absorb water, operating temperature range - from -60 ° C to +150 o C. It is rapidly applied - all works can take three-four hours, but the use of a special apparatus entails the payment for services. They are not suiced - one of the components of the composition is toxic. So with all your attractiveness, this method is used infrequently.

Foam insulation
This is the cheapest of the insulation. It has good thermal insulating properties, does not pass water, moreover, it has good sound insulation properties. The only drawback is low mechanical strength. When it is used, an additional reinforcing belt is necessary. The sequence of actions is the same as when bleeding polystyrene, only two differences:
- sand on top of the insulation pour out a thicker layer, to rub him only patting a shovel, while it is impossible to walk on foam;
- the reinforcing belt is also needed under the tile or blocking, which is covered with the second layer of sand.
Despite the low price, foam - not the best choice: it is too afraid of loads. If on the track will go, it is not worth using it. To reduce the cost of insulation, you can use it for sticking to the foundation, and on the formwork itself to purchase polystyrene foam. This will be the best option.
Waterproofing
Waterproofing is necessary in brutal soils and the absence of the insulation of the foundation and the scene. In this case, the smaller the water is under the building, the less likelihood that the powers will harm your building.
The sequence of layers during waterproofing is:
- The waterproofing layer is a conventional dense polyethylene film with a thickness of 200-300 microns - placed clay. It does not need to stretch it - there must be some freedom of movement so that during seasonal shifts the soil does not break it. The height of the foundation is 15-20 cm. It is nailed to the foundation (if wooden, it must be treated with hot oil so that it does not rot). But it is done later, after laying a layer of sand and geotextile. So while fixing the film on the wall, for example, with a few nails.
- 10-15 cm of sand pour on the film. His trambet. From above stacked geotextiles. For a breakfast, he misses moisture, redistributes the load, does not break, does not allow to intervene in different layers, does not damage insects and rodents, does not germinate plants. And all this is some kind of woven or nonwoven membrane (they are of different types). Geotextile is stacked so that it overlaps the film laid below, and both layers attach the plank to the foundation. On the other hand, it must overlap the last height of the trench left.
- Further two options:
- To save the remaining pie to fall asleep with rubble, and it is to put the reinforcing layer on it - a metal grid of a steel bar with a step of 10 * 10 cm. From above, you can pour concrete on top.
- When using a pavement or tile, the cake will be harder. Another layer of geotextiles will be needed to be for the ramble crushed stone. It is still a layer of sand, and put the protective and finishing tile on the sand.
 Two options of the device of the scene - from concrete and tiles, boob stone, etc.
 Such a design is perfectly removing water.
Soft hidden occasion
Modern waterproofing materials allow not a protective coating around the house. They effectively hold and disassemble water, while the cost of such a cake is significantly less. In this case, they say about hidden cesspaste. And all because immediately from the foundation you can sow grass or to organize a flower garden, and all the weighing water layers are located in the thickness of the breed.
For a soft-sided device, profiled membranes are used. They have a nonlinear structure - small height Proposals and depressions.

Soft cesspool around the house with your own hands is easily implemented. The only thing that can cause some difficulties is a rather large volume of earthworks. The width of the ditch is desirable from 1.2 m to 1.5 m. But the depth may be small - about 25-30 cm.
The order of work in the device of a hidden soft gentle is such:
- First remove the ground, immediately form a bias of 3-5% of the house.
- Chemistry processing from plants.
- Roll over the profiled membrane to the entire width of the scene, one edge is set a little on the wall, and fix it, the second is simply left free.
- The geotextile layer is rolled on top. It is stacked the same - one edge is fixed on the wall. Both layers of waterproofing materials can be fixed together with one clamping plate.
- Geotextile is embanked by pebbles or large fraction Opening, bragmed.
- The next layer is medium and small dropout, and from above - sand. Each layer is trambed separately.
- The fertile soil is embanked from above and plants are planted.
Despite the seeming unreliability, water takes such a design even better than the traditional technologies made. And the works, as you see, there are no complex and expensive. If there is a need, you can put a tile or parallery on the sand layer. Then the view will be more traditional.

There is one nuance: if the ground on the clay area (it is clay) or your home is on the slope, it will be necessary to supplement the design of the drainage pipe. It stacked at a distance of 1.2-1.5 m from the wall of the house, at the level where the SCO geotextile ends (you can lower it slightly below). But at the same time, the membrane and geotextiles should be reduced and from the outer side to cover it so that the collected moisture regulates through the perforation into the pipe, and then it was discharged into the sewer or to the drainage system.
Features of concreting
When the device is a concrete break around the house with their own hands, it is necessary to take into account some subtleties of technology.
First, the composition of the solution should be frost-resistant. Why - understandable. You can buy ready-made mixes, but it is not cheap. You can use additives that increase the frost resistance of concrete. In the simplest case, add more cement. Make a solution at the rate: one part of cement, three parts of sand and rubble.

Secondly, to avoid the appearance of cracks, it is necessary to make compensation seams. To do this, usually use boards with a thickness of 25 mm. They are processed from rotting hot oil or. Then put on the edge, exhibiting the required slope, approximately every 2-3 meters. Fix with metal pins or wooden pegs. When pouring the solution, they can be used as lighthouses. In the future, the bar will ensure the mobility of the formwork during seasonal ports of the soil.
And thirdly, to impart the surface of greater strength and more aesthetic species, it is sprinkled with a dry cement that rubbed the trunks. Do it after the fill is over. Call this process with a piece of concrete. The surface after that becomes durable, smooth, with a rigal gloss.
RESULTS
The device of the scene around the house with their own hands is not the simplest, but also not the most difficult task. There are many solutions that will improve the operational characteristics of the building and extend the service life.
No building can do without a reliable foundation holding its weight and ensuring the integrity of the whole design, but it also needs additional protection. If necessary, each person can perform a concrete break around the house with their own hands without using the services of professional builders. This process does not differ in great complexity, but it requires a thorough fulfillment of a number of requirements.
Requirements for breakfast, arrangement rules
 This design serves as an additional protection for the base of the building, not allowing the devastating influence groundwater and the environment. In addition to protection, it also performs aesthetic function - a building with a breakfast acquires a complete appearance. Before making concreting of the scene, you need to get acquainted with a number of requirements:

 To successfully create a breakfast should be drawing. It can be compiled independently, focusing on typical projects, or contact specialists. If necessary, it can be limited by means. Being a decorative element, it also increases the integrity of the design and protects against the penetration of the roots of trees or shrubs.
Bordeurians are mandatory if you create a breakfast or rubble around the house, and in the event of a growing area of \u200b\u200bpoplar, plane, raspberries and blackberries.
Materials for creating concrete messy around the house do it yourself
 Before starting work, you need to prepare everything necessary materials and scheme. Strengthen the foundation should be consistently, but the entire process should take at least a time. In most cases, in the preparation of the project, you can use standard nodes of the device from concrete, bringing adjustments to the scheme according to the features of your region. You will need materials:
- Concrete. The resulting mixture must match the characteristics of the class from B3.5 to B8. When it is created, the best will be the cement brand M 400.
- Sand. As a pillow, you can use river or career sand. The material used when mixing the mixture should be soft, the presence of large impurities is not allowed.
- Crushed stone or gravel. The rubble fraction for the breakfast house is 10-20. Used as a filler for a concrete mix, or as the main material.
- Clay either geotextile. This material is used in the arrangement of concrete breakdown with their own hands for additional moisture protection, which is relevant for regions with high humidity.
It is determined by the grade of the used cement and its specific weight in the percentage ratio of the elements of the solution. Good decision Material M400 Portland cement. Used cement should be fresh. If the powder in compression in the hand forms lumps, then it will soon become unsuitable. From the planned thickness of the scene from concrete depends on the grade of the selected cement. Recommended proportions for kneading 1 m 3 solution:
- water - 190 l;
- filler (sewan or crushed stone) - 0.8 m 3;
- sand - 0.5 m 3
- plasticizers ( liquid glass and the like) - 2.4 l;
- cement - 320 kg.
When calculating the sizes of the scene around the house should prepare in advance required amount Building materials. It is also important to comply with the procedure for filing materials, which is necessary to provide the necessary consistency. Compliance with technology will make it possible to achieve the desired result and create reliable design. When fulfilling all the requirements, you can effectively equip the concrete break around the house with your own hands.
The amount of water supplied is of great importance. Excess will reduce the strength of the obtained concrete. The lack of water will not allow him to harden properly.
How to make a blindfold for the foundation with your own hands - step-by-step instructions
 In a concrete mixer or another mixing capacity, the required amount of cement is falling asleep, and then it is poured with water. With stirring, "cement milk" is formed, into which other components are served. Next is added in small portions of sand, the mixture should be constantly mixed. Following the filler (crushed stone or dropping). If you learned in advance what crushed stone is better for the scene, and the material of the correct fraction is picked up, mixing is not difficult.
To provide more efficient mixing, expect 5 minutes after adding each component.
Once the materials are prepared, you can proceed to work. The device of the scene around the house includes such steps:

Also before the fill, compensatory seams are established between the scene and the basement using boards or plywood sheets - this measure will protect the concrete from destruction when the temperature changes.
Installation of grocery from rubble
 More economical option It will be the use of rubble as the main filling material. It is imposed to its arrangement as the same requirements as to the breakfast from concrete, however, it does not require reinforcement and creation of a deformation seam. Between the crushed and sandy "pillow", an additional layer of waterproofing (geotextiles) is installed. It will not allow mixing of rubble and sand, and will not allow growing plants from seeds that could stay in the "pillow".
Game from rubble can be made with their own hands without much effort. To fill the bottom of the trench, you can use the material of a large fraction. From above for giving decorative effect, fine crushed stone is used. Such a scene also successfully protects the foundation from the destructive impact of groundwater and the environment. With the right approach, you can give her a neat and attractive appearance.
Concrete breakfast from A to I do it yourself - video
In addition, it is used as a convenient pedestrian passage and decorative decoration With the improvement of the territory adjacent to home. The use of dense or bulk insulation devices from the device allows you to protect the foundation from exposure to low temperatures and reduce heat loss through fencing structures.
A fairly simple device of such a protective coating solves several important tasks associated with protection and improvement, without requiring large financial investments. At the same time, it can be done on his own, not inviting construction specialists for this.
The device of the scene around the house is done immediately after the completion of the outer walls of the building, but before the start of the basement finish. This is due to the need to overlap the compensation seam between the wall and the coating of the track from the rainwater hit by hanging over the protruding surface of the base.
For pile, deep columnar and screw foundations, the presence of the scene is not obligatory, but it is often done as an element of territory improvement and as a convenient pedestrian path.
Design of Gamesost
The protective coating must be done throughout the perimeter of the house, since it is necessary to protect the entire foundation array. The basic requirements on how to make a germ around the house with their own hands are set forth in SNIP 2.02.01-83, which states that on normal soils, its width must be at least 600 mm, and at least a meter. In the general case, the width of the coating should be out of less than 200 mm for the proper cut of the roof. The maximum width is not regulated.
General drawing of the scene.
The solid coating must be laid on a dense base with a thickness of at least 15 cm. The slope of the building from the building is not less than 0.03%, with exceeding the lower browing above the planning mark more than 5 cm. The removal of stormwater should be carried out in storm sewer or trays.
A qualitatively performed warmed scene must consist of three main layers:
- superficial waterproof;
- a gravel or gravel mixture with sand;
- insulated polystyrene foam.
As an additional layer, it can be used that will be sufficiently reliable waterproofing from the rising in the spring of groundwater, as well as prevents the possible germination of weed plants.
Top layer coating materials
Materials used for the top layer during the device of the scene are quite varied and have their own distinctive features. The easiest and inexpensive is an ordinary clay. With it, you can create enough reliable hydraulic shocks. Such protection is often found in rural areas. However, modern developers have long abandoned so primitive materials and use more efficient technologies.
 Options.
 The most common option is how to make a breakfast is a concrete coating device. It can be simply and quickly mounted independently without investing large financial resources. At the same time, concrete is distinguished by high strength and durability, and also allows its paving slabs to improve its appearance.
The decoration of the sidewalk sidewalk is made on the cement-sand mixture or solution. It is most often used to create a single color ensemble with a decoration of a building or its decorative elements. She is also durable enough.
Powder can be laid on the rammed sandy pillow. It has a beautiful appearance, but more than a tile and a few. When using a paving, it is necessary to ensure high-quality for complete sealing of the upper layer.
 Scheme of concrete breakdown in the context.
 The device of the slope from the natural stone looks very beautiful and will serve without repair for many years. However, the high value of the material reduces its widespread use.
Asphalt due to an unpleasant smell in hot weather is rarely used. In addition, this is not distinguished by high strength, and the purchase of the factory costs where more expensive devices Concrete screed.
Concrete device device with their own hands
For the device of the protective coating from concrete you will need the following materials:
- cement brand PC400 or PC500;
- river or washed sand;
- gravel or rubble fraction up to 40 mm;
- plates of insulation of polystyrene foam;
- board and bitumen for its processing from rotting;
- reinforcement grid with a cell 100x100 mm;
- clay or geotextile.
From the tool and building inventory you need to cook:
- or manual tamping;
- bayonet and scum;
- wide baudew for concrete;
- building level;
- plaster rule;
- mastello Mason;
- hack and hammer.
Work begins with the markup of the future coverage. It was mentioned above. After the final markup on the width of the track, the upper layer of the soil should be removed to a depth of 25-30 cm, and the bottom is tamped.
![]()
Next, it is necessary to spread a geotextile web on the bottom of the trench or to arrange hydraulic scams with a thickness of 5-7 cm from the ramble clay. On geotextile or clay, pour a layer of sand 4-5 cm and also tamper. Sand is needed so that the sharp edges of the rubble do not damage the integrity of the waterproofing layer.
Now, from the board or other sheets, you need to collect and install a removable formwork on the edge of the trench. Its height should be 5 cm above the planning mark of the adjacent territory. After that, it is necessary to fall asleep and tumble a layer of rubble with a gravel with a thickness of 7-8 cm and sprinkle a little with sand. This layer of sand is needed so that the cement mortar does not leave the emptiness during the pouring of the concrete mixture remaining between the stones.

When a concrete coating is needed to provide a device for deformation seams 1-2 cm wide. They will compensate for the thermal expansion of the concrete layer in hot weather and will prevent its possible gap with strong cooling. To do this, along the wall of the house around the perimeter of the base with the help of bitumen, it is necessary to glue a layer of rubberoid or hydroographs with a thickness of 1-2 cm. Instead of roll materials, you can use porous harness from foamed polyethylene.
 Formwork drawing.
 In addition, every 2-3 meters, as well as at all corners of the building across the scene, should be installed on the edge of the sections of the 2-3 cm boards, which, after pouring concrete, will ensure the compensation of possible extensions.
Before installing wood, it is necessary to handle the bitumen composition to protect against moisture and rotting. Set the transverse compensation rails in such a way that their upper edge corresponds to the future concrete surface.
Brand concrete and his fill in the formwork
To increase the strength of the concrete layer, it is recommended to reinforce metal mesh With a cell size of 10x10 cm. If you have an old rod or wire with a diameter of 5-8 mm, then you can use this material, but all individual elements must be interconnected.

After the formwork is installed, the reinforcement grid is laid, and the bulk layers are tamped, you can begin the preparation of a concrete mixture and its fill. Durable and durable coating allows you to get the use of concrete brands M200-250.
It can be bought ready for delivery to the object or make yourself, 1 part of cement, 2.5 pieces of sand and 4 parts of gravel. The water in the mixer is filled lately and is added gradually before receiving a homogeneous mass of medium density.

The finished concrete mixture is stacked inside the formwork on top of the reinforcement grid in such a way that its edge is slightly touched over the level of land, and in the direction of the building there was a slope of nearly 3%, i.e. 1 meter width should be 3 cm increasing levels.
Surface alignment should be performed using the plastering rule and workflow. It is necessary to check the presence of slope all the time using the construction level.
 The proportions of the concrete mix.
 Get more durable surface It is possible by the use of iron. For this purpose, the surface has not yet been captured by a wet concrete you need to sprinkle with a dry cement and, with a wide spatula, linnet it into the solution. If such a decoration of the scene near the house occurs due to the sifting of cement through a sieve, it does not have to rub it, it is without this to host the uniform layer.
With hot and dry weather, the bolted concrete layer is recommended to cover with a wet cloth and periodically water with water to ensure the setting, and not drying the material. The initial seizure time of the concrete mix is \u200b\u200b72-96 hours. After that, it is already possible to get up on it, without damaging the surface.
Sidewalk
Since the coating of paving slabs does not differ in such a strength as concrete monolith, the base under its laying is done more dense, having a rather thick layer of the rambling clay as the bottom base, and on top of the cement-sand mixture on which the tile is stacked.
 Scheme with sidewalk tiles.
 The depth of trenches to the manufacture of the scene in this case is digging deeper than for concrete gestures. In order to be covered with pains more stable, a trench is required to be a depth of 40-45 cm.
It is laid on its bottom and trambed a layer of clay with a thickness of 20-30 cm, which will protect the foundation from the penetration of rising in the spring of groundwater. On the clay layer along the edge of the trench, a curb, the top edge of which will not exceed the level of laying tiles along the edge of the scene.
After that, the layer of rubble or gravel is poured with a thickness of 10-15 cm and is well trambed. The top layer of gravel should be at about the ground level. A layer of geotextiles is spread to a stone, as protection against germination of weed plants, and already on it, the pavement tile is stacked on a layer of cement-sand mixture.
Skruce from blocks
Distinguishing from the paving slabs greater thick and better stability, the paving can be laid just on a dense pillow of sand. To do this, it is enough to dig a trench with a depth of 15 cm, spread the geotextile at the bottom, and fall asleep the sand layer, a little incoming to the top of the trench. After that, it is necessary to lay a paving slave, if necessary, slugging the sand.
To ensure the tightness of the upper layer, all seams between the stones should be carefully embedded by a cement-sandy mixture or cement mortar. The border should not go beyond the top of the coating.
Soft slut
 Option with rubble.
 Soft types of coatings include a rubble breakfast and other multi-layer coatings, having a cobblestone, gravel, pebbles and other bulk materials, under which a layer of clay or sand covered with a polyethylene film. This is the most inexpensive look of the coating and it is done very simply, but it serves such a germination from the rubble no more than 5 years. After that, it is necessary to solve the issue of protecting the foundation again.
Highly an important point When a soft design device is the presence of a slope of the waterproofing layer of polyethylene or clay. This is necessary because in this system, water is removed not with a surface coating, which passes it, but a waterproofing layer.
Device of a warmed system
The insulated cesspool protects the building structures of the foundation from the effects of low temperatures and significantly reduces heat loss from the building. As a heater, material is sufficient density, strength, hydrophobic and not subject to rotting. The best way These conditions respond to foam and expanded polystyrene.
 Photo Properly insulated scene at home.
 The process of insulation consists of three stages, which are included in the overall work on the device of the device around the building. At first, a layer of waterproofing in the form of rubberoid or waterproofing with a part of the material on the side walls is lined up on a thin sandy pillow or an endless clay.
Then the vertical is insulated ground Wall By fastening sheets of thermal insulation on it. During the vertical installation of sheets, it is necessary to ensure the connection between them into the protruding groove. In cases where it is impossible, the seams should be taken by mounting foam.
The horizontal layer of the insulation is placed on the bottom layer of the base of clay or sand. To reduce the cost of buying materials, the first layer of foam can be used as a insulation, and it is to lay a more durable polystyrene foam. In this case, it is necessary to ensure that the seams between individual sheets do not coincide vertically.

Further order of how to make a gentleness correctly, no different from what was described above.
It is believed that the insulation of such a design can be ensured, falling asleep in it instead of a rubble layer of clay. This opinion is not entirely true. In the layer of bulk clamzite, air gaps remain in which moisture will accumulate through time, and the thermal insulation properties of such a layer will decrease greatly. If you use a ceramzite concrete, then the required layer thickness will be very large and all savings disappears.
Operation and repair of the scene
On the surface of the concrete coating, cracks or other damage can be formed over time. This occurs most often as a result of soil drawdown, incorrectly selected width of compensatory seams, use low-quality materials And for other reasons. Repair of such damage can be performed using a mixture of bitumen primer, asbestos and sand.
 Market value of services for the device of the device.
 Initially, the crack is somewhat expanding and cleaned with a water jet from garbage and dirt. Then you need to give it to dry and pour the cooked mixture.
Too large damage should be expanded to the desired size, moistened with water and restored by filling the new concrete. If necessary, the volume of damage is reinforced with steel wire or rod. After hardening the concrete mix, restored places must be treated with primer.