We warm the bath from the inside. How to insulate the bath from the inside, if the walls are made of bricks, blocks or wooden, so as not to freeze in the steam room? Insulation of a bath from a bar inside
External or internal insulation of the bath is a must. This reduces fuel consumption and slows down the process of cooling the air in the premises. If the structure is not insulated, then it will take several times longer to heat the steam room to the desired temperature.
We warm the bath with our own hands
Before the construction of the building, it is necessary to calculate the means and forces for thermal insulation. It is best if the insulation process begins during construction, more precisely, from laying the foundation.
Basic requirements for materials for warming a bath
Cheap solutions (impregnations, septic tanks) will not fulfill the role of good thermal insulation. Of course, protection from moisture is necessary in any case, but this is a separate task. It is necessary to warm the bath rooms separately, using materials specially created for this. Most attention is usually paid to the inside of the washroom and steam room. The selection of insulation and thermal insulation is done with the expectation of a draft building material.
One of the most important requirements for insulation materials is non-toxicity. Because in the bath, under the influence of temperatures, toxic materials can easily cause poisoning. Non-hygroscopicity is also important, the insulation should in no case absorb moisture.
http://kakpravilnosdelat.ru/kak-uteplit-banyu/
When choosing a specific material, you need to rely on the following characteristics:
- resistance to steam and high temperatures;
- good fire-fighting properties;
- environmental friendliness;
- low hygroscopicity;
- the ability to maintain shape for a long period.
Types of heaters for a bath
All heaters presented on the construction markets are divided into three conditional groups:
Of course, even 50-60 years ago, only natural materials were used, which were brought from nearby forests. This is foam, tow or moss. Today, these are already partly elite types of insulation, they cost serious money due to the need to manually collect them. Many fans of natural materials insulate their buildings with rolled jute felt or tow. Such material can be bought at hardware stores. As for moss, there are conflicting opinions regarding its use. It is said that moss is not an ideal material for insulation, because it provokes the growth of mold or fungi. However, the moss itself does not have such properties, most likely, the fungus is formed due to improper felling of a wooden structure or poor ventilation.
How to work with different types of buildings
installation procedure and required volume works depend on the material from which the bath is built.
Warming of log cabins
When working with a bar or log, you need to take into account the time for shrinkage, which can be 10 cm or more. Plus, gaps form between the crowns of such buildings, and cold air blows in just in them. It is best to insulate a frame made of round timber or an assembly of timber with jute fiber.
This material does not rot and has excellent thermal conductivity. Jute itself is a very fragile material, so manufacturers are trying to add flax fibers to it. But if there is already loose material available, you can perform classic caulking. So there will be less work, and the building will surely retain more heat.
If it is decided to create a bath from wood, then the insulation is laid during construction. It is better to isolate all the problematic parts of the log house in the process.
The work is performed in the following sequence:

Insulation of buildings made of brick or foam blocks
If the log cabins are insulated in a primitive way, then the masonry will have to work hard. Yes, and there are more financial investments for work with insulation. Additional thermal insulation is necessary, otherwise a well-heated room will cool down in hours. It is better to work, investing in materials, than to stock up on fuel all the time.
A common and proven method is a hinged ventilated facade. The working process does not come from within, but from outer side baths. It is necessary to fix the layers of insulation to the walls, and sheathe them with siding or clapboard on top. In the gap between the layers, an air-filled space is formed, thanks to which condensation will not form on the walls and rotting and dampness will not follow.
The width of the frame for a ventilated facade is made greater than the thickness of the insulation, so an air gap is formed inside, preventing the formation of condensate
For a brick building, the following trick is often practiced: indoors, a steam room is made of wood. Brick absorbs heat for a very long time, so it is easier to warm a small steam room naturally if you use a small frame.
Enough timber 10x10 and crates. The process of warming such an impromptu steam room inside a large bath is simple:

You can make it even easier: do not use a beam, but instead immediately fix the insulation on the frame. In this case, you will need an additional layer of waterproofing.
Calculation and selection of materials and tools
We insulate all surfaces of the steam room, washing room and dressing room. And for this you will need:
- Roll paper (on the ceiling and walls).
- Beam-rail (5x5, for mounting insulation on the ceiling and walls).
- Foil.
- Insulating tape.
- Self-tapping screws.
- Aluminum adhesive tape.
- Insulation, calculated on the area of \u200b\u200bwalls, ceilings and floors.
Of the tools you will need:
- screwdriver;
- level and plumb.
Do-it-yourself warming of the bath
Any stages of insulation are always carried out according to the golden rule - they start from the ceiling and end with the floors.
Ceiling insulation
Before you start working with the ceiling, you need to understand that in the steam room you need 2 times more material. After all, we are not working on a sauna, but on a Russian bath, where the steam should linger as long as possible.
The technology is like this:
- We cover the entire surface of the ceiling with roll paper overlap.
- We fix the bars on top of the paper, a heater will already lie between them.
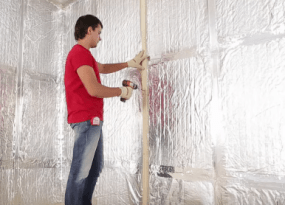
- Cover it all with foil. It will become a normal, safe insulator. But it is necessary to mount the foil without saving. It is important that all connections are closed.
The foil layer reflects heat, so the use of such a material for a bath is necessary
- We glue all the joints on the foil with aluminum tape. Usually foil for insulation comes with the material.
- We fix the edges and joints with several layers of adhesive tape. We check our work for tightness. If there is not enough money for such a heater, then the foil is sometimes replaced with cardboard or thick paper without paint.
- Next, we mount the layers of insulation on the foil between the closed bars.
On the ceiling, it is better to lay the insulation in two or three layers with overlapping joints
- We close the front part of the ceiling with a clapboard under a tree. This material is resistant to elevated temperatures and will not tar.
For frame bath it is necessary to put insulation on the ceiling and walls, but for timber and logs you can do without it. For example, if the bath is made of logs, it is enough to pre-sew up its ceiling with thick boards - at least 6 cm. Mineral wool is most suitable as a heater for the ceiling - you just need to lay it in a layer of at least 15 cm.
Video: insulation and finishing of the ceiling from the inside
Wall insulation
The best solution for wall insulation is a constructor made of materials that can be easily repaired or replaced.
The structure of the bath wall insulation resembles a roofing pie

Video: insulation and foil upholstery in a steam room
Floor insulation in the bath
And finally, let's work on the floor. After all, through it usually leaves the room a large number of heated air. Expanded clay is most often used as insulation for floors - it is an inexpensive and reliable insulation that prevents the appearance of mold and condensation.
It is cheaper, of course, to sprinkle everything with slag, but expanded clay is more environmentally friendly and weighs less. When installing wooden floors, the material is placed between the lags. If a concrete floor is poured, then expanded clay is placed between each concrete layer.
Let's analyze the usual cycle of work on the insulation of the concrete floor.

Video: features of the concrete floor device in the bath
In addition to walls, floors and ceilings, they also pay attention to the insulation of doors, windows and window openings. They are processed silicone sealants. It is customary to insulate external doors with natural materials. And it is not customary to save on them, otherwise in a few years, or even for the next season, everything will have to be redone.
The internal insulation of the bath is one of the most important stages in the arrangement of this building. Without high-quality thermal insulation, the owner will have to spend much more resources on heating the steam room, and the very situation in the bath without properly installed protection will leave much to be desired.
Since ancient times in Russia, moss, felt and even flax have been used to insulate baths, mainly due to the lack of other heaters - vegetable fiber either rots or dries, therefore today it is not used for basic thermal insulation.

Red moss - insulation
The main difference between warming a bathhouse and a similar event in an ordinary house is simple: in the steam room you need to keep the heat for as long as possible, i.e. high temperatures should remain indoors for as long as possible.

Thermal insulation work in the bath can be carried out using a wide variety of materials. For example, an ideal solution is a modern insulation based on stone wool with a foil coating - it does not burn, withstanding temperatures up to 750 degrees, effectively retains heat, does not rot, and is not of interest to rodents.
After reviewing the information below, you will get a complete theoretical understanding of the implementation process internal insulation steam room, and also study step by step instructions on self-assembly thermal insulation materials.
Any construction, repair and finishing activities begin with the preparation of materials, without which the implementation of the planned work will simply be impossible. Pay due attention to the study of the list below: it is better to spend a little time reading and buy everything you need right away than to return to the store and buy more of what you forgot.
insulation
The main component of the list under consideration. The modern market offers the widest range of thermal insulation materials, but not every one of them is suitable for use in a steam room - humidity and temperature can be too tough. For warming the bath, the most commonly used are: expanded clay (floor insulation), materials based on stone wool, and expanded polystyrene.
Important! It is strongly not recommended to use foam plastic for warming the steam room directly - at high temperatures, a material of dubious quality can most likely release substances harmful to human health.
Comparative characteristics of the mentioned materials are given in the following table.
Table. Comparison of popular bath heaters
| Evaluation criterion | |||
|---|---|---|---|
| Structure | Bulk material of natural origin. Presented in the form of granules with a cellular structure. | fibrous structure. The arrangement of fibers is both vertical and horizontal, disordered. | Open cell structure. |
| moisture permeability | The material does not pass water. | Mineral wool insulation has practically no tendency to absorb moisture. | Moisture permeability is extremely low. |
| Weight | Easy | Medium-light | Easy |
| Strength | High | Medium | Medium |
| Compressive strength | High | From low to medium, depending on the specific type of material and manufacturer's technologies. | Medium |
| Toxicity | The material is safe | No toxic properties | Over time, it begins to release harmful substances |
| Can be used under high load conditions | Suitable | Depending on the brand of material | not suitable |
| prone to decay | The material retains its original integrity for a long time | Durable insulation | Has a tendency to break down |
| UV resistance | Doesn't react to sunlight | Features high UV resistance | Long-term direct contact with sunlight extremely negatively affect the performance of the material |
As noted, expanded clay is suitable for warming bath floors. Bulk material allows you to provide the required thermal insulation of both wooden and concrete structures. Mineral wool insulation is optimally suited for insulating both walls and ceilings. The best option, as noted, is a stone wool-based heat-insulating material equipped with an additional foil coating - the key characteristics of such heaters are at a higher level.
Mineral wool prices
mineral wool


In accordance with the current provisions of the technology for carrying out the work in question, the joints of the insulation boards must be glued with foil tape. This will create a sealed surface with the highest possible thermal insulation properties.
foil tape prices
foil tape

The elements of the heat-insulating coating are placed in the cells of a pre-mounted crate, for the assembly of which are used wooden blocks. Select the cross section of the bars in accordance with the thickness of the thermal insulation. For example, if you are equipping a 10 cm thermal insulation layer, use bars with a similar thickness or width to assemble the frame.
Choose the distance between the bars 1-2 cm less than the width of the plates or the insulation roll. For bulk materials, the optimal distance between the bars is 45-60 cm.

Fixing the elements of the crate (bars) is carried out using dowels / self-tapping screws (if the surface is wooden) or anchors (if the base is stone). The length of the fasteners is also selected in accordance with the base material: for wood - 2-2.5 cm, for capital structures - from 4 cm.
The specific length of fasteners is determined in accordance with the characteristics of their use. For example, during the installation of the crate, the fasteners must be of such length that high-quality fixation of the timber / profile of the selected section is ensured. The cross section of the beam itself, as well as the profile parameters, are determined in accordance with the thickness of the heat-insulating layer to be equipped.
Additional materials
If the bath is insulated with a material other than foil mineral wool, you will additionally have to purchase a hydro-vapor barrier film.

If a fill is scheduled concrete screed, the work set will increase to include the following items:
- reinforcing mesh;
- mixture for pouring the screed or materials for its self-preparation (cement, sand, water);
- lighthouses;
- damper tape;
- polyethylene.
Prices for waterproofing film
hydro vapor barrier film
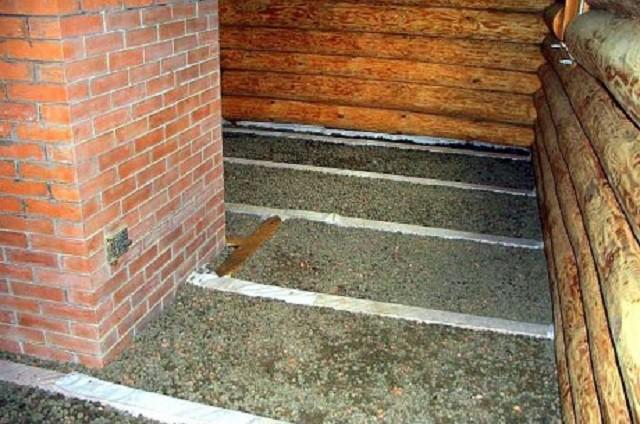
The floors in the bath can be wooden or concrete. The technology for arranging the directly heat-insulating layer does not have any special differences depending on the material for making the floor, except that in the case of a concrete structure, more expanded clay will have to be poured.
The thickness of the backfill is usually determined in accordance with the thickness of the walls. On average, a layer of expanded clay is poured at least 2 times thicker than the walls. If the height of the room allows, the thickness of the backfill can be further increased - this will help increase the efficiency of insulation.
Previously, for greater convenience of work and subsequently more accurate control of the evenness of the backfill, mark the base. To do this, it is enough to divide it with parallel lines into sections up to 1 m wide or along the length of the rule you use.
Important! If you are insulating the floor on the ground, at the very beginning, even before marking, you must do the following:
- carefully tamp the ground inside the base (if the foundation design assumes the presence of “free” soil, for example, in the case of strip supports);
- cover the walls with impregnation for waterproofing;
- fill the soil with a 10-centimeter layer of sand, spill it with water and carefully tamp;
- cover the sand with roofing material with a 15-centimeter overlap on the walls. Lay individual sheets of roofing material also with a 15 cm overlap. For fastening, use waterproof construction tape.
Directly the procedure for warming the floor with expanded clay with illustrations and the necessary explanations is given in the following table.
Table. Bath floor insulation with expanded clay
| Stage | Illustration | Necessary explanations |
|---|---|---|
| The film must be stretched so that its edges along the wall are above the floor level. If the base is already covered with roofing material, there is no need to lay the film. |
|
| For example, a profile for drywall is well suited. The guides are set in accordance with the previously applied markings and fixed in a suitable way, for example, screws or nails. | |
| Set the beacons according to the level. In the future, these accessories will help you fill the most even layer of expanded clay, which will ensure the best quality of further planned work. Determine the installation height of the guides in accordance with the required thickness of the heat-insulating layer. Many developers do without guides, but this is a less convenient and accurate option. |
|
| We pour expanded clay |
| The previously installed guides will help to do this as efficiently as possible. |
| For leveling, we use a rule or an ordinary rail of a suitable length. | |
| For greater convenience of leveling the insulation, we can use various auxiliary devices. For example, in large areas, a rake will come in handy. |


The floor is insulated and ready for further development in accordance with the developer's plans. At the discretion of the owner, additional heat-insulating material, for example, mineral wool or expanded polystyrene, can be laid on top of expanded clay.
As an example, a diagram of a concrete floor, equipped with expanded clay for thermal insulation, is given.

Video - Floor insulation with expanded clay
Insulation of bath walls and ceiling
Wall insulation schemes will vary somewhat depending on the material of manufacture. Information about this is presented in the following table.
Table. Wall insulation schemes
| Production material | Scheme |
|---|---|
|
|
1 - wall, 2 - thermal insulation, 3 - lathing, 4 - sheathing, 5 - ventilation gap. |
|
|
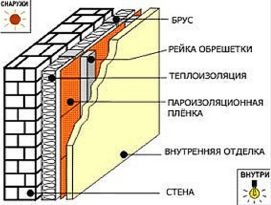


The sequence of thermal insulation work remains the same for walls made of any materials: if necessary, a hydrovapor barrier film is attached, lathing bars are mounted, insulation is placed in the formed cells, another layer of hydrovapor barrier is fixed on top (if necessary), lathing laths are nailed for finishing sheathing (at the same time they will provide the necessary ventilation gap), the selected finishing material is mounted (usually lining).
The ceiling is insulated in a similar sequence. An example of a ceiling thermal insulation scheme is shown in the following image.


Information regarding the step-by-step insulation of the walls and ceiling of the bath is given in the following table.
Important! Insulation will be carried out with a mineral wool material with a foil layer, which eliminates the need for preliminary fastening of a hydrovapor barrier material to the surface. The order of work is considered on the example of wooden surfaces. In a relationship concrete walls and ceilings, the recommendations are the same, the only thing is that you need to use other fasteners and for greater convenience, wooden guides can be replaced with a metal profile.
Table. The procedure for insulating walls and ceilings in the bath from the inside
| Stage of work | Illustration | Necessary explanations |
|---|---|---|
| Information regarding the elements used to arrange the frame, as well as fasteners for fixing the guides in different cases, was given earlier. The installation step of the guides is selected in accordance with the width of the insulation. As a standard, this is about 60 cm, it can be reduced to 59-59.5 cm so that the heat-insulating elements lie as tightly as possible. |
|
| Slab laying rules |
| We must first put on gloves - contact of “bare” skin with mineral wool delivers not the most pleasant sensations. The foil material is laid with foil inside the room - thanks to this, the heat will not only be retained, but also additionally reflected into the steam room. |
| The slabs are installed by surprise into the frame and do not require additional mechanical fastening. | |
| Installation of plates on the wall |
Installation of plates on the wall | The sequence and recommendations for wall and ceiling insulation are similar. To insulate the partition separating the steam room from the adjacent room, a layer 50 mm thick is usually sufficient. |
| thermal insulation outer wall requires a thicker layer - 100-150 mm (in regions with a particularly cold climate - up to 200 mm). | |
| In order to save money, the insulation can be made two-layer, equipping one layer of ordinary mineral wool, and the second, which will “look” into the room, from a foil-coated material. | |
| The use of such a heater, as noted, eliminates the need for additional waterproofing materials. |
|
| Having filled the frame with heat-insulating plates, we glue the seams and joints with foil tape. | |
| A 1-2 cm gap is enough. The outer trim will be attached to the same crate in the future. Important! The order of further installation of the lining depends on the location of the rails: if the rails are fixed vertically, the lining must be fixed horizontally, and vice versa. |
|
| best material for the inner lining of the bath is a lining. The choice of material for the manufacture of the skin is at the discretion of the owner. The fixing of the cladding elements is traditionally performed using screws / self-tapping screws. |


Video - Insulation of walls and ceiling from the inside
Now you know everything about how to properly insulate a bath with your own hands using the most optimal heat-insulating materials for this. The information obtained will help you cope with the planned events on your own, eliminating the need to contact third-party masters and saving significantly.
Successful work!
Video - Insulation of the bath from the inside scheme
It's a shame after the construction of the bath to find that the building cools down quickly, and the heat is not the same. The reason can be only one thing - improper thermal insulation of the steam room. So that warming the sauna with your own hands does not become a disappointment, study the advice of experts!
Thermal insulation of the sauna - the principle of a thermos
Seventy percent of the heat in a bath or sauna is referred to as radiant heat. That is, heating occurs not due to an increase in air temperature (or rather, not only due to it), but due to heat rays from the stove or heated stones. In the same way, you warm yourself by a fire - even at a remote distance you feel heat, and this heat is not from the heated air, but the rays emanating from the fire itself. As soon as a barrier is placed between the fire and you, you will no longer feel these rays.
Task at proper insulation- keep these rays inside the steam room, otherwise it will heat up for a long time and cool down quickly.
Imagine an ordinary thermos with tea. If the hot liquid were inside an ordinary metal can, the heat would escape through the walls. But in a thermos, the rays bounce off the foil, so the tea doesn't cool as quickly. The same "thermos effect" must be created inside the bath with the help of heat-insulating materials. One of the most popular misconceptions is the belief that it is enough to beat the walls with insulation and eurolining, and the job is done.
In fact, as we already understand, thermal insulation of saunas and baths is a much more complicated process. However, not so much that everyone could not do it. The second misconception, or rather, the desire for naturalness, leads people to insulate with materials that are prone to decay - we are talking about insulation with moss. Moss at high humidity not only rots, but is also able to infect wood with rot. True, there is an exception - red building moss. But he is also subject to a problem that at first no one thinks about - all kinds of bugs and birds can pull your insulation system apart into small pieces.
How to insulate - all about materials for insulation
For warming baths and saunas, basalt fiber is most often used. What these materials are good for is durability, fire resistance and moisture resistance. In addition, they are not afraid of rotting. For convenience, manufacturers produce such heaters in the form of rolls, mats or plates.
Baths are also insulated with organic materials, such as wood concrete - these are blocks made from a mixture of sawdust and cement. Such blocks can be made independently and used even in those climatic zones where low temperatures. True, such a heater has a significant drawback - it is flammable. However, if you make blocks with your own hands, you can add substances to the solution that make the tree refractory. With the help of wood concrete, you can significantly save on the construction of a bath, however, it is recommended that the steam room area be upholstered with the same mineral wool - as they say, out of harm's way.
For dressing rooms and rest rooms, materials based on polymers - polystyrene foam and extruded polystyrene foam - are well suited. Again, fire resistance is not listed in their qualities, therefore, in steam rooms, where there is a high chance of ignition, it is better not to use them. In addition to insulation, you should also take care of vapor barrier. For these purposes, inexpensive roofing felt and glassine are most often used, but such savings are harmful to health.
When heated, these materials release toxins that easily enter the human body through the lungs.. Aluminium foil or heat-insulating materials with a foil coating can solve two problems at once - this is not only vapor barrier, but also the reflection of heat back into the room. Manufacturers go further by offering foil coated fiberglass mats. When working with such a task is simplified - the whole process is reduced to almost one stage.
Do-it-yourself sauna warming - step by step!
We figured out the materials, now it's the turn of the insulation process itself. Let's make a reservation right away that this process is not simple and rather expensive, but isn't it worth it? According to all standard schemes, the warming of the bathhouse begins from the floor. And we are talking not only about reducing the degree of displacement of warm air by cold, but also about the comfort of people - it is much more pleasant to walk barefoot on a warm, heated floor in a hot steam room.
How to insulate a sauna with your own hands - a step by step diagram
Step 1: Floor insulation
When installing a solid floor, the insulation is laid on a rough plank floor, on top of it, in turn, a waterproofing layer is attached, so that its edges go onto the walls by no less than 10 centimeters. After that, the finishing floor is laid.
Leaking floors are more complex. To begin with, a pit breaks out with a depth of half a meter, which is filled with sand by 5 cm. The sand is compacted, and foam plates 20 cm thick are laid on it. They must be poured with a five-centimeter layer of a mixture of cement with foam chips (1: 1). Waterproofing is laid on the concrete and again poured with a layer of cement with vermiculite (also 1: 1) 5 cm thick. Then a reinforcing mesh is spread and concrete with fine-grained gravel is poured. Concrete is taken in such a way as to ensure a slope towards the drain. As soon as the screed has hardened properly, the finishing floor is laid.
Step 2: Lathing walls and ceilings
Wall and ceiling insulation technology is almost identical, so the work is not divided into two stages, but is carried out simultaneously. First you need to perform a crate of surfaces. If you have a sawmill at home, you can easily make the bars you need with dimensions of 50 * 50 mm. You need to fill them vertically, keeping a distance slightly less than the width of the insulation. As a result, we get miniature niches in which the insulation is straightened. So he will take his place more tightly.
Step 3: Warming
If you have chosen fiberglass or mineral wool, then due to their elasticity they will not need any fastening - just cut the necessary pieces and straighten them between the crate. The recommended thickness of the insulation, depending on the climate of the region, is from 50 to 100 mm, the colder the region, the larger the insulation layer. The ceiling is always insulated with a double portion of materials.
There are many materials for warming the bath, there are plenty to choose from. These are mineral wool, basalt, fiberglass and foil foam, as well as various wood seals. They are equally well suited for any work and are used for both walls and ceilings of steam rooms. When choosing the best way to insulate a bath, take into account a few tips:
- The packaging must contain information on the coefficient of thermal conductivity and the maximum thickness of the material. If instead of exact numbers the thermal range is indicated, then it is better to refuse it.
- Correctly you need to choose the density of the material. High scores are not always positive side. Give preference to those with lower thermal conductivity.
- The fire safety class should be marked as follows - “GO” or “G1”. The insulation should not be toxic, so that when it is used in the steam room, volatile substances harmful to humans are not released.
An excellent option would be foil penoizol. It does not require additional vapor barrier, and installation is carried out by hand in a short time without specialized tool.
Wall insulation from the outside - a "fur coat" for a bath
The wooden bath is insulated with tow. She lays all mezhventsovye connections. The structure of round logs does not require this, because during processing special cuts are made in the logs and they fit snugly together.
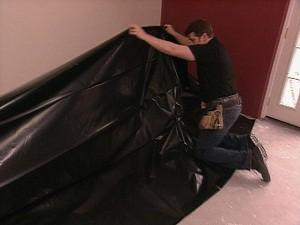
Wall insulation from the outside is carried out only in brick baths. This is done according to the principle of a ventilated facade. As a material for vapor and waterproofing, polyethylene film is used, and as a heater - mineral wool.

How brick walls are insulated - work plan:
- First, a frame made of metal profile, the distance between the guides should be selected based on the size of the insulation so that it does not need to be cut.
- Mineral wool is laid between the frame elements.
- From above, the insulation is covered with a vapor barrier film to protect the wool from condensation.
- The joints of the vapor barrier material are glued with adhesive tape.
- The insulation through the vapor barrier is attached to the wall with special dowels, the cap of which looks like an umbrella.
- After that, the walls are sheathed with the selected finishing material.
There is nothing complicated and all the work on warming the walls of the bath from the outside can be easily done with your own hands. Thanks to the market modern materials type foil pinotherm, you can do without additional hydro-vapor barrier. It is laid on the wall and the whole structure is sewn up with a finishing material.
Wall insulation from the inside
Having dealt with outdoor work, you can proceed to the next step. How to insulate a bath from the inside? For this, an old, tried and tested method is used - a frame device with a gasket of heat-insulating material. The principle is similar to the installation of a ventilated facade during the insulation of the outer wall.

- First around the perimeter bearing walls a frame made of wooden bars or metal elements is mounted. The distance between the guides of the frame should be equal to the width of the insulation.
- Then, a heater is laid in the finished structure, on top of which foil waterproofing must be overlapped. The joints are glued with construction tape.
- The final step will be the installation of a wooden lining.
This method is laborious, but proven over the years. It will not be difficult to insulate the walls of the bath with your own hands, but for clarity, you can watch the video.
Floor insulation
Let's describe general principle. They are insulated with foam, and the scheme looks like this:
- We level the base as much as possible and lay the waterproofing material.
- We carefully place the insulation on a flat film, if necessary, filling the voids with cut-off pieces.
- On top of this "pie" we place a reinforcing mesh and fill everything with concrete.
- After solidification is carried out finishing, tiling, etc.

Many may ask why foam? This is the most durable and rigid material of all roll or plate heaters. It withstands significant mechanical loads without changing its characteristics in a humid environment. Numerous air bubbles are hidden in the thickness of the foam, providing low thermal conductivity. It won't rot or get moldy over time. In fact, this is a universal material, it is also used to insulate the walls of the bath, both outside and inside.
Ceiling
This is a mandatory part because a lot of heat escapes through the roof. Some still use grandfather methods falling asleep attic space soil, straw or sawdust. Today there are more modern options, but the essence of the work has not changed. you need from the outside, that is, from the side of the attic.

Expanded clay, polystyrene or mineral wool can be used. From the side of the steam room, if the chimney pipe exits through the top, it is lined with asbestos cloth and coated with fire-retardant mastic. Styrofoam or mineral wool should be laid no closer than 15–20 cm from the pipe. Expanded clay can be poured next to the pipe, since it is absolutely non-combustible material.
Do-it-yourself ceiling insulation sequence:
- First, we cover the entire surface with waterproofing material.
- Between the lags we lay the material. If it is polystyrene or mineral wool, we cut it according to size, fill up the expanded clay and level it over the entire area.
- We lay another layer of vapor barrier film on top of the insulation and sew up the structure with boards on top - if you want to make a floor in the attic or lay flooring for passage during maintenance of the attic space.

Considering the use of expanded clay, it must be taken into account that this material does not have very good thermal conductivity and for normal insulation a thick layer will be required. Do you think the cover will hold up? by the most the best options there will be roll or slab heaters.
Entrance door
With complex insulation, you will need to think about this problem. Experts recommend making the doors narrow and low. This will greatly reduce heat loss. Well, if you still need their additional protection, then let's look at how to insulate the door to the bathhouse with your own hands. There are several ways, differing in complexity of execution.
The first is the laying of material into the inner cavity of the door. In this embodiment, a two-layer frame structure is required. The method is laborious and not everyone can do it. At the initial stage, you will have to assemble a door from two canvases, with a heat insulator laid inside.

In the second method, you can fix the material on top of the structure. Then close everything with a decorative coating. This option is easier. A foil insulation is stuffed onto the canvas, which is hidden under moisture-resistant plywood or other decorative material.
All measures for warming the bath inside and out are carried out at the construction stage. Integrated approach and right choice material will reduce the cost of heating the steam room and maintain a comfortable room temperature.
IN modern bath like not only to wash, but also to have a good rest. Our tips will help to make the room warm and comfortable.
Warming the bath - what you need for work
Warming the bath from the inside with your own hands will save money on work and heating. It is not a shame to invite friends to a comfortable bathhouse exuding warmth and comfort. A unique microclimate can be maintained by high-quality thermal insulation, competently made of good materials. The work is laborious, but anyone with the necessary knowledge and skillful hands can cope with it.
Insulation of the bath from the inside differs from thermal insulation work in ordinary rooms by the conditions in which the materials are found. First of all, it is humidity, especially in the steam room and washing room, and in other rooms the air is not dry. Therefore, the insulation either should not absorb moisture, or it must be reliably protected from steam and moisture. In the steam room, the temperature can rise even above 100 °. Materials such as polystyrene foam, polystyrene foam are deformed at high temperatures, emit substances harmful to health. For the same reason, plastic or linoleum is never used in the bath. Part of the heat is lost as infrared radiation, so a foil layer is needed to reflect the rays.
In addition to the heat insulator, other materials will be required, in particular, the crate. For stone, brick baths, it is better to use a drywall profile. The CD ceiling profile is usually used, the UD guide is used for edging around the perimeter. Hangers are fixed on average after 0.7 m, the distance between the profiles is slightly less than the width of the insulation. IN wooden bath instead of a drywall profile, it is advisable to use bars, they are cheaper and will last as long as the walls.
You will need foil, for example, foam. It is able to protect walls from dampness, reflect infrared rays, and additionally insulate the room due to the presence of foam material. For wooden baths, it can be used as the main material for insulation. On top of the insulation layer they arrange from the lining. Linden or aspen is considered the best material, they are durable even in such difficult conditions, and besides, they do not burn.
How to insulate - an overview of artificial and natural materials
When choosing a material for insulation, you should be guided by quality characteristics. Good insulation must provide reliable vapor and waterproofing, be environmentally friendly, not fire hazardous. There are many materials for insulation - artificial and traditional from natural raw materials. If you are a fan of absolute sustainability, then, of course, choose natural material. But you should know that without pre-treatment such material is seriously threatened by mold, rodents, insects. Artificial materials have the best qualities, it is easier to work with them.
Natural materials for insulation, such as moss, linen tow, hemp, have been used since ancient times. They are cheap or completely free, highly environmentally friendly, fill the bath with a special natural aroma. But they are short-lived, you need to constantly update them, it is difficult and long to work with them. From natural materials, perhaps, one expanded clay is convenient for work, durable. It is moisture resistant, weighs a little, durable. Thanks to these qualities, expanded clay is used for floor insulation in baths.
From synthetic materials for warming the bath from the inside, extruded polystyrene foam, mineral and glass wool are suitable. Each of the materials has unique properties:
- 1. Expanded polystyrene is a reliable heat insulator of low cost and light weight. It is flammable, does not withstand high temperature, therefore, it is used only in the dressing room and other similar premises, except for the washing department and the steam room.
- 2. Mineral wool is a durable, fireproof, non-hygroscopic material. It is produced in the form of sheets or mats, which are convenient to work with. It is easy to damage, so work with mineral wool should be careful.
- 3. Glass wool is made from interwoven extremely thin glass fibers. The material contains a lot of air, so it has a heat-saving effect. Available in rolls or slabs.
- 4. Basalt fiber is expensive, but it can be an ideal material for warming a bath. The basis is molten rocks, so the insulation does not burn, is not afraid of mechanical deformation and moisture, and keeps heat well. It is convenient to work with it, cutting into pieces of the required size.
The choice is influenced by the material of the walls. If the bath is brick, stone, made of concrete and similar materials, it is necessary to insulate. This is necessary to keep warm and extend the life of the building, because the walls will begin to collapse from high humidity and very large temperature fluctuations. wooden bath warm in itself, but it will not be worse from a warming layer. It is recommended to insulate, if the beam is less than 15 cm thick, log baths with a wall thickness of less than 20 cm. With a greater thickness of log walls, thermal insulation for the bath is not needed, or a waterproofing layer is used, which is then covered with clapboard.
To keep your feet warm - underfloor heating without heating
It will be necessary to insulate the floor from the inside if this operation was previously skipped. The base of an uninsulated floor can be concrete or wood. For a concrete floor, expanded polystyrene or expanded clay is suitable for insulation. Expanded polystyrene is better extruded - denser than polystyrene, capable of withstanding a greater load. There is no need to worry about the threat to health - waterproofing and screed will protect against harmful emissions.
We carry out waterproofing with rolled bituminous material, dense polyethylene or mastic. They should capture the base and walls to a thickness equal to the insulating layer with the screed. On top of the waterproofing, we pour expanded clay or lay PPS slabs. We close the gaps between the sheets using polystyrene foam trimmings, mounting foam, and expanded clay is simply leveled. We lay another membrane on top, glue the joints with adhesive tape, creating a bag that does not allow moisture to pass through.

On waterproofing, we fill in a reinforced screed. If we use expanded clay, the thermal insulation of the floor will improve. On the frozen floor, you can put the finish on top.
We warm the wooden floor in a similar way. We treat wood with antiseptics, use mineral wool or glass wool as a heater. We lay the waterproofing, logs on it, between them there is a tight insulator. From above we cover with two layers of material impregnated with bitumen. We glue the waterproofing membrane with adhesive tape, lay a wooden floor on top. Alternatively, we use plywood, on top of which we make a screed.
If the cold floor from the boards can be disassembled, then it is better to insulate it from the base. We select the ground shallowly, take it out, ram the base. We fall asleep with a 10–15 cm layer of sand and gravel, tamp and lay waterproofing material. We fill the membrane with expanded clay or lay other material. We prepare a solution of cement and sand 1: 1, pour a rough screed. After setting it, we make a finishing reinforced screed.
Warm walls and ceiling - complete comfort for vacationers
We start warming the walls of the bath from the inside with surface preparation - we close up, isolate the cracks, wooden surfaces we treat with solutions from mold, fungi, fire. The insulation pie has the following structure:
- 1. We attach bars or a drywall profile to the wall;
- 2. Between them we lay a heat insulator;
- 3. We put a waterproofing layer on it;
- 4. Wooden crate on top;
- 5. Completes all finishing.
Before installing the crate, be sure to measure the width of the heat-insulating material. The specified dimensions do not always correspond to the actual ones, moreover, the edges could be somewhat deformed during transportation. We install the crate with a step slightly less than the width of the material so that it enters between the crate with little effort. In places of loose fit of the heat insulator, where gaps remain, cold penetrates and condensation forms. The height of the crate must correspond to the thickness of the thermal insulation.

Between the bars tightly, avoiding gaps, we lay the insulation. If the distance is chosen correctly, the heat insulator is held on the wall without additional fastening, but stainless or hot-dip galvanized screws with washers can be used for safety. We glue the foil heat insulator at the joints aluminum tape for tightness. We also seal the contact points of the insulation with the crate, capturing at least 5 cm of insulation and timber. Sealing joints is very important, moisture that has penetrated into the insulation layer greatly increases its thermal conductivity.
Warming the bath from the inside is not limited to a heat-insulating layer. We protect it from moisture - it is better in the steam room and washing compartment, which will also reflect heat. The room will heat up faster, heating costs will decrease, and the stove will last longer. For other rooms, you can use a different material. We lay the strips, overlapping one another by 5 cm, fasten them with staples using a stapler. We cover the joints and places of clogging the staples with foil tape. We do not leave a gap between the insulation and the vapor barrier layer.
On the bars we fasten the crate of wooden planks 20 mm thick for mounting lining. The thickness is selected to provide a gap between the crate and the vapor barrier. We fix the crate vertically so that condensate can drain between the vapor barrier layer and the lining, then it will last longer.
To ensure a stack of condensate, we fasten the crate on the walls horizontally, under the lining - vertically, the finishing layer will be horizontal.
Ceiling insulation is no different from wall insulation, except that we start working with the ceiling earlier than with the walls. Some features of ceiling insulation should be borne in mind. Since most of the heat is collected at the top, we make the thermal insulation layer thicker than on the walls. We provide a small overlap of insulating layers on the walls. When thermally insulating the walls, let it in wall material, glue the connections with foil tape.
Windows and doors - have you forgotten about them?
A significant proportion of heat also escapes through leaky windows and doors. we make a small one, with the minimum allowable size. We raise the threshold above the floor level by 25 cm to block the path of cold air from the adjacent room. We make the door leaf from wood, we tightly adjust the boards. Additionally, doors can be insulated like walls. We seal the door frame and canvas so that there are no gaps.
We do not make large windows in the bathhouse, with the exception of the rest room. The frames must be double glazed so that the air inside serves as a heat insulator. We install the glass on a sealant, it turns out a double-glazed window impenetrable to cold air. The gaps between the opening and the frame are securely sealed with mineral wool, and a layer of waterproofing is applied on top.
We hope the article dispelled the erroneous opinion that the thermal insulation of the bath is a simple matter. It turns out that it has its own specifics, first of all it concerns the choice of materials and installation. Once again, we pay attention to the reliable sealing of all layers. If you do the work carefully, adhering to the advice, the bath will bring real pleasure from being in it.