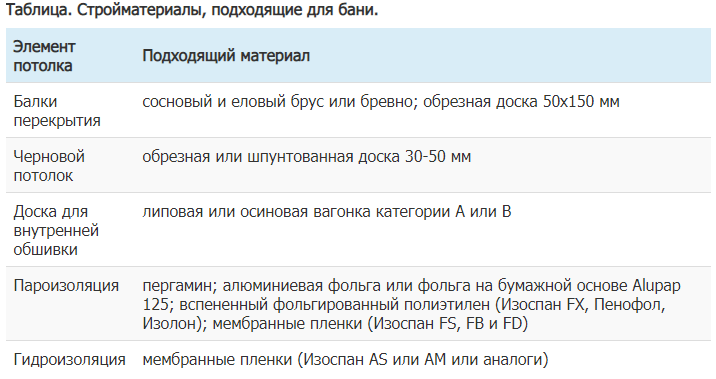
Overlapping and ceiling. Mastery do it yourself: a quality ceiling for a bath how to equip the ceiling in a wooden bath
The one who climbs the independent erection of the bath on its plot is necessary to take into account the huge number of specific nuances of this building. All of them are mostly associated with the features of operation - frequent temperature differences with a very large amplitude, and high levels of humidity. Thus, all construction designs buildings must have operational qualitieswhich make them able to withstand such extreme impacts.
Ceiling in the bath do it yourself
Not exception and bath ceiling. Moreover, the influence of humidity on it is especially critical, since the hot air and steam always strive up, and usually the highest temperatures and the level of humidity are observed in the pavement area in steam or washer. For those newcomers in construction, who decided to make a ceiling in the bath with their own hands step by step guide Just needed. It is these issues that this publication is devoted.
There are several basic ceiling design for the bath - all of them will be discussed below. But whatever of them is chosen as basic, they all must meet certain requirements:

- Any ceiling is a sufficiently massive design, especially if the attic of the bath is planned to be used as a utility, economic room or even an additional useful square - Manzardy. Thus, the ceiling design should differ high reliability in terms of mechanical load resistance. Even if in the attic and it will not be used to move people or accommodation of certain objects, still the ceiling must withstand and its own weight, and the load of the insulation layer is the key rule of operation of operation at all of any room.

One of the key requirements is a reliable thermal insulation
- Bath procedures only in the event will benefit health if the appropriate microclimate will be created in the premises. The ceiling is the element of the design of any building, through which is always possible a very big heat loss. In order not to spend an incredible amount of fuel to maintain the desired temperature, with most of the "heated street", it is necessary to ensure the ceiling of the most reliable thermal insulation.
- Materials used for ceiling construction should not be afraid of dampness and elevated temperatures. How to be that for this in the overwhelming number of cases is used natural tree? Solutions in this problem is - the use of certain breeds of rivets and special processing details of the compositions that Radically increase the material resistance to moisture and to biological decomposition processes.

By the way, many of the modern impregnations give another useful result. They contain special alpires additiveswhich significantly increase the resistance of wood to ignition - for the bath it is extremely important.
- One of the main "enemies" of wood is high humidity, and in the bath without it - nowhere. In order to protect the wooden carrier structural elements from the penetration of moisture to the maximum, it will take reliable hydro and vaporizolation. At the same time, it cannot be allowed that condensate accumulated in the thickness of the tree or insulating material. It means that it is necessary to provide the possibility of free output of the water vapor upward into the atmosphere.

From above, a hydro-medication is shown, a diffuse membrane.
Prices for hydroparasolation
hydroparasolation
This is ensured by using special roll coatings, membranes, with each layer must be strictly in a specific place, otherwise the proper effect is not achieved.
- And finally, in the bath it will be nice to spend time if the ceiling will also be beautiful. Perhaps some homemade masters refer to this requirement to the discharge of excesses, but still decorative qualities of walls and ceiling baths - this is a kind of "business card" of the owners, and it is not worth discounting the issues of finishing.

We now turn to the consideration of the main designs of the bath ceiling - a liner, a flat and panel type.
Steer ceiling
This design is used most often. It is quite simple, understandable, meets all the requirements, allows you to use attic room As a useful area.
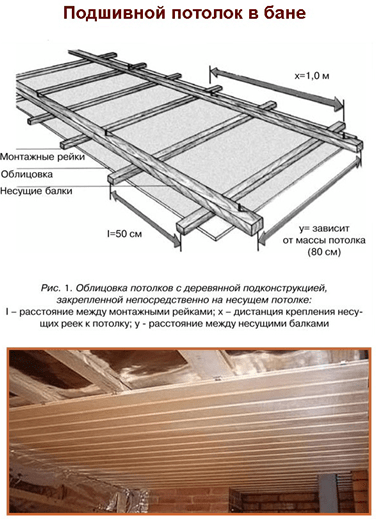
The basis for mounting such a ceiling system is the beams of the attic overlap. All other details, and on top and bottom, based on them. The convenience of the design is that there is no limit on the length and width of the room. It is assumed that the beams of the overlap are established according to the developed project, with the required cross-section of the bar (or the log diameter) and with the necessary step. Thus, the possibility of converting the ceiling into a full-fledged inter-storey overlapping, which opens up the possibilities for useful use of the attic.
Schematically, the ceiling can be represented as follows:

1 - Capital walls of the bath. It is clear that natural wood is most often used, and in this scheme, the monolithic wall is shown only to simplify.
2 - the beams of the attic overlap. Before mounting the ceiling, they should be thoroughly fixed on the walls with the insulation of adjustment nodes to them.
3 - Ceiling binder boards. In this embodiment, shown in the diagram, they play both the role and finishing surface of the ceiling simultaneously, although it happens and not always.
4 - a layer of hydro-insulation. Optimally, if a special is used for this purpose water-resistant membrane. It is even better if it will have a foil layer, the advanced book is an additional moisture barrier and a reflective surface that prevents the loss of heat.
5 - layer of thermal insulation materials laid between overlapping beams.
6 – parotypes The membrane that does not allow water penetration into the insulation from above, but not preventing natural steam exchange - that is, allowing the design of the ceiling "to breathe", getting rid of the accumulated moisture.
7 - attic chambers.
Perhaps the main disadvantage of such a structure of the tail ceiling is the considerable consumption of sawn goods and a sufficiently large complexity in the installation. However, we should not forget that at the same time "two hare is killed" - at the exit there is a warmed bath ceiling and almost the finished sex of the attic (attic).
Are there Banya and Narzard compatible?
For proper planning - why not. It is extremely convenient - after bath procedures, without going outside, climb into a full-fledged rest room.
With a small project, the reader may get acquainted in a special article of the portal.
Conducting installation work
Works are carried out in the following order:
- If the beams overlap to their installation have not yet been processed by special protective impregnations, now the time to eliminate this flaw. Particular attention is paid to the end grade BRUSEV - here you can not regret the three layers of primer.
- In the event that the ceiling is arranged in a room where the bath stove will be located, you should immediately provide for the location of the smoke tube. For this, two jumpers are installed between the beams, which will limit the rectangle or the square required to set the passage metal box.

Values \u200b\u200ba and b must match the size forobserved Or self-making box - this will be more dependent on the diameter of the chimney pipe.

This "outlined" square temporarily falls out of the work area - it will not be watched by the boards to neither from the bottom, nor below, the membranes are not laughed in it and the insulation does not fit.
- The next step is necessary throughout the area of \u200b\u200bthe room to attach from the bottom to the beams of the flooring of the hydraulic membrane. It should be on the walls of about 200 mm on each side - it will be required to create unified system Hydro-eyed room.
The optimal choice is a special rolled material intended for these purposes. If there is no such possibility, it is permissible to use dense polyethylene, a thickness of at least 0.2 mm, but the quality of insulation will not be then. The stripes are attached to the beams of overlapping in such a way as to be created in at least 200 mm, which is necessarily punctured by waterproof tape.
If a foil material is purchased, it is placed with a brilliant side down, and the adolescents are sampled special aluminated Scotch tape.

- Only now you can go to the cover of the ceiling by boards. Here are at least two options.
The first - as shown in the scheme above. The binder boards, provided that this is a high-quality material (the best - tipped) will immediately perform the role of decorative coating. Fasten them to the beams of overlappings, which in this case are peculiar "lags". For fastening, or nails are used, or the screws of the desired length. Self-tapping screws look preferable, as they hold susceptible boards more reliable, and during installation does not require impact efforts that are not quite "useful" for the beams of overlapping.
However, such a way is used infrequently - it turns out expensive, since a good tank board 20 ÷ 25 mm thick is expensive. In addition, it is desirable to create a small air gap between the waterproofing and front cover, it means that a third-rate material can be used for the initial binder, which will simply create the basis for the insulating layer on top. And the bottom it turns out a slightly different design:

1 - walls.
2 - overlap beams.
3 is a layer of hydro-insulation, the same as in the previous case.
4 - Black binder boards (ross). It is quite appropriate, the material is not the highest decorative quality.
5 - layer of foil roll insulation. This is another waterproofing barrier, plus the "Thermos" effect is created in the room, which is very important, in particular, for the steam room.
The 6-layer of the foil insulation is pressed against the batches of rolling with counterbours, which are placed perpendicularly, with the necessary step (400 ÷ 600 mm) for mounting the lining.

7 - natural lining that becomes facial coating ban room. It is usually used on the ceiling, and on the walls.

Prices for wooden lining
wooden lining
When the ceiling surface is finished, insert the passage box for the chimney pipe and fasten it to the ceiling coating.
After the lower part of the ceiling is covered, you can proceed for further work in the attic room.
- The next step is to lay the insulating layer. And here it is important to make one very important remark.
Often, in publications with bath ceilings, you can meet the recommendations first to sunmate the bottom boards, and then in top of the floor, on the flooring and on beams, hydrotreating film. Let's look at the scheme - it would seem, all the same as above. But here the error is shown - it is highlighted in a red arrow.

If you make vaporizolation in this way, it turns out that the beams of the overlap have no protection against the moisture-rising. Moreover, completely excluded the possibility of evaporation of moisture up, into the atmosphere, that is, the beams will not be filled even when the bath is not used. Unfortunately, this error "walks" through the spaces of the Internet is replicated, and as a result, the master who applied such a scheme, the design of the ceiling on the briefness.

The same error - in the photo
The front cover of the face cover in any case will be in contact with the ferry, but they are easy to change as wear. But the beams do a supporting role, and if the process of GNG or the formation of fungus goes, the strength of the structure will be under a big question, and the repair work "falls into a penny".
The beams should remain open from above - then with the correct organization of insulation, the excess moisture will be simply evaporated into the atmosphere.

As a heater, the ceiling of the bath is very often used mineral wool - it is safe in terms of fire, harmless to humans (if you use stone wool. Flakes or slag in baths are undesirable). Mats of the insulation spread out between the beams of overlapping, so that they are as close as possible, without leaving the gaps.
Polystyrene foam used in construction practice for insulation of the bath ceiling does not follow yet. First, the material is not designed for high temperatures, and with severe heating can be deformed, "swim". Secondly, a lot of questions to foam and ecology - over time, its decomposition is inevitable with the release of toxic substances. And thirdly, expanded polystyrene can not be attributed to the category of non-combustible materials, and for the bath it is extremely important.

Often, the ceiling is used to insulate the ceiling use a ceramic filling between overlap beams, a thickness of about 100 ÷ 150 mm. The method is not bad, but only in the case of using high-quality clay, since you can find very critical reviews from people who used inexpensive material, and not delighted with the results obtained.
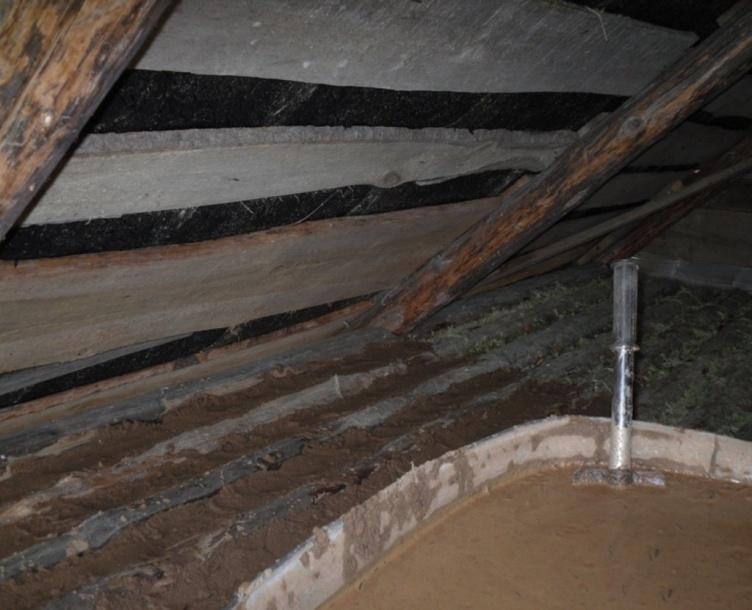
Do not lose popularity and old "grandfathers" ways of insulation ceiling bath. So, usually a lot of chips and sawdust remain in the construction of a log. And this is a very good insulation material. And under normal conditions fall asleep into the space between the beams in a dry form, but for the bath it is better to make a dense wet solution with the use of cement or clay. You can consider using the example:
| Illustration | Brief description of the operation |
|---|---|
 | The ceiling is completely late with clapboard. Between it and the tanks of the overlap is the corresponding year-acolyting layer. |
 | The passage box is installed, and in this case the chimney pipe has already been mounted. |
 | The same box is a view from the attic, with a covered clayman, performing the role of a thermal insulating "pillow". |
 | There is an expectation of a wet solution, so the cells between the beams of the overlap must be additionally closed with slices of film hydrocariolar insulation. You can additionally pave a profound cardboard from below. The beams themselves remain on top open. |
 | Surely, there are cracks in the coating - for example, in places in passing cables or other communications. In addition, the gaps can be in the beam pairing sites. |
 | First of all, it is possible to close all the gaps and gaps using the mounting foam, break the possible cold bridges. |
 | Now you can prepare insulating composition. For this, two buckets of dry sawdust are added to two buckets of dry sawdust (1.5 dm³) of dry cement. |
 | Fastened required amount water. You need to be very careful with this - the solution should not get liquid. The required consistency is semi-dry, so that when compressing in the fist, a lump is formed, but without the release of water. |
 | The mixture is mixed - it will mostly be done with the help of a construction mixer. With large volumes, it is possible to use the concrete mixer, feeding the finished mixture to the top. |
 | The finished composition is poured between the beams of overlapping. |
 | It is possible to distribute it using a trowel - a smooth layer of the same thickness. It is not necessary to rub the solution. |
 | Usually, the layer is adjusted to the top cutting of the beams - it turns out about 100 ÷ 150 mm, which will be enough for high-quality bathing of the bath. Sometimes work is carried out in layers, gradually bringing the insulation thickness to the desired level, giving the laid layers to grab and dry. |
Instead of sawdust, it is sometimes used by a chopped straw, however, in this case it is better to use a clay solution.
Whatever insulation nor used, after its stacking recommended overlapping beams to fix paropropustea Diffuse membrane. The properties of this material are such that the moisture from the top cannot be in the insulation, and the water vapors are free. Such natural ventilation prevents the formation of condensate and reduce insulation properties.

Action diffuse membrane - water is delayed, and the couple passes
After the membrane is installed and fixed with brackets to beams, you can move to the flooring of an attic board, if he planned. Usually, with the ceiling types of ceiling, the attic floors are always fully made, the room can be used, and the insulation will be protected against mechanical damage.
Video: An interesting method of insulation ceiling in the bath
Bathing ceiling
This type of ceiling is much easier to install, requires a much smaller amount of sawnwood. However, it is not always possible to apply it.

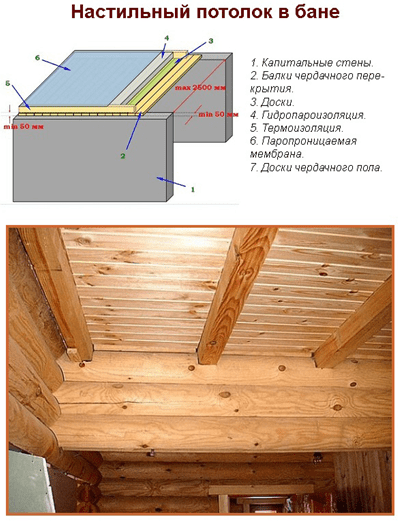
Flooring ceiling - on a miniature bath layout
The floor ceiling will be appropriate only for rooms of small size - 2, a maximum of 2.5 meters. At the same time, the flooring boards must have a thickness of about 50 mm. As a rule, the use of a attic as a useful area in such cases is not considered - the floor will not have the necessary strength. But it is greatly facilitated by the process of insulation - the thermal insulating material itself does not require additional protection from above.
The approximate scheme of the floor ceiling is shown in Figure:

1 - walls. The distance between the capital walls is no more than 2500 mm (light partitions are not taken into account).
2 - flooring board, which are attached nails or self-drawing directly on the wall timber. Board thickness - not less 50 mm, the width of its wall is the same - 50 mm. Well for these purposes is a high-quality planed board, which can be laid tightly one to another, without gaps.
3 - Layer parohydrozolation - It does not differ from those mentioned above.
4 - insulating material. Almost anyone can be applied. However, if a bulk will be used, it will still need to make partitions from the bar (pos. 5, shown by a dotted line as an optional element) so that the backfill still had the necessary uniform thickness.
By the way, it is often possible as thermal insulation in this case, self-made mats, stitched from a waterproof film, and filled with an affordable insulation material. For example, it may be the waste of synthesis, dry needles, and the like.
Since the movements of the attic will not be foreseen, to do floor on top of the insulating layer is completely optional.

Under the number 6 showing the layer parpural Diffuse membrane. In this case, this is also not mandatory. If the roof design is made in all the rules, then such a membrane is already used under roofing material, and free steam exchange will be provided. Reliable roofing should completely eliminate direct water from entering, and since the attic is not used in economic or domestic purposes, then the random spill of water is extremely unlikely. So this can be somewhat saved.

Boards of the floor ceiling often immediately play the role of the first coating. If there is a need, for example, when finishing the steam plans, add thermal insulation, then you can do the same as in the case of a tail ceiling - to fill perpendicularly to the counterbours, which will set on the surface of the foil material, and then put the natural lining.
Video: An example of mounting the floor ceiling
Panel-type ceiling
The design of such a ceiling to some extent combines the features of the filling and standard circuit. The ceiling surface is assembled on Earth, the process of insulation and waterproofing can also occur here, and then the finished panels rise to height and mounted on the upper vents of the walls.
What do these panels are usually represented from yourself? These are chopped shields, the basis for which is two bars located in parallel at a distance of 500 mm one from the other. The cross section of the bar depends on the length of the span, but usually take it equal to 50 × 100 mm - this makes it possible to achieve high strength of the ceiling structure - it will fully serve as a sex for a attic or attic. And, at the same time, 100 mm is a sufficient thickness for full insulation.
The bars are laid out in parallel on an even sustainable base at a distance of 500 mm on the outer sides, the edges align. Then they feed the segments of the boards of the thickness of about 25 ÷ 30 mm, 600 mm long. The width of the board does not matter - use, as a rule, residues of sawn timber, which, by the way, allows you to seriously save on such a ceiling. Each board is attached to a bruse with two nails to ensure that the design is provided. The boards are placed in such a way that they equally performed on the sides of the shield by 50 mm.

After the panel is incomplete, it turns the bars up. Using the stapler brackets on its inner surface, a hydro-plating film is attached (shown by the arrow). Please note that the top of the brush remains open.

If working hands are enough, or there are load-lifting devices that will help raise the panel to the height, then you can immediately, on Earth, to immediately hold and insulate the panel (if, of course, we are talking about rolls or mates of thermal insulation material). For example, a mineral wool laying panel will not too much - but it will not be necessary to carry out these works in the attic.
The insulation mats are stacked tightly in the interval between the bars, the styled membrane. In order for the resulting design to gain an additional hardness needed to raise it to height, they set 2 ÷ 3kosy temporary jumpers from the boards.

1 - mats (blocks) of insulating material - Minvati.
2 - temporary "oblique" jumpers for lifting panels on the walls.
Prices for mineral wool
Panels rise to the place of installation. It can be the top plane of the crown, or the horizontal stepped groove on it is selected specifically under the panel design. Another option - a ram with a thickness of at least 50 mm is attached to the walls around the perimeter, which will become "shelf" to install the finished panels.
In any case, the place of laying panels needs insulating seal. Usually for these purposes use the jute felt ribbon - it will perfectly block the slot between the wall and the panels.
The panels are placed close one to the other, remove temporary jumpers. The ambition interval between the panels, based on their design, the gap of 100 mm width remains. It is not left by chance: its purpose is insulation of the junctions.

1 - wall.
2 - felt tape, sealing wall joints and panels.
3 - finished panels with already removed temporary jumpers.
4 - carved strip of thermal insulation material.
5 - boards fixing panels among themselves.
In each of these openings at the junction, at the bottom of the bottom and walls, the same hydropara insulating film will be banned. Then, a wide band is cut out of the plates of mineral wool, which is stacked in the opening with a maximum density (shown by wide green arrows). Thus, the bridge of cold at the junction will be reliably closed.
It remains to fix the panels among themselves. At first, a diffuse membrane is spread on top of them, which is attached to the bars of brackets. Then the solid board is stacked with a thickness of at least 30 mm - preferably long over the entire length of the room, that is, the total it must be copper all the installed panels. It is nailed (bolted) to each bar. The same board is immediately placed on the opposite side of the panel ceiling. Then you can sneak the resulting surface with a short board, 600 mm long - so the attic floor will be formed. At the same time, they do not forget that the binding panels long boards should go not only along the opposite walls, but also between them, with a step of no more than 1000 mm.
From the bottom of the ceiling, you can lifting the clapboard, using all the same technology that has already been mentioned above.
The advantages of this technique of mounting the ceiling:
- The main assembly and even insulation is carried out in comfortable and safe conditions - on Earth.
- The design is solid - this is a full insulated overlap for a attic that can be used.
- Such a ceiling can be mounted in the premises of almost any reasonable size.
The disadvantages include:
- Very large-scale work.
- The need for lifting devices or technique, or the effort of several people.
- Installation of such a ceiling need to be carried out before installation rafter system - And this is not always convenient from the point of view of construction organization.
So, the main varieties were considered. wooden ceilings For baths, technological recommendations on their installation are given. It should be carefully examined by all the advantages and disadvantages of each of the systems to assess the possibilities of its installation in relation to the specific conditions of the bath available, weighing their capabilities, both from the point of view of the necessary construction skills and from the standpoint of material costs. Ensured in such matters it is impossible - a poorly performed ceiling will definitely affect the comfort of bath procedures, and its alteration is an extremely complex and cost-effective event.
Based on information from various sources, as well as taking into account the practical experience of private real estate owners, many believe that the process of erection of one or another economic building does not constitute anything difficult. In particular, this also applies to the bath. In general, this conclusion is faithful. However, on a certain stage of work there are nuances that need to be considered. Touching the construction of a bath, it should be noted that in most cases the complexity occurs when the ceiling device in it. Further in the article we will analyze how to avoid problems during this work.
Primary requirements
Are you looking for information, how to make a ceiling in a bath? First of all, you need to learn what properties should this overlap. First of all, it should be noted that indoors are almost constantly increased humidity. This means that the ceiling in the bath (photo of the overlap can be seen in the article) must have high waterproofing characteristics. The heat-saving properties of the design also have important importance. It is also necessary that the overlap to withstand various weight loads. How to make it so that he meets all the listed requirements? About this next.
Design features
Speaking about how to make the ceiling in the bath, it must be said that the overlap is shut-off in several stages. Optimal heighton which it should be placed, is considered to be 2.1-2.3 m. To prevent negative impact Moisture and so that it does not work heat through the overlap, you need to properly make the ceiling in the bath. This means that the design should be multi-layered:
- Boards (they finish an attic floor).
- Parchment or film (waterproofing layer).
- Ceramzite or wool. These materials are used to lay the heat insulating layer.
- Film or parchment (vaporizolation).
- Finish finish.
This scheme of the ceiling device is used in all three versions of its facilities:
- in the switcher;
- flooring;
- panels.

What is the ceiling in a bath?
Material for overlapping should be natural. An ideal option is undoubtedly a tree. Most often, the ceiling is built in a bath from aspen and larch. All items, of course, should be processed by protective compositions and not have defects (bitch and cracks). Boards should be purchased dry, but not overporn. Next, we will analyze how you can build a ceiling in a bath with your own hands.
Stitching: Mounting Features
In this case, the ceiling to the bath with your own hands is fixed to the carrier frame. He, in turn, consists of overlapping beams. The remaining parts of the multilayer overlap are mounted. To the supports on the inside of the room are numbered with a solid clutch or edged boards. In the resulting "pockets" laid and insulation. From above, the construction is covered by a waterproofing film. The last stage of the plating structures is the covering board of the upper parts of the beams on the attic room.
Benefits of construction
Thus constructed the ceiling in a bath with their own hands (photo of overlapping of this type can be seen in the article) is optimally suitable for the construction of the attic. All works can be performed independently, not attracting outsiders. The scheme is quite simple. It does not need to use it special equipment Or have special knowledge.

Disadvantages of overlapping
Among the minuses it is necessary to note the high cost of such a ceiling. Most of the budget in this case will need to be spent on the purchase of massive elements. In addition, there will be quite a lot of long boards.
Panel construction
This overlap is constructed from individual shields. They are fitted close to each other. The elastic gasket is placed between them, which is the waterproof insulation. For the manufacture of each sector, a template consisting of two carrier bars is used. They are pinching a number of t-shirt or edged boards. In the formed "KORITS" stacked vaporizolation, then the heat insulator. The waterproof film is surface. The construction is completed with a filling unit with a tree.
Pros design
The main advantage of such overlapping is the substantial savings of lumber. In the manufacture of shields, "illiquid" raw materials are used. In particular, the material can be the boards remaining after the construction of the bath itself. For the plating there will be enough sixteenthistimet meters.

disadvantages
The minuses of the panel design include a large weight of shields. Therefore, before in the bath there is a ceiling of this type, you need to enlist someone help. Some wizards first install empty panels. Then the other materials are stacked on the spot. However, it should be said that even this method requires the coordinated work of several people.
Flooring
This design consists of thick boards, laid tight jack. The thickness of the elements from 5 cm. The ends of the boards are based on the last crown of the structure. From above overlap, a vapor barrier film is laid. The insulation is stacked on it.
Advantages of construction
The main advantage of the overlap is the simplicity of installation. For the construction of such a design, quite a few materials will be needed. This, in turn, will save finances.

Disadvantages of overlapping
The main disadvantage should be considered in width. Such a design is optimal with a spangle of 2.5 m. In addition, with such a ceiling there will be no possibility to build an attic. Another disadvantage of the structure should be considered an unprotected insulation. With the preventive repair of overlapping or a rafter system, the material will be damaged.
The need for thermal insulation
Speaking about how to properly make a bantal ceiling, it is necessary to note the importance of the insulation. To the issue of arrangement of thermal insulation, it is necessary to approach with all attention. This is due to the features of the microclimate indoors. It should be remembered that the higher the temperature, the more difficult it will keep heat. The ideal option is considered to use several materials at once. Consider some of them.
Minvata.
This material is made on the basis of basalt. Fiber is considered an ideal heat insulator. Its advantages should include harmlessness, fire resistance, low thermal conductivity. However, there are minvati and disadvantages. The main is the susceptibility to the influence of moisture. With high humidity of the Ministry of Service begins to lose its beneficial features. To protect the material, steam and hydraulic lots are used. When laying minvats, it should be remembered that it should "breathe". To ensure ventilation between the insulation and the waterproofer, leave the gap.

Ceramzit
The material is granules that are obtained by leaving the clay slightweight and subsequent thermal processing of the mass. Thanks to the cellular structure, the particles reliably hold warm. In connection with often applied in construction. Among other things, this material is inexpensive. For effective insulation, it is necessary to float a layer of 30 cm. Ceramzite should also be protected by hydro and vaporizolation.
Clay and sawdust
This is a fairly well-known and long-applied method of solving the problem of software in the bath. From the side of the attic of the overlap board is treated with a solution of sand and clay. After the coating dries, the leaves (oak desirable), chips and sawdust are poured on the boards. The layer is covered with a five-meantimeter layer of land (dry). I must say that this option is quite laborious. In addition, there will be a lot of dirt. But of all is the cheapest method.
How to make a ceiling in a bath?
The first stage includes the installation of carrier beams. Elements are fixed on the very small bundle of the construction box. The interval between beams - 0.5-1 m. The width and height of the elements are selected depending on the time and constant loads, as well as the distances between carriage walls. In the upper crowns of the cut, grooves are made. They are inserted by beams treated with a pre-antiseptic. The depth of the installation socket must be at least 10 cm. The edges of the supports that are based on outer walls, It is necessary to burn and wrap the rubberoid in two layers. After installing the beams, a chimney hole is formed. To do this, perpendicular jumpers are inserted on the selected area. They cut into the beams on half thickness. For reliability, the jumpers are fixed with nails.

Parosolation
Before in the bath, make a ceiling from the inside, should be attached to the vapor insulation layer. Fixation is carried out by brackets and stapler. During the laying of the material, it is necessary to leave on the walls of science. It will be 15-20 cm. Special membranes that are reinforced by foil and a special grid can act as vaporizolation. The material is placed with the allen at 15-20 cm. In terms of edges, the bands are squeezed by scotch.
Entrance boards
Elements are fixed with nails. Fastening is carried out to beams. Starting crossbar is adjusted under the wall. As a rule, the lining is used in the trim. She is stacked with the help of the Cyanka. The subsequent element is fixed with a spike in the mounting hole of the previous one.
Heat insulator
The insulation is placed directly on the vapor barrier film. It should be remembered that cotton materials should not be stored on the street without a film, as they quickly absorb moisture. When laying a material (rolled or in the form of plates), elements are customized tight to each other. Between them should not be lumen. It is more expedient when stripping make items a little wider "nests" and squeeze the material. It is much better than if he is "walking." In addition, so heat protection will become more efficient.
Waterproofing
This material is stacked similarly to a vapor barrier film. Here it is also necessary to sneak with the allen on the side walls. Between film and fiber material should be ventilation gap. Due to even the minimum distance, the insulation coating will be carried out. This will prevent it from hearing and, as a result, loss of operational qualities.
Arrangement of the attic
For the construction of the overlap are used edged boards. Their laying is carried out by the same technology as on the surface from the inside bath. Elements are pressed to each other tightly. At the same time, the walls are recommended to make a gap. It can be hidden subsequently by the plinth.
Finally
The technology describes the technology, as in the bath to make the ceiling. In general, work is not accompanied by any difficulties. As for the type of construction, the specialists are recommended to decorate a stitched overlap. Despite the fact that its cost is above one, such a ceiling will be reliable and durable.
The ceiling in the bath should be equipped, accurately observing technology. Couple formed in the steam room accumulate. If under the cladding there is a bad heat insulation cake, condensate will appear when contacting cold air. Over time, the moisture will destroy the insulation and the wooden floor elements.
Ceiling device in the bath
To come out effective ceiling In the bath with their own hands, even before the start of work and the purchase of materials you need to know exactly from which nodes it consists of:
- Overlapping. On slag block, brick buildings can be laid concrete plates Overlapping. However, most often the baths are built of wood. The overlap is made from a similar material. The laid beams form a framework frame.
- Facing. From the inside of the bath, the ceiling is covered with clapboard. Inside the steam rooms are used only wooden board. Plastic is suitable for the sheeling of other rooms.
- Parosolation. The cloth is laid under cladding to protect thermal insulation from steam.
- Insulation. The thick layer of heat-insulating material is laid between the beams of overlapping under the trim.
- Waterproofing. Waterproof material protects thermal insulation by the attic.
None of the listed layers cannot be excluded from the ball overlap.
Important! There are membranes of pair and waterproofing with one-sided passage of moisture.
The canvas displays steam with thermal insulation, but does not allow it in the opposite direction. Such membranes must be properly positioned in relation to the insulation.
Ceiling height in the bath
For home construction The height of the floor of the floor to the ceiling is calculated according to the simplest formula: the highest of the family, the person becomes full of growth, pulls up his hands and add more than another 50 cm. The average height to the ceiling is from 2.2 to 2.6 m .
Sometimes the host in the ceiling overlap in the ceiling bath is solves the problem of accelerating the heating of the room. The idea is true. However, it is impossible to lower the ceiling below 2.1 m on a number of important reasons:
- Hot air is constantly at the top. Inside the bath with low ceiling overlap there is an accelerated mixing of cold and warm streams, which is reflected in the well-being of soiling people.
- In a low ceiling bath, it is more difficult to equip high-quality lighting, ventilation, maintain optimal humidity.
If you adhere to the standard, the ceiling height in the bath must be 2.1-2.4 m. The indicator varies depending on the size of the building, alleged maximum number visitors, functional purpose of each room.

Tip! To oversee the ceiling of the bath can not. Energy consumption will increase.
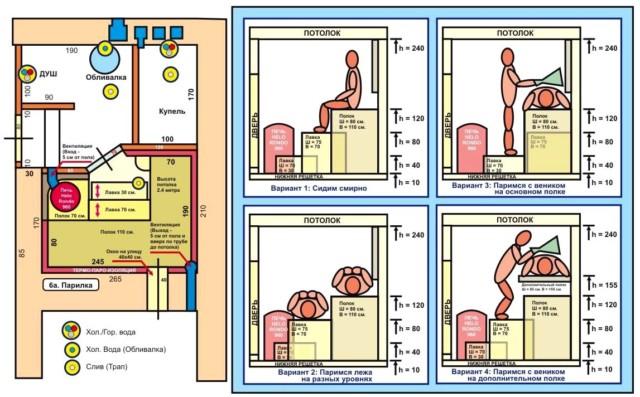
Separately calculated the height of the ceiling in the steam room, which is associated with the arrangement of the shelves. Sun beds are customary to install two or three tiers. The visitor chooses the most comfortable place. The higher the level of the shelf, the hotter the ambient air.
If you take into account the norms of SNiP, then the minimum distance of 1.1 m should be maintained between the underlying of the upper tier and the ceiling. For parillas of public bath, the indicator has been increased to 1.85 m.
Ceiling in the bath: what is better to do
When installing the ceiling in the Ban, the host worries the question of which materials will need. For an accurate answer, you need to return to the layer-by-layer design:
- Overlapping frame. Create a rough ceiling in a bath with coniferous wood. Budget and easily accessible material is considered pine. Increased service life has a cedar or larch.
- Facing. Clean the ceiling in the steam room can be only wooden lining. The board is used from wood, weakly transmitting heat: linden, aspen or alder. In other rooms, the baths will fit the pine lining. You can shelter plastic, which is especially good for the shower room.
Important! You can not wash the ceiling overlap of fiberboard, MDF and other materials from pressed wood waste. From the effects of dampness, the facing swells, deforming, rotates.
- Parosolation. For all rooms of the bath, besides steam room, any vapor barrier material is suitable. Inside the parillers, the ceiling is squeezed by a membrane, withstanding an elevated temperature to + 120 o C.
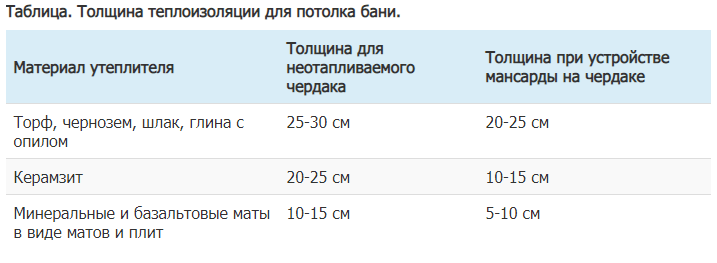
- Insulation. Of natural materials Used clayzit, clay grims with straw or wood sawdust, peat. For reliable insulation, a layer is a layer with a thickness of at least 300 mm, which is unprofitable due to the decrease in the attic space. For modern baths When sheeling uses non-combustible thermal insulation from minvati.
- Waterproofing. When using natural insulation, cover the ceiling overlooking the attic can be referenced or film. The purpose of waterproofing is to protect thermal insulation from water in the event of a roof. If the ceiling is cobbled by the minvata, from the side of the attic heat insulation is better to cover the membrane with the possibility of passing steam in one direction. Through such waterproofing from the insulation, the residues will evaporate the moisture randomly penetrated.
When covering the ceiling, all pie elements will need to be fixed. Nails and hardware are used only with galvanized coating. Inside the wage, the trim is sometimes nailed with copper nails.
Important! The main requirement for the choice of material for the trim is fireproof, ecological purity.
What materials can not be used

The bath is building a specific destination. Aggressive medium will not allow any material to be used. Facing plates and panels made of extruded waste of the woodworking industry are not suitable for any room. From the slightest humidity they deform. The insulation cannot be used combustible materials. Polyfoam and polystyrene foam is suitable only for the insulation of the floor of the pre-banker or a washing room, but it is desirable to pour it with a concrete tie.
PET film, rubberoid when trimming the bath is not used. The material can be laid instead of waterproofing the ceiling from the cold attic. However, the plot over the steam is better to cover the heat-resistant membrane.
It is impossible to use wooden lining with signs of mold. In a humid environment, the fungus will quickly spread over all elements of the design. Inside the bath will appear unpleasant smell of rot. The ceiling will quickly collapse.
Attention! It is unacceptable to use the mounting foam inside the wage to seal the joints and the sealing of the slots.
Ceiling device in a cold attic bath
Cold roof consists of crates, waterproofing and roofing coating. The thermal insulation in such a cake is not provided. The total ceiling device in a cold attics bath consists of the same layers of trim, but you can put them in two ways:
- Outside. The entire cake of the plating from steam, heat, waterproofing is laid by the attic on the ball overlap. Top shutting up a rough floor.
- From the inside The cake of the skin is attached to the ceiling on the side of the bath on the additionally mounted frame, and the tops are trimmed.
The heat-insulating cake takes a useful space. Which side, the owner itself is solved.
Types of ceilings in the bath
Depending on the selected materials and construction of the building, one of the three types of ceiling is equipped inside the bath. The design is determined immediately at the construction stage of the walls.
Steer ceiling
The design of the tail type is used in the bathroom. The ceiling is durable, regardless of the size of the building. The design is ideal for a two-story bath with an equipped attic under the rest room.
The basis of the tail ceiling is formed by strong beams. Usually they are made from the same logs as a log house. Bearing ceiling elements Examine from below to beams. From above the draft or finishing floor. The second option is chosen for residential second floor. Between the shelves, the void is filled with thermal insulation.
Important! In addition to the log cabin, the staircase design is suitable for the baths of brick, foam blocks and frame-type.
Panel-type ceiling
Panel design type is convenient in terms of savings. The skin is collected in the form of separate boxes from cropping the board. The inner emptiness is filled with residues of existing heat insulation. Fasten the trim box to overlap the bath, where the frame is pre-equipped. Advantage of technology to simplify repair. To change the rotten area, you do not need to remove all the skin. It is enough to dismantle a problem box, and in its place to install a new element of the same size. Of the minuses of the trim, the complexity of the sealing of the junctions between each box is distinguished.
Bathing ceiling
Specific type of trim apply to small baths. The distinction of the structure is the absence of beam overlap. They are replaced by boards laid on brick or block walls. In the case of a log, the elements are embedded inside the logs using the selected groove. For a large bath, the overlap is not suitable, as long boards will be fed. The complexity arises with the arrangement of reliable pair and thermal insulation. In the attic one it is impossible to go or use space for storing things.
Warming the ceiling in the bath with your own hands
Rural inhabitants in the old manner sometimes insulate the ceiling in the bath with their own natural material. The choice of such thermal insulation is explained by affordable. Built by modern projects Baths are trimmed by factory manufacturer. The material has less thermal conductivity, due to which the thickness of the ceiling cake decreases.
Selection of material
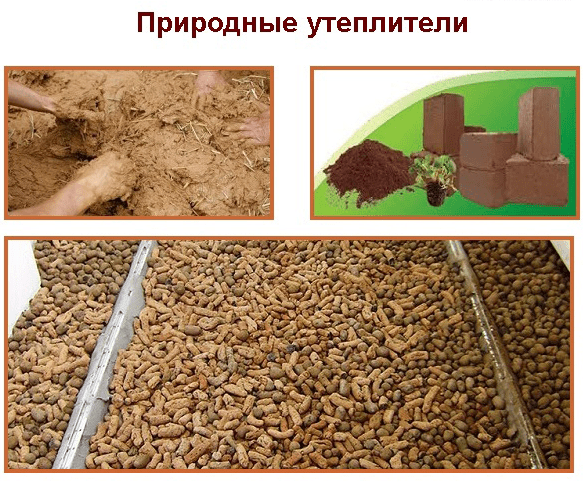
Natural insulation are environmentally friendly. Most materials get free. The most popular insulation is brown clay in the way with straw, wood chips or sawdust. If there are peatlands nearby, you can download another natural insulation for free. Keramzit will have to buy, but its advantage in low weight, due to which the load on the overlap is reduced.
Natural material is resistant to a pair. It easily absorbs and does not interfere with the evaporation of moisture. The disadvantage is a large thermal conductivity. The ceiling will have to pour a thick layer, and this is already excessive load with walls and foundation, reducing the useful space of a attic or bath.
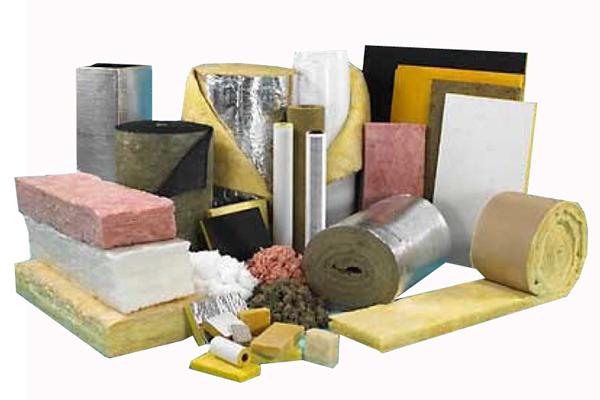
From the thermal insulation of factory manufacturers for the bath is used mineral wool. Material non-combustible, environmentally friendly, light. Rolled minvatu is more difficult to fix. It is easier between the beams to lay basalt plates. Minvatu is released with a foil coating, which is ideal for the insulation of the bath. The disadvantage of the material is only one. Mineral wool is drinking moisture if vapor barrier is broken.
On the video tell about the choice of the insulation for the plating bath:
Required tools

To see the ceiling, the complex tool is not needed. The list is limited to the most necessary:
- wood hacksaw;
- screwdriver;
- roulette;
- level;
- construction stapler;
- a hammer.
Electrolovka, Bulgarian, disc electronized helps accelerate the process of skin. From materials prepared aluminum Scotch, self-tapping screws, staples for a stapler, nails.
Step-by-step mounting
All natural insulation laid a thickness of a minimum of 30 cm on a layer of clay putty, performing the role of vapor barrier. Top put another layer of smelting. If the attic is non-residential, the cake is left in this version. When the upper floor is an attic, the cake is covered with vaporizolation, stall the draft floor. Above there is a pie from artificial thermal insulation and finishing floor.
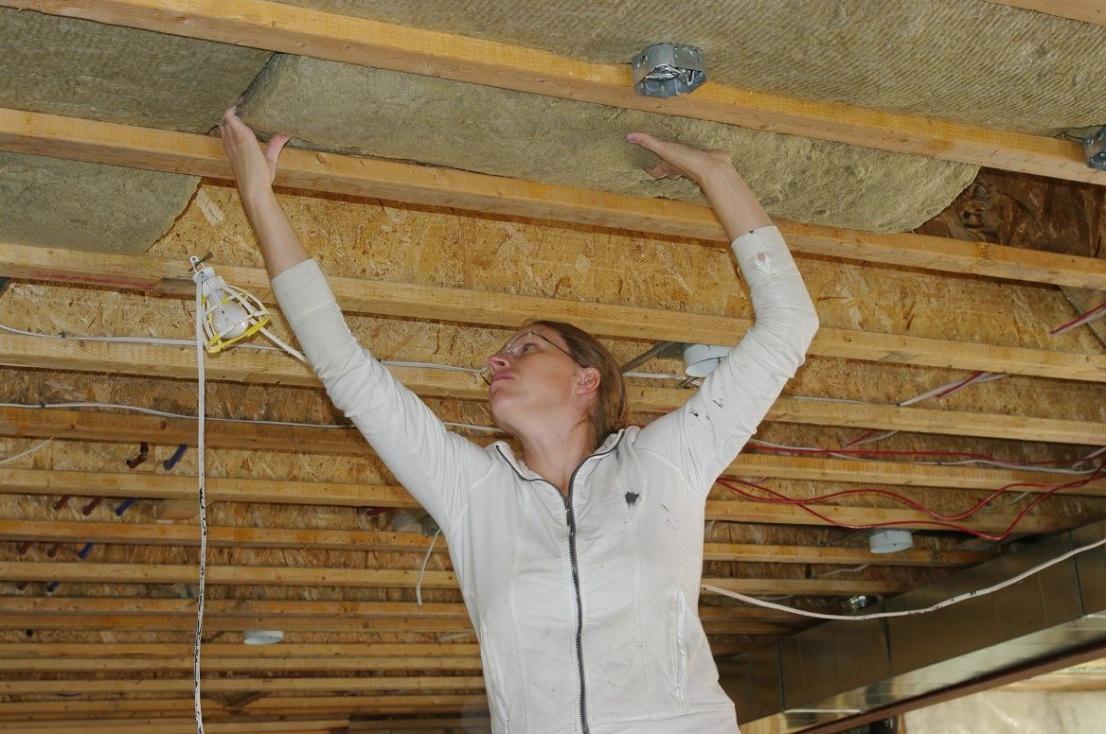
Basalt wool plates are placed in cells wooden carcass. On both sides, thermal insulation is closed with vapor insulation. The stove should be tightly ease between the beams. On the side of the bath, the cake is pressed by the Reiki counterclaim to which the cladding is fixed.
Bani ceiling finish

The ceiling cover in the steam room is performed only by wooden clapboard. It is preferable to use a lipa, alder, aspen. Plastic is suitable for other bath rooms, but the natural material is better for the trim.
If the overlapping is made with a draft ceiling, the need to sample is determined by its quality. Well fitted boards will serve without facing. However, the draft ceiling is less beautiful, has flaws.

The ceiling finish is performed in a bath with a foil material. First, a 40-50 mm thick on the draft ceiling is fastened. Folgized vapor insulation is shot by a stapler. Shakes glue aluminum scotch.
How to shepherd ceiling in a bath with clapboard

Take the ceiling in the steam room with your own clapboard class "A" or "B". The boards are more expensive, but they are perfectly smooth without bitch and other defects. Fasten the lining to the bars of the counterclaims with nails or methols with stainless coating. Near the walls around the perimeter, the room is left for the ventilation of the space formed between the facing and the draft ceiling.
At the end of the trim, the lining is treated with protective impregnations and a special lacquer for a bath. Materials are made on a water basis, do not emit toxic vapors. A good protective impregnation is linseed oil.
For details on arrangement of a bath ceiling Talk to the video:
Conclusion
The ceiling in the bath with your own hands is not done. The trim is carried out simultaneously with the walls. If the materials were correctly selected and laid, the facing in the steam room will serve more than 15 years. In other rooms, the service life is much larger, but it all depends on the quality of ventilation.
Banya is a place where you want to spend time with comfort. In order to achieve such an effect, it is necessary to accommodately approach the installation of this enough complex designproviding for non-standard conditions when used. In particular, in the built bath, it is necessary to competently approach the question than to sew the ceiling in the bath inside, to its insulation, soundproofing and waterproofing.
The fact is that the improper ceiling space device in the bath, the fuel consumption for heating, the microclimate in the drilled bath and the duration of its warm-up will be very long and large. It is in order to reduce and improve these indicators must be done. quality ceiling.
Preparation for ceiling arrangement
Immediately before starting the ceiling finishes in the bath, it is necessary to carefully prepare the project in order to further avoid errors or unwanted consequences.
The ceiling in the bath must meet several requirements:
- Be heat insulator;
- Look beautiful;
- Do not issue evaporation, sprieving the pleasure of the campaign to the bath;
- Have a long service life;
- Serve protection against moisture layer of thermal insulation.
Before arranging the ceiling you need to also decide on its high. Most of the modern bathrooms are ideal for about 2.5 m. For bath structures made of wood there is also a gap, since the material gives shrinkage.
After that, you need to decide on the materials that the ceiling will be trimmed, the necessary lighting and the installation method of the selected finish.
Options for finishing materials
 The most commonly used means of finishing the ceiling space of the bathroom is a tree. The most often used panels from such rocks like aspen or linden. The fact is that they contain less resin than coniferous wood. Due to this panels have increased soundproofing and heat resistance, and also significantly reduce thermal conductivity of the material.
In addition, the first time of resin in facing material can melt at high temperatures and cause inconvenience to soaring people.
It is important that the elements of the facing were high-quality, without defects and well dried.
 It is also necessary to process the ceiling indoor with antiseptic compositions, in order to avoid the formation of mold and fungus, dangerous to human health.
A vapor polyethylene film or aluminum foil can be used by vaporiazolation material. Of modern species Finishing Building Stores offer Penoplex or Izospan. Here is the choice only for the owners.
Among other things, the ceiling space must be insulated. There are many decent options.
Options insulation
Old Methods - Clay, Sand, Sawdust
Many, taking care of the environmental friendliness of the bathroom, decide to cover the ceiling in the bath with such old methods as clay, sawdust, sand or mixtures from various natural materials.
Despite the fact that such methods are very effective, they have a number of minuses. For example, sand with time will begin to pour on the head of soaring people, and in clay and sawdust can settle rodents and insects that harm man.
New methods - mineral wool, foam, foamizol
Modern materials presented in the construction markets and in stores are foam, foaminess, minvati.
- Mineral wool
 Mineral wool is most often used to insulate the bathroom. And this is not surprising: it is extremely simple in the laying, it is inexpensive, fireproof, the microbes do not multiply in it and insects and rodents will not be nest. In addition, it is very lightweight. What allows you to mount it with your own hands alone.
The significant disadvantage of such a material is only her fear of moisture. With wetting, mineral wool loses all its heat insulating properties. Also during deformation during transportation or in the installation process, the mineral wool will also be worse on the operational properties.
 Foam plates are also very popular with the insulation of the ceiling space in the bathhouse. This is due to its lightness, simplicity of installation, good sound insulation and thermal insulation, low cost, waterproof and other excellent performance characteristics.
The main and significant disadvantage of such a material is its fragility and light flammability, as well as the separation of gas dangerous for the human body. These properties make it use undesirable in bathrooms.
- Penosop
Penosop is an alternative to foam, which is offered modern building markets and shops. This type of insulation is a substance in a liquid form, which is sprayed over the surface of the ceiling.
The main advantage of such a insulation is its ability to fill all the slots and cracks on the ceiling surface. This is a relatively inexpensive way of heat insulation, and its operational properties are much higher than that of the foam and minvati.
Ceiling installation options
There are three ways to arrange the ceiling in the bath:
- Floor ceiling;
- Cable ceiling;
- Panel ceiling.
Flooring ceiling
This is the easiest and fairly cheapest version of the ceiling space. But there is such an option to finish and a number of minuses. For example, it is suitable only for small rooms, no more than 2.5 meters wide. And also to equip the attic on the roof with such a finish is not possible.

But, if you still decided to make a ceiling in your own Balke in this way, you need to comply with some technology.
- The first step in the installation of the floor ceiling should be the laying of 50 mm width of the width. Laying should occur tightly, there should be no gaps and cracks between the boards. The boards are reliably attached to the walls of the bathroom.
- After laying a board wooden base, a vapor insulation layer is stacked. It is important to put it with a flystone on the walls of a bathroom, about 15 - 20 cm.
- The selected insulation is placed on the vapor barrier layer. Most often, mineral wool or clay is used here, but everyone is free to make the choice of material on their own depending on their own preferences.
On this, the installation of the floor ceiling in the bathroom is over. Eo is a fast and easy way to finish, which is suitable for small bathrooms and parots.
Steer ceiling
This method of registration requires more time costs and for money will be released a bit more expensive than the flooring option, however, it will pay off with its reliability and durability, as well as excellent operational qualities. At the same time, the construction of such a ceiling can be easily carried out with their own hands.

Installation scheme involves several important steps:
- First, on the walls of the bathroom, the carrier makeup with a cross section of 5x15 cm. The chimney is also a frame of BRUSEV. Upon completion of work on the entire perimeter, the ceiling should be the carrier frame from BRUSEV, reliably fixed to walls and beams.
- Secondly, the sewing of the ceiling by Eurovantia. Fastening in this case is best to have in the grooves. And not in the middle of the lining.
- Then the vapor insulation layer is placed on the Euro woman, which is attached to the stapler to the beams. The insulating layer must necessarily go to the walls of the room, about 15 cm. If several layers of insulating material are stacked, the next layer must be greater than 20 cm of the previous one.
- After that, lay a layer of insulation between beams.
- The heat insulation layer is covered with a waterproofing layer, for example, aluminum foil or polyethylene film.
- From above, installed flooring from the boards, which must be fixed to the beams of nails with a wide hat.
After all manipulations, the ceiling is ready. It is noteworthy that the scheme can be changed and carried out with accuracy on the contrary. This option will be perfect for bathing with an attic room.
Panel ceiling
 This type of finish involves laying the panels to the surface of the ceiling. Also expected several steps to manufacture such a ceiling:
- Two bars are placed on the surface in parallel to each other and at a distance of 0.5 meters from each other. The edges of the Bruus should be resting in the rail.
- A pair of brushes to the beams are driven up 60 cm long boards. Boards must fit tightly to each other.
- The design is turned over and from the inside is littered with vaporizolation.
- Then the baths are stacked on the walls, when attaching on the beams, the harness must be installed on them.
- Panels are stacked by each other.
- The heat-insulating layer is invested, which is covered with a waterproofing layer.
- The slots between the panels are laying out the moisture-resistant thermal insulation material.
- On top of the panel are covered with a boardwater, which connects the shields with each other.
- Inside the placement ceiling decorated with eurvagon.
This option is very laborious and it is impossible to produce it only. own forcesMost 1 - 2 assistants. In addition, such a finish options are more busy than other options.
- If the ceiling in the bath involves the use of an attic room. Do not forget about the availability of a hatch with a pull-out or anxid staircase;
- The ceiling trim should be engaged after finishing the floor, but before finish finish walls;
- The ceiling is the most vulnerable place in the steam room, so special attention should be paid to its thermal insulation;
- First Planck ceiling trim Must be laid perfect, as it serves as a landmark for the rest of the boards.
Lighting on the ceiling in the bath
A modern bathroom premises and the presence of lamps in the steam room. It is important to consider that the lamps should be heat-resistant.
The use of energy-saving lamps and daylight lamps is categorically prohibited. The most preferred option is incandescent lamps.
Do not forget to install wooden protective boxes near the lamps to protect against contact. The best way out will be the installation of lamps under the ceiling, preferably in the corners of the room.

So, we reviewed several types of ceiling finishes in the bath with their own hands. All of them have their pros and cons, as well as diverse on pricing policies and temporary costs when installing.
Only the owners of the bathroom decide which the ceiling is suitable. The choice of materials for finishing the ceiling space in the bath is also entirely dependent on the consumer's preferences.
So what is better to make the ceiling in the bath? Experienced masters Nevertheless, we recommend paying close attention to the variant of the tail ceiling. This is a fairly simple and cheap option for finishes. Which can be easily constructed by own, having only some skills and a small set of tool existing in every home.
When designing a bath, it is necessary to take into account the nuances of operation. These include elevated humidity, sharp temperature difference and high thermal insulation coefficient of materials used. Most often, problems arise when trying to make a ceiling in the bath with their own hands. Step-by-step guide with photos and videos will allow you to perform work qualitatively and in accordance with applicable requirements.
Terms of Ceiling Arrangement in Ban
First you need to get acquainted with the microclimate in the room of the steam and the pre-banner. In the first case, high temperatures affect the surface of the walls and the ceiling, and the level of humidity can reach 80%. These conditions impose special requirements for materials used.
Based on this, you can form the basic requirements for the materials and design of the ceiling in the bath:
- Minimum temperature expansion coefficient. Between the layers of protective or decorative material should not occur.
- Ensuring thermal insulation. In particular, it concerns the wage, where temperature mode should not change due to heat losses.
- Ventilation. It is necessary for tributary fresh air and humidity control.
- Fire safety. You can not use a coating that supports burning. Exception - Wooden sheat. But it is pre-treated with special compositions.
Choosing materials
The ceiling arrangement directly depends on its design. It can consist of wooden rafters with two layers board coating Or represent the w / w overlap. For each option, the individual scheme and coating materials are selected.

Most often do wooden overlap. It should consist of the following layers, ranging from internal.
- Clean end.
- Ventilation gap.
- Parosolation.
- Insulation.
- Second ventilation gap.
- Drawing attic attraction.
To properly arrange the ceiling in the bath, it is necessary to choose the appropriate materials.
Finishing facing steam and pre-bankers
Despite the emergence of new decorative protective facing, more often the choice is stopped on wooden lining or blackboard. They have optimal performance, after processing with antipirens, the risk of ignition is reduced, while compliance with the manufacturing technology, the temperature expansion and absorption of moisture is minimal.

- A reliable connection "Schip-groove" compensates for the temperature expansion and does not affect the insulating properties of the layer.
- Air channels for moisture removal reduce the likelihood of timber swelling.
- Good appearance.
- Easy installation and replacement of individual elements.
Heat insulation
The most important component of the ceiling arrangement in the bath. Immediately it is necessary to abandon polymer insulation - polystyrene foam, foam and polyurethane. Despite the available cost and ease of installation, they lose their properties under the influence of high temperatures and are combustible materials. In addition, the absence of a vapor-permeable effect will cause moisture concentration on a wooden coating.

- Refractory effect. Can withstand temperatures up to + 1100 ° C.
- The best indicators of thermal insulation.
- Easy installation.
- Flexibility. After a strong compression restores the former shape. It is convenient for mounting.
- Passes water pairs, but at the same time the absorption coefficient is minimal.
Procedure for performing work
Before the start of the process of arranging the roof, it is necessary to develop a scheme for installing materials. To do this, you need to take standard drawings and adapt them according to the properties of the bathroom. The Scheme indicates the recommended dimensions of the ventilation gaps and the heat insulating layer.

Sequence of work.
- On the beams are mounted bars for fixing the insulation. If the distance between them is large - an additional doom is made.
- Installation of lining. When connecting boards, compensation gaps must be left. The distance from the lining to the bars should be 12-14 mm.
- Installation of a vapor barrier film. The joints are connected by the brass with the help of the tape.
- Installation of insulation. Its thickness should be 50-100 mm. The presence of slots is unacceptable.
- Installation of waterproofing film.
- The arrangement of the boardwalk in the attic.
The minimum height from the floor to the ceiling should be 2200 mm. Ventilation channels are made, special sleeves protecting wood and heat insulator from exposure to high temperatures are mounted in the field of chimney pipes.
Ceiling in a bath do it yourself: step-by-step guide, photos and videos
Step by step guide that will help you to build a bath ceiling correctly, insulate it and choose all materials. Photo and video.
How to make the ceiling in the bath do it yourself correctly

stock Foto Ceiling in bath
The construction of a hygienic construction in the country site is a responsible event, with the implementation of which a lot of accompanying nuances should be taken into account. For the most part, they relate to the operation of the bath. A small room is exposed to high moisture, frequent temperature adjustments in wide ranges. All this puts out special requirements for a bath design.
It is important to know not only how to build the "box" itself, but also how to make the ceiling in the bath in such a way that it coped with extreme loads. The beginners will have to make a step-by-step instruction, it will be relevant for both professional architects. This article is devoted to this.
The main requirements for the ceiling in the pair

"Layered" ceiling scheme
For the bath there are several types of ceiling zone - each of them will be considered in today's material. On what kind of option you did not stop, consider the requirements remain unchanged:
- All ceilings are massive solutions, especially in cases where they are used as attic, nozzles or counters. The key requirement for such structures is high design reliability, the ability to withstand operational loads.

Overlapping beams of the future bath
- Water procedures and high temperatures are useful for human health only in cases where the optimal microclimate is formed inside. It is important to take into account that it is through the ceiling in the bath "goes" the lion's share of heat. In context, it is necessary to ensure that this zone is reliable thermal insulation.

Graph of moisture dependence on temperature in different baths
- Constructive elements and materials must be resistant to high temperature, damp. But what to do, if traditionally, a tree is used to build hygienic buildings? In this case, it is necessary to treat the surface of products by impregnation and specialized protective compositions, antipyrenes.
- For a bath, high humidity is a constant attribute, because without it, the use of zero water procedures. In the context of this, carrying elements and design solutions are protected by vapor and waterproofing. The couple should have free access to the surrounding atmosphere.
Do not forget about the aesthetic aspect of the bath ceiling. If everything is done beautiful and cozy, the pleasure of the pastime increases at times. Not in vain, experienced architects consider the decorative elements of the "calling card" not only buildings, but also its owners. The design of the bath ceiling can be panel, flooring or tail. Each of them will stop more.
Steer ceiling
In domestic expanses, it is most often found precisely the stewed ceiling of the bath. Its design is characterized by intuitiveness, simplicity, reliability and compliance with all the well-known standards. Installation starts from setting overlap beams. It is on them that other elements will be installed, details. In this case, there are no restrictions on the size of the room.

stewed ceiling in the bath
It is very important to adhere to project documentation, including in the aspect of the blocking beam installation (adhere to a certain step between logs, to use the material of a given diameter). Thanks to this approach, the ceiling device in the bath becomes full inter-storey overlapping With a lot of useful features.
Fig. 7 shows a schematic image of a tail ceiling.

Scheme of stitched ceiling
- Building walls (in most cases, capital from natural wood).
- Thoroughly fixed and insulated beams.
- Cheerful boards for the ceiling.
- Waterproofing layer (leveling heat loss can be due to the use of the foil layer of the waterproof membrane).
- The space between the beams is filled with thermal insulation.
- Parpural membrane.
- An attic floor.
The construction of the above design assumes large number Lumber and "free hands", in view of the time consultancy of the event.
Mounting work
So, the step-by-step guide to the creation of the ceiling in the bath do it yourself:
- Beams for overlapping are mandatory processed with antipirens and other impregnations. With special care "pass" on the edges of the tree. The primer makes sense to apply in several layers.

Processed protective compositions of overlapping beams
- For those pairs, where the installation of the Kamenka stove is planned, it is necessary to decide on the chimney mounting area. Between the 2nd beams there are several jumpers, by means of which a small square is formed. In the made rectangular mounted metallic passage box.
note! It is very important to achieve conformity between the hole and the acquired metal product..
- The ceiling in the bath with their own hands is formed with a hydro and vaporizolation membrane. It has it in such a way that the protective layer has formed a difficult launch in 20 cm.

Hydro and vapor barrier ceiling in the bath
- The construction of the ceiling construction is impossible to imagine without binder. Professionals advise to use the 3rd grade material for this purpose, through which it is possible to form a base under the insulation layer. At the bottom of the construction will have a slightly different look.

Ceiling Body
After completing the trim, you can insert a box for a pipe for removal of smoke, and then fasten the product from the overlap.
- The next step is the insulation laying. Some experts advise the lower row of boards, and already should be treated by hydro and vaporizolation. But if you do it in this way, then from the bottom of the beam overlap remain completely unprotected from moisture, which traditionally rises from the bottom. Of which vaporizolation would be implemented, the beam always remains moist, even in cases where the steam room is not used.

Incorrect position of the waterproofing film
Such a ceiling zone "will not work out", because the fusion in any scenario comes into contact with the ferry. The intensity of the proceedings of rotting processes increases at times. Naturally, the strength of the ceiling is reduced to a minimum and without expensive repairs in this case no longer do.
The optimal insulation in the case of a bath is a stone or mineral wool. These materials are absolutely safe for human health. In addition, they are not susceptible to fire. The mats are filling in such a way that they are as tight to the beams as much as possible, without the slightest hints.
Dedovskaya »Methods of ceiling insulation
The rapid progress did not affect the popularity of "grandfathers" approaches to the warming of the ceiling zone in the steam room . Bani do it with their own hands predominantly from the cut, while the residual products in the form of sawdust, small chips are formed. In essence, this is a wonderful insulation.
The traditional way of their use is to fall asleep small particles in an empty space between adjacent beam structures. These professionals complement crushed fishing clay or cement. The operation is quite simple in its essence, but the phased plan must be carried out in a strict sequence.
- In the bottom of the ceiling, the lining is laid. In space between the beams, the waterproofing layer is laid.

stringing the clamp to the ceiling
- Mounted box under the chimney with a pipe.

Drying Pipe
- The space between the base of the beams is covered with a wet solution (pre-providing reliable protection wooden surfaces from liquid consistency). In the upper part of the beams should be required to remain open.

Dry solution between beams
- Answering the question of how to properly make the ceiling in the bath, you should not lose such an important aspect as the sealing of gaps and gaps of construction foam. This levels the likelihood of the formation of unwanted wool bridges.
- The next step is to prepare insulating consistency. At 1.5 DM3 dry cement added at least 2 buckets of sawdust (necessarily dry).
- It is necessary to make the optimal volume of water, while it is necessary to do it in such a way that the composition is not liquid. In the hands (with an easy physical impact) there should be a small lump in which there is no water.
- The mixer knead the mixture (if it comes to small volumes), which fills the space between adjacent beams.

Cement mortar for a bath roof
- A solid layer is formed. For high-quality ceiling insulation, it is necessary to fill the space to the level of the cutting of the beams (thickness from 10 to 15 cm). The composition gives some time for setting and final drying.
Thus, the ceiling is created in the bath with their own hands - the technology is simple, but very efficient. Regardless of the selection of the insulation, the diffusion membrane is fixed on the surface of the beams, which is capable of passing steam. It is structurally designed in such a way that the penetration of the water vapor from above is excluded in principle, while it can freely move towards the bottom up.

Experts state that ventilation implemented in such a method levels the risk of accumulation on the surface of the material of the slightest condensate. Insulation characteristics remain unchanged during the entire period of operation of the ceiling. At the final stage, it is created on the flooring on the attic, if it is provided by the layout.
Fixed ceilings are complemented by full-fledged floors. After that, the construction is absolutely free and safely used.
Ceiling in the bath do it yourself: step-by-step leadership, advice of professionals
photo of the ceiling in the bath is the construction of a hygienic building on a country site - a responsible event, when implementing which it is necessary to accept
Ceiling in the bath do it yourself
The bath is a room with a certain and sufficiently serious functional load. Therefore, all elements in it play an important role. It is impossible to underestimate and the importance of the correct construction of the ceiling, which performs not only the decorative and demarcation of the functions. Let us dwell on the topic of the bath ceiling.
Where to start the arrangement of the ceiling in the bath?
Before proceeding directly to the work on the construction of the ceiling in the bath, it is necessary to make a project. This will help reduce the risk of errors and make sure that the finished design will respond to the requirements for it.
Ceiling in a bath do it yourself photo
- ensure the heat insulation of the bath;
- have aesthetic species;
- do not give evaporation that will spoil the impression of bath procedures;
- be durable
- do not allow wetting layer of thermal insulation.
The first, with which it is necessary to decide on the preparation of the project, - at what height the ceiling should be located. When calculating the height of the ceiling usually rely on the following data:
- growth of the highest person in your family;
- a person sitting on the upper shelf should not touch the ceiling;
- what height will be raised with a broom the hand of the person who will soar.
For wooden baths, it is also added to the resulting ceiling height rate of 0.15 m to take into account the shrinkage of the structure. In most cases, the height of the steam of 2.5 m is suitable for the bath.
Traditional material for the arrangement of the bath is a tree. Not exception is the ceiling. Ceiling beams, The attic flooring (if any), as well as the ceiling cladding is made of wood. Only in the first two cases are used coniferous rocks that have excellent moisture resistance. But the ceiling facing is better made from hardwood like aspen or linden.
This is due to the fact that the low resin content increases sound insulation and heat resistance and reduces the thermal conductivity of the material. In addition, the resin in the cladding will be melted first and drag, which will bring inconvenience to buyers.
In any case, all wooden elements should not have defects, be well dried and saturated with a special antiseptic composition.
The use of a dense polyethylene film, aluminum foil, is allowed as vaporizolation. Sometimes to protect the insulation from the action steam from the bathboard, a cardboard is used, which is pre-treated with oil, but it is not the best decisionSince this material is very quickly exposed to mold.
The modern building market offers as vapor barrier, for example, isospan or penplex, when laying which you need to follow the instructions.
It is impossible to imagine a bath ceiling without a layer of insulation. There is a lot of options. Insulation can be natural or artificial origin.
From the old days warmed the ceiling bath clay, earth, layers, sand or a combination of several listed materials. This technology is used to this day in some baths, because many care about the ecology of the construction, especially steam room. Most often use clay mixed with straw.
Heat ceiling sawdust
But each of the natural insulation has its own substantial minuses:
- sawdust in the layer of insulation often cause fire or fire enhancement;
- sand sooner or later begins to draw on the head of the bathhouse;
- in the ground, microorganisms that can be harmed to visitors to the baths after a short period of time
- warry insulation is a rather laborious process.
As an artificial insulation, the ceiling baths are used mineral wool, foamizol and foam.
2. Minvata is one of the most common materials used to insulate the ceiling of the bath.
This is related to its advantages, among which:
- ease in laying;
- low price;
- mineral wool can not cause a fire;
- this material is not a medium for the growth of microbes and the nesting site of rodents and insects.
However, mineral wool loses its heat insulating properties during wetting. Its ability to retain heat decreases also with time as a result of density growth. For the same reason, it is important not to crush the Minvatu during the installation.
Ceiling insulation in the bath
This material is produced in the form of reservoirs or rolls.
Note! If the mineral wool is used for insulation in particularly cold areas, it is dismissed in several layers.
2. Another popular insulating material is a foam.
This is due to its light weight and low cost, as well as a number of other positive qualities:
- good sound and thermal insulation;
- waterproof stew;
- it does not multiply microorganisms, including mold fungi.
The minus foam is its fragility, easy flammability, as well as the selection as a result of the burning of the paralyzing system of respiration of gases.
This material is sold in the form of sheets. The layer thickness of the foam for insulation of the ceiling in the bath should be 50-100 mm. For fastening the plates between themselves and with the base, the dowels, a thick cement solution or special adhesive compositions are used
Ceiling insulation in a foam bath
3. An alternative to foam is foaming. It is also called carbomid foam. It is a liquid substance that is sprayed over the surface. This allows you to carefully fill all the slots. Penosol is inexpensive, and its thermal insulation properties are higher than that of classic foam and mineral wool.
Ceiling insulation in bath foamizol
4. Along with the mineral wool, clamzit uses the greatest popularity. Its significant advantage is natural origin. For insulation, the ceilings are used by the granules with a fraction of 5-40 mm.
Warming ceiling in the bath with clay
This material is environmentally friendly, non-combustible, has high noise and heat insulating and properties. However, when applied, it is necessary to take into account a number of nuances:
- since the gigrosite is hygroscopic, it is necessary to take care of pair and waterproofing;
- the height of the clamping layer on average should be 0.2 m.
Note! The insulation of the space around the stove pipe is best carried out with a clay or mineral wool. In the last case, the pipe must be pre-closed by leaf asbestos.
The selection of the insulation depends not only on your preferences, but also from the method of laying the ceiling in the bath.
Cable Ceiling Device Options
At the moment, three ways to lay the ceiling in the bath are distinguished:
- the floor is the easiest method;
- stewed - high-quality and not particularly expensive ceiling;
- when installing the panel ceiling, help is required 1-2 people, but such a ceiling system is very reliable and durable.
Bath floor ceiling
Step 1. At the first stage of the room on the ceiling, the boards of 50 mm width are laid. They must be laid very tight, without gaps and relying and fixed the edges to the wall of the bath.
Step 2. On the boarding base, the layer of vapor barrier with the adhesive on the walls of the bath is spread. If the thermal insulation is the material to serve as a clamzite, then on the perimeter of the ceiling on the roof side makes boards.
Step 3. The insulation is placed on vaporizolation. For this method, mineral wool or clamzite is more often used.
The ceiling of this type is suitable only for small baths without a attic: the width of the walls should not exceed 250 cm. Another disadvantage is the insecurity of thermal insulation from external moisture. And when replacing the overlap board, the pair-and thermal insulation layers are broken.
Stitching ceiling system
Such a ceiling, although it requires more temporary and cash costs, but is more reliable. At the same time, its structure is easy to produce on its own.
Step 1. On the walls of the baths are mounted bearing bars with a cross section of 5 cm by 15 cm. Around the chimney, it is also necessary to create a frame of bars. For this, in small beams that are stacked by the main longitudinal, the grooves are cut out for the main bars. The frame is a square on the side length of about 380 mm
Step 2. From the inside, it makes the ceiling of the ceiling by eurryagon or tongue. When installing the plating to beams, the fastening elements are not located in the central part of the boards, but in the grooves.
Stewed ceiling in the bath
Step 3. The wrapper is placed on the trim and fix it to the beams by the stapler. Isolation must be found on the walls by 15 cm. If you have to use several paoso-insulation crashes, then the edge of one should go to another sheet for 20 cm. The joints of the joints fasten the aluminum film on the adhesive basis.
Step 4. Invest heat insulation between beams, such as mineral wool, crumples and foam. If you use the latter, the space around the chimney is poured by clay. When laying minvats, it is cutting off its strictly in size and try not to crush so that this insulation does not lose properties.
Step 5. Thermal insulation layer is closed with waterproofing, which can also be aluminium foil, polyethylene film, etc.
Step 6. Located on top of the flooring from the boards, which are attached to nails with a wide hat to the beams.
Stitching ceiling system
If a mineral wool or foam is used as a insulation, then the assembly of the tail ceiling can be made in the opposite direction: first install the beams, the external flooring is attached to them, the insulation is placed between the bars, the steam barrier is fixed to the beams, then the racks are fixed to the bars. Sew.
Such a ceiling is an excellent option for baths with a attic.
Panel ceiling
From the name you can guess that this type of ceiling is collected from the panels. They are prepared in advance according to the scheme described below.
Step 1. Place two timber at a distance of half meter from each other. They must lie strictly in parallel. Their edges rest in the rail.
Step 2. Accept to the beams tightly lying to each other with a length of 60 cm.
Step 3. The design is turned over. It turns out a kind of drawer, which from the inside linse with vaporizolation and fix the stapler.
You can collect shields completely, but it is better to stop at this stage, which will facilitate the transportation and installation of panels.
Note! To protect the panels from the distortion of geometry during moving on the side, free from the board, the diagonals should be selected.
The installation of panels are step by step can be described as follows.
Step 1. On the walls of the baths are laid harness. It should be paved on the beams if the installation will be made on them.
Step 2. Place the panels for each other.
Step 3. Insert the thermal insulation layer in them, which is closed with waterproofing.
Step 4. The space between the panels is filled with moisture-resistant thermal insulation M material, for example, felt with foil layer.
Step 5. From above, the panel is closed with a decidant from the board, which simultaneously connects the shields with each other.
Step 6. From the inside of the ceiling decorated with clapboard.
This option has only one advantage - the ability to use barking boards. Otherwise, the installation of such a design is much more complicated and impossible by one person. Therefore, experts recommend to stop on the tail ceiling.
In rare cases, lighting is installed on the ceiling in the bath. In the steam room, heat-resistant lamps are used. In no case cannot be used energy-saving E or daylight lamps. It is best to apply traditional incandescent lamps. The lamps are closed with lattices of wood that protect against contact with a lamp. But it is preferable to establish lighting under the ceiling, for example, in the corners.
At this stage, the installation of the ceiling in the bath is considered completed.
Ceiling in the bath do it yourself
Find out how you can install the ceiling in the bath. Types of thermal insulation Options for ceiling construction. Photo + video.
Ceiling in the bath do it yourself: step-by-step guide
Special requirements are presented to the bath ceiling device, because it works under conditions of constant temperature drops and humidity. From HIS right mounting It depends not only the heating time of the bath, but also the life of the entire structure. How to make the ceiling in the bath? You will learn about this from today's article.
Requirements for a bath ceiling
The microclimate in the bath and the sauna is very different from the residential premises. In the pair separation, the temperature can reach 80-100 degrees, humidity - 90-98%. In addition, the bath works in cyclic mode "Heating - cooling", so in the ceiling floors there is a condensation of moisture in the insulation, wood deformation and other unfavorable processes.

Bath ceiling height
The correct ceiling cake device allows minimizing the effect of harsh conditions and reduce the cost of firewood or other fuel.
The ceiling in the bath must perform several functions:
- well to keep heat inside the paired and washing compartment;
- do not miss moisture pairs into an attic room;
- do not distinguish the placement of harmful substances when heated;
- enjoy fire safety;
- work for a long time in high humidity and temperature.
These tasks are solved with the help of the correct choice of materials and the technology of mounting overlaps and the ceiling.
What materials are suitable for the ceiling in the bath
The choice of materials for a bath ceiling is a responsible step. Of the variety offered in the construction market, it is necessary to choose the most reliable, eco-friendly and fireproof.
- Wood for cutting frame. Overlapping in the bath is usually made from coniferous wood, thanks to the resin structure, it does not rot for longer. In addition, the timber and boards of coniferous rocks are easily processed and not expensive. Softwood is used for beams, rough ceiling, as well as for the floor of the attic. To avoid shrinkage and appearance of gaps, boards are better to apply after atmospheric or forced drying.
- Wood for interior decoration. Despite all the advantages of coniferous wood, it has a disadvantage: at high temperatures, it highlights drops of resin, which can cause severe burns when entering the skin. Therefore, for the inner finishing cladding, the ceiling in the bath is more often used by deciduous boards - aspen, a lamp, alder. These types of wood allow you to create a special spirit in the bath, easy to handle. Their price is true, somewhat higher.
- Parosolation. Required condition The durability of the ceiling in the bath or sauna is a high-quality vapor barrier, which does not allow the exit of steam through the ceiling and overlap in the layer of the insulation and the attic room. Pergamine, film materials from foamed polyethylene, as well as various vapor insulation films - membranes can be used for this purpose. Before buying, it is necessary to make sure that the material can be operated under high temperature conditions up to 120 degrees.

Parosolation ceiling in the bath
What materials can not be used?
For the bath ceiling are not suitable for materials separating harmful substances when heated; In particular, this is:
- plywood, OSB and chipboard;
- polyfoam, expanded polystyrene as a heater;
- mounting foam for sealing slots;
- polyethylene films not intended for operation at high temperatures.
Even in the absence of smell, these materials are distinguished by phenols and monomers. At high temperatures, the body absorbs them more actively, which may cause serious diseases up to the oncology.

Materials that cannot be used when building a ceiling in the bath: 1. Plywood, OSB and chipboard. 2. Polyfoam (expanded polystyrene). 3. Mounting foam. 4. PET film. 5. Boards affected by fungus.
Also, it is also impossible to use a board affected by fungus - in conditions of high humidity, it will begin actively multiply, destroy wood and allocate toxins. To extend the service life, wooden elements are treated with antiseptics intended for the bath and sauna - they are environmentally friendly and harmless.
Ceiling and ceiling device in the bath
Ceiling overlaps and ceiling in the bath can be performed different waysThe most popular of them:
Their device is characterized by materials and technologies used, and determine the type of overlaps is better at the stage of the construction of the wall or cut.
Steer ceiling
This design is used in the traditional carbon construction of baths and is distinguished by increased strength. It is suitable for the bath of any size and layout, including for two-story buildings with a relaxation room in the attic.

Stewed ceiling in the bath
The main difference between the stitched ceiling - the durable beams of overlapping from the log, the so-called Matitsa. They are laid on the last crown of a church. The beams serve as a support for the attic overlap and tighten the walls of the structure, giving it strength. The ceiling to beams are launched from below, on top of the semicircle floor, and the space between the beams is filled with insulation.
- increased strength;
- good thermal insulation;
- durability.
- laying beams at the construction stage of the walls;
- large material consumption.
The ceiling can also be mounted in a frame, brick bath and a structure from foam blocks. To do this, when the walls are erected, windows or grooves are left in the masonry, where the beams from the log or timber are installed.
Flooring ceiling
The main difference of such a ceiling is that the boards are placed on the walls or in the grooves in the log, for which a quarter of a log is shy. There are no overlap beams in this case, so the method is suitable only for bathing a small area, otherwise the boards will be fed. It is difficult to arrange an attic on the flooring floor, you will have to walk along the insulation. In such baths, the attic is more often used as a technical room.

Flooring ceiling in the bath
- cheaper design;
- simple construction and repair.
- it is difficult to make effective insulation;
- suitable only for baths and a small sauna with an unused attic.
Panel ceiling
The prefabricated design of individual panels allows you to assemble the ceiling of cutting board and remnants of the insulation. From the headboards make boxes in which the warming mats are laid, sew them from above. The boxes are laid on a pre-prepared frame from a bar or board close to each other.

Features of the device panel ceiling in the bath
- you can use a thinner board and trimming, due to the prefabricular design, the desired rigidity and strength will be provided;
- it is easy to replace individual elements during repair.
- pretty massive design;
- shakes and cracks need to be thoroughly seal.
The selection of the ceiling design depends on the size and type of structure and the presence of suitable materials.
The cordless ceiling is reliable and durable, so in the construction of the bath it is most often. Below is a gradual technology of its installation.
Step-by-step instructions for mounting a tail ceiling
Before starting work, you need to decide on the height of the ceiling. It is believed that for a convenient guar, its height in finishing should be at least 2.2 m.
At the same time, the following features should be taken into account:
- the log house for the first two years can give shrinkage to 10-15% height;
- the thickness of the draft ceiling is 30-50 mm;
- between the draft ceiling and finishing, the ventilating clearance is required in 50 mm;
- the thickness of the skin is 10-20 mm.
To ensure the desired height of the clean ceiling, the ceiling beams should be located during the construction of a bath at an altitude of at least 2.5 m.
Overlapping device
- The beams of overlaps in the classic bath construction are made from the same type of log from which the log house is put. Located on a short side of a log in 1-1.5 m. The logs are shy on both sides for the convenience of the black ceiling binder and the floor of the attic.
- Mother of the log is prepared: they are placed and scolded in size, shy up the upper and lower plane on 1/8 diameter.
- In the logs of the upper crown - a comb and mathicers - choose the grooves for the connection "in Kurdyuk". This type of compound as a whole is similar to the connection "in the bowl", but is distinguished by an increased windproof, it is smaller thanks to the additional spike.
- After fitting, the Matitsa is placed in place with a pantry moss, pacles or interventovate insulation. From above to the last crown, Mauerlats are placed on which the rafter system is mounted.

Barbell ceiling
- A rough ceiling is made of edged or tipped soft boards Thus, to ensure the minimum of gaps and cracks. When using a edged board, it is recommended to choose a quarter in it for better docking. The thickness of the boards for the washing compartment is 25-30 mm, for the wage - 40-50 mm.
- The board is chosen to the Mathians from the bottom. For a dense fit of the boards to the crowns of a log shy the logs.
- To the resulting plane nourishes the bars in such a way as to align them with the top and bottom of the matits. They nourish the ends of the black floor boards, and later - the sex of the attic.
- A rough ceiling is naked to the Matians from the bottom, tightly joking the board. The first board is placed in bulk to the cut, pre-spit spit or a selected quarter. Fasten the boards with nails to each Matice, so that it did not take and not cobble, they use two galvanized nails for each intersection. Galvanized screws can be used, half-diameter holes in the boards. The length of the nails should be 2-3 times the thickness of the board, usually use fastener with a length of 80-90 mm.
- Each next board is breeded with a spike in the grooves of the previous one and bubble with the help of a hammer through a bar until the castle is completely connected.
- If the stove is installed in the bath, the chimney of which passes through the overlaps, it is necessary to prepare the opening for the chimney at the stage of the bed flooring. Matitsa at the place of execution of the opening is shy just like the logs of the upper crown, and nourish the bars or boards, between which additional overlaps are mounted in the size of the pipe penetration box.

Parosolation
The purpose of the ceiling vaporizolation is to exclude steam from the steam and the washing compartment in the insulation layer. Given the high humidity in these rooms, vaporizolation should be done in compliance with all the rules, not saving on it.
When the bantle of the bath, the ceiling can be heated to a temperature of 60-100 degrees, so vaporizolation is performed only by heat-resistant materials.
The traditional vapor barrier method is a gap and junction of the clay-sandy solution, which is also used for masonry furnaces. Its vaporoselation properties are not inferior to modern materials.
Make a solution like this:
- small-grained dry career sand sieves through a sieve to remove garbage, stones, organics;
- oily furnace clay is soaked on three days in water, after which they wipe the resulting solution of semi-liquid consistency through the sieve;
- scraps and residues of basalt or mineral fibrous insulation are crushed manually, it gives a plastic solution with a solution;
- mix these components in equal shares to the pasty mass by a construction mixer, if necessary, adding water.
The resulting composition is missing the adjoining of rough floors to a cut, pipe penetration.

They also cover the rough floor from the side of the attic, the thickness of the vapor insulating layer is at least 5 cm.
Drying such vaporizolation usually takes at least a week. This method is environmentally friendly and tested for years, but not very convenient, and therefore is not particularly popular with modern developers - they prefer to make vaporizoation with modern materials.
The adjacent of the draft floor boards to the cut in this case canopate pacles or interventory insulation. For vaporizolation, any heat-resistant and steamproof rolled material, such as foil or insulating film, use.
It is placed on top of the draft floor with the allen on Matitsa at least 10 cm, grabbing their edges with a steppeler or small nails through thin wooden planks.

You can completely overlap the matzes from above. Slices of material in this case are placed with an allen at least 10 cm, sinking the joints with metallized or aluminum scotch.
Heat ceiling
An important stage is the thermal insulation of the bath ceiling. It, as well as vapor barrier, can be done both using natural materials and with the help of modern insulation. The purpose of thermal insulation is the savings of firewood and time on the ground of the bath, as well as the long-term preservation of high temperature in the steam room.
To calculate the thickness of thermal insulation, there are many techniques in which the thermal conductivity of the material is taken into account, the temperature difference inside and the outside of the room and other factors. However, this calculation is complicated, so the developers usually use ready-made solutionsbased on the experience of bathing.
Table. The thickness of thermal insulation for the ceiling of the bath.
As can be seen from the table, natural heaters are effective only if their layer is quite thick. Therefore, when appliance mansard floor Above the steam is better to use modern materials.
These include clay, mixed with a solid or straw sharp, peat or black soil, ceramzite.

Pluses of using natural materials:
- couples and moisture are not afraid - absorb and gradually evaporate it without losing insulation properties;
- eco-friendly;
- cheap or go out in general.
- low thermal insulation properties;
- requires a fill in a thick layer;
These materials are usually used in combination with clay vaporizolation. They are falling asleep right on top of the dried layer of clay putty between the Mathians to their top level.
If the attic is used as a technical room, you can not close the insulation with nothing, it is not afraid of wetting even in the case of a roof leakage. In the equipment of the attic floor, over the insulation, the draft floor is laid and finished.
A more convenient and modern method - the thermal insulation of the ceiling of the bath with the help of mineral, basalt wool. It is produced in the form of rolls or mats of different density and thickness. The thermal conductivity of the insulation depends on the density and its ability to keep the form.
For insulation of horizontal surfaces, you can use mats with a density of 30 kg / m³. For the bath, they produce special insulation, one side of which has a foil surface - they additionally reflect infrared radiation. Such mats or stoves are placed shiny side down.

Modern thermal insulation materials
Cut mats into size with a sharp knife or scissors. You can also use crushed material trimming. They are fully laid all the space between the Mathians, observing the recommended layer thickness. If slabs are used, they are put in checker, overlapping the joints of the previous row.
Mineral and basalt cotton wool must necessarily close the layer of vapor-permeable waterproofing. Even with a single winking of fibers sticks out, the cotton will settle and ceases to delay the heat.
Waterproofing insulation
It is placed on top of the insulation under the black floor of the attic room or as the upper layer of the ceiling cake in a non-residential attic. As waterproofing, it is better to use modern nonwoven membranes with one-sided vapor permeability - they produce outwards from the insulation of a pair of moisture, but do not allow water to penetrate the insulation from the outside.
The membranes in the modern market are presented in a huge assortment, their characteristics are similar, so you can choose any suitable for the price and properties. Ensure the waterproofing over the insulation and mats with the allen on Mauerlates and the top log logs, having a film pattern up.
The strips are joined with the allen at least 10 cm. Fasten the waterproofing to maths with the help of a stapler, on top of the fastening the strips of construction scotch. The joints also isolate scotch.

Chernotham
The floor in the attic do in the event that they plan to use it as a room for drying and storing brooms or as a summer room. For the draft floor, a cutting board is used with a thickness of 25-40 mm coniferous rocks. It is collected on the matzit with nails, 2 nails for each intersection.
Along all the walls, there is a mandatory gap for the ventilation of the insulation, its width is 2-2.5 cm. On top of the draft floor, you can put any finite coating, for example, laminate. It is also necessary to observe the ventilation gap. For a technical attic enough rough floor.

Technology of performing a floor ceiling - features
To perform the flooring ceiling, thicker boards are used, capable of withstanding the load of the insulation. As a rule, it is used for this purpose a tipped or cutting board 50-60 mm. It is placed on over a log in the groove chosen logs of the upper crown.
Boards put, tightly having to each other. Vaporizoation is fixed from below the draft ceiling with the help of a stapler, after which it is performed by clapboard or thin edged board. In this case, the insulation is laid out over a rough ceiling and is closed with waterproofing, which is fixed on a stapler to Mauerlat and the upper wand.
Bath Ceiling Interior Decoration
With the help of interior decorations hide the flaws of the draft ceiling and give the bath design and beauty. It should be immediately noted that a well-fitted roughing ceiling can be operated without a trim, but most developers prefer simultaneously with the walls of the walls also to separate the ceiling.

Ceiling clapboard clapboard
To cover the ceiling, the lining wood wall panel is most often used: aspen, a lamp or alder. It has a light fragrance of a tree, which allows you to create a unique fragrance in the bath. Categories choose categories A or B - there are no bitch, through holes, other defects.
On the draft ceiling on top of the mats fasten the bars 50x50 or 40x60 mm with a nail of 120 mm. For better vaporizolation of the draft ceiling, they are additionally squeezed with foil vapor insulation by filling it on top of the boards and bar stapler. The joints are sampled by aluminum scotch.

Skuffing the joints aluminum scotch
The lining is attached to the bars with the help of finish nails or galvanized self-tapping screws. From the edge of the walls leave the ventilation gap, which after the walls of the walls are closed by a plinth. Through this clearance, the space between the trim and the draft ceiling is ventilated, which allows you to extend the life of the lining.

So that the trim board does not change the color and did not dry from moisture, it is recommended to process 1-2 layers of varnish or impregnation for a bath and sauna. The compounds for the bath are made on a water basis, so that they do not form the films, and the tree breathes. You can also use linseed oil.
The correctly mounted ceiling in the bath serves at least 20 years without the need to replace. There is no moisture in it, condensate evaporates quickly thanks to a mending up ventilation gap. Experts recommend to inspect the ceiling every six months to notice the violation of the vapor insulating layer, the darkening and rotting of the wood and conduct timely repairs. In this case, the bath for many years will give you health and a good mood.
The ceiling in the bath do it yourself - step-by-step guide and tips
Learn how to make a ceiling in a bath with your own hands - step-by-step guide to the arrangement of the ceiling, the choice of materials, tips, photos + video.