Recommendations for installing a metal gazebo in the country. Do-it-yourself metal gazebos for summer cottages Step # 2 - choosing a place and preparing the base
Prefabricated metal utility blocks, sheds for summer cottages TM "Greenstorage"
A metal utility block or a metal shed is assembled from profiles and sheets of metal on site manually and without the use of special mechanisms. The frame of the metal utility block is assembled from galvanized profiles. The walls and roof of a metal shed are assembled from deep corrugated steel sheets.
Our quick-assembly sheds and utility blocks of the Russian brand Greenstorage are assembled on a pre-prepared flat and level area. The base can be a wooden platform or evenly laid paving slabs. It is desirable that the base be rigid in the plane in order to avoid deformation of the frame, and as a consequence of the difficult closing of the doors in the future. Precision details - fast assembly... Therefore, we pay great attention compliance with the exact geometry of parts during their manufacture.
General and specifications products of the type: a shed for a dacha, a utility block for a dacha TM "Greenstorage"
The frame profiles for the floor, walls and ceiling are made of 0.45 mm galvanized steel. Walls and roofs with a thickness of 0.28 mm are assembled from deeply profiled galvanized steel sheet painted in several layers in a hot solution. This ensures the durability of the product. The product does not require additional repair or additional painting during the entire service life. We provide a wide range of models and colors. 10-year rustproofing guarantee.
Advantages of products such as: prefabricated metal shed or prefabricated metal utility block
1. The Greenstorage metal shed provides inexpensive way obtaining the necessary protected space.
2. The metal utility block does not require repair or painting during its entire service life. 10-year rustproofing guarantee.
3. The metal shed "Greenstorage" due to its light weight and compact packaging is easy to transport and easy to install. Precision parts - fast assembly.
4. The metal utility block does not require a special, heavy foundation.
5. Ventilation grilles and openings in the metal shed provide the necessary exchange of air in the room, sufficient to breathe freely and sufficient to prevent the growth of mold on the walls.
6. Sliding doors metal sheds allow you to save space and make it easier to open the shed in winter without requiring additional cleaning of snow and ice.
7. The metal shed has the following advantages over the PVC plastic shed:
- not toxic
- does not fade in the sun
- does not deform during summer-winter cycles
- not susceptible to gnawing by mice and rats
details on the main page under the heading - ""
Ways of using products such as: prefab barn, prefabricated utility block in the country and on the garden plot
A metal utility block or shed can be used for:
Storage of garden tools and work clothes and footwear,
Storage seed before planting and storing the harvested crop,
Storage of technical items such as: lawn mowers, pumps and hoses, portable lights and extension cords, bicycles, scooters, snowmobiles, motorcycles, inflatable boats, outboard motors, etc.,
Storage of fishing tackle,
Storage of bulky children's toys intended for outdoor play,
Workshop arrangement,
and much more ...
Important!
Aluminum floors
Aluminum floors in sheds, which you may come across in the photographs of our products, are an additional option and are supplied according to individual orders.
This is due to the fact that when a metal utility unit is equipped with a stainless steel floor (additional galvanized frame and U-shaped aluminum sheets), the weight of the product increases multiple times, which requires additional packaging space, and, accordingly, the final cost of the entire product increases significantly.


To assemble and install a metal shed (metal utility block), a base or foundation is required.
We offer one of the options. It is usually used when buying a barn without a metal floor.
- We make the base frame from timber treated with an antiseptic. The permissible cross-sectional timber size is width (40 ÷ 60) mm, height (100 ÷ 120) mm, length = length of the utility block + 10 cm.
- We assemble the frame by connecting the parts with metal corners.
- Having chosen the place of installation of the metal shed, we remove vegetable soil, in length and width by 12-15 cm. larger than the size of the utility block.
- We install support blocks at the points of "ligation" of the frame of the base of the utility block, 5-10 cm above the ground level in the horizontal plane.
- We fill the entire area with crushed stone to the height of the support blocks and install the frame on the blocks.
- We lay a sheet of plywood or OSB (thickness not less than 12 mm) on the frame and fix it along the perimeter to the timber and to the transverse lags of the frame made of timber.
The foundation is ready.
Now you can assemble the metal frame of the shed on the surface of the base (base) in accordance with step by step instructions attached to the barn
.


1.Bar. 2.Plywood or OSB. 3. Support block. 4. Fastening corner. 5.Screw.
About snow load on the roof of the barn
1. The roofs of collapsible sheds have a slope less than 45 degrees.
Therefore, you need to know and remember that:
- A roof slope that is self-cleaning from snow is a roof slope with a slope of 45 degrees or more to the horizon.
- roofs with a slope of less than 45 degrees require periodic cleaning of snow and ice.
- the main technical requirement cleaning the roof from snow is to prevent the height of the snow cover on the roof over 30 cm.
2. The following are excerpts from current cleaning regulations pitched roofs from snow and ice, operating on the territory of Russia, Moscow and the Moscow region.
Remember that the responsibility for compliance with the rules and regulations for cleaning pitched roofs from snow and ice always rests only with the person operating the product, structure, or the operating organization.
STATE COMMITTEE OF THE RUSSIAN FEDERATION
CONSTRUCTION AND HOUSING AND UTILITY COMPLEX
RESOLUTION
ON APPROVAL OF RULES AND STANDARDS
TECHNICAL OPERATION OF THE HOUSING FUND
State Committee Russian Federation for construction and housing and communal complex decides:
1. Approve the attached Rules and Regulations technical exploitation housing stock.
2. Not to apply on the territory of the Russian Federation the order of the Ministry of Housing and Communal Services of the RSFSR dated January 5, 1989 N 8 "On the approval of the Rules and norms for the technical operation of the housing stock".
3. Control over the implementation of this resolution shall be entrusted to the Deputy Chairman of the Gosstroy of Russia LN Chernyshov.
Chairperson
N.P. Koshman
RULES AND STANDARDS FOR TECHNICAL OPERATION OF THE HOUSING FUND
4.6.1.23. The roof is cleaned from debris and dirt twice a year: in spring and autumn.
Removal of ice and icicles - as needed.
Soft roofs are not cleared of snow, except for:
gutters and overhangs on pitched roll roofs with an external drain;
snow awnings on all types of roofs, snow awnings and ice from balconies and canopies.
A roof with an external drainage system must be periodically cleaned of snow (snow accumulation with a layer of more than 30 cm is not allowed; during thaws, snow should be dropped at a lower thickness).
Directions
on the technical operation of pitched roofs and technologies of anticorrosion protection and sealing of metal roofing surfaces during installation and repair with sealing materials of the ABRIS® S and ABRIS® R brands
Agreed
Director of LLC
"Plant of sealing materials"
G.A. Savchenkova
Developed by
scientific adviser
problems "Hydroprotection"
O.A. Lukinsky
Moscow, 2005
2.12. During intensive leaf fall and snowfall, it is necessary to quickly clean the roof. It is safe for roofing to sweep away leaves and snow. On a galvanized roof, you can throw snow with wooden shovels, leaving a layer of snow about 5 cm thick on the roof. It is strictly forbidden to use metal shovels and similar devices for cleaning the roof, which can damage the roof covering.
2.13. If the layer of freshly fallen snow exceeds 5 cm, snow removal on a roof with a slope of less than 45 ° should be carried out on the roof section for a gable roof at a distance of up to 3 m from the edge of the eaves, and for a pitched roof - 4.5 m.When a snow cover is more than 30 cm thick Taking into account the density of freshly fallen snow of 0.25 g / cm3, the mass of the snow cover exceeds the permissible standard, and, therefore, cleaning is necessary. Roofs with a slope of 45 ° or more are self-cleaning.
Many owners of summer cottages or country houses, sooner or later, decide to build a gazebo. different materials, including wood, brick, etc. However, a metal gazebo for giving with your own hands is becoming more and more popular, which is more than realistic to make.
What explains the choice of metal as the main building material, because, as you know, the same wood is much simpler in terms of mechanical processing? The fact is that a do-it-yourself gazebo made of metal for a summer residence, built according to the appropriate technology, has a number of advantages, with no shortcomings at all.
Such structures are characterized by:
- strength and resistance to mechanical stress;
- high maintainability;
- long service life;
- attractive and respectable appearance;
- compatibility with the exterior of various buildings (that is, such a design will look equally advantageous as close small summer cottages, and next to a comfortable cottage);
- reasonable price in comparison with stationary structures of gazebos made of bricks or glued beams and tongue-and-groove boards.

So, not every summer resident is able to purchase a ready-made gazebo assembled using high-quality metal rolling. Therefore, consider what the instruction is self-made structures made of metal pipes. Let's say right away that such work is quite within the power of any person who has a small set of plumbing tools.
Features of self-construction of metal structures

Before starting construction with your own hands, you need to stock up on the appropriate materials and tools.
You will need:
- metal pipes of square and rectangular cross-section;
- self-tapping screws;
- components for the preparation of concrete;
- corner Sander Angle grinder (grinder);
- welding machine;
- a screwdriver with the function of an electric drill and a set of drills for metal;
- water or laser level
- plumb line;
- square;
- roulette;
- shovel and bayonet shovel;
- accessories for the preparation of concrete.

Like any construction, summer cottages they are made of metal with their own hands, starting with project development and budgeting. A simple drawing of a summer cottage can be sketched on paper yourself, indicated the appropriate dimensions and calculated how many materials are required.
If self-development of the project makes it difficult for you, the drawings can be found on our portal.
Do-it-yourself metal construction of a gazebo for a summer residence is a complex work, which includes the following steps:
- search for a place for installation;
- marking and cutting of material;
- frame assembly;
- installation of structural and decorative elements;
- anti-corrosion treatment of the finished structure.
Choosing a place for construction
A do-it-yourself gazebo in a dacha made of metal is built on dense leveled ground. For this reason, we mark the perimeter of the future structure on the site and identify all the irregularities.
The identified irregularities are eliminated with a bayonet shovel. In addition, we carefully ram the soil throughout the site. For these purposes, a homemade rammer is ideal, made from trimming a log up to 1.5 m long with a handle attached to the upper end.
Related articles:
Marking and cutting of material

There is a common expression: measure seven times - cut one. This is just about what we have to do. You need to carefully read the dimensions given in the project. After that, it remains to measure the design dimensions on the pipes.
Important: When working with angle grinders, you must follow the safety rules.
That is, you need to work in protective gloves, goggles and, if possible, in a respirator.
We lay out the cut pipes separately - we put the elements of the main frame in a separate pile, we put the scraps in another pile, which will go for the racks of the purlins and screeds.
Important: To save money, the cross-section of the pipes can be reduced in the direction from the main frame to the roof frame.
That is, it is advisable to use the thickest pipes in the lower part of the gazebo, in the middle of the pipe of medium thickness, etc.
Assembling the main frame
The assembly of the gazebo frame begins with the installation of vertical posts, which will bear the main load.
- Along the perimeter of the gazebo, we mark the places for installing the supports and dig holes 1 meter deep. To simplify the work, you can use a hand drill.
- After the pits have been dug, we cover the end of the pipes of the main frame with bitumen mastic and set them in place, securing them with props.
- Next, we prepare cement-sand mortar at the rate of 3 parts of cement to 6 parts of sand. To save money, 4 parts of fine crushed stone can be added to the resulting solution. The mixture is thoroughly mixed in a concrete mixer until a homogeneous consistency is obtained.
Important: In the absence of a concrete mixer, concrete can be prepared in a trough, stirring with a shovel or garden hoe.
- Pour the ready-made concrete into the pits in which the pipes are installed. You need to fill up the solution just above the ground level. In order to prevent the solution from spreading to the sides, formwork in the form of a ring is made around the pits from improvised means.

- After about two days, the supports from the supports can be removed and the installation of other structural elements can be started.
- In the upper part of the supports, we weld horizontal arcs that connect the parallel supports. On this, the manufacture of the main frame can be considered complete.
Important: Before proceeding with the installation of secondary fasteners, you need to make sure that the main frame is welded tightly enough and firmly held on its base.
- After the main frame is made and you are convinced that it is strong enough, we proceed to the installation of fasteners for the roof. As a rule, these elements are corners and plates, which are welded at the attachment points. roofing material.
- Further in fasteners we drill holes for self-tapping screws.

- Then, we lay the roofing material, for example, a polycarbonate sheet and fasten it with self-tapping screws. If desired, polycarbonate can also be used to decorate the side walls.
Important: To save money, furniture in the gazebo can also be assembled and welded from pipes and trimmed with boards.
Features of welded works

The quality of welding is largely determined by the type of welding machine, the type of electrodes used, the composition and grade of steel, the shape of the pipes, etc.
As a rule, the assembly of summer cottages is carried out using an inverter-type welding machine. When assembling the frame, the pipes are connected “into the corner” and “into the Tavr”. The success of welding depends largely on the preparation of the pipe ends.
Before starting welding, the following preparatory work will need to be done:
- stripping pipes from dirt, debris and oxides;
- trimming or straightening the ends with deformation;
- cleaning the edges, as well as cleaning the outer and inner surfaces adjacent to the edge to a width of at least 1 cm.
We cook the joints until complete welding without interruption. Considering small thickness walls of square pipes, cook in one layer.
Metal summer cottages - designs are inexpensive, aesthetic and easy to assemble. This explains their extraordinary popularity. You can build such a structure on a suburban area in a couple of days. Of course, before that you need to decide on its shape, size, and also choose the most suitable material for cladding. Only then can you start welding the frame.
Further in the article, we will deal in detail with how to properly draft such a structure and build it with our own hands.
What are the advantages of metal gazebos
The main advantage of metal arbors is that they can be installed on absolutely any soil, even unstable ones. Moreover, if desired, some varieties of such structures, in contrast to the same wooden ones, are allowed to be transferred from place to place.
The second advantage of such structures as metal gazebos for summer cottages is the variety of designs and a very aesthetic appearance. Such structures usually have an unusually beautiful and original shape. If you wish, you can choose an option that is ideal for the design of the site, both in classic and modern, folk and almost any other style.
Photos of metal gazebos, comfortable and beautiful:


Another advantage of metal structures is the extraordinary strength and durability. A steel gazebo will not be covered with white mold, like a wooden one, will not rot and will never be damaged by insects. At the same time, iron structures are much cheaper than chopped and cobbled ones. Collecting them is also much easier.
Varieties of welded arbors
Garden metal gazebos can differ both in the material used for the manufacture and in shape or purpose.
Types of frames and cladding made of iron

Photo of a portable and stationary design
In portable gazebos, the supports are attached to the lower horizontal frame, welded from strong metal. Of course, in terms of dimensions, such prefabricated options are usually much smaller than stationary ones.
In general, metal summer gazebo can have both very simple design, and the original exclusive.


How to draw up a project
What should be the size

Mounting scheme cellular polycarbonate to the frame with a self-tapping screw with a thermal washer
Important: It is necessary to work with polycarbonate correctly. Since this material is capable of expanding when the temperature rises, the fasteners must not be tightened too much. A gap of about 1mm should be left between the sheet and the head of the fastener. It is best to use special self-tapping screws with a thermal washer.
As you can see, assembling a metal gazebo is not a particularly difficult process. The main thing is to draw up the correct project, having calculated everything exactly. The rest is a matter of technology.
A gazebo is a very important element of the country interior, which helps to make it unique, as well as to emphasize your individuality. It can be constructed from a wide variety of materials, but in this article we will focus on metal products.
If you wanted to build a metal gazebo for a summer residence with your own hands or purchase a ready-made version, then this article will help you understand the intricacies of the process and answer many questions.


The main advantages of the material
Metal is one of the most commonly used materials in construction, but there are a number of reasons that contribute to this popularity:
- Metal products can look great in a wide variety of environments, thanks to their noble appearance. There are projects of a forged gazebo to order, which you can use, or you can make it yourself, based on personal preferences, then it will become a unique instance.
- To be honest, most metal buildings often outlive their owners, and sometimes even their descendants, due to their durability.
- You can order a product from specialists, and it will be made relatively quickly, but you will have to tinker with making it yourself.
Types of metal structures
Of metal, it can be either a collapsible or a monolithic structure; in the second case, a foundation will be required. It is worth considering that the greater the weight of the structure, the more durable it should be. The following are the main types of metal arbors:
Forged. Very memorable designs that attract attention and are remembered, just such options you see in the photo.

With a frame made of metal profiles, which makes it possible to reduce the construction budget.
Country gazebos with a bent steel strip at the base are also a budget alternative.
The aluminum profile is most often used for the construction of collapsible arbors. For the manufacture of the frame, you will need a material with a square section, which is more expensive than steel.
Which option should you choose?
Fastening is carried out using bolts and threads, and if the structure is heavier, then using electric welding.
A clear advantage of the collapsible design is the ability to store it in a closed place during the cold season. And the minus is that the bolts will have to be tightened regularly, and this will damage the protective coating, therefore, with a high degree of probability, rust will appear in these places and the material will begin to collapse after some time. In addition, the cost of such a rack can be even higher than that of a monolithic one, given the number of precise holes and threading.
The welding process allows you to simplify the assembly, it is enough just to connect the individual elements together and weld them into a frame, and then treat them with an anti-corrosion compound.
The monolithic version, of course, is more reliable, as well as durable, it will require welding work.


Build style
Recently, gazebos made in an oriental theme are gaining more and more popularity due to their original and memorable design. You see just such an option in the photo.

East style
Classic variations never go out of fashion, summer residents have preferred them for many years. Such a gazebo is a carved flowing structure, look at the example in the photo, maybe you will like it.

Metal profile construction
"Green" gazebos, covered with ivy or other, look very beautiful and naturally fit into the landscape of the cottage. In addition, this option will create a cool corner in the country where you can hide from the heat in summer and calmly rest.
Choosing the right foundation
Suitable as a basis for a collapsible gazebo metal pipes that should be treated with an anti-corrosion coating. A stationary structure requires the support legs to be deepened into the ground by at least half a meter.
Heavier metal structures need a more solid foundation: a pile or tape option is suitable. And don't forget about waterproofing!
Assembly stages
Since the installation of a collapsible gazebo is more suitable for do-it-yourself work, we will consider it exactly. Remember when proper care, a collapsible design, as well as a monolithic one, can serve you for many years. Let's walk through the assembly steps step by step:
- To begin with, you should sketch a drawing of the future structure on paper, with all sizes and scales. Such projects help to determine the type and location of the building, as well as provide for important subtleties.
- We find a suitable place for placement.
- We make a rectangular base from a metal profile (the base can be any other shape you choose, for example, round or octagonal). We cut all sides, based on the drawing, and then we connect by welding.
- We weld a piece of a profile pipe to each top of the base.
- Then we attach the rafter pipes, always at a ten-degree angle with respect to the horizontal upper part of the frame.
- After we lay the crate for the future roof.
- In the end, it is worth doing the inside: place benches, a table, a barbecue and other interior items.
Metal is a very practical material, but it corrodes over time. To prevent this, or at least to minimize it, it is necessary to carefully paint over the gazebo. Color palette you can choose based on your preferences, but it is worth considering a number of paint requirements to achieve the best result:
- Powder paint is an excellent option for, the surface will look very beautiful, but it is difficult to carry it out with your own hands, so you should seek help from specialists.
- If you still decide to save your budget and do everything yourself, cover the surface with hammer paint or resistant nitro enamel, just remember to prime the entire metal surface first.
Important! To carry out high-quality painting on your own, it is best to use a compressor with a spray gun, otherwise, the paint may lie unevenly.
Decoration of the building
When the most crucial stages are over, the moment comes to think about the design of the resulting structure. In this case, your imagination is not limited by anything, focus only on your own taste.
You can decorate it with curtains made of dense material, as in the photo, it looks beautiful and even somehow mysterious.

Or wrap it in bloom with roses, as in the photo, this decor will certainly delight the eye in summer.

And also decorate with custom-made forged parts. Or leave everything as it is, the metal gazebo looks great.

Thus, we have considered the key points that will help in creating a unique and memorable gazebo for giving with our own hands. Then it all depends on skill and preference. Decide on an option and implement it, following the above recommendations.
On a sunny hot day when the walls country house warm up thoroughly and do not give the desired coolness, many of us often have a desire to find a place to relax on fresh air... A good solution for arranging such a cozy corner in the open air will be a do-it-yourself metal gazebo. The graceful design will not obscure the picturesque landscape or the view of the house and will be an organic addition to the architectural ensemble.
Beautifully designed metal gazebos for summer cottages, acting as an aesthetic addition landscape design, are able to emphasize the taste of the owner. Variety of shapes and sizes of metal garden gazebos striking. The decoration of suburban areas is becoming both traditional round, square, six- and octagonal gazebos, and original designs the most unusual design solutions.

Depending on the designer's ideas, the gazebos can be decorated with a wide variety of decorative elements: artistic forging, hanging pots with ampelous flowers ...
The main advantage of metal gazebos for summer cottages is their strength and durability. Convenient designs can regularly serve for more than one season. The only thing that is required to extend their service life is to periodically inspect and promptly clean areas that show signs of corrosion.
The rigidity of the frame of metal arbors allows you to prevent changes in geometric dimensions, which often arise due to uneven soil subsidence under the influence of seasonal changes.

Depending on the constructive solution and functional purpose of the gazebo, any attributes for recreation can be installed on the covered area, starting with garden furniture and finishing with a brazier or a barbecue oven
Roof design options metal frame also many: slate, metal profiled sheet, polycarbonate ... The choice is limited only by the preferences and material capabilities of the owner.
The gazebos can be either permanent permanent structures or portable temporary structures. In the first case, they are installed on a base: slab or columnar foundation... Portable structures, which are easy to dismantle and remove with the onset of cold weather, are installed directly on the ground.
A hand-made metal gazebo is at least a reason for the pride of its owner. Therefore, we propose to consider the main stages of construction of a structure that is so necessary in the economy.
The hexagonal gazebo is a classic that has not lost its relevance for several decades. Such a cozy design has a number of undeniable advantages, the main ones among which are: elegance, spaciousness, strength and ease of construction.

Such an eight- or hexagonal structure is analogous to a round gazebo model, but unlike the latter, it is much simpler in terms of construction
There is nothing difficult in making a metal gazebo yourself. To do this, you just need to have specialized tool and have minimal plumbing skills.
Step # 1 - Prepare All Necessary Materials
To make a metal gazebo you will need:
- Hollow pipes with a wall thickness of 2-4 mm for structural racks (rectangular or square);
- Mounting brackets;
- Sheathing rods;
- Roofing material (wave polycarbonate, soft tiles ...);
- Lining for wall cladding;
- Brace or garden drill;
- Electrodes;
- Drills for metal;
- Building level;
- Sand and cement;
- Metal paint.
Among the tools we need: a grinder, a welding machine, a hammer drill or an electric drill, galvanized screws and a screwdriver.
Step # 2 - site selection and foundation preparation
The main condition for choosing a place for arranging a gazebo is for the owners and guests to feel cozy and comfortable here, admiring the most beautiful views at their summer cottage.

Any place for arranging a gazebo on the site can be chosen: under the canopy of trees in the garden, near a reservoir or not far from the entrance to the house
Thinking over the design of the gazebo, you need to decide for yourself whether it will be an open blown or closed version, with or without lighting. To visualize the project and determine the dimensions of the future structure, it is advisable to make a drawing of the building. A drawing made to scale will allow you to correctly calculate required amount pipes for installing the main frame, and additional ties of a smaller section for arranging the roof and crossbars.
Determination of the dimensions of the doorway:
- the height is calculated based on the average human height (1.8-2.0 meters);
- opening width is approximately equal standard size doors to the apartment (0.9-1.0 meters).
We clear the site chosen for arranging the gazebo from debris and tree roots.
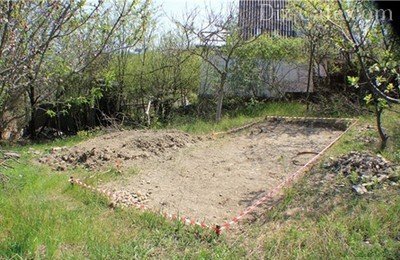
From the site cleared of debris and plant residues, we remove the fertile soil layer, which we use for pouring into flower beds and leveling differences on the site
After clearing the site and removing a 15-20 cm layer of earth, fill the bottom of the formed "pit" with a 5-8 cm layer of sand, water it with water and tamp it thoroughly. On a sand base, you can simply lay out paving stones or paving slabs, or build a concrete platform. To do this, we form a formwork from the boards, fixing it with pegs driven into the ground on the outside. Fill the site with concrete and leave it to solidify for several days.
When arranging a site with an area of more than two square meters, it is necessary to provide for expansion joints. To do this, we install the formwork boards, maintaining an interval of 1 meter, and fill the space cement mortar... After the concrete has hardened, we remove the boards, and seal the cracks and voids with a liquid solution.
Step # 3 - installing support legs
After completing the work on the arrangement of the floor, we set marks around the perimeter of the site where we will place the support pillars. The number of racks should correspond to the number of corners of the gazebo.

To erect support posts in designated places using a brace or a garden drill, we dig holes about 80 centimeters deep
It is advisable to deepen the support posts below the level of soil freezing, which is from 80 -100 cm. The bottom of the dug holes is covered with a layer sand and gravel mixture... In the center of the holes we set metal poles... Using the level, we determine their verticality, and then fill the voids with cement mortar.
Another option for the construction of racks is also possible, in which a columnar foundation is installed in designated places at a depth below the level of freezing of the soil - concrete pillars with mortgages. Metal pillars will be welded to these mortgages.

After installing the vertical posts, horizontal crossbars can be welded to them, which can be metal pipes or rods.
The veins are placed in two rows, the width between which is 1.2-1.5 meters. In the future, sheathing (boards, lining, polycarbonate) will be attached to them.
The metal structure can be assembled using self-tapping screws and bolts, or by welding. The choice depends only on whether the owner knows how to work with a welding machine or whether he has the opportunity to invite an experienced welder. The main advantage of the bolted connection is the ability to dismantle the structure for the winter. But at the same time, do not forget that during the operation of the structure bolted connections will have to constantly tighten.
Step # 4 - arranging a hexagonal roof structure
So that the water flowing from the roof does not flood the structure, we place the transverse logs so that they come out by 50 cm from each end.

To equip the correct eight- or hexagonal roof, we weld the transverse beams to the support posts, placing them at a distance of two meters from each other

We weld the logs to the metal crossbars, and then, focusing on the level, we apply and fix the rafters
The simplest option for arranging the roof is sheathing with polycarbonate sheets. To do this, we make holes in the metal rafters for fastening the roofing material. In order to correctly set the first sheet of the roof, we lay two sheets, we calculate and set the desired angle and offset. After that, we remove the first sheet, and fix the second with screws. We fasten all sheets of the roof in turn, to give rigidity, fastening them together through two waves.
Video examples of the construction of other structures
Example # 1:
Example # 2:
The gazebo is almost ready. It remains to attach the side panels and paint the metal frame elements. The finished structure can be painted by powder coating. Good result gives also the traditional version of painting, in which a layer of primer is first applied to the surface, and then paint on metal.