The sequence of renovation of a kitchen with a stretch ceiling. Where to start renovating the kitchen: sequence, choice of materials
Sooner or later, but the moment comes when the owners of the apartment begin to think closely about major repairs, alterations, modernization of their kitchen. Someone just got tired of old dilapidated walls, ceiling, worn out furniture. Someone is not satisfied with too little, in his opinion, the functionality of the room. Someone wants to optimize tight spaces to the maximum. In any case, the renovation of a good kitchen results in a fairly large-scale and expensive event.
In addition to the fact that you have to acquire a lot building materials good quality, select new furniture and kitchen appliances, carry out or update communications, a very significant part of the costs should be planned for the remuneration of specialists. Is it possible to save money on this by making a kitchen renovation with your own hands?
To make such a bold decision, you need to be very clear about the amount of work that you have to face. The purpose of this article is to give the reader an idea about the specifics of repairs in the kitchen, about the nuances of arranging this room, so that you can really assess your strengths and capabilities before starting work.
Why is the kitchen so special?
The kitchen almost always has a special "status" in comparison with other areas of the apartment, and special requirements are imposed on its equipment and decoration.
- Housewives spend a very significant part of their lives in the kitchen. This means that it is necessary to create the most comfortable conditions for this. It should be warm, good lighting required, and drafts should be prevented.
- Food preparation should be carried out as clean as possible. This means that it is necessary to make the premises meet the accepted sanitary standards. The kitchen is cleaned almost after every use and should therefore not be overly difficult.

- All the necessary communications should be laid in the kitchen - water supply, with cold and hot water, sewerage, gas main (if the house is gasified), electrical wiring of the required power.
- The products used for cooking often leave oily, greasy traces, and can be quite chemically aggressive. At the same time, the danger lies not only in the direct hit of such substances on the surface of the floor and walls adjacent to the working areas - one cannot but take into account the abundant fumes that are inevitable during thermal cooking. This means that even the ceiling is not completely insured from such an impact. Materials for finishing all surfaces of the room and kitchen furniture must be selected so that they are not afraid of such influences and can be easily washed.

- At the same time, the kitchen is a room with high humidity - this must also be taken into account when choosing finishing materials. Whatever one may say, no one in the kitchen can be insured against liquid spills on the floor - hence the increased requirements for waterproofing.
- To minimize Negative consequences fumes and maintain a comfortable atmosphere in the kitchen, it is difficult to do without an exhaust system and / or autonomous air purification.
 Required element kitchens - effective ventilation
 - Modern kitchen full of technology, without which many housewives can no longer imagine their life. A thoughtful placement of devices and their correct connection is required, taking into account the safety rules of operation.
- The very room of the kitchen and the placement of all the necessary elements in it should be thought out to the smallest detail - the owners should be as convenient as possible to use it for its intended purpose.
- Another important point is that in the vast majority of families, the kitchen is by no means just a cooking room. Usually this is a kind of "family club" where a lot of topical internal issues are resolved and where "get-togethers" are held with the closest relatives and friends. And this means that, if possible, a cozy corner should be provided where you can comfortably sit. Yes, and the entire decoration of the kitchen should be such that it is pleasing to the eye, and so that it would not be ashamed to receive guests there.

And all this, as mentioned above, needs to be organized, most often, in conditions of a very limited area of the premises, where you will not particularly "run away". So the task is very difficult.
What is to be done?
Actually, the kitchen renovation itself can be divided into many stages, each of which is important in its own way, but more often it is mandatory, with one or another variation. It is enough just to list these stages to make it clear how ambitious the overall task is. So, "on the way to the finish line" is the following:
- Freeing the premises - usually it is required to be carried out in full, otherwise it is difficult to carry out measurements and planning.
- Checking the condition of walls, ceilings, floors, windows and doors, communications, etc.
- Carrying out careful measurements.
- Planning the placement of large-sized stationary kitchen and household appliances.
- Preselection kitchen furniture- both in size and functionality. Drawing up a project for its placement.
- Thorough cleaning of all surfaces of the room.
- Repair (renewal) of the base floor surface.
- A similar operation is revision of the state and basic repair ceiling.
- Repair of communications or laying new ones, corresponding to the drawn up project.
- Checking the status of ventilation, possibly making changes to its design.
- Replacement or thorough restoration of windows and doors.
- Finishing work, towards top down: ceiling, walls and finishing flooring with the installation of skirting boards.
- Installation and suspension of stationary equipment, furniture, lighting fixtures.
- Connecting and checking the performance of all systems.
Now it makes sense to consider these stages in more detail. However, not everyone will be treated equally. great attention: some of them are simple and intuitive, do not require special explanations, others are related to technological processes, which are described in great detail and intelligibly in special publications of our portal (the corresponding links will be offered to the reader). But certain specific points require a really close look.
Primary activities
Assessment of the general condition of the kitchen
It is impossible to plan the repair correctly without conducting a thorough audit of the condition of the room - walls, floor, ceiling, communications. And it will be possible to carry out such a deep check only after the kitchen is completely freed from furniture and equipment, since in most cases it will be necessary to remove the old floor covering. Ideally, renovations are best done when the family is temporarily living elsewhere. If this is not possible, you will have to somehow get out of the situation - temporarily leave the old stove in place, there is water in the bathroom, and even a small work table can be moved wherever you need it.

After that, it will be possible to t briskly assess the condition of the room - is there any point in leaving something in its original state, or is it still required a more radical approach. It is necessary to tap all walls to identify weak, unstable spots. It has already been mentioned about flooring - in 99 cases out of 100, dismantling will be required. The condition of windows and doors is assessed - is it worth repairing and restoring them or is it easier to install new ones. The same applies to the heating radiator - perhaps old battery will not fit into the conceived concept of the kitchen interior.

It is necessary to assess the condition of water mains and sewerage systems - whether they need replacement, transfer to another place, complete alteration in connection with the planned installation, for example, a column or a boiler.
The location of the outlets and their condition should be assessed. True, if repairs are carried out with the installation of new kitchen appliances, then, Most likely, the wiring will have to be redone to suit the increasing load.
After the room is vacated, it will not be difficult to carry out thorough measurements of all the parameters of the kitchen - to the smallest detail. it — necessary condition for further planning.
Measurements
It is necessary to draw on a sheet of paper at least an approximate plan of the kitchen so that you can transfer the results to it directly during measurements. Subsequently, the plan can (and even should) be "cultivated".
What parameters are subject to mandatory measurements:
- The length and width of the room. The distance between the opposite walls is measured, preferably not only along the wall perpendicular to them, but at several points. Do not be too lazy to measure the diagonals to compare them - this will help you to find out exactly whether the correct rectangle lies at the base. If the room has a complicated shape - with a niche or part of a corridor, this is also transferred to the plan with all dimensions
- Height from floor to stream.
- The location of windows and doors - their distance from the walls, length and width, the direction of opening the sashes, for a window - the height of the window sill.
- Location heater(batteries) tied to the wall on which it is located, the passage of the heating riser and the pipes to which the radiator is connected.
- The specific position of the gas riser, the meter (if any) and the mounted branch pipe with a tap for connecting a gas stove.
- Input location water pipes and sewerage. If a transfer is planned, then on the diagram it will be possible to mark their desired position.
- The size and position of the vent.
- The exact location of power outlets, general lighting switch in the kitchen.
- If there are other stationary elements in the kitchen (for example, mezzanines above the door, etc.), then they are also applied to the diagram.
For convenience, the reader is offered an approximate graphical diagram of the required measurements:
 Measurement scheme. Decoding - in the table below
 | Designation on the diagram | Parameter |
|---|---|
| NS | Length (width) of the room at the level of the base of the kitchen furniture |
| Y | - at the level of placement of tabletops |
| Z | - at the level of suspension of kitchen cabinets |
| Such measurements are necessary, since these three values are not always equal to each other, and this can cause certain difficulties when placing furniture, for example, if the room narrows upwards. The corresponding levels are indicated by the following symbols: | |
| - a- the height of the base, usually 100 ÷ 150 mm; | |
| - b- countertops height, 820 ÷ 870 mm; | |
| - with- top of kitchen cabinets - 2100 mm | |
| H | Total room height |
| D, G | The position of the gas riser relative to the corners, above and at the level of the connection point of the stove |
| V | The height of the ventilation outlet. Its size and position relative to the corner are immediately measured. |
| R | Position of the window relative to the corner of the room |
| U | Dimensions (length and height of the window) |
| Similar measurements are taken for a door not shown in the diagram. | |
| k and h | The height of the window opening and the height of the sill above the floor level |
| W | The location of the heating riser. At the same time, the position and dimensions of the battery itself (if necessary) and its connection points are measured. |
After carrying out all the necessary measurements, you can proceed to planning the placement of the kitchen.
Kitchen layout planning
The process of planning a future kitchen will require the owners to concentrate all their creative powers. The work is carried out with the expectation of many years of use without additional alterations, so the haste in this matter is absolutely inappropriate.
Surely the owners already have some established preferences for the water of kitchen furniture, a refrigerator, a gas or electric stove or a hob. This means that it will be necessary to determine exactly whether this choice corresponds to the size of the kitchen, and how it will be more correct to organize the placement of all items in the room, with the expectation of the most comfortable operation and taking into account the existing rules.
How to approach planning from a practical point of view - everyone decides for himself. People with artistic talent prefer to make sketches in color - this way it is easier for them to imagine the future interior of the kitchen.

For lovers of the modern approach, with the appropriate skills, a lot of computer applications have been created, from purely graphic programs (such as CorelDRAW) to real engineering CAD, allowing you to work, including with 3D layouts.

You can do it differently. It is easy to glue a layout of a room on a scale of, say, 1: 10 from a piece of packaging cardboard (1 m of a real room = 10 cm on a layout). On the same scale, models of large household appliances that will be placed in the kitchen and pieces of furniture are cut from a piece of foam plastic.
“Playing with cubes”, that is, moving objects around the “kitchen” and hanging “cabinets” with a piece of plasticine, it will be possible to arrive at an optimal arrangement.
Things to consider:
- The gas riser cannot be moved. True, flexible gas hoses up to four meters long are now allowed, so the owners have a certain degree of freedom with the location of the stove.
- Plumbing and sewer pipes no one forbids building up or completely laying new ones. At the same time, the permissible length of flexible hoses for connecting the mixer in the sink should not exceed 1.5 m (the less - the better, since this is always a vulnerable area ).

- For safety reasons, a gas or electric stove should not be located near a window or near a sink. Also absolutely unacceptable her neighborhood with tall vertical kitchen units and a refrigerator.
- If planned exhaust ventilation, then it is more expedient to place the stove as close as possible to the vent so that you do not have to pull a long pipe or box.
Now let's move on to the comfort of placement.
There is a concept of the "kitchen working triangle". This is a conditionally limited space, which accounts for the bulk of the hostess's movements during the cooking process. Usually such a triangle is defined by three "vertices" - gas stove, sink and refrigerator.
 The working triangle of the kitchen is the area where the hostess's activities are concentrated when cooking
 It is clear that the kitchen will be the more comfortable, the less unnecessary movements the hostess will have to do in the process of work. But, at the same time, it should not be too tight to constrain movements and prevent accidental touching with hands or body to dangerous places (plate) and other objects. Usually, a triangle is considered close to the ideal, in which the sink is located approximately 1 ÷ 1.2 m from the stove and 1.2 ÷ 2 m from the refrigerator.
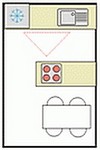
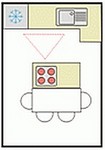
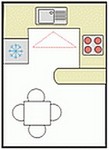
It is clear that in practice it is far from always possible to achieve the ideal. Depending on the configuration of the room and its area, one of the basic schemes is selected, which can be slightly varied applicable to specific conditions. Thumbnails of such schemes are presented in the table. The red line marks the kitchen's working triangle.
| Scheme | Short description |
|---|---|
 | Linear arrangement. Typical for narrow or elongated rooms. The triangle turns into a line, with a sink, refrigerator and stove at the edges in the center. Suitable for a wall length of 2 to 3.5 meters, otherwise it will be either very crowded, or the extreme points will be too spaced apart. |
 | Corner, L-shaped arrangement, usually used in typical small kitchens, although it is perfect for a spacious room. Even in the tightest conditions, it becomes possible to select a dining area that does not intersect with the working triangle. |
 | Two-row layout. It can be as shown in the diagram, or with the arrangement of rows along opposite walls. The latter is relevant in those rare cases when a through passage is organized through the kitchen. |
 | The U-shaped placement spans three adjacent walls. One of the most successful locations, if the area of the room allows, since there should be a space of at least 1.3 ÷ 1.5 m between opposite rows. |
 | Island location - either a sink or a stove is placed in the center of the room. It is clear that such an arrangement is possible only in very spacious kitchens, and, frankly, it is designed for an amateur. |
 | The G-shaped or peninsular arrangement implies a protruding part that separates the workspace from the dining area. Often a bar counter is used for this purpose. It is clear that the area of the kitchen should be very impressive. |
Drawing up a project and selecting suitable pieces of furniture and kitchen equipment for it will certainly take a lot of time. However, without this it is impossible to move on in any way. The laying of communications is ahead, the wiring of power lines - all this is often associated with dirty and dusty work on slashing walls and even floors, and you need to clearly know what and where should be done.
If the planning is successfully completed, proceed directly to the practical repair work.
Video: some interesting ideas for a small kitchen
Repair work
Cleaning surfaces
If the repair is carried out in the kitchen, which has served a lot earlier, then the surfaces of the walls and ceiling, doors and windows are surely saturated with old fumes, which must be gotten rid of.
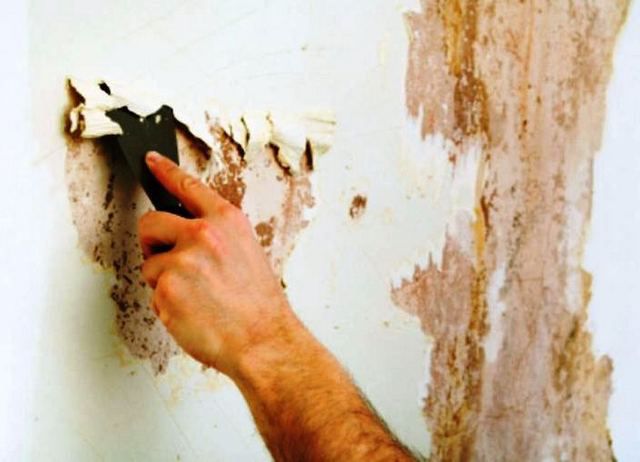
All the old covering is removed from the walls - whether it be wallpaper or painting, tile cladding (if it is not supposed to be left). In matters of cleaning, there is no single advice - all possible means are used: spatulas, scrapers, moistening the wall or firing with construction hair dryer... If areas of swollen plaster are revealed, then they are mercilessly beaten off to the base of the wall. Similar actions are taken on the ceiling - weak and dirty places should not remain, even if you have to reach the bare brick (concrete) of the wall or floor slab.
It is recommended not to be limited to cleaning, but also to thoroughly rinse the surfaces with a solution that is made from water and kitchen detergent(1:20) with the addition of vinegar. Cleaning is carried out with a metallized sponge, and then washed with clean water at least twice.
After the surfaces are cleaned and washed, it is advisable to carry out the first stage of their "treatment" to treat them twice with a penetrating antiseptic effect. This will give not only a disinfecting effect - temporary strengthening of surfaces will be achieved, before finishing work.
 All surfaces must be "treated" with an antiseptic primer
 In the event that the old wooden windows and the doors are planned to be left, then all their surfaces are also cleaned of old paint- washing, scraping, firing, grinding, etc.
Prices different kinds primers
Primer
Preliminary preparation of the floor and ceiling
On the floor, as a rule, the old coating needs to be replaced. It is dismantled, the debris is taken out, and the condition of the surface is carefully examined. Very often you have to beat old screed to get to the "healthy" floor slab.

It will be extremely inconvenient to carry out further work, having an uneven floor under your feet after dismantling, therefore it is better to immediately start the screed device. It is poured in such a way that the thickness of the planned topcoat is taken into account.
Skirting boards remain. The peculiarity of their use in the kitchen is that they are not only a decorative element, but also protect the junction of the floor and walls from moisture and dirt entering the corner. This imposes special installation requirements on them - the skirting boards must be mounted to the walls not only on fasteners, but also on an airtight continuous adhesive base (for example, “liquid nails). There should be no gap between the wall and the baseboard. If, nevertheless, a small gap remains (due to the slight curvature of the wall), then it should be sealed with a sealant matched to the color.
 Installation of plinth on "liquid nails"
 Installing wooden skirting boards is not worth it - they do not like high humidity. There are many different models for sale made of plastic or other composite materials.
Floor coverings prices
Floor coverings
⃰ ⃰ ⃰ ⃰ ⃰
In fact, you can "put a point" - the repair of the kitchen can be considered complete. It remains to import the selected and household appliances, carefully unpack and consistently install at the planned places. Installation and connection are carried out in accordance with the instructions supplied with the products - but this is beyond the scope of our article.
This is an approximately "thorny path" for the owners who wish to make repairs in the kitchen on their own. It is worth assessing your capabilities very well, and it is possible that the choice will still be made in favor of calling qualified craftsmen. However - "it is not the gods who burn the pots." Be bold!
Video: transforming a small kitchen
Like any other room in an apartment, the kitchen often needs renovation. And sometimes more often than bedrooms, hallways or living rooms. In the kitchen they prepare food, eat, communicate, in general, the kitchen is one of the most popular places in the house. Therefore, the frequency of renewal of kitchen rooms increases.
Surface preparation
Where to start renovating a kitchen? First of all, you need to level the walls and floor. The walls should be leveled with plaster so that the cabinets kitchen set during installation they hung evenly, without noticeable distortions.
The floors, if they are concrete, are leveled with a screed and a finishing leveler. Subsequently, you can lay any covering on them, for example, tiles.
If the floors are wooden, then slight distortions are not very terrible, it is enough to fasten the boards with plywood. It is not recommended to lay tiles on a wooden floor, it is better to use linoleum, PVC tiles or laminate.
The final stage of kitchen renovation is the installation of a kitchen set. But before that, it is necessary to carry out a number of preparatory work and the decoration of the entire room.
Preparation works include:
- In the wiring for the hob, oven and microwave.
- In the distribution of water pipes for connection dishwasher s and fine filters.
- In laying tiles between upper and floor cabinets, that is, the so-called apron.
Kitchen renovation step by step
Using the example of one kitchen, the article will tell you about all the stages of repair.
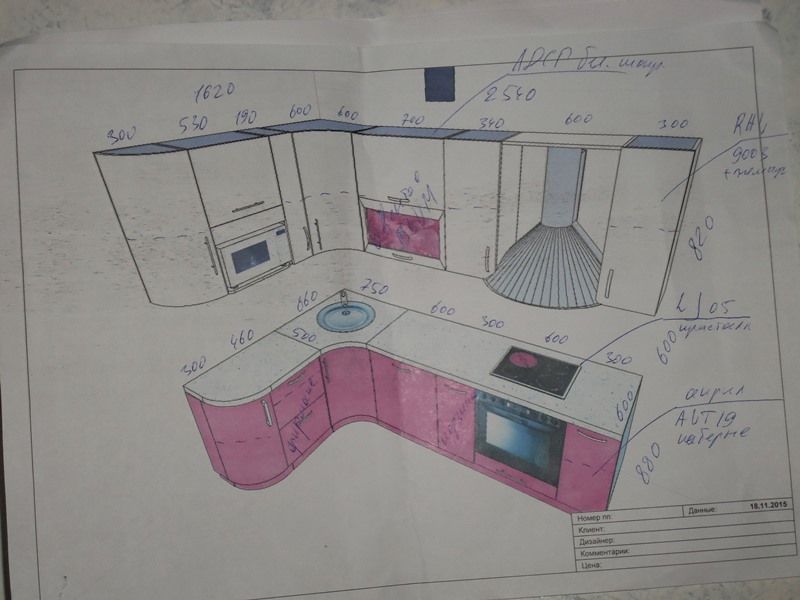
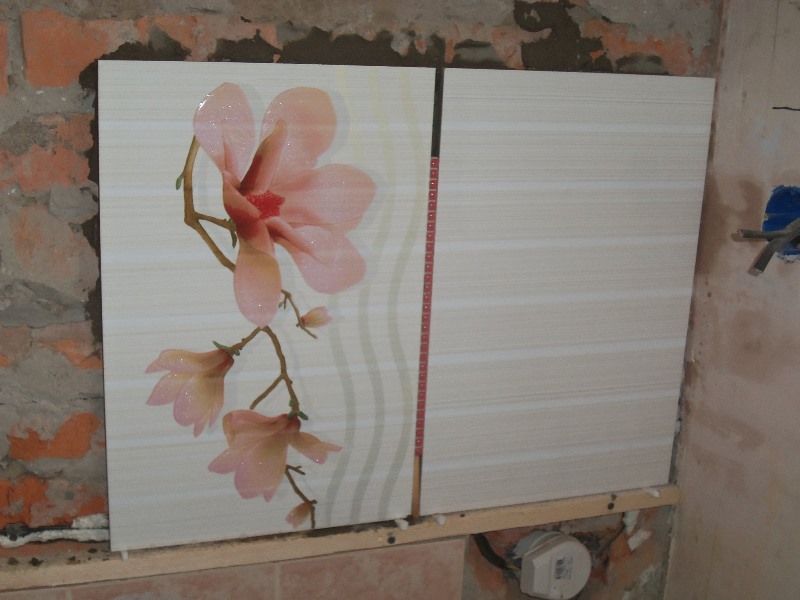
1. First, a kitchen set was ordered. While it was being made, according to the finished sketch, the places for future outlets were marked. The dimensions of the future tile apron were also applied.
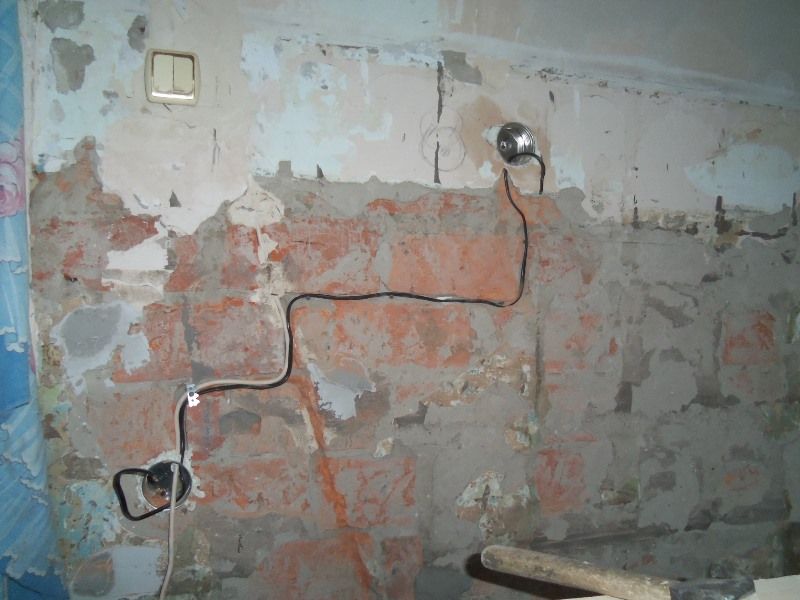
2. Then two power cables were laid from the electrical panel in the hallway. They had to be laid through the bathroom and toilet, making punches in bricks. One of the cables (VVG 3 × 2.5) was intended for powering the bathtub with hydromassage.
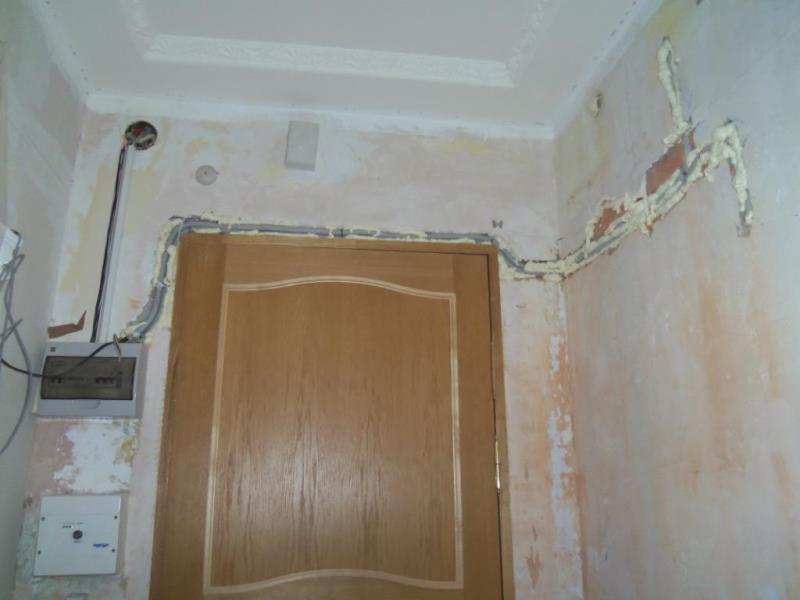
3. To connect the hob and oven a more powerful power cable (VVG 3 × 6) was used. He went to the kitchen to the place where the sockets were installed.

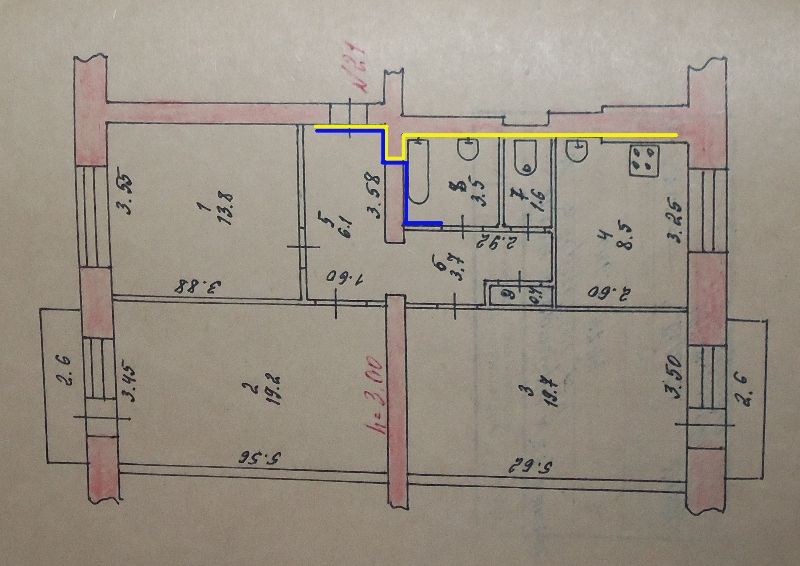
4. These cables are shown schematically on the plan of the apartment. The wire to the kitchen is shown with a yellow line, and the bath cable is shown in blue (Figure 4).
5. Subsequently, the wires were laid in corrugated plastic pipes and covered with tiles.
6. The sockets for the panel and oven had to be recessed into the wall so that they would not interfere with the later installation of the headset. I had to chisel, install sockets, plaster and lay the old tiles back in their old place.

7. Then, on the wall between the kitchen and the bathroom, a branch was made from the outlet for an additional point, to which the microwave oven was then connected.
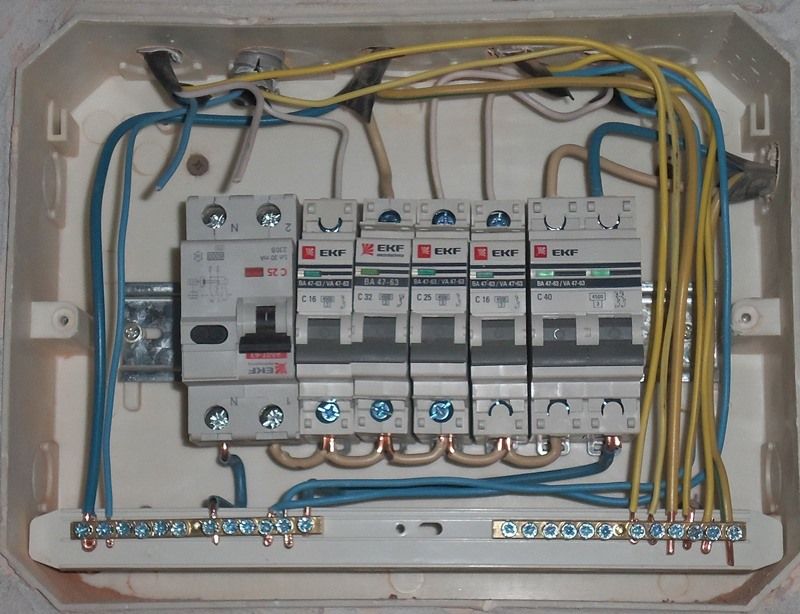
8. Two new circuit breakers were installed in the apartment's electrical panel. Connected to the machine with a nominal value of 32 A hob, and an oven for the 25 A machine.
9. Then it was laid tile around the entire perimeter of the future kitchen set.
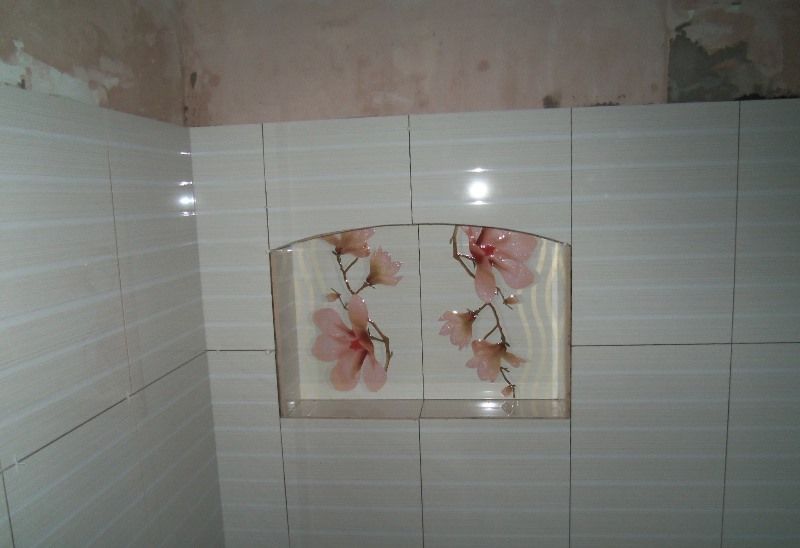
10. A decorative niche was made and also finished with ceramics.
11. The place for the future ventilation hood was laid out separately, according to the sketch.
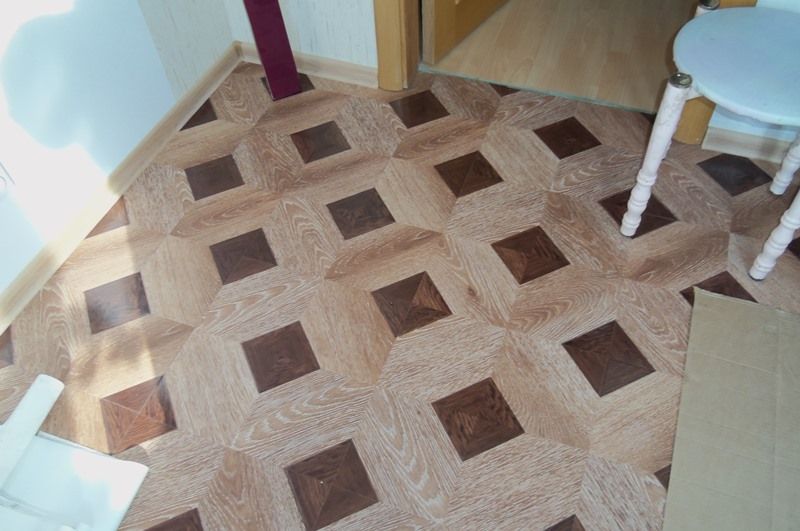
12. Since the floor in our kitchen was originally made of wood, it was decided to lay a laminate.
13. A little earlier, the floor was covered with plywood sheets, and they were fixed with self-tapping screws.
14. After wallpapering and installing the skirting board, the kitchen was finally installed.
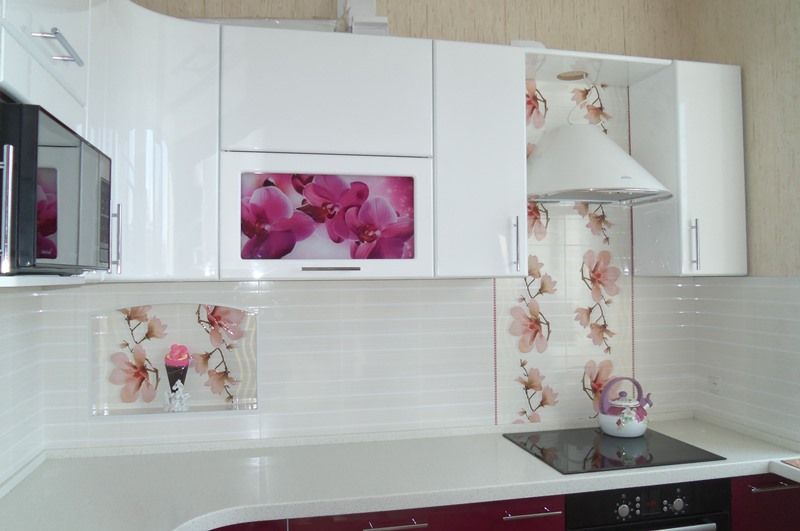
15. The microwave took its place in the niche intended for it, was connected and tested.

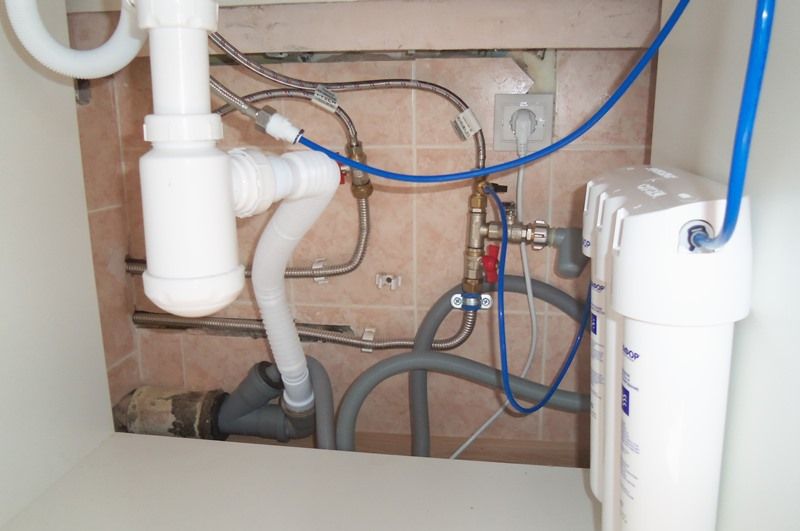
16. When a sink with a mixer and a tap for clean water was installed, it was time to connect fine filters and a dishwasher. This operation was done to the previously connected pipelines using tees and adapters.
17. Then we connected and tested the hob and oven.
18. The final stage was the installation of ventilation. The hood was connected to the ventilation stack using adapters.

Before you get started, you need to think over the design and ideas for renovating your kitchen. Repairing a small kitchen will differ from repairing a kitchen in a private house or in an apartment with a large area. First, make a list of what you need to do. Decide if you will be doing a redecoration of the kitchen or need a major overhaul. Find pictures of the kitchen that you like.
When you have decided on the choice of building materials, the finishing of the kitchen should be carried out in a certain sequence, excluding the return to previous stages and the alteration of any discovered deficiencies.
Kitchen renovation sequence:
- Initially, the kitchen is freed from all furniture and old communications, including electrical wiring.
- Rough work is being done on leveling and finishing the ceiling, walls and floor. If necessary, remove the old flooring.
- At the same stage, all windows and doors are replaced, if necessary.
- New communications are being laid.
- Ceiling installation, wall decoration, flooring are being carried out.
Where to start renovating a kitchen:
- Laying new pipes, installing water meters (if necessary), connecting the heating system.
- In place of the old metal pipes polypropylene or metal-plastic analogs are installed. These modern materials they are convenient not only because they are not clogged with deposits, but also because they allow you to do the installation yourself.
Attention! It is forbidden to carry gas communications on your own!
- In the walls and ceiling it is necessary lay new electrical wiring by choosing a suitable cable cross-section. Consider supplying electricity to several places in the room, including the backsplash.
- The ceiling frame is mounted or it is leveled by plastering.
Walls must also be leveled with plaster mixes.
After the plaster hardens, the surfaces are cleaned. For leveling the walls, you can use drywall, through which even very significant irregularities are eliminated. You can install it on a prepared frame or glue. Plasterboard surfaces are plastered and sanded.
- If there is a concrete screed on the floor, then it is leveled to an ideal state. If there are boards on the floor, they are strengthened. Often the boards are covered from above with fiberboard sheets for insulation and elimination of cracks.
Until the final finishing of the premises is completed, it is recommended to replace windows and doors. It is desirable to prefer plastic windows, although some people prefer modern wooden structures. It is difficult to change windows with your own hands if you are not a master in this area, so take care of calling the measurer in advance. Please note that the windows will take about two weeks to manufacture.
The door to the kitchen can be made of any material. This is wood, chipboard, and plastic. Your choice should correspond to the general idea of \ u200b \ u200bdesigning the interior of the kitchen. The door design can also vary. This is a traditional hinged door, a sliding wardrobe model, and a folding accordion door.
External finishing
At this stage, the final finishing of the premises is carried out. Work starts from the ceiling. There, on the frame or without it, the selected material is attached (plastic, expanded polystyrene tiles), or a stretch ceiling is installed by specialists. Walls are primed, painted, whitewashed, applied decorative plaster... Or wallpaper is glued. The kitchen apron is finished with one of the selected materials.
The floor covering is laid last. If laying is done on concrete screed, then it is necessary to provide for the presence of waterproofing and insulation at the bottom of the floor covering.
There are several design options for a kitchen apron:
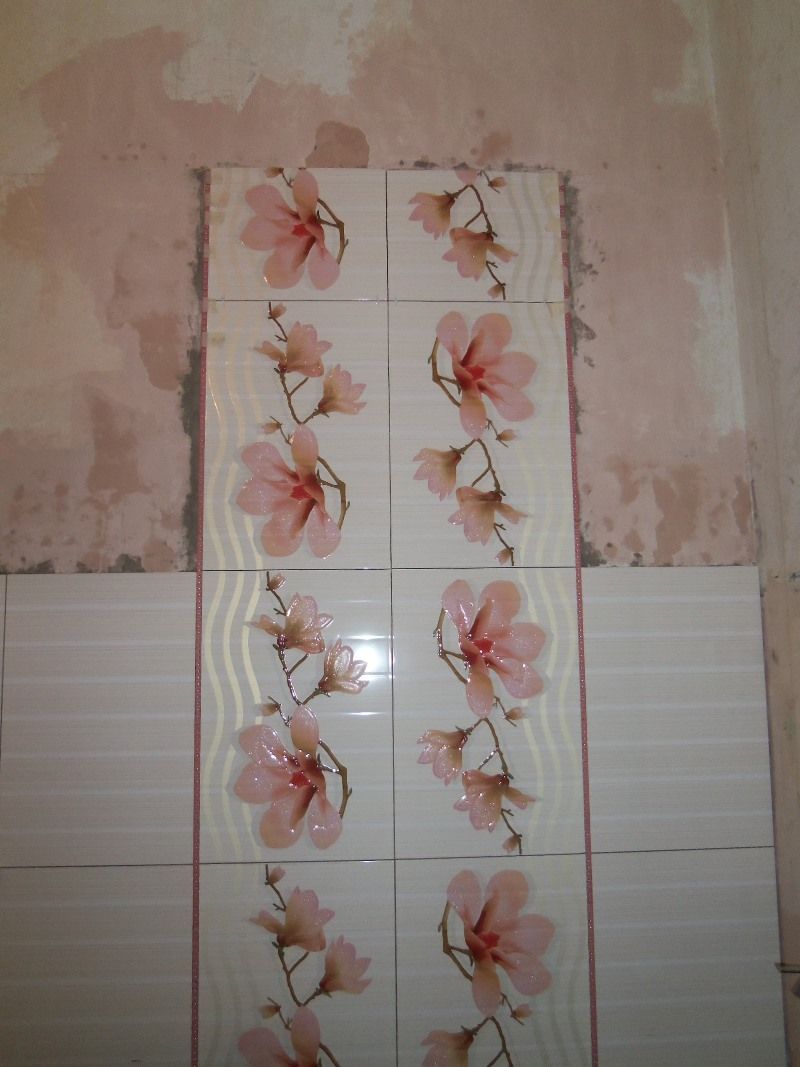
- Ceramic tile. It is durable, not afraid of dirt, easy to clean. Do-it-yourself wall-mounted. For a small kitchen, smaller tiles should be preferred. For example, 10 x 10 cm;
- Glass. This is the most progressive choice. The glass is quickly washed, allows you to create a unique backlight. On such an apron, you can place a drawing or photograph. Tempered glass is used. Option with frosted or tinted glass is possible. The absence of seams facilitates the maintenance of the apron. The disadvantage is fragility, which can manifest itself during installation or operation;
- MDF. Easily cleaned from dirt. The color of the apron can be selected based on the color of the rest of the furniture. Modern MDF panels are capable of imitating many building materials such as brick, marble, tile, stone. But there is one limitation. Since the board is made of wood, it is undesirable to use it in the presence of a gas stove.
Arranging a kitchen space is not an easy task. Probably, when the idea of reorganizing the premises arises, a lot of questions are poured in. For example, how to properly make repairs in the kitchen, how to make beautiful repairs in the kitchen, etc. There is no need to buy building materials and demolish walls at breakneck speed. You need to start with a detailed plan. We will talk about this in more detail in the next paragraph.
Do you have an idea and your own kitchen design project has already matured in your head? Before bringing it to life, think again if it fits a particular room:
- draw up a detailed plan of the premises indicating not only the locations of windows, doors, furniture and plumbing, but also communication systems; also mark on it all the architectural features: ledges, niches and arches;
- carefully measure the distance between each of the elements of future furniture and household appliances; keep in mind that for comfortable movement, the width of the aisles between furniture should be at least 90 cm; the distance between the facades of the U-shaped kitchen set is 120 cm;
- check for outlets near electrical appliances, add a few more outlets if necessary; do not forget that they will be needed not only for the refrigerator, washing machine and dishwasher, but also for small kitchen appliances;
The subtleties of repairing a small kitchen
How to make repairs in the kitchen with your own hands without spending almost the entire family budget? Probably, you can save on materials or household appliances. But this is not necessary if you are the owner of a small kitchen area. This will not affect the stages of repair in any way, everything is done using the same technology.
There are design restrictions here. To be more precise, the use of decorative elements and color solutions that will physically or visually constrict the room. These include laying walls and ceilings with plasterboard. In this case, there is a real reduction in the room by several centimeters.

Stretch ceilings will visually expand the space due to the mirror reflection of the surrounding objects. Spotlights are a good addition to stretch ceilings.
To save on materials, use the interior zoning method. Folding furniture, an abundance of vertical cabinets on the walls will help save space. For visual expansion, light the room as intensely as possible, and decorate the interior in light pastel colors.
Now you know how to make inexpensive repairs in the kitchen, photos and videos on this topic can be found on our website. Self-reliance and careful planning of the process will be the foundation for creating your dream kitchen.
For repairing a small kitchen with your own hands, the area of which does not exceed 6 sq.m. there are rules for the selection of design and furniture. First of all, it is important to choose the optimal and appropriate option that will be convenient for the hostess in the kitchen. Of course, the main purpose of such a small kitchen will be cooking, but the right design will please the eye.
Particular attention should be paid to the choice of location for the refrigerator. It should not be placed close (no closer than 15-20 cm) to a stove, oven or radiator - otherwise it will quickly fail. For the same reason, it is not recommended to place it in direct sunlight.
Renovation work in no other room of the apartment will be as difficult as in the kitchen. Unlike all other rooms, here it is important to ensure not only comfort, but also maximum practicality and durability, to choose the right combination of household appliances, plumbing fixtures, furniture and finishes. This task is not the easiest one, therefore it is necessary to approach its solution with all thoroughness.

First steps towards renovation
Perhaps the very first decision on the way to carrying out a full-fledged kitchen renovation is to understand how the result should look like, and what steps should lead to its implementation. To create a design project for renovation in the kitchen, it is not necessary to involve a professional designer - you can, after thinking well, draw up a plan yourself, however, it is definitely not worth starting repairs in an apartment without an exact plan.

In this case, it is necessary to correctly calculate the repair needs. For example, in a new building there is no decoration, but all communications, as a rule, are present, and they are new, that is, there is no need to replace them - accordingly, you just need to select equipment, furniture and decoration. If the same communications are still in good condition, but the need to change the finish is ripe, you need to find a way to dismantle the old coatings so as not to damage what is not yet planned to be replaced. As for the overhaul, in this case it is worth starting with the complete dismantling of everything, including the window block, but the sequence of further restoration should be chosen correctly.


The importance of planning
Before starting the repair, it is important not only to see the final picture, but to clearly imagine what sequence of steps the plan will consist of, as well as how many consumables will be needed, and how much it will all result in. Agree, it makes no sense to first assemble kitchen cabinets, and then replace pipes inside them- so you can ruin both, create unnecessary inconveniences, and therefore lose money.
Experienced people do not advise relying entirely on the very first master whose number you found - try to get even a little closer to specialists in the field of home repair. Repairmen, seeing an inexperienced newbie, will most likely try to sell you unnecessary goods and services, and will also provide you with a “bonus” in the form of a surcharge, so have a clear idea of what you would like to see in your kitchen after renovation, and how much it costs. Be sure to find out the prices of consumables and the cost of materials in different places - this way you will reach a fair value, and even be able to save money.

When choosing consumables, focus on the main materials that are not directly related to the decor. Only by creating a reliable and durable basis for the decor, you will be sure that you have not wasted your money., because the latter can be quite expensive and lead you astray, prompting you to save where saving is inappropriate. Even after calculating everything carefully, do not grab the phone right away - put the project in your head for a while, think over the details a few more times so that there are no doubts left. If no objections come to mind (or they have already been taken into account in the final plan), it remains only to postpone the full amount of the cost of the repair - and only now you can call the masters and agree on the exact date of the work.


Phased sequence of repair work
A little earlier, we mentioned that the correct algorithm of actions, involving the stages of performing the repair in a strict logical order, is already half the success and reducing the risk of unforeseen expenses and delays. To explain in detail how it should look like step by step order overhaul, we will briefly consider all the main types of work.


Dismantling
If the repair is carried out in a new building, that is, from scratch, and there was simply no previous repair in the room, this stage will not have to go through - there is simply nothing to dismantle. However, during a major overhaul old kitchen this stage cannot be avoided, and certain difficulties may arise already here. The fact is that this step in the repair process is usually the easiest one, as you know, to break - not to build. Many owners prefer to dismantle before repairing on their own, however, in the case of a kitchen, this is not always so simple - the same pipes without necessary tools it is not so easy to make out. If there is a man in the house who knows how to work with his hands, you can try to do it yourself, significantly saving on the services of workers, but if you are confident in own forces no, you can't do without their help. The same applies to non-capital repairs - if the task does not include the complete destruction of the kitchen to bare walls and floors, you should not risk taking apart the structures with your own hands.


An important point dismantling - garbage disposal. There is usually a lot of it, and it can be even more difficult to take it out on your own than to destroy the old finish. Removal may be a separate service, the cost of which should be specified in advance. Expect to buy dozens of bags, which will also cost you a certain amount.
Wall and ceiling preparation
In general, it would be appropriate to refer this stage to dismantling, but not everyone understands that removing the same old paint is also dismantling. All that is needed first is to clean the walls down to concrete. Many types of wall and ceiling decoration suggest installation exclusively on a perfectly flat surface, therefore it makes sense to wash the walls and ceiling from dirt, grease and mold, and also level them.


Window
This is the first stage when, during the renovation of the kitchen, we will not only break, but also introduce something new. As a rule, the dismantling of the old window and the installation of a new one are performed by the same masters, the whole procedure usually takes a little time - no more than two hours are spent on replacing one block. They begin with the installation of windows for the reason that their replacement provokes the destruction of the adjacent sections of the wall, which means that after finishing or even preparatory work, it is too late to do this. Please note that for many companies, the installation of the window itself and the repair of the slope are different services that are performed by different craftsmen, therefore you need to plan everything correctly so that further repairs do not spoil the fresh slope.


Electrician
This stage is quite difficult to plan, and it is in this part that inexperienced planners often make mistakes. Before doing wiring, you should think carefully about the configuration of electrical appliances in the kitchen - since we are doing a major overhaul, it is worth doing everything right away so that there is no need for extension cords and tees. If the electrical wiring is hidden in the walls, they should be punched out, and then the surface should be leveled, although today the wires are not always hidden inside for ease of possible replacement. It is important to bring out the ends of the wires for future outlets, switches and lighting fixtures, although they have not yet put covers on them, limiting themselves to protruding (and unconnected) contacts.


Pipes
The installation of plumbing structures in general resembles the installation of electrical wiring with the only difference that geographically these works are a little more limited. In terms of the renovated premises, you should think in advance where all the equipment that needs to be connected to the water supply and sewerage system will be located. In many modern kitchens, these communications are no longer limited to just one sink - quite often in the same room you can find and washing machine dishwashers are becoming more and more popular.


Wall and work area decoration
After the installation of communications, it's time to gradually move on to the stylistic design of the room. Start off Finishing work usually advise from above, gradually moving down - so splashes and falling fragments of finishing materials will not damage the new floor, and will not even stain it - that is simply not there yet. Materials must be selected in strict accordance with the destructive conditions that prevail in the kitchen. A prerequisite for any kitchen finish is increased resistance to high temperatures and moisture (both liquid and vapor). The part of the wall directly adjacent to the working area (the so-called apron) should have even more sophisticated qualities, for example, withstand any temperature, not burn even in direct contact with fire, and also be easily cleaned of any kind of contamination.


Floor
To protect the floor from dirt or damage from working tools, they go to putting it in order last. Refining it is perhaps the most time-consuming part of a kitchen renovation. Since during major works it is supposed to pour a new concrete screed, and it dries very slowly. It is unacceptable to start laying on a screed that has grasped incompletely - with such an ill-considered decision, you will greatly reduce the service life of the coating.


In some cases, the flooring steps are intertwined with the wall and ceiling steps. For example, if the main work on the preparation of the walls has been completed, and it remains only to paint them, but for some reason a long break is foreseen in the performance of work, you can pour the concrete screed right now. Then they switch to painting the walls after it dries, but still before laying the floor covering - by themselves, paint splashes on the screed are not terrible if they are then covered with a laminate or any other floor on top.


Arrangement of furniture, appliances and accessories
When all of the above steps have been passed, the customer has a neat and beautiful, but still empty and impractical kitchen at his disposal. Its further arrangement is divided into two stages - professional and independent. A modern kitchen is not a set of separately taken accessories - many of its components are interconnected, so the owner simply cannot cope with the installation of this entire system on his own. The final design of the same electrical system, the installation of equipment with its connection to the main communications, and even the assembly of the kitchen unit - all these are tasks that are usually entrusted to professionals. Although because of this you do not even need to know the exact order of installation, experienced people advise to be present during such an assembly - this helps to control the quality of the work itself.


The last stage is carried out independently and involves bringing the kitchen to the final condition for everyday use. It consists in arranging furniture and dishes, hanging window textiles and general ennobling of the room, and starts with a more banal thing - general cleaning. In practice, bringing the kitchen to mind can take several weeks, but you can use the room earlier - right after all the equipment has been connected, the headset is assembled, and dinner table- entered.


Major mistakes
Inexperience often turns out to be a big problem for customers who, in their zeal to do everything as quickly as possible, often face the problem of excessive and thoughtless waste of money, or even with a complete impossibility to bring their plans to life, although part of the money has already been spent. To warn readers, here are some of the most common mistakes.

The first, it is also the main mistake, is to start repairs without any plan in the hope that it will be possible to figure it out on the fly. A kitchen renovation, especially a major one, in principle, cannot be extremely fast, it will certainly take several weeks, but by doing as indicated above, you risk plunging the room into chaos for months or even years. Without sufficient information about the cost of the desired result, many owners start work that are unable to finance in full, which is why the original project has to be redrawn many times right along the way. You should not be surprised if the result with such an attitude will very little resemble what was conceived, and it’s also good if the kitchen can be used in the end, simply without inviting guests to it. In the worst case, such an option is not excluded, in which it will only be possible to break everything, and there will not be enough money for adequate restoration.

Another huge mistake is going too far ahead of making money into consumables. Even with very careful planning of kitchen renovation, expectation and reality rarely coincide - there are too many details here that need to be coordinated. It's also good if, already in the process of repair, the masters or you yourself simply come up with an option of how to do it better than it was planned - then, having the materials on hand for the implementation of the original plan, you can breathe and abandon the changes. It is much worse if it turns out that the original plan for some reason is not subject to implementation at all, or its implementation threatens with certain inconveniences during further operation. In this case, it turns out that the money for the purchased finishing was wasted, and the cost of repairs, of course, will increase - or you will have to put up with what we have.

An even more global mistake is buying furniture early. This option is even more striking work for the future, the headset itself or the table itself can be quite expensive, and they are selected strictly by design. Having bought such accessories, you will no longer be ready to easily change something else, which means that it will be really difficult to deviate from the original plan, even if flaws are found in it.

It is often a mistake to contact a designer. His services are expensive, but he will never do absolutely everything for you. He tries to please you as much as possible, because he will only slightly narrow down the possible choice of finishes, furniture and equipment, he will make all these details harmonize, but he will coordinate every step with you, so you still have to go shopping.
Russia, Moscow region, Moscow +79041000555
Where to start renovating the kitchen: sequence, choice of materials
It takes ~ 6 minutes to read
Boring old interiors get bored quickly. To freshen up appearance kitchens, many owners of city apartments or suburban real estate are planning renovations. If you have free time and a sufficient amount of financial resources, you can immediately start work. But not every user knows where to start renovating the kitchen in order to get the job done in a short time with maximum efficiency and minimal cost labor resources.

Save
How to choose an interior style
So that the kitchen does not stand out from the rest of the rooms, it must be done in the same style. The most popular options are:
- modern hi-tech;
- baroque;
- minimalism;
- classic style;
- modern.
Where to start renovating the kitchen? Of course, with the choice of style. V classic interiors are used natural materials, the floors are covered with parquet. Modern and high-tech styles are more suitable for modern youth, glass and plastic products are used here. In the Baroque, carved furniture predominates, but such items are more suitable for a living room or bedroom.
Provence style is considered an economical option for interior decoration. It is dominated by simple materials... The walls and ceiling are covered with light pastel colors. There are floral patterns on the furniture. In provence, it is not advisable to use bulky parts, for example, heavy textile curtains or massive chandeliers. The kitchen decorated in this style is simple and romantic.

Save
Ceiling
Many users do not know where to start renovating a kitchen in an apartment. You can try to transform the ceiling, paste over the surface with photo wallpaper or make complex structure from metal profile and drywall sheets. There is another option - stretch ceilings, but such elements are made by professional builders. With your own hands, you can finish the styrofoam plates or fix the PVC panels on the frame. Consider several simple options decorating the ceiling.

Save
Coloration
To perform such work, you do not need special knowledge, a roller and a can of paint are enough. Water emulsion or latex materials are used here as a dye. Before carrying out work, the base surface is cleaned, then chips and cracks are repaired. The paint is applied in two layers, the first time along long walls, the second in the perpendicular direction.

Save
Wallpaper gluing
Waterproof materials are chosen as the coating. When using thick trellises, there is no need to level the base. Such products hide the unevenness of the base surface, give the ceiling a unique appearance.
Wallpaper sticker is considered one of the cheapest ceiling decoration options. Everyone can handle this work. It is enough to cut the panels of the required length and apply glue to the surface. Trellis are glued by the method of joining with the combination of the pattern. In places where the walls meet the ceiling, decorative trim is glued.

Save
Floor
Where to start renovating a kitchen in stages? The best place to start renovation work from the repair of the floor covering. When decorating a room in the Provence style, you can use a wooden plank floor or artificial counterparts, for example, linoleum, laminate or ceramic tiles... Whichever material is chosen, the surface of the products should be light.

Save
Tile
Ceramic tiles have many advantages. They are durable, water-resistant products with an abrasion-resistant surface. The only thing that the tile is afraid of is the fall of heavy objects. Not everyone can lay this flooring option with their own hands. To carry out such work, you will need skills and the presence of a special tool (grinder, tile cutter).
The tile flooring is cold, so a warm floor or thick rugs are installed in the kitchen. Laying tiles in the kitchen will cost a decent amount, so many users refuse this option.

Save
Laminate
For the installation of flooring in the kitchen, you can choose a laminate, but preference should be given to moisture-resistant products. Conventional materials are not suitable for this purpose, because they have a small coefficient of moisture resistance. Laminate panels are laid on the base using locking joints. To prevent the appearance of squeaks, a backing made of cork or other materials is laid under the laminate.
It is noticed that moisture-resistant models of the specified material can withstand 6 hours of exposure to moisture. For ordinary products, this effect can be disastrous - the floor covering is deformed, mold and mildew appear in its lower part.

Save
Linoleum
The most budget-friendly option for flooring in the kitchen. Linoleum is available in the store in a wide range of colors and shades. Commercial models of such roll products are characterized by high strength and wear resistance. Ordinary linoleum is short-lived; if the surface ruptures, it needs to be replaced.
The main disadvantage of rolled products is considered to be a small thickness, which requires careful preparation of the base surface. To level the floor in this room, a self-leveling mixture is used. This solution can be applied by hand. The dry mixture is mixed with water using an electric drill with a whisk. The finished solution is leveled over the surface with a toothed roller with a long handle.

Save
Walls
How to start DIY kitchen renovation? The maximum area in any room is occupied by walls, so they are finished first. The surface of the enclosing structures in the kitchen should be easily cleaned from dirt. In accordance with this requirement, they select Decoration Materials... The most used products for decorating Provence style kitchen walls are:
- ceramic tile;
- decorative panels made of polyvinyl chloride or mdf;
- waterproof paint;
- wallpaper.
V modern interiors tile is rarely used for wall decoration. It is an expensive, out of fashion material that is used for decoration working area... Polyvinyl chloride panels, as well as products from MDF and wood particle boards are made in the form of sheets with overall dimensions of 1.2 * 3 meters. Such elements can be solid or typeset. The latter materials are rigidly fixed to the lathing made of wood or metal profiles.
The use of panels is not without its drawbacks. First of all, this is a decrease in free space in the kitchen due to the thickness of the frame. The best option wall finishes are considered MDF boards or moisture-resistant polyvinyl chloride products with protective film on the surface, as well as a laminated organit made of chipboard. All products have a small thickness (3 millimeters), which allows them to be fixed to the surface using an adhesive mixture.

Save
For decorative wall decoration, only waterproof types of paint are used, because such a coating will not lose its original appearance after washing. The base must be thoroughly cleaned before painting. Then the cracks are filled in and the wall is leveled with putty. If this is not done, then sunlight falling from the windows will indicate any existing irregularities. This work must be carried out by a qualified specialist, which will entail additional financial costs. It should be noted that plain paint looks boring. Such a background will not be able to decorate the interior.

Save
Wallpaper sticker
How to make repairs in the kitchen with your own hands with minimal effort? The most in a simple way Decorating is considered to be the sticker of wallpaper on the walls. Everyone can lay roll materials, such products well hide all wall defects. For pasting the kitchen, vinyl roll materials or glass wallpaper are most often used. Good choice will become 3D wallpapers, but working with them is much more difficult than with conventional counterparts.
- We free the room from furniture, remove the chandelier, sockets and switches.
- Dismantle decorative trim ceiling and walls, remove the old flooring.
- We collect and remove garbage, clean the surface from dust and dirt.
- We apply plaster to the walls, level the base of the floor.
- We make grooves in the enclosing structures, we lay the wiring. We drill holes for sockets and switches. In some cases, we chase the walls for laying engineering communications, we make recesses for the output of plumbing fittings.
- We carry out the finishing of the ceiling.
- We lay decorative materials on the walls.
- We carry out the installation of the floor covering.
Experts recommend carrying out repair work from top to bottom to avoid contamination of other structures. First of all, the ceiling is painted, then they move to the walls, the flooring is laid at the very end. When installing a laminate or linoleum floor, such materials are mounted last. If the walls are covered with wallpaper, then you can lay the floor, and then the decor of the enclosing structures. No dust is emitted when wallpapering, besides, the glue is well washed off the floor covering.