Do-it-yourself installation of mdf panels on the wall is a practical and effective way to decorate a room. Wall cladding with MDF panels - a detailed guide Installing MDF panels with your own hands
MDF panels are one of the most affordable and easy-to-install finishing materials for wall decoration. You will need a minimum of components, a little skill and a desire to decorate the room beautifully. And, of course, the most important thing is our installation instructions for lamellas.
After finishing the wall with MDF panels, it may look like this. Nice, isn't it?
What is MDF panels
MDF or MDF (Medium Density Fibreboard) is a fiberboard produced by dry hot pressing. The raw materials used are fine-grained sawdust of technical wood species, binders and some additives that provide the material with plasticity and relative moisture resistance.
MDF boards are convenient in that they can be produced in any thickness, easy to process, cut, mill, and veneer. Therefore, panels are produced from them. wall thickness from 6 to 16 mm. The width of the products varies from 12 to 37 cm, the length is from 2.4 to 3 m. The surface is most often decorated using plastic or paper-resinous films with a design for the texture of wood, natural stone, ceramic products, fabric, leather.
MDF panels are equipped with a tongue-and-groove connection system, that is, there is a spike on one side of the strip, and a groove on the other. As components, manufacturers (Kronostar, Soyuz, Kronospan, etc.) produce thin external and internal corners with a decorative surface imitating wood, stone and other materials from the same material.
 The “tongue-and-groove” system allows the panels to be connected firmly and without gaps
 The main method of panel mounting is frame or glue. The first one is more complicated but reliable. The second requires a more thorough preparation of the foundation, respectively, the time, labor and material costs can increase significantly.
What is required for the installation of MDF
For mounting MDF-panel do-it-yourself you need the following set of tools and accessories:
- Panels and accessories made of MDF or plastic (external, internal, finishing F-, U- or T-shaped corners).
- U-shaped steel profiles for gypsum boards and accessories for the formation of the frame. Alternative - timber 30x50 mm, 40x40 mm, 40x60 mm, etc.
- A hardening primer for concrete or an antiseptic impregnation for wood.
- Self-tapping screws for metal or wood, nails or special clamps.
- Insulation (isolon, foam, mineral wool, EPS and others).
- A hacksaw with canvases for wood or a jigsaw, scissors for metal.
- Tape measure and construction pencil.
- Gyro level and metal corner.
- Hammer, screwdriver or drill. Alternatively, you can use a construction stapler or Liquid Nails glue.
Step-by-step instruction
Consider the most common way to install panels with your own hands on walls - frame. The bottom line is that a "skeleton" is formed on the walls from wooden slats or steel profiles for gypsum boards, to which decorative slats are subsequently attached.
In the case of installing MDF boards on the frame, the wall does not need to be carefully plastering, putty, leveling, removing the old coating in the form of wallpaper or paint.
Mineral crumbling bases (concrete, plaster, brick, cement) should be treated with a deep penetration reinforcing primer, wooden ones - with fire-retardant impregnation or antiseptic indelible primer to prevent the development of mold, fungi, bugs.
Installation of MDF is carried out in the following order.
Step 1. Preparing the walls
The surface must be treated with a protective and strengthening compound. If necessary, fix a thin insulation using plastic dowels or a construction stapler - regular or foil-clad foamed polyethylene (Izolon, Penoizol), EPS up to 7 mm thick (Pufas, QS) or others.
At this stage, work is also carried out with electrical wiring and other communications. Outlets of sockets, switches, cables are marked.
Step 2. Forming the frame
The main rule when installing planks with your own hands is that logs or profiles are attached perpendicular to the direction of installation of the panels. As a rule, MDF is mounted vertically; accordingly, the slats must be fixed horizontally.
First of all, you should check the evenness of the wall with a level and mark it. It is advisable to cut off especially protruding areas, mark the pits and depressions with a pencil, so that when installing the battens in these areas, place thin strips of fiberboard, chipboard or plywood for alignment.
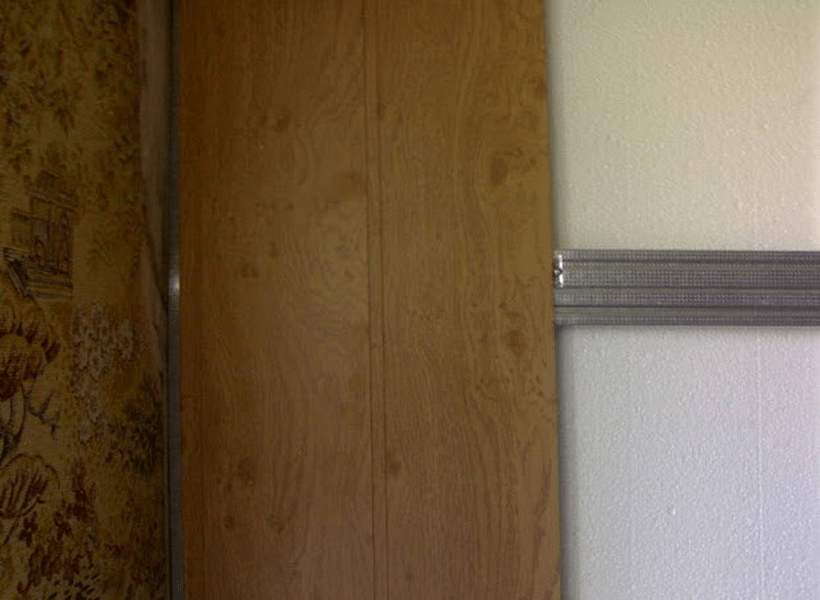
First, a frame is formed along the perimeter of the wall. The lower and upper timber or profile is installed at a distance of 3-5 cm from the floor / ceiling. Between them, the elements of the crate are placed in increments of 40-60 cm. The metal guides are fastened with self-tapping screws for metal or anchors; for wooden slats, you can use nails, dowel-nails or self-tapping screws for wood.

Along the perimeter of the door and window openings the crate is mounted with an indent of 3-5 cm from the edge. The distance between adjacent profiles should be kept as standard - 40-60 cm.
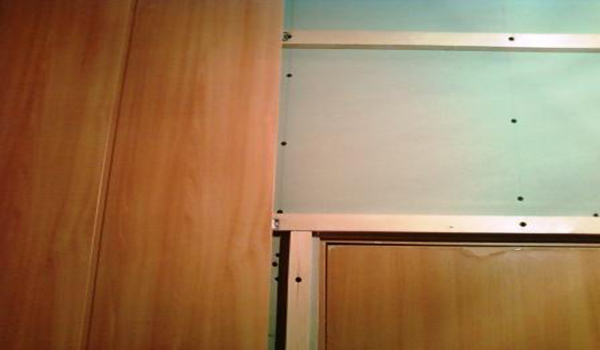 Around doorways and window boxes it is possible to install additional battens to increase rigidity
 Between the elements of the finished lathing, you can install insulation plates - mineral wool, foam, extruded polystyrene foam and others.
Step 3. Installing panels
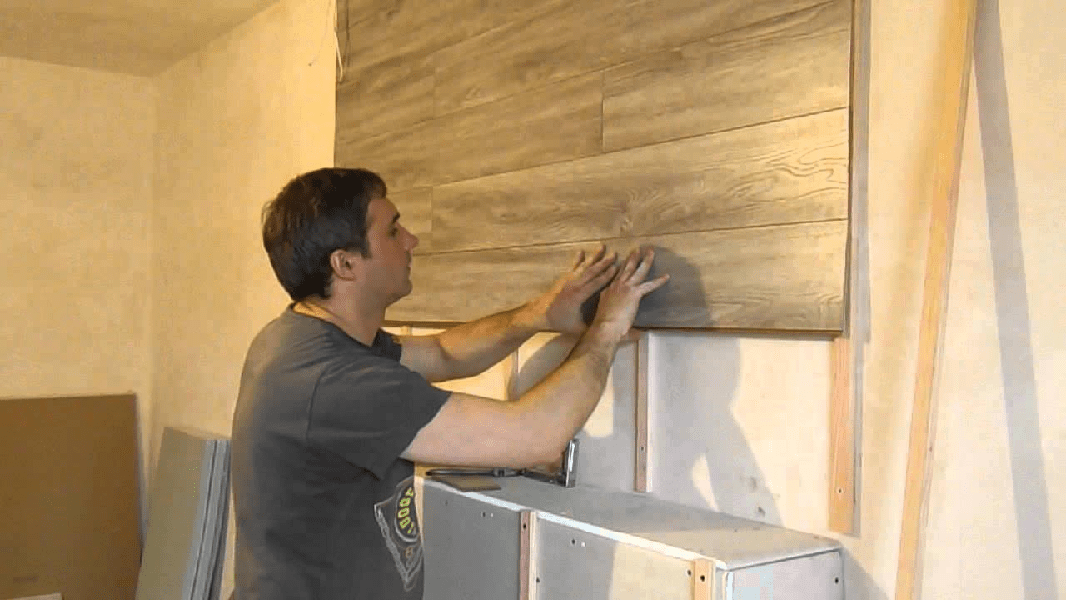
MDF must be carefully cut to size in advance. Installation starts from the corner. The panel is attached to the wall, the verticality is checked with a hydraulic level and fixed from the side of the ridge to the crate with small nails or special clamps. The next lamella is inserted with a thorn into the groove of the previous one until it stops and is fixed on the other side with hardware. The rest of the panels are mounted in a similar way.

After the completion of the work, the corners and edges around the windows and doors are decorated with MDF fittings. Folding corners made of MDF or plastic are fastened with glue "Liquid nails", "Titanium" and their analogues.
 Initially, the MDF corner is not a corner at all, but a bar. Depending on the type of corner (internal or external), it is bent in the right direction
 Excess adhesive should be removed immediately with a damp cloth. The upper part can be hidden under a decorative plastic or polyurethane cornice; from below, skirting boards are mounted with their own hands to match the color of the floor or wall covering.
The covering from MDF panels is ready. It is recommended to use a vacuum cleaner or a slightly damp cloth to remove dust and dirt. Do not use rags that are abundantly moistened with water, abrasive and aggressive detergents in order to avoid damage to the surface of the plates.
Detailed video instructions for the installation of MDF panels:
Glue method of mounting MDF lamellas on the wall
With the adhesive installation method, more stringent requirements are imposed on the base. The surface must be firm, level and dry. It is advisable to remove the remnants of old coatings completely, then prime with a compound that increases adhesion.
On the reverse side of the panel, glue is applied in a zigzag manner, then the strip is applied to the wall and pressed. The next lamella is also lubricated with glue, connected to the previous one and pressed. After installing all the elements, the corners and edges are decorated with corners, cornices, and the rest of the fittings.
The decoration of any room must be carefully thought out. The design must be not only beautiful, but also functional. For example, MDF panels can later be washed, they will not quickly get dirty and age. In addition, this material has additional benefits.
The finish for which MDF is used may be ideal. At the same time, DIY installation is quite simple to do. No special knowledge is required here. So a non-professional can handle the job.
What is MDF?
For the manufacture of which very fine chips are used. Production requires high pressure and temperature. In order for the chips to stick together in one mixture, carbamide resins are added to it, which are considered a binder.
MDF wall panels (even an amateur can do their own installation) are used for cladding vertical surfaces in residential and office premises. Other types of material can be used for making furniture, arranging partitions, laying flooring... Very often, acoustic systems are made from slabs. The thickness of the material reaches 4 mm. There are some conditions for storing these products: humidity - no more than 70%, temperature - no higher than 25 degrees.
Material advantages

Sheathing with MDF panels has some advantages:
1. High level of resistance to moisture. Some types of materials can even be used to decorate the bathroom.
2. Good strength. Plates are well pressed.
3. Low cost. You can buy them at any hardware store at an affordable price.
4. Resistance to temperature changes, biological effects. Mice will not be able to gnaw through such a skin.
5.Ease of handling and use. You can cut the material with a regular jigsaw or circular saw.
6... Good soundproofing qualities.
7. Products keep warm well, and also they lend themselves to painting, lamination, varnishing.
8. The ability to create an original design.
9. Easy cleaning of panels.
MDF wall panels, self-assembly of which is carried out only after assembly necessary tools, made of natural material, therefore, they are environmentally friendly.
Disadvantages of the product

Among the disadvantages of this material are the following:
Combustible.
A fairly large mass. This feature prevents shields from being used on all walls.
The presence of synthetic resins in the product. Although they do not evaporate and are not harmful to health.
These disadvantages are not significant when correct operation material.
What types of plate fixings are there?
Before you need to understand the connection methods. They are like this:
- Thorn groove. This is the simplest type of element locking. Laying is done joint to joint. A feature of this installation is the need for a base made of metal profiles or wooden lathing.
- Groove groove. This will also require special training. The wall will need to be reinforced with U-shaped profiles.
- Kleeva. This method is used quite often. However, the panel should be lightweight and the wall should be perfectly flat. For work, a special adhesive is required. Naturally, dust and dirt awaits you during the installation process. But if you have a small room at your disposal and the availability of free centimeters is essential, then it is better to choose this method.
- Profile. It allows you to level the base and attach large-format products.
What tools do you need to work?

If you purchased MDF wall panels, do-it-yourself installation should be done only after all required material and the fixtures will be ready. You will need:
- Building level.
- Reiki for the construction of the lathing.
- Locksmith's square for the correct determination of the angle.
- Plumb line.
- A drill, as well as a special attachment for tightening self-tapping screws.
- Hammer and pliers.
- for cutting panels.
- Special fasteners.
- Screw, self-tapping screw in the required amount.
These tools should be sufficient to mount the panels. Other tools may be required to prepare the surface.
Varieties and features of panels

In order for the finish to serve for a long time and with high quality, it is necessary to choose the right facing material. There are these types of panels:
- Regular... They are highly durable, but do not have much protection against moisture. Therefore, such products can be used for wall cladding in dry rooms: hallways, living rooms, bedrooms.
- For rooms with high humidity levels. Such MDF panels are suitable for the kitchen. It is in this room that moisture often accumulates and there are temperature drops.
- Heavily loaded. They can be installed in bathrooms, as they have the highest level of protection against the harmful effects of moisture.
Naturally, the decorative properties of MDF boards should not be overlooked. With different patterns and colors, you can work wonders. For example, to make the room look larger, use light or white panels. To get an original and unique interior, you should pay attention to the material with an individual design pattern.
Naturally, during the selection, you should pay attention to specifications and quality. Buy material only from licensed stores. It is better to choose those manufacturers who have a good reputation and customer reviews.
Features of surface preparation
Before that, you must definitely prepare the base. In principle, this is not difficult to do. First, remove the previous finish or its fragile parts. If the basis for fixing the slabs is a wooden crate, then there will be no need to level the wall. It should be marked first.

The glue method requires a perfectly flat surface. If the defects or level drops are small, then you can use ordinary plaster mortar. Naturally, the walls will need to be primed later in order to maximize adhesion with glue.
Most often, a wooden crate is still used. It is not difficult to do it. The slats are installed vertically and horizontally. The distance between them should not exceed 30-40 cm. For fastening the rails, a screw, self-tapping screw or nail is usually used. Please note that all wooden elements should be treated with a special antiseptic.
If metal profiles are used for the lathing, then the space that remains between them can be filled mineral wool or other insulation. In addition to retaining heat, you can provide additional sound insulation.
Installation features

Interior decoration with MDF panels has a certain sequence:
- Fastening the first panel. It is screwed at the inner corner with self-tapping screws. If necessary, the slab is trimmed to length. Since each panel has a comb, it will need to be ground down a little. For additional fixation, metal fasteners are used.
- The next strips need to be screwed back to back to the previous ones. From the side of the side groove, the product is fixed with additional fasteners.
- Installing the last panel. If necessary, it is trimmed to the width. This element is attached to the crate with self-tapping screws.
- Next, you need to repeat the above steps for each wall. After completing the work, a narrow plinth should be installed along the upper edge. It is fastened with nails or self-tapping screws.
As you can see, you can handle this work yourself.
MDF panels are in great demand. However, improperly mounted material can degrade the interior of the room. Therefore, try to follow the recommendations of experts.
For example, use a plumb line all the time when laying the slabs and this will help you to attach the products evenly.
You can sew up the entire wall or part of it with such material. For example, you can only mount panels at half the height of the base. This will make it possible to use additional finishing materials, as well as diversify the interior.
If there are small irregularities on the wall, then small pieces of plastic can be placed under the wooden slats. They will strengthen the crate. That's all. Let your home be beautiful and unusual. Good luck!
To date, the simplest and fast way to make the walls of your home beautiful and even is the decoration with MDF panels. This solution is, of course, not suitable for all rooms, but for corridors, staircases, storage rooms and hallways, this material will be almost ideal. We will talk about it in this article, in which, together with the site, we will consider how the installation of mdf panels is carried out in a frame and frameless way with our own hands.
There are two ways to fix mdf panels on the walls - the so-called glue and frame. Both of these methods are good and are used depending on the circumstances. If the wall decoration with MDF panels provides for the hiding of any communications, then the frame method of fixing MDF is used. If we are talking about finishing smooth walls, then the glue method is used.
Wall decoration with mdf panels photo
Installation of mdf panels: frame installation method
The very name of this method speaks for itself - to implement it, you will need to build a frame, which in some way resembles the structure that is used for. The difference lies only in the position of the carriers - if they are installed vertically for fastening drywall sheets, then MDF provides for a horizontal arrangement of profiles. In this regard, the features of the construction of such a frame also arise.
In principle, at the first stage, everything happens in the same way - the plane of the future frame is beaten off, then guide profiles are attached along the perimeter of the wall, on the floor, ceiling and adjacent walls. This is where the differences begin. In a given plane, the vertical bearing profiles cd are installed not every 600mm, but 3000mm, which is the standard length of the bearing profile.

Installation of mdf panels: frame method
This is done in order to subsequently install between them horizontal bearing profiles cd, the step of which is 500 mm. They are connected to vertical profiles using crab cd-connectors, and are fixed to the wall with the same U-shaped brackets.
The installation of the frame is the main work in the process of installing MDF panels. The fastening itself is an easier process that almost everyone can handle. MDF panels are attached to the frame with clamps (special clamps). The kleimer itself, before being attached to the frame, is inserted into the groove located at the end of the panel, thus ensuring their reliable fixation to the frame. The cleats are designed so that they do not interfere with the insertion of the next panel into the groove.

DIY installation of mdf panels photo
Do-it-yourself installation of panels on glue: installation features
Installation of MDF panels on walls using glue is much easier - the entire installation process is greatly facilitated by the absence of a metal or wooden frame, the construction of which takes a lot of time.

Installation of wall mdf panels Photo
Before proceeding with the direct fastening of the panels, first we will deal with the glue that is used for these purposes. Or what kind of glue is not suitable here - you need a composition that has certain qualities.
- Firstly, the glue must be plastic even after hardening - the fact is that MDF panels made of pressed cardboard are highly susceptible to deformation depending on the temperature and humidity in the room. Therefore, an adhesive is needed that can extinguish these very thermal expansions.
- Secondly, the glue used for MDF panels should facilitate their fastening even in places where the walls are slightly curved. That is, the texture of the glue should make it possible to spread it both with a thin layer and with a thick one - in a word, it should be thick enough. Under these requirements, the so-called "", which are successfully used to resolve the issue of how to mount MDF panels, by almost all masters, are the best fit.

Liquid nails for mounting MDF panels photo
The very installation of panels with the help of glue looks quite simple - its technology is almost completely described on a tube with Liquid Nails glue. It is not recommended to violate it. To begin with, the walls covered with panels must be cleaned of dust and dirt - in principle, if you are going to seriously study self-repair, then the priming process, which is performed to clean the walls from dust and dirt, and at the same time to improve the adhesion of materials, should become a habit for you. They primer always, everything and everywhere.

Priming the walls before installing the MDF panels photo
After the primer has dried, proceed to the direct gluing of the panels. In the meantime, it dries, you can do other preparations - for example, cut several dozen panels to size.
The glue is applied directly to the panel itself in a dotted manner and in a checkerboard pattern - the glue drops should be large. After the glue has been applied, the panel is pressed against the wall, taps firmly and comes off. This is required by the technology of gluing - you need to tear off the panel so that the glue is weathered and the panel does not peel off the wall under its own weight. To speed up the process and make the installation of MDF panels with your own hands faster, you can immediately, one by one, smear up to a dozen panels, attach them to the wall and tear them off. While the glue is weathered, it is allowed to smoke - after five minutes, the panels can be reattached to the wall and thoroughly slammed.

How to glue mdf panels on a photo wall
It is easy to glue the panels - it is much more difficult to cut them evenly and with high quality. In this regard, special attention must be paid to slopes and similar obstacles that come across in the path of installing MDF panels. It should be understood that the appearance of the room depends entirely on the even trimming of the panels.

Installation of mdf panels on walls
Well, in conclusion, let us dwell on the main nuances of installation, which are characteristic of both methods of fixing MDF panels.
- First, there are the corners. It should be understood that it will not work to bend the MDF panels, so they are simply cut as close to the corner as possible, after which the cut edges are safely overlapped with a special corner, which can be used for both outer and inner corners.
- Secondly, this is a frame - the lowest horizontal profile should lie on the floor. In this way, you will ensure that the skirting boards are securely fastened.
- Thirdly, so that there is no distortion in the future, the first panel must be installed in accordance with the vertical level and firmly fixed with self-tapping screws in places where they will subsequently overlap (at the bottom with a plinth, at the top of the ceiling, in the corner decorative overlay). It is desirable to check the position of the panels with the level in the future - you should not control everything in a row, but you need to apply it to every fifth panel.
That's basically it. This is how MDF panels are installed. This process is not complicated and not simple, as, in general, any finishing work in which your attitude to the little things plays an important role, which together affect the overall picture of the repair. Simply put, there are no trifles in this matter.
To get an attractive design of the walls, to provide comfort in the room and an environmentally friendly environment in it, possibly with the help of a modern finishing material- MDF. Its release is carried out in the form of panels. He gained fame extremely quickly, due to its practicality and attractiveness, its use is allowed in rooms with extreme loads: kitchen, living room, hallway. MDF panels surprise with a variety of shades and textures, they can very accurately imitate natural wood materials, brickwork or tiles. The cost of the material is low; if you install it yourself, you can get significant savings on finishing works, during operation, especially complex care will not be required.
Wall MDF panels, their properties and advantages
To begin with, we note that MDF panels are produced not from solid wood, but from waste, while no synthetic impurities or glue are used, the technological process consists in heating wood chips to high temperatures and pressing it under high pressure... The strong connection of the fragments of the material occurs due to the natural polymer compound released during heating - lignin.
Among the important advantages of MDF panels, it should be noted:
- environmental friendliness of the material,
- possibility of quick and easy installation,
- good thermal insulation and noise insulation characteristics,
- material strength, long service life,
- ease of replacing any piece of decoration if necessary,
- simple care that does not require the purchase of expensive household chemicals,
- the ability to hide under a layer of cladding wires, pipes, others engineering Communication,
- affordable material cost.

The main disadvantages of the panels are:
- flammability of the material - when laying electrical wiring cables under the plates, it will be necessary to carefully insulate them in a self-extinguishing corrugation,
- inability to use in conditions of high humidity,
- fragility, the need for very careful handling when performing installation works.
Varieties of MDF panels

In the manufacture of panels, different methods of finishing the front side are used, respectively, the panels themselves are divided into two types:
- laminated, the surface of which is covered with PVC film, characterized by an attractive appearance imitating the structure of natural wood, other building materials not prone to dust accumulation, resistant to damage;
- veneered, for the decoration of which veneer of the best wood species is used.

The external finishing of the panels can be glossy - glossy, or matte.
We purchase MDF panels and materials that will be required when performing installation work

Although the installation of MDF panels is not a complicated process, nevertheless, it will require preliminary preparation, the purchase of the facing material itself and the necessary components. In order to correctly calculate the number of panels, you should first take into account the width of the space to be finished. MDF panels have the following dimensions: their standard width is 148, 190, 240 mm. Determining the required number of panels is simple: it will be the quotient of dividing the width of the wall by the width of the panel. A little more material should be purchased than was obtained by calculation: defects may be caught, some of it will be spent on trimming, losses may also arise as a result of errors.
To work, you will need to stock up:
- MDF panels,
- insulating corrugation, if electrical wiring will be laid under the panels,
- self-tapping screws,
- ceiling lights,
- suspensions,
- kleimer,
- profiles.
The preparation of the walls will consist in cleaning them from the remnants of old wallpaper. You will also have to remove the baseboards. The surface of the walls must be treated with an antifungal primer, especially for rooms with increased air humidity. If necessary, the walls can be pasted over with insulating material, for example - foamed foam A foil. It is attached with glue, end-to-end, with the foil side inside the room.

The use of finishing corners will greatly simplify the installation. Consisting of strips located with a gap of 2 mm, they are intended for fastening the strips; a film is applied to their surface corresponding to the color of the panels. The formed corner bends very easily outward or inward. This point is especially important if the geometry of the available angles is far from ideal.
To build a frame for cladding, you will need slats, preferably 20x40 mm. It makes no sense to use slats with a large cross-section - the panel weight is small. In addition, slats with such a cross section are constantly on sale in hardware stores. The rails can be fastened using plastic dowels and wood screws.
To fasten MDF panels to the frame bars, you will need clamps, most often they are sold complete with panels. It will be convenient to glue the corners with liquid nails. The quality of the glue should be discussed especially - since the panels can change under the influence of moisture and temperature, then the glue for them should also have some plasticity. Such characteristics of the glue are usually indicated on its packaging. In addition, the glue must have a texture that allows it to be applied in a thicker or very thin layer, depending on the curvatures on the walls. Liquid nails meet these requirements.
The installation of the lathing should be done with checking the evenness of the structure, for which you can use the usual building level.

Before fixing the MDF panels, you should definitely make sure of the quality of the installation of the battens - this will ultimately determine the general appearance of the walls. Clamps are used to fasten the panels to the crate.
Those who decide to decorate with MDF panels with their own hands should not neglect the following recommendations:
- If it is necessary to cut the panels, it is best to use a jigsaw - the cut will be even and clear. Here it should be remembered that milling, grinding and drilling of panels is quite simple to perform, while the tools are the same ones that are used when processing wood materials.
- In rooms with a high level of humidity, the frame is best made of metal profile... If the lathing will be made of wood, then it should be treated with high-quality antifungal impregnations.
- If you plan to finish the junction of the ceiling and walls with a plinth, then before installing the panels around the perimeter of the room, the mounting device is installed. After installing the plates, a ceiling plinth is installed in its groove.
- In places where hinged interior items are supposed to be placed, it will be necessary to strengthen the frame with additional bars.
Finishing with MDF panels - the order of work
The installation of the lathing begins from the most convex place on the wall. The bars are mounted in a horizontal direction, in increments of no more than 40 cm. Increasing the step may distort the pattern.

You should start attaching the planks from the corner, it is advisable to make the calculation in such a way that the last panel remains intact. Before starting the installation work, you can repeat the calculations or even try on how the purchased material will fit on the wall. The spike of the first panel should be in the corner.

You will need to use 5-6 fastening clips along the length of each panel. They are distributed evenly and fixed with a screwdriver to the rails. The opposite end is fixed using self-tapping screws.

In order for the self-tapping screw to sink into the material, you must first drill a hole with a diameter of 8-10 mm in the strip. The fastening of the next strip is performed with a spike in the groove of the previous one, this procedure is repeated until the last one is installed. Each of the joints at the joints, the side and top edges are fixed with corners, on liquid nails.
If the option of laying the panels in a horizontal or diagonal direction is chosen, then the direction of the lathing should be changed - its strips should be located perpendicular to the panels of the facing material.
All found significant depressions on the walls should be laid with blocks or wedges.
From below, the joints of the slabs are covered with an ordinary plinth, it can be fixed with nails or put on a sealant. For the convenience of fixing the plinth, the lower batten of the batten is fixed at floor level. The joint under the ceiling can be decorated with a corner or skirting board.
Methods for fixing MDF boards

The methods of fixing MDF boards may be different, depending on the condition concrete surface on which the installation is carried out. If it is leveled and clean, then the panels can be glued directly to the wall using adhesive sealant.

It is applied in a zigzag pattern all over the board, then it is pressed firmly against the wall for a couple of seconds. If the excess glue comes out, they are carefully removed with a spatula.
If a layer of insulation is laid under the MDF boards, or if numerous engineering communications have to be hidden under it, then the best option would be to install the boards on a metal frame.

If you need to hide noticeable irregularities in the wall, it is better to use a crate made of wooden beams- it will be stronger and more stable. In places where sockets or switches are installed, holes of the required diameter should be made using an electric drill.
MDF panels for the kitchen - are they a suitable material

You can often find a discussion of the topic of installing MDF panels in the kitchen. It is not easy to give an unequivocal answer to it. MDF is an environmentally friendly material, it does not have an unpleasant odor, therefore, it cannot cause any harm to people in the kitchen.
At the same time, the material is not moisture resistant to the extent that would allow its unhindered installation in rooms with a high level of humidity - under the influence of water, the material may lose its attractive appearance. But it is still possible to refine areas remote from places where water is used, for example, a dining area, with the help of MDF plates. At the same time, it is recommended to fasten the panels to a metal profile - wood in a humid environment can suffer from fungi and putrefactive processes. In addition, experts recommend paying attention to a relatively new version of panels with a special moisture-resistant coating.
Caring for MDF boards

The period of operation of the plates will not cause much trouble. The surface of the boards is very smooth, it is well laminated and painted. Cleaning the material from contamination is carried out with a damp soft cloth; when cleaning, do not use substances containing abrasive particles.
If, during operation, the peeling of the top coating of the film becomes noticeable, then it can be removed using fine-grained sandpaper. Any of the damaged slabs can be replaced fairly easily with a new one.
How to fix MDF panels to the wall, and on what basis - the decision must be made taking into account the peculiarities of the wall geometry, the size of the room, the availability of communications and constant heating. Despite the immense popularity, MDF wall plates are quite picky about the operating conditions, so you should not fix it in the first way that comes to hand, so as not to re-lay the finish a second time.
Dimensions of MDF - panels
Often, consultants of trading companies present MDF boards as a lightweight version of chipboard panels, especially if deciphered English abbreviation... Accordingly, it is recommended to fix them in the same way as in the case of using chipboard. In fact, MDF panels in structure and production method differ significantly from particle board, which allows the material to be fastened at lower costs and at a higher speed.

There are only three main differences:
- Thin MDF boards are made from recycled cellulose fiber, which is practically free of polysaccharides - the main food for bacteria, fungi and rodents. Chipboard uses ordinary shavings filled with phenol-formaldehyde resin, so it is fixed with special dowels;
- Plates are made by pressing wood fiber pulp with the addition of hydrogen peroxide. At a temperature of 250 ° C, lignin and part of the cellulose are welded with the remains of caramelized polysaccharides into a dense fiber mass. In thick slabs, the MDF core is additionally impregnated with polymer resin, which makes it possible to fasten without the risk of material delamination;
- The flexural strength of the panel is only slightly inferior to plywood with greater ductility and resistance to moisture. Most brands of MDF can be wall-mounted even in rooms with low ventilation.
The difference, at first glance, is insignificant, but it is the strength and elasticity of the cellulose-fiber base of the MDF panel that makes it possible to fasten the cladding plates using end locks.
Even with a strong temperature difference, the MDF panel shows a level of expansion that is significantly less than that of plastic or conventional wooden lining, therefore, the material can be fastened with smaller gaps, which is especially important for slabs of medium and large thickness.
What are the most popular sizes
Three size groups are used for wall cladding:
- Thin slabs, size group 5-9 mm thick, 153, 198, 200.325 and 2070 mm wide;
- Medium MDF panels, 10-18 mm thick, 2070 mm wide;
- Oversized slabs, thickness 19-38 mm, width 2070 mm.
There are no restrictions on the outer dimensions, and the maximum thickness of the boards is limited by pressing capabilities up to 40 mm. Two-layer MDF panels with a maximum thickness of up to 60 mm are also available, used for the manufacture of reusable formwork and roof sheathing. But the quality of the outer surface of such slabs is rather low, so they are not used for wall decoration.
Installation of MDF panels
Pressed cellulose fibers retain heat and absorb noise much better than plastic or wood. In addition, the MDF panel has a certain anisotropy of properties, it can be cut and processed in almost any order. Fastening the panels is easy and quite possible even for a novice cladder.
For household purposes, panels can be fixed in three ways:
- Place the slabs on glue;
- Mount the cladding on a wooden or metal frame;
- Installation of MDF panels using the suspension method.
The latter case is used as an exceptional way of cladding walls in a house from a bar or rounded log. We have to fix the MDF slabs on a suspended ceiling profile with a small gap between the floor and the lower edge of the slab. The cladding is suspended on the profile, and as the walls shrink, the MDF sags along with the timber material.

It is clear that for wooden house it will be more preferable to use narrow slabs, 190-200 mm wide, while MDF is better to be fixed in the vertical direction. If it is not known exactly about the planned amount of wall shrinkage, then the decorative finish is best fixed with a gap increased by 2-3 cm. Firstly, this ensures that in case of excessive shrinkage, the floor will not tear the slabs off the walls, and secondly, the cracks will provide a normal level of ventilation and airflow in the space between the panels and the wall.

Mounting on a metal frame
The installation of panels on a supporting frame made of galvanized profiles is recognized by experts as the most rational and reliable way of fastening any cellulose-fiber materials. Even heavy slabs with a density of up to 1.5-1.8 g / cm 3 can be attached to the metal frame without any problems. The metal will not lead from condensation or blocking of walls as a result of pipe breaks, water leakage in an apartment on the floor above or a break in the roof.

The assembly of the frame begins with the installation of the starter profile and side strips. MDF panels are lightweight, so it is enough to install a number of vertical profiles No. 50 with a step of 40-50 cm. The use of a galvanized U-profile makes it possible to fix MDF on the walls of the room about two to three times faster than in any other way.
Two or three drops of silicone applied to the profile will even out the load on the wall and prevent the cladding from flapping in strong winds, if there is a ventilation gap behind the decorative MDF lamellas.
Installation on a wooden frame
The easiest way is to mount MDF panels on wooden frame... There are two options for wall cladding using cellulose fiber panels. It all depends on the size of the room and the condition of the walls.

If the slight reduction in space due to the lathing is not critical, the timber frame is sewn onto the walls using metal hanger holders. For small and small rooms, most often it is necessary to partially cut and knock down a layer of plaster in order to level the surface along a vertical plumb line, to make it as even as possible.

In any case, the starting strip is initially laid on the floor and under the ceiling. Using a long building level on the wall, mark the installation points of the suspensions and determine the minimum required overhang of the side lobes of the fasteners.

In the event that it is planned to install horizontal MDF lamellas, the supporting strips are fixed vertically. For the installation of full-size panels over 200 mm wide, the walls are sewn up in both directions. Every wooden plank the battens are aligned with the starting guides and fixed with the suspension petals using self-tapping screws and a screwdriver.

For relatively flat and dry brick, concrete or block walls, the batten can be attached directly to the wall using dowels. In this case, work is added, since each bar has to be adjusted for a long time before fastening with washers in order to maintain a single vertical plane. But on the other hand, you can save 3-4 cm of internal space, which is very useful, for example, when decorating the walls of a small bathroom or corridor.
Installation on glue
The use of a batten or support frame always eats up an additional 3-7 cm of space on each wall. The use of a frame system is considered a good solution, but it is not at all necessary to fence in the frame jungle if the walls of the room for the future MDF cladding are flat, without serious defects and deviations from the vertical.

In this case, it is enough to clean the walls, prime them with acrylic primer and apply a thin layer of insulating putty. The lime layer will help to further level the walls and improve the adherence of the MDF boards to the supporting surface.
Laying panels on walls using glue is carried out in two versions:
- Each MDF is glued to the wall with one lamella, from ceiling to floor, with fixation along the end edge using self-tapping screws and plastic plugs;
- The material is laid on the wall in horizontal stripes from corner to corner after assembly and gluing of corner and edge pieces.
If the lamellas are glued directly to the wall, then the end joints are not glued and are not treated with sealing materials. Most often, with the help of glue, rather large panels, 40-60 cm wide, are laid on the walls.This method is more profitable from a technological point of view, since the load from the rather large weight of the MDF panel is distributed not over several clamps or staples, but over the entire surface of the plate and walls. What does it do? Greater reliability if the upper row of MDF lamellas breaks off, the middle and lower rows will hold the entire structure.

Before fixing the mdf panels to the wall, cover the back side with small portions of glue. These can be dots, spirals, short stripes. The main thing is that the adhesive material is evenly distributed over the wall surface.
It is best to use a car sealant as an adhesive, polyurethane adhesives and homemade adhesive masses based on a mixture of acetone and foam. Acrylic and polyvinyl acetate adhesives hold MDF panels rather weakly.
For your information! The MDF sticker on the sealant provides the ability to cut and remove the panel from the wall, if necessary, without damaging the surface. Harder alkyd, polystyrene and acrylic adhesives can tear off some of the back surface.

Fastening MDF - panels to the wall
The process of installing cellulose fiber panels is relatively simple and straightforward even for a beginner. If the horizontal laying method is used, then the bottom panel or lamella is installed first, directly resting on the starting plate of the frame. It must be laid on glue, aligned to the building level and fixed with a stapler or self-tapping screw.
Before laying the next panel on the wall, it is necessary to install the corner or edge cladding elements, fix them on the wall, and only then proceed with the installation of the following MDF parts.
How to attach mdf panels to a bar or profile is selected in each case individually, based on the conditions of the fastener and the size of the material. Relatively thin, 6-9 mm lamellas are snapped in with groove-thorn locks, after which the free end is sewn to the timber with self-tapping staples. If it is supposed to be able to periodically remove the MDF cladding from the wall for revising communications or wiring laid behind the decorative trim, then the panels are placed on clamps.

Thick slabs are mounted directly on the walls using glue and dowels, joints are sealed with acrylic filler and then wallpaper or PVC foil is glued.
A difficult option, how to mount MDF on walls with insulation
MDF boards are much easier and more convenient to handle than heavy drywall, plywood or plastic, while the strength of the panels is enough to build two or even three-layer cladding options from fiber composite with insulation as an intermediate layer.
For example, cold external walls made of profile, siding or concrete blocks are hemmed from the inside with HDF class MDF plates, with a density of 800-1800 kg / m 3. The thickness of the slabs is 25-40 mm. The laid panels are sewn at the joints with oblique self-tapping screws and stapling staples, the seam itself is rubbed over with polymer mastic.
The material is treated with impregnation, which provides good vapor transmission with high resistance to surface condensation. Plates are fixed to external walls "cold" - with the help of steel dowels and carpentry screws. WITH inside the slab sheathing is sewn on wooden or slats cut from the slabs.
A vapor membrane is pulled over the laid thermal insulation and clogged with horizontal slats with a section of 20x20 mm. The last step is to sew lightweight decorative MDF panels of the LDF class with the texture of wood, natural stone or veneered on the lathing.
Due to the low density LDF, 200-600 kg / m 3, MDF panels perfectly let steam through, which is removed through the ventilation gap and the ceiling ventilation joint. In this way, the walls are sheathed in summer kitchens, balconies, verandas, any premises with frame-type walls.
Features of finishing MDF - panels
Most professional finishers prefer to work with MDF, since there is no dust and dirt, as in the case of drywall, installation is faster and there are much fewer problems.
Assembling and installing MDF on walls is in many ways similar to laying laminate floors, with the only difference that there are more options for choosing schemes decorative design premises and a much more complex arrangement of the corner and slope sectors of the walls.
Slopes
Arrangement scheme for door or window slopes is no different from drywall options. If the lamellas were laid vertically on the walls, then to design a window or door opening, it is enough to cut a panel of the required height and width and stick it on the slope plane polyurethane foam or a sealant.
If the walls in the protection room are horizontal panels, then the slopes will have to be recruited from sections on self-tapping screws and plastic plugs.

Corners and slots
There are always gaps and gaps between the installed additional elements and the main part of the cladding. They have to be removed with special decorative corner strips and decorative skirting boards.

All auxiliary decor is glued on "Titanium" or "Mounting moment for MDF", a small amount of glue is applied to the edge along the gap, after which a corner strip is installed on the joint. To prevent the decor from moving away, the corner is temporarily fixed with tape.
Sockets and switches
Every room has at least a couple of outlets and one switch. In order not to dismantle them during the installation of MDF, proceed as follows: measure the coordinates of the location of the outlet on the wall, after which a hole of the appropriate shape and size is cut out with a circular drill or jigsaw. When installing the MDF panel, the size and position of the hole is specified and cut with a sharp knife.

It remains to install the panel, fix it on the wall, and close the remaining gap with a decorative frame.
Conclusion
The details of the process, how to fix MDF panels to the wall, must be thought over and planned in advance, before starting work on decorative finishing premises. The process itself is not particularly difficult, but in any room there are many problem areas where the method of fastening has to be almost invented on its own. In this case, it is better to draw the details and the fixing method on the diagram so that you do not have to rack your brains and waste time in the process.