Toilet from blocks in the country do it yourself. Cottage toilet do it yourself
Cottage simply can not do without a toilet, at least the seasonally used, that is, a mobile beyatuette. But it is advisable to briefly bring it every year and only if it is planned to relax in summer at the cottage, and then on weekends. If the country station is not empty, that is, in the country, someone will live most of the year, or come here a large number of People need to think about building a stationary design, for example, from a brick.
A brick toilet is better than a wooden counterpart, since its service life does not compare with the service life of the construction of wood. Of course, the construction of a brick booth will cost more, but building it with their own hands, you can forget about this issue.
Process nuances
Double toilet with brick showerStarting the construction of the toilet, you need to consider:

- Location: The toilet must be no closer than 30 m from the well or well with drinking water.
- If the site in the country has a bias, construction can not be launched below the well or well.
- No need to build in a prominent place.
- The door of the house should not be opened toward the neighbors section.
- Rose winds.
- It is better not to make a toilet closer than 12 m from home.
- If underground water on the site flows at a depth of greater 2.5m, the type of construction can be any. Otherwise scheme with cesspool Not suitable.
Inside the brick room is a frighting box, the role of which can play sawdust, ash or peat.
Pros and cons
The most obvious plus buildings from the brick, of course, is durability. She is not terrible:
- moisture;
- frost;
- pinged bacteria.
The toilet does not require additional processing of brick walls outside, again, it is easy to build it with your own hands.

Disadvantages:
- the lack of good protection from the cold (need internal insulation);
- static;
- relatively expensive construction.
Tools and materials
To build your own hands toilet in the country, you should take care of availability:

With this set with the task, it will be possible to cope with your own hands. The usual country design involves the presence of a floor with a coating, walls, doors and roofs. The walls of the brick construction, the base of the floor of the concrete, the roof of the materials for the roof.
How to make a toilet in the country do it yourself
Jama device
Before starting to build your own hands toilet in the country, it is recommended to draw up a drawing.
Minimum construction dimensions:
- width (and Length) - 1.3 m;
- depth - 1.5 m.

It would seem that prevents a deeper pit in the country. However, it is difficult to empty a depth of more than 1.5 m, so during construction with your own bricks, it is not recommended to exceed this value. The finished pit is laid out with a red brick, the laying is plastering and concreted. To ensure that the cement grabbies, you should leave two or three days.

Thanks to concreting, the service life increases, the environment is less polluted. Make sure that the surface remains smooth. After filling with concrete, you need to wait until it grab. If you use a brick building, it is planned for a short time, and it is possible not to pour the bottom with concrete.
If the walls of the pits are concrete, you must first build a formwork. It can be made of boards connected by nails. You can go straw to formwork with your own hands for the entire height of the pit, or to do it in several stages, and to fill in concrete gradually. For increased strength, fittings are used.

For the preparation of the solution, cement brand is not less than M-200, crushed stone, sand and water, proportions - 1: 5: 3. Water is added at the rate of 0.65-0.7 m cubic meters. on 1 m cubic meter. concrete. It is important that the mixture is homogeneous. It is better to use concrete mixer.
For emptying the pit, the pipe is used, it can be plastic, for example. The pipe is included in the corner, and there should be an entrance of the car of the car of the associates, which will work on your dacha. To protect the pit from the garbage, the outdoor end of the pipe is covered with a grid or a visor. However, it is necessary to take care that these elements do not make it difficult to work to the assessing agents.
Plastic containers are used to clean the toilet in the country. That is, an eurocub is installed in the pit or a plastic barrel with a cut top. So that the moisture does not accumulate under the bottom, the container is put on the pillow of sand and rubble.
Masonry solution

Popular more brick: M100, M125, M150 and M200; Cement: M300, M400, M500. If the M-4 brick, cement may be brands: M300, M400, M500.
To determine the grade of the solution, the cement brand is divided into the total number of parts of cement and sand.
If the cement M400, and the amount of cement and sand 4, the grade of the solution - 400/4 \u003d 100.
If the M100 brick, the solution of the solution 100 will be mixed: cement and sand:
- M300 - 1: 2;
- M400 - 1: 3;
- M500 - 1: 4.
During masonry, the solution should be interinted periodically so that heavy particles do not accumulate below. To increase the strength of the solution, organic particles can be added to it: crushed stone, marble, sand, clinker.
Walling
When the pit grabbed, you can continue to build a design with your own hands. Before "withdrawing" walls, a frame of concrete pillars is made. The core provides strength to the construction, allows to prevent the collapse of heavy walls. It is recommended to leave several windows on the back wall so that the room is ventilated.

When a certain part brick wall It will be posted, the seams are expanding. This is done so that the dry solution has not crumble. Surplus dried solutions are knocked down by dry rag. The level should be used when laying each row of bricks so that neither verticality nor the horizontality is violated.
Facial row brick masonry Made "on dry", that is, without the use of the solution. So it is possible to normally distribute the vertical seams and frees from the need to use with the front side of the halves of bricks. Next is the markup of the corners of the building. Then the base row of bricks is laid out. Even if the height of the construction is small, the horizontal should not be neglected. The same refers to the vertical of the corners. After the establishment of all angles, the cord is tensioned. To secure it, carnations stick to the seams. The masonry continues on the cords.

After laying the first two rows, a wooden frame of the door is installed, which is being strengthened outside the struts. 40 cm from the floor between the rear wall bricks metallic corners are inserted, fastening podium. At the very top there is another 1-2 row to lift the roof.
a - spoonful row; B - Tychkovy row: 1-4 - order of action.
Be sure to comply with the presence of a window (approximately 20x20 cm). It is recommended to place it above the entrance door.
Roof
 Building a toilet cabin at the cottage
 For our simple buildings, the usual single Roof. It is recommended to make a skat aside back wall or sides. The roof material may be slate or other suitable materials. Remember that raindrop drops falling on the roof of the corrugation create a big noise!
To make an angle, enough on one wall of construction put an additional row of bricks. For fastening, a frame of a tree or metal can be used, to which the roof can be attached by hardware or other fasteners.
The beams to which the roof material is mounted, you can put in the upper rows of brickwork. They are wrapped in rubberoid to protect against moisture penetrating the solution. When the solution is driving, the lamp is nailed on the beam, to which the roof material is attached.
For the dimensions of the roofing cabin should go to 10-15 cm. Make the fetches not necessarily, since the area of \u200b\u200bthe roof is small to be necessary.
Conclusion
In the construction of the toilet, you need not so much experience as strict adherence to all rules. If you are not going to ride in winter, you are not going to ride, and the toilet will be temporary building, it can be built of wood.
Video: how to put brick
August 3, 2016
Specialization: Master in the construction of plasterboard structures, finishing works and styling outdoor coatings. Installation of door and window blocks, finishing of facades, installation of electricians, plumbing and heating - for all types of work I can give detailed consultation.
Toilet with a cesspool A couple of centuries ago was the only option that constructed everywhere. But today, this option is relevant for country and country sites, as well as during the construction of houses - this construction is always put on the very first.
The main difference between such toilets is the design of a cesspool, and I will tell you how each of the types are being built so that you can choose the best in accordance with the nature of the use and features of your site.
Basic requirements for designs
Before I tell how to do this or that option toilet, you need to designate the basic requirements for the choice of its location. The fact is that the sanitary standards clearly define several important rules, the violation of which will lead to a fine or even damage to drinking water on your site, which is extremely undesirable.

- The distance to the well should be at least 30 meters, in general, the more this indicator - the better;
- Before the roadway should be at least 5 metersotherwise unpleasant odors can disturb passersby;
- It is impossible to place the design close to the fence, the minimum indent is 1 meter;
- Reservoirs should be at least 30 meters, to small streams - at least 10 meters;
- Residential buildings should be located at a distance of at least 12 meters;
- To trees should be at least 3 meters.
If the groundwater level on your site is located above 2.5 meters to the soil level, you can only make the design with a closed cesspool. Open options are prohibited by sanitary standards.

I want to note from myself, if there is a nizin on your site, in which water is worthwhile, then the toilet is forbidden there, since every year all the uncleans will spread in your opinion and neighboring sites.
Types of facilities
So, we will look at those options that best have proven themselves in operation. I will not talk about the simplest system with just dug apartments, since such a toilet does not correspond to any sanitary standards and is not distinguished by reliability. It is better to choose one of those types that will be discussed in this section.
Option 1: Using automotive tires
In fact, old tires from agricultural machinery can also be used, it all depends on what you can find. We will immediately understand with the advantages of this decision:
| Budget | Used old elements that can be found for free. That is, you practically do not spend money and eventually get a fairly reliable system. Project implementation is minimal |
| Easy workflow | If you are working with your own hands and have no experience in the construction sector, then some of the following options may seem difficult to you. Immediately you need a minimum of knowledge and skills. |
| Durability | Personally, I have a well made from tractor tires, which used about 20 years, was at first it was local sewage, then laid central SystemAnd the design serves as a sump before entering the highway. No signs of wear and destruction are not yet observed |

Works on the construction of such a cesspool look like this:
- First of all, you need to find several tires of the same size.Their quantity depends on the depth of the cesspool. Calculate it is easy: Measure the thickness of one tire and divide the total depth to this indicator;
- Further you need to attach one bus to the ground and draw the circle with a diameter of 20 cm more than the size of the element. This will allow work without any problems;
- The stage of digging the pit, perhaps the most time-consuming of the whole process, it takes quite a long time, so I advise you to attract an assistant to work alternately or hire an excavator in order to get rid of myself from these works;

- If you do the design of the closed type, the gravel or rubble layer is added to the bottom, after which the concrete screed with a thickness of 5-10 cm is poured. If the lower part will perform the role of the filter, then 5 cm of river sand is added to the bottom, and at least 20 cm of a large rubble, it perfectly performs drainage functions;
- Then the tires are stacked, they are very tightly adjacent to each other, so it is additionally strengthened to strengthen them. The only strengthening of the design is made with outdoor – between the pit walls and tires fall asleep crushed stone, stones or broken bricksit allows you to strengthen the design and eliminate the offset of the tires subsequently;

- The upper part can be done in different ways. You can cut the inner rim to increase diameter and make a slot in the place where the hose of the assesenizor machine will be put. On top, you can put a wooden shield or frame from bars, and you can use a concrete cover that are used on sewer wells.

Option 2: Brick cesspool
This solution has several advantages:
- The durability of the design, such a system will serve you for decades;
- Construction strength: It is unlikely to destroy the movement of the soil during freezing;
- Simplicity of work: You do not need to possess the skills of a professional mason, accuracy is not important here.
Now we will understand how the workflow is passed:
- First of all, the pit is digging, it can have both a round and square form depending on which design you will do. I advise you to choose the second option, since such a pit is easier to dig, and put a square sump much easier than round, especially if we are talking about a person without experience;

- Next, you need to catch the bottom, many are advised to make it with a bias back, but if it is flat, then nothing is essentially changed, but it will be easier for you. If you have an open option, you should pour out at least 20 cm of a large rubble, which will perform the role of the filter;
- If the system is hermetic, then you need to pour the screed to the size of the future drive, you can continue work at least 2 weeks when concrete becomes more or less durable;
- The brick cesspool for the toilet in the country can be both solid in the case of a closed system and have cells for drainage, if you have an option with a filtering layer at the bottom. The main requirement for masonry is reliability, beauty does not matter.

Option 3: Plastic Capacity
This type of structures has become increasingly becoming more and more popular due to several reasons:
- Plastic is immune to aggressive impact and maintains strength over a long period of time;
- If you need an absolutely hermetic system, then better option No, polymer materials will not let the fluid outward;
- The design is very easy.

Work on the construction of cesspools from plastic is carried out like this:
- First of all, it is necessary to determine what the container will be used. It can be both a ready-made option and plastic cube that is used for transportation. different compositions, or another option, which turned out to be at hand;
- Next, the pit of the desired size and configuration is digging. In order for the design to be smoothly and was stable, at the bottom I advise you to put several bricks or small concrete slabs;
- Capacity exhibits in such a way that its neck is located under the future toiletif necessary, cutout is done in the upper part;

- Lastly, the design falls asleep soil, and the top is constructed from above support system To build a future toilet. The design can be any, the main thing is its reliability.
Option 4: Concrete Rings
This solution is used for a wide variety of structures, and for cesspools it is also suitable, the construction of the construction constructs occur as follows:
- First of all, elements are delivered to the site, due to their greater weight, you need to attract several assistants to unload or use the lifting technique;
- To simplify the workflow, I advise you to carry out work by analogy with the root of the wells. Initially, a hole of 20-30 cm depth of 20-30 cm is digging in the diameter of the ring, you just need to remove the turf. After that, the ring is rolled up and installed at the location;

- Then the soil is neatly selected throughout the perimeter so that the ring gradually lowered to the groundwhen the upper part comes with a soil, the second one and so on to the end of the process, is put on it;
- The upper part should be located 10CM above the ground level so that there is no precipitation and trash in the pit. The seams between the elements can be sealed and processed with bitumen mastics for additional reliability;
- The bottom is done if the pit is an open type, then rubble is the rubble layer of 20-30 cm, and if the design is sealed, then the screed with a thickness of about 10 cm is poured.

Option 5: Monolithic design
This is one of the most complex types of design, but such a cesspool will be very reliable and durable. The workflow is as follows:

- First you need to dig a pit of the desired size and configuration. At the same time, remember one simple rule - the more its size, the less it will have to be cleaned and pump out, so do not do too small;
- Next, the bottom is done, the crushed stone falls asleep and the durable screed is poured. It will serve as the basis for the walls, so it is better to make a layer at least 10 cm;
- The next stage is the construction of the reinforcement frame, which will make the pit much stronger and prevents the cracking of the concrete when temperatures drops. Elements are associated with wire to ensure the mobility of the compounds;
- Then it is necessary to make a formwork, for this you can use boards or other suitable items. It is important to fasten the design well so that under the weight of the solution it did not spread;
- Pouring is performed in one stage to achieve maximum strength and reliability. Formwork can be removed after a day, further work can be carried out in 2 weeks.

How to simplify the process of maintenance of the system
The correct device of the cesspool is only the first part of the work that can be done once, and it is necessary to maintain a cesspool. If before cleaning was performed only with the involvement of the assessing machine, then in our time appeared special means For toilets and cesspools.

I considered all the biological products in detail in one of the reviews, you can familiarize yourself with it, here I will talk about the main versions and their features:
- The liquid antiseptic is characterized by ease of use. The solution you just need to add to the pit, and it will begin to act immediately. The half-liter is enough for one cubic meter, you must approximately estimate the volume of the pit to calculate the desired amount. The cost varies from 300 to 1000 rubles per 500 ml;

- Powdered options before use should be dissolved in a certain amount of warm water, after which the solution is simply poured into the cesspool. It can be bogranules, they are used in the same way as a powder. The package price is about 200 rubles, the composition must be added 1 time per month;
- If the toilet with a cesspool is located in the country or panstone, I advise you to use special pills. They extremely effectively remove bottom sediments, improving drainage, and decompose water drains that can be used for irrigation, and Il, which is an excellent fertilizer. The price of the tablet ranges from 70 to 200 rubles, it is enough for 1-2 months;

It is worth remembering that any chemistry negatively affects the bacteria, so it is not recommended to pour out in a cesspool of a hole with detergent and cleaning agents.
Alternative option
If you have groundwater It is very high or use the design you will be epizodically, you can make a country toilet without a cesspool, which is differently called Pood-closet.

Its main feature is that under the chair of the wooden structure, a container is installed, most often a bucket that serves to collect waste. The operation of the system is performed using the filler, most often for this peat or minor sawdust.
The use of the design occurs as follows: the filler is added to the bottom of the container, after each use, the filler is added. After the container is filled with it, you need to make it on composted bile. As you can see, everything is very simple.
In order to minimize the unpleasant smell when using PPP-closet, it should be done in the form of a pipe that comes from the upboard compartment.

Output
Make a toilet with a cesspool easy, you need to choose optimal design And follow the recommendations set out above. It is equally important to maintain the system correctly, and so as not to spend money on the arrangements, use bacteria, they will get rid of you from an unpleasant smell, and water can be used for watering. The video in this article will help to figure it out in some nuances better, and if something is unclear - ask in the comments.
August 3, 2016.If you want to express your gratitude, add clarification or objection to ask the author - add a comment or tell me thanks!
August 6, 2016Specialization: finishing of facades, interior decoration, construction of cottages, garages. Experience and gardener and gardener experience. There is also experience in repairing cars and motorcycles. Hobbies: the game is not a guitar and a lot more, to which there is not enough time :)
The toilet is one of the most necessary objects in the country. Therefore, experienced people always advise to begin the arrangement of a naked site from him. But how to make a toilet yourself without having any experience of such work?
Next, I will try to help in this matter. Of course, we will not consider how to install the installation in the house or fulfill another complicated operation. Below I will only describe a few most simple ways Construction of outdoor close-oriented masters. We also let us touch some aspects of the restroom in the house or within a different structure.
Outdoor closet construction options
You can build a toilet at the cottage from any materials that have been at your hand.For example, if you are going to build a country house, and bought building materials with a good stock, the toilet can be erected from the same materials, for example, from foam blocks. Brick, etc. In this case, you will get a capital construction with solid walls, however, for construction will have to spend a relatively long time.
If you want to build a toilet with minimal cost time and strength, it is better to make it frame from a bar or metal profile, after which it is to see any material that will be at your hand:
- boards;
- clapboard;
- polycarbonate;
- professional, etc.;
If the site already has a building with a free place, sufficient to the toilet, then the cabin can not be built. Below I will tell you how to make a toilet in the garage, in a house or any other structure that is available on the site.
Regardless of how you will build a toilet, this procedure will include several main steps:

Below more for more information with all these stages.
Design toilet
So, first of all, we need to make a draft future building. This stage implies a solution to several important tasks at once:

In fact, there is nothing complex in this, however, each of the stages has its own nuances.
Designing the cabin
The simplest is the skeleton design of the toilet. The frame, as a rule, consists of four racks, as well as lower and upper strapping. To increase strength, the disclosures and crossbars are additionally used.
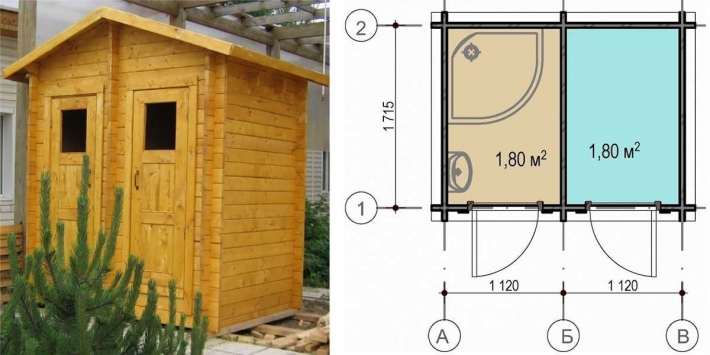
Of course, if you wish, you can use a more complex frame, for example, to make closet in the form of a teremka. Sometimes, under one roof, the toilet and summer shower are combined, which is also very convenient. Moreover, the layout may include both the locker room so that things do not go out in the process of taking the soul.

On our portal you can find other ideas for the toilet. The main thing is that the level of their complexity is commensurate with your skills. If you do this work for the first time, it is better to perform a simple rectangular cabin.
The project of a brick or block knob is simpler, as all the walls are erected by laying bricks or blocks. Therefore, in the drawing, you should only specify their location and number of rows on each wall for the convenience of further work.
But, before making a drawing of the structure, it is necessary to determine its size. The latter, of course, can be taken arbitrarily at their request, however, there are some generally accepted standards:
- height - 2 meters. This is usually quite enough, however, if there are high people in the family, this parameter can be increased;
- the width of the standards should be at least one and a half meters;
- length - 2 meters, it is also enough to place a stoolcuck and provide a spacious platform in front of it.

By drawing up the drawing, it is necessary to specify not only the total size of the toilet, but also the dimensions of all parts in millimeters to prevent errors in the construction process. After that, it is possible to calculate the number of materials.
Type of toilet
After the cabin project is ready, you need to solve how the waste will be accumulated or processed. Depending on this, the outer closes can be divided into several types:
- with a cesspool - in this case, a pit is located under the toilet, which is usually cleaned once every few years;

- pood-closet - in this case, a small container is located under the stool, which from time to time is carried out and empty;
- biotales - in fact, this same Pood-closet, but the waste of life in this case is sprinkled with peat, as a result of which immediately begin to be processed. After filling the tank, the waste is poured into a compost hole, where excellent fertilizer for plants is formed over time.
I must say that the beyatuette can be positioned even in a house or any other room. In this case, no additional plumbing for the toilet will need. The only thing will have to perform, for example, from drywall.

There are ready-made toilets in the form of plastic toilet bowls with a tank. Instead of water in the tank there is peat. The price of these products begins from 4500-5000 rubles.
The most common is a toilet with a cesspool, because after its construction you can forget for several years about any care. The pit is performed necessarily with hermetic walls and a bottom-filter for the withdrawal of liquid components of waste. A layer of sand and rubble is used as a filter.
Groundwater should be located at a depth of at least six meters from the soil level. Otherwise, the bottom of the cesspool is necessary to perform hermetically.
As for the volume of the pit, then two meters of cubic is quite enough for a family of three to clean it every few years.. If you have a big family, and you will spend a lot of time at the cottage, it is possible to increase its volume to 2.5 cubic meters.
Of course, it is much easier and faster to perform Pood-closure, however, it is less convenient in terms of operation, as it will have to often empty the container. But, if you have taken such a solution, put a bucket with peat near the stool, so that after each visit to the restroom you can sprinkle the contents of the bucket peat. Thus, you will have a lookup.

Choosing a place
The final stage of the design of the toilet with their own hands is to determine the location of its location. You can arrange a relay or Pood-closet in any place in any place.
If there are drops on the site, it is necessary to arrange the toilet as close as possible to the highest point to eliminate the possibility of its flooding with thaws or stormwaters.
But when choosing a place toilet with a cesspool, you need to follow certain rules. The fact is that by sanitary standards from the toilet to important objects on the site it is necessary to observe a certain distance:
It is necessary to place the toilet on the site so that unpleasant smells do not interfere with your rest or resting neighbors.
In addition, it should be borne in mind that sooner or later the pit will have to be cleaned. Therefore, it is desirable locate the toilet closer to the outdoor fence, in order for it to drive up an arbitrary car.
After preparing the project, you can proceed to the practical part - construction.

Building a block or brick toilet
Preparation of cesspool and base
First of all, consider how to build a capital toilet from blocks and bricks. Work should be started with the execution of a cesspool, which in our case will serve as a foundation. The instructions for performing this work looks like this:
- first you need to place the pad. It is advisable to position the pit so that it be centimeters at least 30-40 longer cabins. In this case, the toilet can be performed by the hatch for pumping waste.
In the process of marking, it should be borne in mind that the minimum width between the walls should be one and a half meters. Those. Width of the pit must be denoted with the thickness of the walls; - next, you need to dig a hole to a depth of about one and a half meters;
- then the bottom falls asleep with sand and rubble, after which it is thoroughly tram. If nearby are groundwater, it should be reinforced and annoyed with concrete;

- next, the walls are performed. They can be erected from bricks or pour concrete.
This operation is performed by the same principle as the belt foundation. On our portal you can find detailed information on how this is done; - when the walls are ready, you need to pour out a thickness of a thickness of at least 5 cm. To fill the slabs, you also need to perform a formwork for the walls and reinforce. At the same time, do not forget to perform the hatch above the stool, and also leave the open area to be located behind the toilet.
After each stage of the fill, i.e. Fill the bottom, gender, walls and overlap, you need to stop working so that the concrete scores the necessary strength.
On this process of building a cesspool completed. Now it is necessary to wait until the brand durability takes.

Construction of walls and roofs
The laying of the toilet walls does not have any features and is performed in such a sequence:
- around perimeter concrete slab There are several layers of rubberoid for wall waterproofing;
- then the brick or block laying is performed. There is nothing particularly difficult in this procedure. The only one, you need to neatly lay each row so that all bricks are located in one horizontal and vertical plane.
To do this, use the level, as well as pull the ropes that will serve as lighthouses. In addition, try to have all the seds to have the same thickness (about 5 mm) and were completely filled with a solution;

- above the door I. window passing You must perform jumpers. For these purposes, you can use two metal corners located so that the brick or block can be on them;
- when the walls are "raised" to the necessary height, you need to perform the roof. To do this, lay the boards that can be fixed on the walls with a dowel. The waterproofing film is stacked on top of the boards and the shelter is performed by rail.
On top of the crates attached any roofing material - slate, professional flooring, metal tile, etc.
The rear wall of the toilet should be centimeters 15-20 below the front to ensure the roofing slope.
At this, the construction of a capital toilet is almost completed. Now you need to make a chalchak board, which is a drawer with a hatch, as well as install the door and make a lid for the pit from the board. Below I will tell you more than the door and chalchak.

Arrangement of cesspool and foundation
If the toilet is the first to do with the experience of construction, then it is better to make it frame, as it is much easier. At the same time, a cesspool can be made from automotive tires.
To do this, you need to perform the following actions:
- first of all, you need to place the pad and dig a hole in the back of the toilet. Its sizes should be such that the tires can be placed plastics;
- further, the pits are performed according to the scheme described above, after which the tires are stacked on each other until they reach the ground level;
- now need to perform foundation columnal. To do this, it is necessary to dig a holes in the size of concrete blocks under each corner of the design to a depth of about 40 cm. After that, the bottom of the holes need to be covered with sand and rubble with a thickness of about 30 cm, thoroughly tumped and then lay concrete blocks.
Blocks should be located in one horizontal plane, so during the installation process, use lighthouses and levels; - At the end of work on the blocks you need to lay several layers of rubberoid.
Now, when the pit and foundation are ready, you can proceed to the arrangement of the frame.

Construction of carcass
The easiest way is to build a frame of a bar with a cross section of 50x50 mm, as it will not be necessary for this welding machine and any special tools. It is manufactured as follows:
- the foundation is stacked by the scarlet in the form of a rectangle from the bar. Credit the timber among themselves with self-draws and metal corners;

- further on the same principle, vertical racks are installed, which can be strengthened with disconsets;

- based on the crossing, which separates the chalk zone from the floor. On this cross, the chairs will be located in the future;
- from above, the top strapping is performed, which is also fastened with corners and self-drawing;
- now you need to fix the racks and cross in places location of the door and window opening;
- at the end of work, you need to perform a chalk frame, which also consists of racks from horizontal crossing.
Sheaving
Now that the frame is ready, it needs to be sewn. As mentioned above, you can make it from any "primary" materials. For example, a polycarbonate is originally covered.
If the exterior of the site is made in a rustic or rustic style, make it out of lining or at least from the boards. The skin is attached to the frame also with our favorite self-tapping screws. On the same principle is silent and stoolchak.

The roof is performed according to the scheme described above. As for the door, it can be made from the plank of suitable length, which are bonded with each other Z-shaped rails. On the floor of the toilet simply stacked the boards.

Here, in fact, all I wanted to tell you about the construction of the outdoor toilet. I note that the presence of a restroom at the plot does not say at all about the fact that it is necessary to abandon amenities in the house. Even on the contrary, if initially the restroom was not planned, you can highlight the place for it at the expense of the residential room.
Between this case is not the only way to arrange the toilet in the house. If you want to create the most comfortable conditions, you can perform autonomous sewer and install septic tank.
In this case, even installation of installation in the toilet can be implemented. However, this is a separate topic for the conversation, we will talk about next time.
Output
The construction of the toilet is a task with which to cope with every homemade craftsman. Moreover, it is possible to build a skeleton design yourself in just a few days. I hope the above information was useful.
Additional information contains video in this article. If you have difficulty in the construction process or there are other questions, ask them in the comments, and I will gladly answer you.
August 6, 2016.If you want to express your gratitude, add clarification or objection to ask the author - add a comment or tell me thanks!
🔨 Country toilet is easy to make it yourself, if you attach some efforts and efforts. We picked up drawings with dimensions for popular country toilets that will serve you dozens of years! Also in the article waiting for you step-by-step photo instructions For the construction of a country toilet.
The most time-consuming stage in the course of the exhaust place will be a digging of a drink, but this work can be done. The aesthetic side of the building is a secondary question, the most important thing is to correctly arrange a cesspool and create a reliable basis for an overhead structure.
It should be noted that some of the owners of country sites do not build a toilet according to the rules and costs the usual bucket substituted under the chairs. But, anyway, the waste of life is necessary to go somewhere, so without capital pit, it is still not to do. Therefore, it is better to fulfill all the works correctly and for many years not to return to this issue. It is especially important to make a capital structure in the event that the tenants spend a significant part of the year at the cottage.
When if a I do not want to spoil the design of the area of \u200b\u200bthe installation site, it can be hidden in the far corner at home, or invent such a design for him, which will help to organically enter the building in the landscape.
Choosing a place of fault and its design
Usually the toilet is installed in closer to the long boundary of the site, and this is understandable, since at least a minor smell, but will be present in this room or near it. But sometimes use another option, arranging a cesspool near the house, and a free corner of the house is removed to the toilet, with a wide sewer pipe in pit. This design is mainly used in cases where water was carried out in the house, and the plans are setting an isolated container for collecting life waste.
In any case, you should follow the standards installed by sanitary and epidemiological services. They must be observed in order to protect themselves, neighbors and environment from unwanted consequences, such as infectious diseases or soil contamination.
- If a cesspool is satisfied, it must be arranged at a distance, not less than 30 m from water sources, and its depth should not reach groundwater.
- If a septic tank is installed, then it is not closer than 15 m from the house.
- If you plan to use an isolated container that will be cleaned as it fills asshenizatorsky The machine, it can be installed anywhere, as waste will not go into the ground.
Isolated capacity is also the exit in cases where the groundwater takes place not too deeply and the device of the cesspool, dug in the soil, is impossible.
Usually the pit of the simplest summer toilet has an area of \u200b\u200babout one square meter. If the pit is breaking round, its diameter should be equal to about 1 m. Its depth is 1.5-2 m, depending on the depth of groundwater.
After the place is defined for the pit, you can move to the selection of the toilet design.
- The first thing you need to consider is the weight of the design - it will largely be predetermined by the material that is planned to be used for construction. The house itself should not be too heavy, since with time the ground under his weight can start to see and, in the end, the construction is deformed and damaged.
For construction it is good wooden bars Both boards, or thin metal - galvanized profiles and professional flooring.
If it is decided to build a toilet booth from logs or bricks, you will have to think about a well-fortified foundation. But to build such heavy buildings to nothing, as they still will not become warmer light buildings. Better if there is a necessity to thermalize Placing insulation, which have a small weight, for example, foam. Such a building will be lightweight, and warm, not blown in the cold season, and it will not be overly hot in summer.
- Deciding with the material you can move to the size of the booth.
Usually, the standard toilet has a size in a width of 1 m, a height is 2.3 m, and the length of the room is 1.3 ÷ 1.5 m. However, these sizes are by no means dogma and may well vary. In any case, the room must be comfortable to find in it any family member in the position and standing, and sitting.
What will take to build a toilet
Deciding with the design and placement of the toilet, acquire necessary materials To build it. Wooden or metal "house" can already be bought in the finished form. If it is decided to raise it yourself, then the following materials will be needed:
- Boards and wooden bars.
- Fasteners - nails and self-tapping screws.
- Metal corners to enhance the design of a wooden frame.
- Handle for doors, hook or valve to close the door.
- Roof coating material - slate or professional flooring.
- Plastic or wooden stool with lid.
- For necessity - foamart I am insulation of booth, and material for the inner covering of insulated walls, chipboard, thin board or plywood.
For the cesspool, you need to be required:
- Cement, crushed stone, sand.
- Armature to strengthen the foundation of the house.
- Metal chain grid for tosing pit and metal brackets or pins for fastening this grid to the soil.
Another option, instead of a mesh and plastering with concrete, can be a brick that the walls are placed.
In addition, the wells for the device are often used having a hole in the walls. Many dackets prefer old rubber tires Large sizes.

Another, the most environmentally friendly option may become finished capacity - Septic tank. They produce different sizes, so you can choose the desired, depending on the number of family members and the duration of the residence period in the country.

Naturally, when the country toilet is erected, it is not necessary to do without tools, so you need to have:
- Hand bug, which can help when digging a pit.
- Soviet and bayonet shovel, with a long and short handle.
- If the soil is stony, it may take a perforator.
- Hammer and screwdriver.
- Shlifmashinka - Bulgarian with disks on stone and metal.
- Electrolzik.
- Marking tool - ruler, roulette, square, construction level, pencil or marker.
Prices for popular septicities
Device cesspool
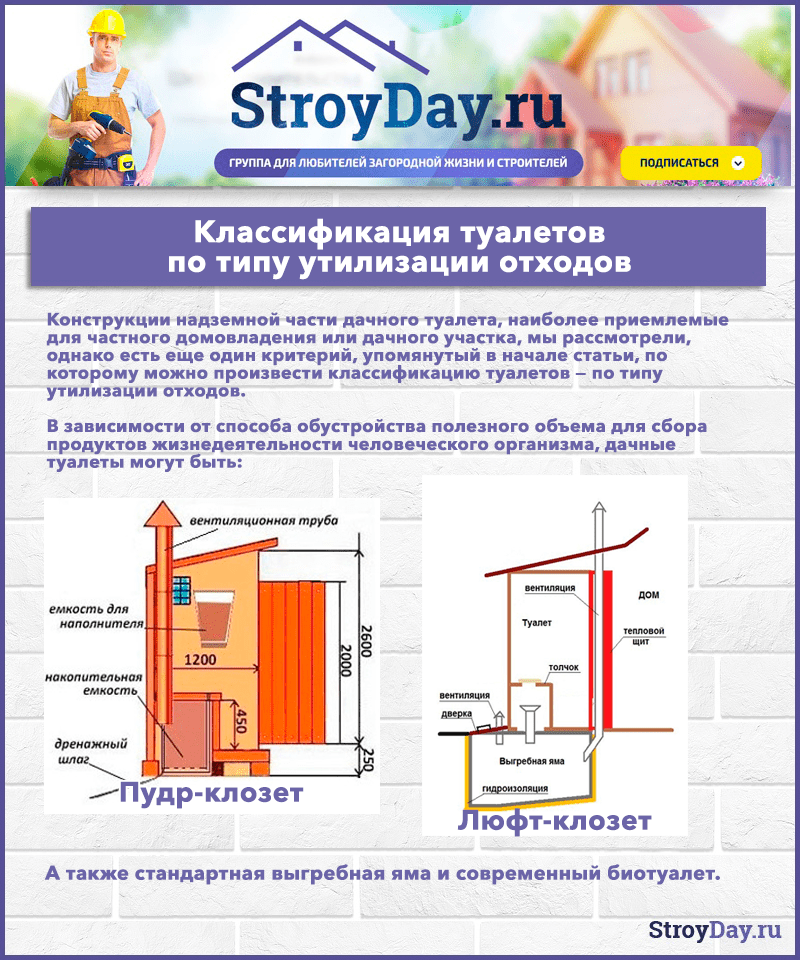 Classification of toilets
 by type of waste disposal
Of course, they always begin with marking and digging pit. It will have a square or round shape, depending on the selected design.
1. If a two-chamber plastic septic is installed, the pit is drunk so that the inlet nozzle is directly in the toilet's booth, since it will be mounted on it. The neck of the second chamber should remain outside the room - it is needed for regular pumping of accumulated fecal masses.

Tanks are of different shapesAnd this will depend on the dimensions and the form of the pit. The size of the pit needs to be made by 20-30 cm more than the existing capacity, as it is good to ravibrate the soil around it.

2. If the walls of the pit will be frozen by concrete or brick, it can be done round or square shape.

- After digging the pit of the right depth, at its bottom you need to arrange drainage from a large rubble, stones, bricks debris
- Then, the walls are covered with a metal chain mesh with a 50 × 50 mm cell. The grid is fixed, driven into the soil of the reference of steel wire or pins.
- So that the walls are stronger, you can additionally reinforce the walls with a metal grid with large cells of 100 × 100 mm.
- Further, the method of pumping, a concrete solution is applied to the walls, which are left to complete drying. The total thickness of the concrete layer should be about 50 ÷ 80 mm.
- After grapping the first sketched layer, the walls are placed to an even state of the same concrete solution. Twisted pit leaves left.
- Overlap pit or ready reinforced concrete slabor manufactured by place. It will serve for the toilet foundation and platform around it.
- The boards are laid on the pit, which should go beyond 700 ÷ 800 mm and be recessed to the ground to one level with the soil. Boards must be treated with antiseptic means. This wooden substrate under the foundation of the VP can be replaced by concrete columns.

- On the surface there are two holes for installing the stool and for a cesspool, which later should be covered with a lid. Formwork is installed around future holes.
- Polyethylene dense film is spread to the entire area of \u200b\u200bthe future foundation.
- The reinforcement grille is stacked on top of it, which is a formwork throughout the perimeter of the future foundation.

- The height of the hole formwork should be the same as the formwork of the entire foundation. Formwork boards and will serve beacons when leveling the surface.
- The concrete solution is mixed, poured onto the platform, it is recomposed and left to dry. For the durability and strength of the external concrete layer, it is possible, after the initial setting, to carry out "ironing" of the wet surface with dry cement.

- On the finished area after its full maturation, you can install a booth for the toilet. On a hole, intended for pumping accumulated waste, you need to arrange a hatch. It can be purchased at the store or make it yourself. Luke cover should be easily open and closed.
3. Another option can be a round pit with laid in it. car tires. But it should be noted that such a type of cesspool is not suitable for continuous use. The like toilet can be used only in the country conditions, when the tenants come only episodically, for example, on weekends, otherwise it will be very often for the gathered waste.

- For the device of a cesspool of this type, a round boiler is rotated 150 ÷ \u200b\u200b200 mm more than the diameter of the available tires.
- The drainage layer of 15-20 cm thick is stacked on the bottom of the drinker.
- Then exactly in the middle of the pits are stacked on the On the other to the surface of the soil.
- Around the tires, as the drainage of crushed stone and sand is falling asleep and tamper. This process PR is diluted to the top.
- When the tires are fully laid, a shallow ribbon foundation can be arranged around the pit. To do this, on the perimeter of the future toilet, a trench of a depth of about 500 mm, in which concrete will be poured.
- Bottom of trench it is rambling I. falling asleep layer of sand at 50 ÷ 70 mm, which too it is rambling I. Closed with a layer of rubble of the same thickness.
- Waterproofing from dense polyethylene is stacked.
- Next, you can do in two ways:
- cook and install the reinforcement grille, mount the formwork with a height of 100 ÷ 150 mm above the ground level and then pour with concrete solution;
- Share the foundation out of the brick, and then shook it with cement.
- After pouring the solution from the cement foundation, the formwork is removed, and the brick is aligned from above.
- Ruberoid is stacked on its surface, which separated concrete surface From wooden.
- On the foundation or the finished design of the toilet is established, or it is erected independently.

For the convenience of the construction process, the wooden base frame, made of powerful bars, is fixed on the foundation of CH middle, and other elements of the design will be mounted, depending on the selected construction model.
4. It is impossible not to mention another way to arrange a cesspool - with the help of metal barrels with a cropped bottom. They are installed one on the other and the same as in the previous case. Around the resulting pipe tamper gravel mix Or a mixture of sand with rubble.
 Village Yama from metal barrels - clearly not last long
 Prices for country toilets
country toilet
It would seem that the method is simple in performance, but he has much more flaws than the merits. Metal barrels under aggressive impact and from the inside, and outside, from the ground, very quickly corroded, and will serve such a toilet very long.
Popular country toilet projects


Construction of a cottage toilet house
When the pit, and the site for installing the toilet room are ready, you can move to the installation of a house in advance of the diagram.
Toilet houses can have a variety of forms, for example, even in the form of a fabulous hut. The uninitiated immediately and will not determine that this room was so perfect in landscape design Plot. Such a structure can be performed with your own hands, knowing the scheme of its assembly.
The photo presents the option partially made of logs that give this structure with decorativeness, mask the purpose of the construction itself.
 Original teremok - not immediately and understand that this is a toilet
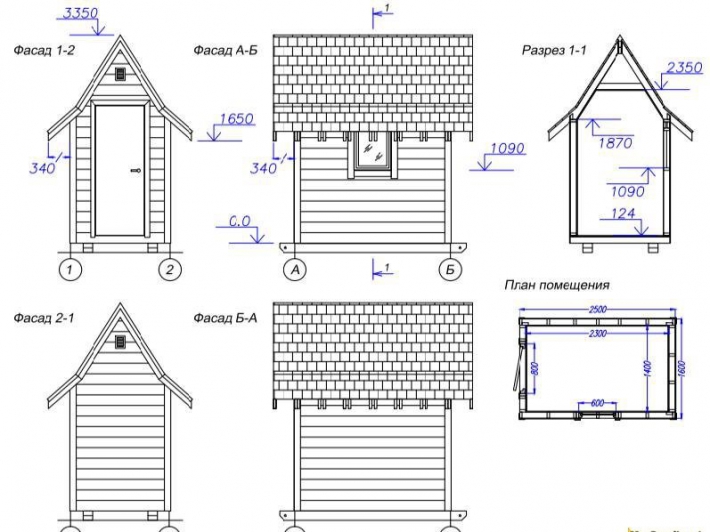
 The scheme presents the basis of the construction of a log house, only instead of logs used boards. It can be clearly seen how the walls are collected and the roofs rose. Distributed internal space and chosen location Stulchak.
 Approximate scheme "Teremka"
 The next stage will go the roof lamp, roofing and the walls of the walls chosen for this is the material - it can be both a tree and metal.
Such a house can be either installed on a cesspool, or used as a room for the dry lad.
Video: Making a house - "Teremka" for a country toilet
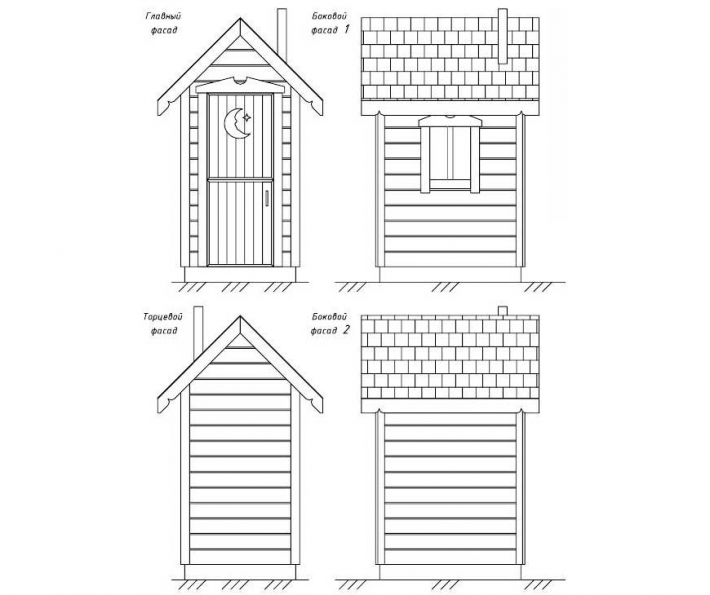
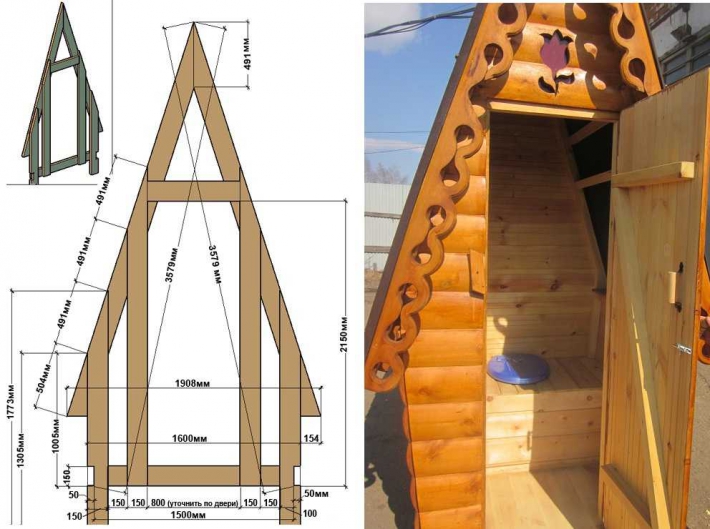
Another variant of the breakage of the toilet, which is called "Chalas". In this case, the house is built as a triangle, and its side walls are at the same time the roof. The form is quite simple, so it will be easy to build the construction.
 Toilet - "Shalash"
Such a design is not only easy to build, but also convenient to operate - it is stable at the base and is quite spacious inside.
Installation of the toilet - "Shalash"On the presented drawing shows everything internal structure The house, the location of the stool and the way of the wall-roof crates. The front of the forefront of the structure and the back wall has begun. Domik- "Shalash" can be put on the equipped cesspool, as in this case, and can also be used as a room for the dry lad.

This form of a house can be called traditional, since most often it can be found in the plots. But even such an uncomplicated design can be decorated in their preference.
For example, a toilet on this household territory was decided to do under the Japanese house. It is told by hieroglyphs written on a plate suspended on chains, a Japanese lantern at the entrance and even an additionally arranged roof. In addition, the internal design of the room is also sustained in general style.
A similar attitude to the design of the site says that even from such a structure, as, you can make a small work of art, if you make a little effort.

The approximate scheme of the construction of such a toilet is presented in the figure. The device of a cesspool, installation of a toilet structure and a cleaning hatch on it, is clearly visible. The design is quite simple in the device, and it is easy to build it. But that it was reliable, it is necessary to achieve stiffness of ligaments of all parts among themselves.
The internal space of the toilet, suitable over the cesspool, in the process of the construction of the walls may look like. That is, bars of the foundation are installed on the foundation for which the framework of the future structure is fixed.


After final finishing of the toilet from the inside, the room may have such a neat and a cozy view.
If desired I. opportunities can be come up with another dacha toilet design, but do all interior decoration Needs from warm materials. Not recommended to use for registration ceramic tilesSince this is a very cold type of material, and besides this, in winter, the tile becomes very slippery.
Video: Multiple options for a dacha toilet device
Biotica
If there is no way to build a country toilet or simply missing a desire to contact construction workYou can use a biotage. This option will save both from digging a pit and, possibly, from the installation of a house.
 Biota usa is an excellent solution for country conditions.
 - It is an autonomous toilet, which does not require any separate room, nor connecting to the allocated communications
The relay consists of two compartments-cameras, the upper of which performs the role of the toilet, and the other is used for biological waste recycling. In the second, the bottom chamber are active substances that decompose the feces and turn them into a homogeneous mass, which does not smell. The actions of the bioactive fluid decomposition is enough for ten days, then the chamber is cleaned by pouring the contents into the central sewer or to the soil. The disposal method will depend on which active substances will be used in the beyute flight. These substances are there t.rech types: Composting, chemical and microorganic. Each of them is suitable for a specific type of biotage.
- For a composting dry content, peat is used as an active substance. It has a high absorbent ability - so, one kilogram of the peat absorbs ten liters of fluid. Received as a result of active processes, not smelling compost is perfect for fertilizing beds.
Usually, in a set with such a relay, there are tons of ventilation, which are discharged by unpleasant odors during processing.
- The biotales, whose work is based on the use of chemicals, has an indicator that indicates that the container requires cleaning. Waste, processed in this way, merge into the sewer, to protect the environment. For such models, special substances are manufactured with non-freezing property.
- The third type of this useful adaptation is a biotoid, in which microorganisms are engaged in recycling, turning them into compost. The resulting material is environmentally friendly and harmless to soil and animals, so it will not be disposed of it.
Benefits and disadvantages of the beytail
- high levels of environmental safety;
- ease of use;
- no unpleasant fragrances;
- affordable price;
- durable material.
- there is a smell leakage, it will be necessary to install in a ventilated room;
- with a strong contamination of the tank capacity, it will have to wash his own.
- in rooms with low temperatures, it is not possible to use peat looks. From the cold, all processing processes stop, the contents of the lower reservoir freezes, as well as the peat itself. The problem is solved by the transfer of the dry content to the warm room.
If desired, the beytalet can be installed in the most common room, built with your own hands, which is located in the courtyard, and on winter - To put it in the house, setting up for these needs a convenient angle.
Prices for a popular range of biotoids
Biotales
Biological toilets
To help the owners of country sites that have toilets with cesspools on their territory, special means are developed similar to those used in the biotales.

Before applying, it is necessary to study the instruction, since the composition is poured or poured into parts. How to use such substances correctly, you can learn from the information on the package, since each means is dosed in different ways. A similar substance is used, as a rule, very economically. For example, one packaging or banks of some funds are attached for a year for a cesspool with a volume of 3.5 ÷ 4 tons.
So, there are many ways to solve the problem of the country toilet - there is always the opportunity to choose one or another option.
The design of the toilet in the country as a whole consists of two main parts. They are the place for the unclean and the ground part of the structure, in which it will be possible to hide from the eyes during the "procedures". In this article you will learn how to build a restroom without resorting to the help of specialists.
Types of country toilets
To sort out and build a country toilet with your own hands step by step, you need:
- Determined with the type of visual productivity to the external environment.
- Select location to the toilet on cottage plot According to the local conditions and the recommended standards of its location.
- Decide on the appearance of the ground structure, choose materials and decorative pieces of design.
 The separation of types is just the same in place for unclean. External part can be built Do with your own hands in any form and from any materials as soon as you pleased, or what is enough money and free time. But on the type of disintegration of uncleans, 4 types can be distinguished:
- poll-closet;
- lesuft closet;
- cesspool;
- biothuette.
So, let's deal with how to make a toilet in the country, in order to choose suitable option By the type of removal of unclean.
Poll-closet
Uncleans in this embodiment are not in a cesspool, but in the container that is installed under the stool. It can act the usual bucket, box or barrel. Features of this design are as follows:

Summarize. To build Pood-closet, it is necessary to take care only about its ground construction. Inside, it is necessary to equip a comfortable high stoolchak, under which the remote waste for waste and ventilation will be located. Not bad straight indoors to organize a drawer for filler.
Schedule-close
The advantage of this type of restroom for the cottage is that it can be equipped even in the house. The features of the design consist in the following.

 The trick of the design is as follows. It is necessary that the end of the sewage pipe from the receiving funnel is much lower than the end of the ventilation pipe, or in a different launcher, located at the upper boundary of the pit.
It is worth it to lay next to the heating element - vertical pipe heating, chimney. Thus, the air in the play-channel will be heated from the source, creating a temperature difference, due to which the smells will preferably come out through it. At the very top, the backbone must be supplied with a deflector.
The cesspool for the play-closet must be located directly under the toilet or a bit at an angle, which will not prevent the waste of uncleanness into the pit.
To smells do not penetrate the room, toilet or chalchak must be equipped with a roofth, and the premises itself should be done ventilated, especially if we are talking about closet inside the cottage building.


Arrangement of hermetic pit
Dimensions are chosen taking into account the number of people living and the activity of the use of the toilet. Make a huge cesspool there is no need if you arrive at the cottage seasonally. Usually the calculation comes from 0.5 cubic meters. meter per person. Recommended dimensions:

An important point is that the bottom of the pit needs to be done at an angle. Bias should go from toilet, and make up at least 30 centimeters in height. Thus, uncleans will be concentrated under a pumping hatch.
Laying the cesspool of this type is needed by brick, on the outer border of which the clay castle will be. You can do it with your own hands if there was an experience.
For hermetic cesspools, it is necessary to finish the position of the location regarding the buildings (speech, rather about neighbors) and roads (the distance of at least 2 meters), as well as adhere to sanitary standards regarding pollution pumping. Depending on the number of residents The challenge of the assessing machine to the cottage must be made from time to the quarter.
 Summarize. The backlock is convenient in the fact that it can be equipped in the house that heats. You can do it with your own hands, but it is much more difficult than installing the backlash. It is better to have a restroom room in a remote location from kitchen or bedrooms. It is necessary to perform work on the arrangement of a hermetic cesspool with the possibility of access to an associate machine, with ventilation described above, as well as with additional ventilation in the residential room.
Toilet with a cesspool
The easiest and usual type of restroom for giving. It does not suit, if the soil is on the plot of shale or limestone, or if the groundwater is located close to the surface. Features of this type of toilet are as follows:

Sanitary standards for places Location of cesspool with infiltration in the ground
- The distance to the river or the stream is at least 15 meters;
- the distance to non-peccasses and planting of food crops is at least 30 meters;
- to non-shredded trees, bushes - at least 2 meters, the same distance to the borders of the site;
- distance to buildings and roads - at least 5 meters;
- not less than 30 meters to water sources.
Biotica
 Biotypes for their type are divided into biological and chemical restrooms. What is the difference?
Chemical toilets are used to process uncleanness strong substances - inorganic oxidizers or organic reagents Abiogenic origin. Such fillers are expensive, although they bandwidth And absorbing ability is very large.
After use, they must be disposed of in a special organization. It is not possible to do this independently, since the contents of the used cartridge is very toxic, and the appropriate equipment and trained people need to be disposed of. For these reasons, chemical biothelients are used very rarely.
The biological type of the biotage has peat, crumbs, sawdust and other bulk materials as fillers, which promotes waste recycling vital activity. In principle, it is similar to the structure of Pood-closet. On sale there are both separate equipped seats to build a house for closet with their own hands and a plastic cabin with all the necessary devices. Depending on which substances of biological or chemicals are used in the relay, containers are included for substances.
However, if you decide to stop at the choice of the hay to the cottage, then carefully read it with its characteristics, with materials that are used for waste processing, with the design of the toilet. Take accountability, waste cleaning, as well as the cost of the most fillers.
Ground part
By choosing a place to lead uncleanness and its design, you can make a house. Let's deal with the types of cottages to be located on the street.
You can build a toilet in the country with your own hands and virtually all possible materials:

The choice is limited only by financial capabilities, as well as the calculation of how long you are going to use the country toilet for its intended purpose. Naturally, from the brick or slag block of the cabin will be longer in operation, rather than a model of wood or plywood. Although competent exterior lining and high-quality roof will be able to extend the life and preservation of the presentable external view For quite a long time.
To choose for yourself a specific scheme dacha houseYou can familiarize yourself with closet drawings for different models.
 Naturally, the diversity of forms refers to those models that are built from the frame, and then trimmed with lung materials. Beginners from the brick or from the slag block can be built only the traditional countrycarf.
But to competently make the construction of other types, you can search ready drawingswhere all sizes will be delivered, or create your own, unique drawing, if it is impossible to keep your fantasy.
If you decide to create a house from scratch, then when developing a drawing, consider you inside it all the necessary items fit and so that it was comfortable there. Consider growth and a set of possible visitors of this room at your country. It is better to make a spacious house, in which even the most complete from acquaintances will be able to enter.
The toilet seats can be done both from a wooden stand and in the form of a regular toilet. Unless you choose such that the passage of waste of life in the cesspool was unhindered. Washing function for dacha premises is not provided.
Toilet house models are the following type:

In principle, nothing complicated in it. You only need to assemble the frame, and then strip it using the selected type of materials. Installing a house can go straight to the ground. There is no need for the foundation for him. All you need is to immerse the frame for about 30 centimeters into the soil. That is, it is obvious to do in every lower corner an extended leg so that you can fix the cottage toilet's house on Earth.