Little bathroom baths are some interesting projects for self-construction. Budget bath do it yourself light sauna
- This is a complex, but quite fulfilled event. First of all, the owner must choose the appropriate material to build a bath.

Choosing a place to build a bath
Start by selecting a suitable place to locate the building. This will help you with the following recommendations:

Before starting any construction activities, prepare the Bani project.

Determine the optimal size of the structure. At one vacationer should have at least 5 m2 from the total area of \u200b\u200bconstruction. For example, if you build a bath for 4 people, its area should be at least 20 m2.

Standard Banya consists of a wage, a washing department, a pre-banker and rest rooms. Install convenient dimensions for you and features spatial about the placement of listed premises.

Prepare the following drawings:

You can do all these drawings yourself or find in the open source. In general, the projects of baths from the bar remain almost the same. If there is a desire and sufficient budget, order the preparation of the drawings of the professional.

Bath construction materials
To build a bath from a bar, you will need a whole set of various materials and devices, namely:
- bar. Traditionally, the material is used by section 150x150 mm;

- paul boards. The best way - four-meter cutting board 15x5 cm;

- boards for the ceiling. Typically uses a width of 10 cm wide and a thickness of 2 cm;

- materials for finishing interior. Perfectly suitable lining;

- vapor insulation material. The best option is modern vapor insulation films;

- waterproofing material. If possible, use a foam. Polyethylene film is also suitable;

- heater for the ceiling. Mineral wool materials are well suited;

- sheet asbestos. With it, you are insulating wooden elements of building from high temperatures. Isolation sheets must be fixed on the walls near bath Furnace. Also in isolation, wooden elements installed in close proximity to chimney are needed;

- bulk materials for arrangement. Standard set: cement, sand and rubble;

- material for finish finish Roof. Focus on your preferences. The main thing is that the roof of the bath looks well surrounded by the roofs of other buildings on the site;


- insulation for interventory space. Use jute. Also suitable pack and moss.

The construction of the bath is best to start in the spring, because After the completion of the main events, wood will need to leave on the semi-annual "wintering". During this time, the material will dry and give the desired shrinkage.
Cement buy immediately before construction.
Bath Guide
The work is performed in stages - from the preparation of the construction site before the bath equipment of various accessories.
First stage - Preparation of terrain
Clean the construction site from various kinds of garbage, shrubs, large roots and in general, which is able to prevent the foundation at the stage of arrangement.


The second stage - the fill of the foundation


Attach to the rafters of the crate board. Place hydro-, heat and vaporizolation materials, bathing is one of the most important elements of its construction from this will directly depend on the quality of the built bath. Install the selected finish roofing.
Prices for various types of timber
Fourth Stage - Interior Equipment
Start with the arrangement of the necessary communications.

You must take care of the installation at the stage of creating a foundation. To do this, be able to create a veil or a drainage well connected to a bath with a bias.

After completing the sewage arrangement, make the floor. It can be concrete or wooden. Concrete floors are usually lined with a tile. Such a coating is more durable.
The wooden floor is traditionally done by flowing. The technology is extremely simple: lags are installed, floorboards are nourished with some gap. You can also create a small hatch for the impact of the effluent and close it with a perforated grille. The floor in this case should be made with some slope. As a result, the moisture from the floor will fall into the hatch, and from there on the pipe to be discharged into a drainage well or pit.


So that the wood serves as long as possible, carefully carry out the bath after each visit.
Perform the insulation of the ceiling and the structure of the structure using suitable moisture, heat and vapor barrier materials. Install the doors and double-glazed windows. Move the water pipe and electricity into the bath. Install the necessary electrical appliances.


Prices for thermal insulation materials
Heat insulation materials
Fifth stage - oven and shelves
The design of the shelves pick up at its discretion. They are built in the same order: first mounted a reference frame from a solid timber, after which the boards are nailed to the supports.
The furnace also choose at your discretion. You can lay out the traditional, install a convenient metal unit or a modern electric heater.

Heavy furnaces require compulsory arrangement of an individual foundation. In this moment, everything is also determined in a separate order, taking into account the characteristics of a particular furnace.
Prices for various types of stoves for furnaces
Stones for stoves
Sixth Stage - Additional Accessories


In conclusion, you will only have to supplement your country bath of different kinds of accessories, namely:
- brooms;
- wooden mug to add water;
- buckets;
- of different types of wooden lattices, etc.
The internal arrangement of additional rooms of the bath remains at your discretion.

Good job!
Prices for Bath and Sauna Accessories
Accessories for baths and saunas
Video - Bath in the country with your own hands
Who did not dream to build a real bath on your summer cottage? But sometimes it is so small that a full-fledged bath structure is simply not "squeezed." In this case, a mini-bath can be excellent out of the situation. In terms of comfort and functionality, it is practically no different from the bath standard sizesAnd the time, forces and means to build a similar design will be much smaller. In addition, a small bath is quite realistic to make it yourself. This will be discussed further.
Features of the design of the internal space bath
When creating any project, the first thing is to choose a suitable material for the construction of the structure. And the bath in this question is no exception. So, when building a bath construction, builders use mainly materials such as foam block, brick, timber or solid log. Professionals recommend preference to give natural materials - wood. But this is no longer a matter of taste, but financial opportunities.
When designing a small bath area, you need to adhere to the same technologies as when planning the battery of standard sizes. But in our case, it is still important to take into account some moments:
- To build a small bath, a powerful complex foundation is absolutely not required, since we are talking about low loads. Therefore, in order to facilitate the process of earthworks and reduce the consumption of funds, it is quite possible to do with tape / support-pile.
- The location of the functional zones should be approached very seriously, because in a small design area, all flaws and imperfect layout will immediately be noticeable and certainly causes inconvenience.
- The furnace is best placed in the pre-tribades so that it does not interfere with the wage to the steam room and vice versa. The furnace must be maximally protected from self-burning.
- The principle of building the premises in the minibar should be absolutely the same as the standard. So, the shelves must be installed along a deaf wall, the door threshold to raise up up, and make the box low. All this is done in order to delay the pair inside even when opening the door.
- In the bathrooms, in no case should there be locks, and all the doors should open only.
Attention! So that in the bath it was convenient to wash and comfortably steam, the construction area must be calculated in such a way that its useful part is at least 10 square meters. m.
Basic mini bath drawing: compact and functional solution For dacha
So, consider the simplest project of the bath design. Any bath must have four main rooms: a pre-banker, a washing, a steam room and a lounge. It is necessary to clearly understand what minimal dimensions may have each of them. So, for the pre-banker and the steers, you can choose the optimal dimensions - 1.5x2 m; Washing can be an area of \u200b\u200b1x1 m; And the lounge is 2 times more washer.
Construction of foundation
After determining all the main parameters bathrooms You can proceed directly to construction work. When choosing a suitable type of foundation, pay special attention to the type of soil area on which the bath will be erected. If the soil is solid, and groundwater Slit deeply, it will be enough lightweight foundation. Around the markup of the future building laying flat stones, cover them with a small layer of clay and slightly presses. Top of laying wooden bars. Complete the process covering the bars with waterproofing bitumen.
If there is a ribbon foundation on a plot or wet soil on the site. Prepare a trench, fill it with a layer of sand, then rubble and firmly sink. After put the reinforcing grid on top. It remains to prepare a cement solution, which will need to pour. Do not forget about waterproofing: in this capacity you can use runneroid sheets.
Construction of carcass
There are many options for the construction of the walls of the bath. We will use the easiest and fast - frame. For its construction, we will need the following materials:
- wooden bars (5x5 cm);
- boards (minimum thickness - 2.5 cm);
- foil / Waterproofing film;
- heat insulation.

Frame Mini Bath: The most simple and fast building
According to a previously prepared project, a frame of BRUSEV is collected. FROM inner Sheets with boards. You can use conventional screws or anchors as fasteners. Do not forget about heat and waterproofing. The first mounted the material that does not pass the heat from the bathhouse. In this capacity, you can use clayzit, sawdust or mineral wool (rarely used). To create a waterproofing layer, bitumen mastic is suitable. The final stage of the construction of the walls is an internal coating (not mandatory, but desirable element).
Council. To finish the washer best to use materials that are well tolerated with water contacts: galvanized, polystyrene, etc.
The point is left for small - build a roof. First prepare slinge system And mount it on the frame. After starting the installation of the roof: metal tile, slate, etc. suitable Do not forget about the chimney - it is necessary to leave the free opening on the roof.
To make the appearance of the bath, the completion, as a protective and simultaneously decorative element, the lining or block house is used. Lining is the most common option for finishing the exterior bathhouse. This material is cheap, practical and durable. In addition, it is a rather successful imitation wooden bar. The block house externally looks like a lining, but is distinguished by a more presentable appearance and quality of wood.

Sheathed outwardly under the bay tree will delight its aesthetic look
With the trim, we finished, it remains only to conduct communication. Let's start with the water-sewer system. The water supply system (use the sampling principle) is mounted as follows:
- We prepare two 50 liter water tanks, as well as hose and mixers.
- We install the tank in such a way that the tank with cold water is half a meter above the tank with hot.
- We connect tanks with a hose: one end connect to the bottom of the "cold" tank, and the other to the upper "hot".
- As an additional connecting element, use a pipe with a mixer.
To ensure a complete drainage of water after a bath "Session", you need to construct an effective drainage system. It's easy enough to do it. It is only necessary to dig a drainage well not far from the bath, and in the washing to do the drain holes, to which the pipes are tested under a slight tilt and direct them to the well.

Scheme of one of the options for summing up communications to the mini bath
For water heating in the washing, a mini-oven or a tan is quite suitable. To ensure sufficient air ventilation in the bath, it is enough to do several wall holes near the entrance and close them with special assault.
On this process of the construction of a mini-bath for dacha can be considered complete. Follow the instructions offered in the article, and you can build a convenient and high-quality bath For your family.
Video: Mini bath for giving with their own hands
The bath at the cottage is a special philosophy, culture, tradition. Often, happy owners of country land plots begin to ennoble them from the construction of a bath, and not at home. In Russia, baths are separate standing buildingsAccordingly, they should organically fit into the design of the local area.
Bath in the country with your own hands: Is it worth the game of the candle?
The financial question is the most relevant. It is one thing if the bath is being built for hygiene and consists of two small rooms - a pre-banker and steam room. In this case, the construction can be saved well.

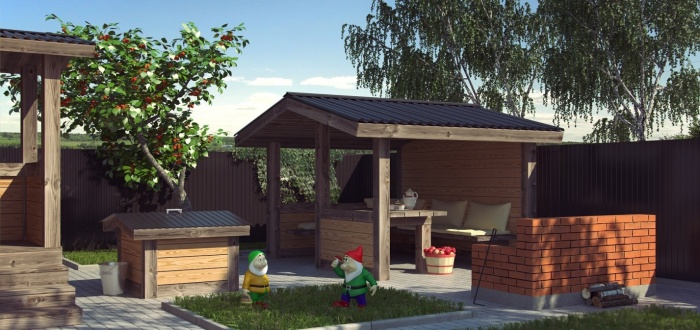
Another thing is when a multifunctional bath is built, as in the photo above - with a steam room, a lounge, a font and terrace. Its designer needs to be involved in designers, experienced builders, order natural finishing materials, equip the area for the pool or font. Such a bath in the country - the luxury that units can afford.
But always there alternative options - this is finished bathswhich are collected on the site as a designer. There are mobile baths, ready for use on the first day. In this case, relaxation and pleasure for little money are guaranteed to summer houses.
How to build a bath to give your own hands: Estimation
Any construction begins with counting costs. Professionals advise to add 25-30 percent to the resulting amount so that there are no unpleasant surprises in the course of construction.
Dachnips, which attract to the arrangement of the baths of professionals, the service will cost about 20 thousand dollars. For this money you will get a facility with a steam room, a shower, a small lounge and a swimming pool. Connecting communications is also included in the price.
By excluding the pool from the project, the customers will save 2-3 thousand dollars and will receive a bath of such a sample as in the diagram below.

It is clear that the turnkey bath involves the use modern technologies And reduces construction time. But it is unlikely that these advantages will weaken the low-blank sums in the estimate, since almost half of the amount (if not most of them) is the payment of labor to builders.
Independent construction requires 3-4 times longer, but it costs cheaper. What time is cheaper? To do this, make a list of works and calculate their cost.
In the estimate cost, be sure to include:
On average, the construction of the bath with their own hands will cost 600-650 thousand rubles. It is twice as cheaper than professional construction, but still for many daches expensive, while ready-made mobile baths can be purchased for 120-200 thousand rubles.
We will talk about mobile baths below, but still focus on stationary structures and their views.
How to make a bath with your own hands: Drawings, Project
The construction of a traditional bath in the countryside begins with the design and drawings. Any designer engineer will ask the material to be used in construction. The type of foundation, the load on the soil, other characteristics depends on its choice.
Brick bath
Such baths are warm, beautifully look, suitable for any landscape design, but to build them with your own hands, not having experience, it will not work. Yes, and the cost of brick baths cheap can not be called.

Block bath
Foam block, gasoblock and other block materials inexpensive. The disadvantage is that these materials quickly absorb moisture - the problem is solved by the waterproofing device. Again, you need knowledge and experience in construction.

Bath of polycarbonate
The budget structure, which can be used in direct appointment only in the warm season. But for the construction of such a bath, no need to fill the foundation, to build a stationary roof - everything is much easier. What such a bath looks like, can be seen in the photo below.

Wooden baths
The log house is a classic. Such baths are warm, useful, durable, cost inexpensively if with knowledge of the case to approach their construction.

The classic bath consists of 4 rooms:
- Terrace or dressing room (pregnant).
- Restroom.
- Shower.
- Pair.
Here are some projects baths of different sizes:

If the area area allows you to extend the bath at the expense of the veranda, as in the next drawing.

If the place and means allow you to equip a font or pool. Some dackets put the swimming pool on the terrace.

If there is no roofs or a terrace of a small area, you can cover it with polycarbonate. Such an approach expands the functionality of the bath and hesitate the project, because polycarbonate costs cheaper than the construction of walls, overlaps and roofs.

It is not necessary to install a landline pool - you can do the frame pool by installing it on the street.

On video recorded step-by-step technology Construction of a pretty bath with their own hands. This construction is a size of 3x4 meters, erected from a wooden bar with a cross section of 150x150 mm.
What does the inexpensive bath look like: photo
Cheap baths look not so luxurious as objects built on an exclusive project. Strong side Budget structures - simplicity and functionality.
1. Compact bath in context, consists of a pre-banker and steam room.

2. Cute semicircular form structure. Inside - dressing room and steam room with wood stove.

3. In order to save space, the furnace can be installed in the paired itself or beyond. In the photos below you see both options.


Simple and cheap mini-bath
The simplest version of the bath is a building 2x3 meters, which has a steam room and changing room. Two adults can be batted with comfort. For the pre-banner, there is enough segment of a meter width, and the remaining two meters - for the steam room.
An alternative option is to complete a canopy on the foundation column and equip in it.

The next step is the foundation, it should be durable and durable. The ideal option for stationary country buildings is a ribbon base.
While the finished foundation will stick, summer houses can prepare a bar to the strapping and construction of the walls, to then quickly connect the logs into a single integer.

After the walls are ready, you can move to the floor mounting. When installing the floor in the steam room you need to withstand the slopes so that water flows into the ladder.
The floor is stacked in several stages, the order is as follows:
- Tamper soil and disseminate the hydrobarier.
- Fill in the inner space by clay.
- Put lags for the floor.
- 4. Mix mineral wool or foam between lags.
Sew space wooden boards closely.

For a small bath fit single Roof - Supports for it are made from the same wooden bar as vertical skeletal supports, and fastened with metal corners. They are mounted onto the case, and on it - tile or other decorative coating. The ceiling inside is fed edged board, closely combined

The oven in the bath can be made with your own hands, attract specialists to the laying or buy a ready-made model. The finished furnaces are two species - wood and electric.
Wood furnaces and fireplaces are used in the traditional Russian bath on firewood - to maintain temperatures, it is necessary to periodically throw onto the lamps. The chimney for the removal of combustion products is required.

Electric furnaces are compact, equipped with thermostators to maintain a given temperature, produced different power and design. They are easier to operate, but wet steam will not work in such a bath.

Banya-barrel under the order
The most comfortable and low-cost option for summer residents we left on the final. These are bath barrels or sauna barrels, as they are different called.

They stylishly look, initially equipped with wood or electrical furnaces, and for their installation it is not necessary to pour a strengthened foundation.
The barrels are installed on the cemented platform or a portion laid out. Bearing paws that are supplied complete with a bath, give it stability.

Inside the bath barrels are a steam room with sun beds, a pre-banker. Dimensions change, depending on customer preferences. The barrel diameter may vary from 2.5 to 5 meters.

In 5-meter buildings there are mounted shower, a lounge. The manufacturer initially provides exits for connecting to central water supply.

For the manufacture of barrels, coniferous wood varieties are used - from the inside and outside the board and the timber is processed by special varnishes that protect wood from rotting and deformation.
Roofing in sauna-barrels made from flexible tile. The tile is laid on a layer of moisture-resistant plywood.

There are barrels in banya ventilation system - It is mounted in the partition, it is possible to regulate it. Plums for excess water are under the landscape of the floors. This design allows you to quickly remove moisture and condensate.
The advantage of steam barrels is that you can buy them in 180-210 thousand rubles, i.e. 3 times cheaper than the construction of a minibant with their own hands will cost.

Well, of course, they won mobility. At the end of the summer season, the bath can be transported to the city house or go to the journey.
Light steam I. good mood You are guaranteed even on the road.
This article describes in detail all the stages according to which the construction of a bath is carried out in the country: video, step-by-step instructions, requirements for structures and materials. In the text you can find the most common and popular projects, photos of the best buildings, practical advice On the creation of a bath in the country area with their own hands: Starting from the choice of design, foundation and roof, ending the floor trim and the choice of furniture.
Construction of a practical and beautiful bath at the cottage: photo inside and outside, interesting projects
In order to create comfortable conditions for accommodation or recreation, the owners of summer cottages add territory. For this, flowerbeds or lawns are broken in the yard, recreation areas are equipped and small buildings are constructed, for example, canopies, gazebos, summer cuisines etc. It is an integral part of comfort on the bath.

The following factors affect the comfort of operation:
- manufacturing material;
- internal layout;
- pair feed type;
- temperature mode;
- air humidity, etc.
Much of this depends on the features of the project and compliance with all the requirements of the technology.

Classification of the main varieties of baths at the cottage: Photos of common projects
Russian steam room is the most common variety of baths made by their own hands at the cottage, photos of similar designs in large quantities Can be found online. Such a structure is a room equipped with a stove-stone. In the process of combustion of fuel, it injected the heat. For Russian steam steers, high humidity is characterized, so in order to increase the amount of water vapor, it is enough to pour cold water into hot stones.
Japanese Baths Furo are performed in the form of a large wooden tub. It is filled hot water and is installed in a room with wet air, the temperature of which reaches 30 ° C and more. Most often, the designs of such baths are built at the cottage with the shower, because before visiting it is desirable to wash.

Finnish baths called saunas are very popular. Projects of these designs are no different from the Russian Parils, the difference lies in the microclimate. IN finnish baths Air is supported in a dry state. In such conditions, the human body is able to withstand a higher temperature regime. Some lovers can move the heating greater than 100 ° C. But this is possible only in Finnish saunas.
Dachini and the construction of the Turkish bath Hamam are not refused. These structures are operated at lower temperatures. It is recommended to maintain air in the room in a wet state and not lift the temperature above 50-60 ° C. In such conditions, a person can spend a few hours in the steam room without fear of harming his health.
Important! Broom can be used in the steam room only at low temperatures. Otherwise, strong burns on the skin can remain from its application.

Projects, photos, features frame baths. Frame-shield baths. Turnkey baths: prices where to buy. Step-by-step instruction Construction, video.
If you set the bath so that the sunset rays fall into the paired through the window, it will contribute to the removal of stress. At the same time, the bath must be located so that the entrance to it would be well visible from the window of the house. Such an accommodation allows you to observe the most build up and for children.

Helpful advice! If we design the bath in the form of an extension to the house, you can save on materials and simplify work. In this case, one of the walls will be ready, and the design itself will turn out more reliable.
In the design process, it is necessary to check with the prescriptions of SNiP 30-02-97. The sixth section contains all regulatory requirements for the construction of a bath, including optimal accommodation. It is not recommended to place the design closer than 10 m from wooden objects on the site.
It is also necessary to follow the requirements of the construction standards of the bath from the fence of neighbors and other objects located on the territory. From the garden house, the minimum allowable distance is 3 m. The construction of economic purposes should not be at a distance less than 1 m from the intended construction site. If we neglect the instructions of the regulatory documents, the authorities or neighbors may require the transfer of the structure to another place, which will entail additional time and cash.

Popular types of small baths for giving
The development of a project for the construction of a bath in the country area is carried out taking into account the technical and operational characteristics of the material that will be used in the work.
The highest demand among developers enjoy the projects of the following types:
- frame structures;
- bathrooms of the precast type made of wood;
- structures made of block material, stone or brick;
- buildings made on the basis of arbolit.
Making a bet on a certain material, you should make sure that it meets the requirements for all criteria for safety standards. For example, the bath must quickly warm up and easily withstand daily use. If half the day is required for heating the room, it is much more practical to use.

It will take for a small bathhouse for the cottage to buy the following furnishing items:
- compact table;
- benches;
- clothes hangers;
- cabinet for storing bath accessories.
Helpful advice! It is advisable to plan the bathhouse so that the stove-Kamenka was located indoors of the steam room, and the boot door for firewood went to the pre-banker. In this case, you can save on heating.

You can also make with your own hands from the tree or use the old one, after removing the layer of varnish or paint and the scarce all metal parts
The bath can do without plumbing system. But this is due to certain difficulties, because the water will have to be pressed by hand with a bucket, and to equip the tank on the furnace. It is not necessarily the presence of a separate bathroom. Can be limited to the amenities in cottage house. But in this case, the bath can only be operated in the summer.
If you can refuse from the water supply, then without sewage and electricity, the bath will not be able to fully function. The problem with light solves the power line, which is stretched to the construction site.
The sewage arrangement can be done independently or entrust it to professionals by ordering the construction of one of such objects:
- Cesspools.
- Septica.
- Drainage pit.

On the project scheme you need to specify the following data:
- building dimensions;
- dimensions of each individual room;
- the height of the building and all the premises in it;
- place of installation of the heat source (furnace);
- opening type (in which direction);
- placement of window structures;
- location of switches, sockets, lamps and shields.
Elements electrical system Must have a high level of moisture protection (more than IP54). The window in the steam room is recommended to be placed at a height of 185-195 cm. It is impossible that it is located above the shelf. Optimal height premises - 2 m.
Choosing a foundation for the construction of a mini bathhouse for giving
The base for the bath is selected taking into account the size of the building and the type of soil at the construction site. Most often, experts prefer the tape and column foundation.
A columnar foundation is easy to execute. Its design consists of reference pillars that are mounted separately. Material for the manufacture of supports can serve as brick, reinforced concrete, buttone or concrete. The recommended partition size is 60-60 cm. They are installed under the angular parts of the building and walls in a step of 2 m. Under the supports it is recommended to equip the pillow from sand and gravel.
A columnar foundation should rise above the soil level by 20-30 cm. The top is aligned with the solution and is covered with several layers of rubberoid. It is recommended to apply a material 2-3 times.

Construction of a ribbon foundation costs more than a columnar. This is due to the fact that the construction of the base passes throughout the perimeter of the building. A trench is digging for its arrangement, the depth of which is 40-60 cm. On the bottom it is equipped with a sand pillow, which should be tamped. It will protect the basis of destruction when a seasonal shift of the soil occurs. Foundation walls are formed using concrete fill. It is allowed to use reinforced concrete or concrete blocks, boot or red bricks.
Note! Wood baths do not have a lot of weight, therefore it will be enough small-breeding foundation for reliability.
How to build a bath at the dacha with your own hands: Technology
Before proceeding with construction, you should prepare the platform. To do this, clean the territory from superfluous: garbage, vegetation, stumps and stones. Only after that you can proceed to markup. If a country cottage area Located under a slope, in addition to this, the construction site will have to be aligned.

After that, in accordance with the project, marking on the ground is applied. It is easy to transfer the battery outline, it is enough to put a mark in the form of fittings or long pegs in the form of armature or long pegs. The length of two walls is measured from the first label, after which other elements are installed. When the entire perimeter of the building is transferred, you should check markup. Corners should be straight. To check it, it is enough to measure the markup over the axes between the spicks. Length parameters must match.
Ribbon foundation does not need strict compliance with markup parameters. If the discrepancy in the length of the axes is small, the result can be left. For columnar and pile bases, accuracy is needed in measurements, so the longest axis will have to shorten until the parameters match. Thus, the primary markup is made.
Applying marking for a small bath in the country with your own hands, taking into account the features of the foundation
When the perimeter of the building was transferred to the terrain, further marking is carried out taking into account the characteristics of the selected foundation.
The base in the form of plates is extremely rare, since its cost is very high. This type of foundation applies only in cases where it is not possible to choose something else. Marking is performed in accordance with the sizes of the project on the project. You can perform the foundation wider and longer than the bath, if it is provided for by the project, but not less.
Fine breeding belt foundation is the most inexpensive and durable option of the base. Marking is done so that the tape filled with concrete passed strictly around the perimeter of the building, as well as under the walls of the walls. A columnar foundation is mainly used for the construction of wooden structures.

The markup is performed in accordance with the number of supports, which in turn depends on the size of the construction.
Screw foundation has its advantages. Its construction does not take much time, and the installation system is very simple. In addition, there is no need to perform earthworks, so the playground will remain clean. Marking is performed in accordance with the number of piles. No deviations are allowed.
Helpful advice! If the site is under a big bias, it is recommended to use a pile foundation. It allows you to increase the reliability of building and reduce the probability of climbing.
Preparation of a ribbon foundation under a mini-bath for giving with your own hands
Fine-brewed belt foundation will be acceptable in the following cases:
- Soils on the plot of incomputsy and dry.
- Groundwater run high.
- Winter is not accompanied by severe frosts.
- For construction, lightweight material is chosen, so the building is not heavy.

After the outer markup is performed, you can move to the inner. The minimum foundation width is 50 cm. The base protrusion beyond the battery on each side is 5-10 cm. If the structure of the structure is 3 × 4 m, then the maximum markup parameters for the outer edge will be equal to 3.2 × 4.2 m. At the same time You should consider the place where the oven will be placed, because it also needs the foundation.
For more convenient to work with marking, it is recommended to install wooden structures that resemble small benches at the corners. They are set on the same plane. The height of these structures should correspond to the height of the formwork, which will be erected later. The measuring cord is attached to them.

Next you need to remove upper layer The soil according to the markup and, removing it to the side, dig a trench with a depth of 50-60 cm. In some cases, the depth of 35 cm is allowed if the soil freezes not too deeply. It is very important to get to the clay layer. It is impossible to leave the soil bottom of the trench. Subsequently, clay will be used in further work.
The bottom of the trench must be aligned. To do this, it is better to use the construction level. Then the sand pillow is formed, the sand layer is poured into the trench, the minimum thickness of 15 cm. It is wetted with water and is well trambed. If there is no vibrotherapwork at hand, this operation can be done manually by taking the massive bar and having a handle to it. The next layer is formed from rubble with an average fraction size and in the same way trambed.
Production of formwork for construction of a bath in the country with their own hands
At this stage of construction, a formwork design for filling the belt foundation is made. The height of the sides is selected so that their upper part is tuned to mark the cord. Materials for the manufacture of formwork can serve any techniques, such as old boards or slices. The design will be temporary, so after use it will need to disassemble. Prepared shields are installed along the trench.
Important! Fixing formwork should be rigid and reliable, otherwise a heavy concrete mass can move the elements during the fill and deform the entire design.

Before performing the fill from the inside, the formwork should be closed with a polyethylene film. This coating will protect the boards from dirt and will prevent the leakage concrete solution Through the slots between the design elements. To fix the film layer, thin nails or staples installed using a stapler can be used.
There should be a distance of about 5 cm between the edges of the trench and the resulting frame. Do it you need to do the most accurately to protective film did not break. It is advisable to raise the frame over the pillow. To do this, under the formwork put slices of granite. It is not recommended for these purposes to use a brick, since it is scattered under the influence of moisture.
If the project provides for the commissioning of communication systems through the foundation part of the construction, then for these elements, it is necessary to leave the holes. For this fit sleeves. They can also be used to form a product.
Filling the foundation for the construction of a bath in the country
The process of filling the foundation does not allow substantial breaks in the work, so the time allotted on this procedure should be planned so that you can manage in one day. Otherwise, it will not be possible to make a monolithic tape. The most convenient method of delivering a concrete solution is a mixer. It can also be used for filling the foundation.
Application of concrete mixer is less convenient. In this case, you will have to prepare the mixture yourself. This requires the cement M400 brand. The mortar from cement, sand and rubble (gravel) is mixed in the following ratio of 1: 3: 5, respectively.

After filling, the foundation is compacted with a vibrator. You can use the bayonge method so that the base is caught. When this happens, add a small amount of concrete to align the platform. If the base is formed under wooden buildingWhile the solution is not frozen, it should contain the bolts for the foundation. The formwork design can be removed no earlier than a week after the fill.
Note! One week is not enough for concrete to gain strength. Therefore, all work must be done carefully. In order not to risk, the construction of the bath is recommended to start 28 days after filling the base.
How to build your own hands in the country of the bath: Wall Laying
If the construction of a bath based on bricks, stone or block material is performed, the foundation level should be aligned with cement-sandy solution. After that, the double layer of rubberoid is stacked.
The masonry must be started from angular zones. When the first blocks are installed on cement-sandy solutionThe placement is checked. Elements should be located in the same plane. Then it is necessary to pull the twine at the top edge. It will be used as a landmark for the entire row.

For laying of the second row, another mixture can be used. It depends on the material. If the walls are erected on the basis of the shell and brick, the cement-sandy solution can be left. For lightweight blocks, it is better to take the mixtures that manufacturer recommends.
Above window and door structures are mounted jumpers. A formwork is installed here and armopoyas is formed. It is fixed in the foundation bolts, helping to fix Maurylalat. When concrete fully freezes, you can move to the creation of the roof.
Construction of a frame for a small bath in the country
For the construction of a frame of a frame type, a base of wood is constructed. She is silent finishing material. Due to this, the wall of the building is formed. To work, you need to take high-quality materials and strictly observe the technology of their installation.
The foundation forms a frame design without lower strapping. For this, the timber is suitable with a cross section of 10 × 10 cm. On the end parts of the material, the propuls should be made approximately half the thickness. This will allow the elements to be made with each other with self-tapping screws. If bars are taken for construction with a size of 5 × 10 cm, then the frame side is assembled by the method of docking. To bore the items to use metal corners.

Priority Further frame assembly:
- Installation of the face strapping board.
- Flooring the lag flooring to the board.
- Trimming the lag on the other side for mounting the second ending board for the strapping.
- Laying the insulation between lags.
- Bringing strapping boards.
- Build the frame and installation of parts to the place allotted for them.
- The connection of all elements in one design.
Helpful advice! To get a low thermal conductivity frame, it is better to use boards made from aspen, well-dried larch or linden. In this case, the design will be resurable to deformation loads.
To prevent the liquid accumulation inside the frame, it is recommended to use a vapor barrier film. Fiberglass and mineral woolthat will provide air access. This procedure should be performed after the roof is made because the material can wet under the rain.

How to do the roof and installation of floors
At this stage, the construction of a skeleton bath will only remain the installation of the genital board and build a rafter system.
Projects of other buildings need more complex design, which is carried out in the following order:
- Installation of lag.
- Organization of roughing.
- Fixing a vapor insulation layer.
- Laying insulation.
- Installation of waterproofing material.
- Flooring genital boards.

These boards need regular replacement, which is carried out every few years. Taking into account the fact that a lot of time is required for drying a lot of time, it is recommended to make floors not from the boards, but from concrete or carry a facing of a tile. On top of it you can put shields from wood, which, after use, it is easy to carry out where they can succeed during the absence of owners. In frame structures that are mounted on top of the pile or foundation, Allow only a wooden floor with insulation.
You should also think about hydro and thermal insulation, otherwise pairs will be unhindered to the attic, accelerating destruction wooden beams and the rafter system.

The choice of the roof depends on technical features Buildings and type of terrain, where it is worth. If the site is surrounded by high trees, you can no concern to build a high roof of a bat-type. For steppe zonesWhere buildings are subjected to serious wind loads, it is better to make roofs with a minimal bias.
For the buildings of a small size, a single roof is suitable, but provided that snow loads are insignificant in winter. This type of construction is often used in projects, where the bath is attached to the building of a residential building.
Organization of ventilation according to the general projects of the bath in the country
During the operation of the steam, the air should be updated in it for an hour twice, or even three times. Most often, the inlet is placed at the bottom of the boiler, and the exhaust is located on the opposite side under the ceiling. If ventilation is incorrect, the air flows will move slowly. There are other options when this process is completely controlled and the heat quickly leaves the limits of the room. In this case, the legs will be frozen, and under the ceiling will be unbearable heat.
Note! It is necessary to close the exhaust window during steaming steam. Otherwise, it will take too much time.

To keep the warm air at the ceiling, two holes should be performed. Each of them will perform a specific function. The bottom hole is designed to maintain comfortable conditions indoors. Through it will go outside the cooling air. The top hole should be opened when there is a need for ventilating.
In need not only the steam room, but also the rest of the rooms of the bathroom. To eliminate heat loss when it is not necessary, it is advisable to equip hole holes that will be opened only at the time of air.
Performing the trim according to the project of the bathhouse for the cottage
Regardless of whether the bath is made of brick or wood, the finishing of surfaces is performed according to a single technology. First you need to make a crate and consolidate it on the wall. Wooden rails are suitable for this. After that, the design is truncated. Similarly, the finish of all rooms is carried out, except for the steam. Here it is required to sash under the crate heat-reflecting material in the form of foil.
Outdoor finish performs not only decorative, but also a protective function. As a trim, you can use a block house, a timber imitation, lining, siding and facade tiles. Also fit the finish in the form of paint.

On this construction of the bath ended. It will only be left to install the appropriate heating equipment and furnishings. Some of the object items can be made independently. If there is no desire to make the furniture with your own hands, there are extensive selection of special furniture in stores. As a budget alternative, you can use old interior items, which after a small restoration will be able to last for a long time. But you should not use products from the chipboard, because they are very quickly being destructed under the influence of moisture.
Bath construction in the country: video instruction
Emphasize the taste and individuality of the owner country house A harmonious landscape design is capable. Hiring an expensive specialist is not at all necessary. Regardless of the area of \u200b\u200bthe site, it is interesting to plan and place the territory can be independently, based on its own preferences. An derived approach deserves accommodation on the bath site. Learn more about important details of landscape design and admire the harmonious design of the territory will help the information below with the gallery of current photos.
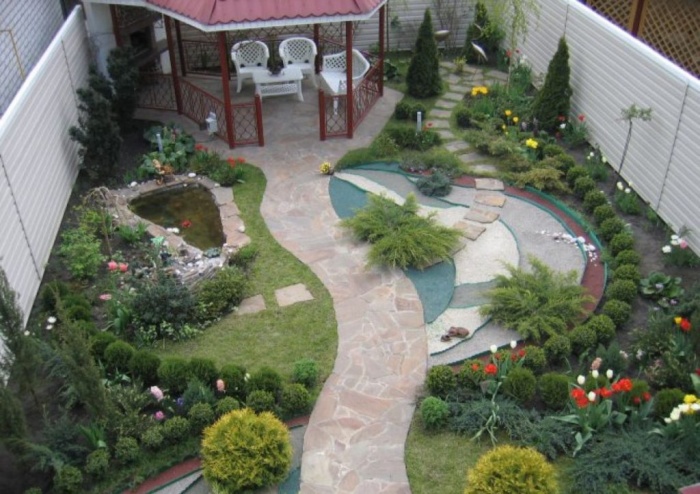
The main stages of the design planning of the territory
The design of the site is easier from scratch when the territory stores the original purity of nature. The presence of a house in most cases is not a hindrance. But the affected space is amenable to transformation, the main thing is to work out a clear concept. Therefore, the landscape design always begins with planning, which includes the following steps:
- On a sheet of paper, the scheme of the site is drawn, transmitting its shape and dimensions in a large-scale ratio.
- Available structures (house, garage, bath, hozpostroy) are applied.
- Sections are noted that planned to develop under various needs (greenhouse, playground, recreation area or pool).
Comment! If the plot is small, you should put priorities in advance.

The jamming of buildings and decorative elements does not contribute to the formation of harmonious landscape design.
- The scheme should contain all significant perennial plantings, after which it is complemented by new elements.
- The mark with the summing up communications contribute to the competent placement of new objects. This is especially true of the baths and greenhouses whose functioning will require the presence of light, water and, in some cases, gas.
- Comfortable pastime on the country site is impossible without making tracks. According to the rules of landscape design, they must interlene all the buildings and have a single style solution.
- Bright design notes always stay flower beds. Multipoints of flower beds will allow you to choose the most suitable For a particular area.
When drawing up a landscape design plan, it is advisable to have information about the characteristics of the soil and the corve. This also matches the breakdown of flower beds, building a bath or garage arrangement.
Features of choosing a place for a bath
Country rest cannot be considered complete if the bath is not worth it. When choosing or drafting a project, the size of the site, planned financial costs and strive for the combination of style with a residential house. It is very important to find a suitable place for the bath on the plot. The rest is invariably associated with a peaceful atmosphere, while preferably not to interfere with the neighbors. Guided by the following recommendations, pick up a suitable area for the bath will be easier:
- Despite the seeming convenience of finding the vicinity of the reservoir, the bath must be aimed. This will avoid the foundation and negative consequences Floods. An exception can be a bath on a hilly plot, and then after careful geological exploration.
- It is unreasonable to put a bath near the road, dust and noise are able to break any atmosphere, even an expensive design of the room will not help.
- The bath with high-quality ventilation and a thought-out sewer system will protect the plot from pollution with drains and unpleasant amber.
- It is preferable to place a bath on the southern side of the site, so the construction will be protected from the wind and have better lighting. The door with the exit to the south will retain the power of the owners of the site in winterWhen the need to discharge the drifts.
- Bani windows are recommended to plan with exit to the West. Evening rest and admiring sunset - what can be romantic.
- Bath near the neighboring site contradicts construction standards. Achieve organicity B. landscape design Allows the bath, located among the trees.
- If the material for the construction of the bath will be a wooded material, put the construction of it is better away from home from the point of view of ignition.
- Prevent infection of the source of drinking water by runoff from the bath will help the gap between the buildings at least 15-20 m.
In addition to the right sector, the exterior design of the bath plays a significant role. It is desirable that the walls of the house and bath are made of one material. This is especially important for landscape design, if the construction is in plain form. The exterior hidden in the currency of the green planes is less important. But roofing material It is better to choose a similar basic building. This contributes to the harmonious perception of the design of the site as a whole.


Tracks and lawns
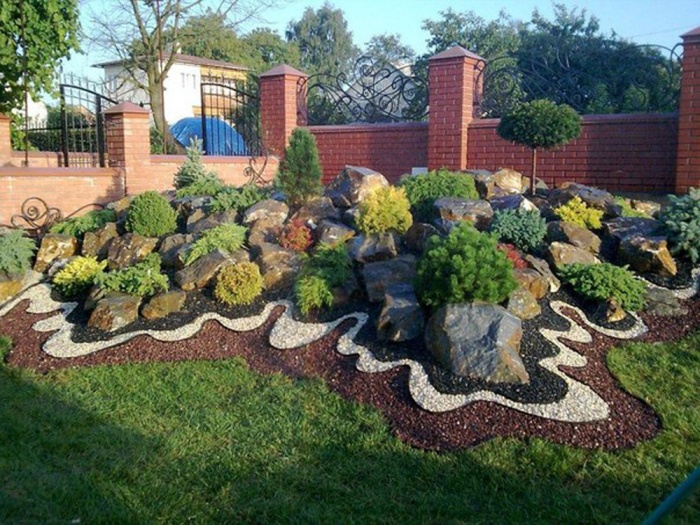
The attractive design of the site is formed due to the combination of garden tracks with a lawn. Variations of arrangement set, start with forms. Someone has a clear geometry, others prefer to bring the landscape design as much as possible to natural manifestations of nature and arrange winding trails. Material for arrangement is selected taking into account the overall stylistics of the site:
- Massive or graceful stone structures need a stone or pebbles.
- Adherents rustic style And the owners of the log cabins should be supervised to the option of laying tracks from wooden sleeps.
- Clinker brick or pavement is another option for making tracks in landscape design.
- The area with combined tracks is originally, when the middle is filled with large stone plates, and the edges are decorated with small pebbles.


The origin of the lawn on the site is also different. The presence of funds allows you to supplement the landscape design with a lawn ruls. An ideal appearance in this case is guaranteed. Save funds will allow an independent landing on the site lawn grass. Long-term process, achieve impeccable external view Landscape design can be, if it is possible to periodically hang off and regularly care for the plot.


Breakdown of flower and flower beds
Visual enjoyment in the process of staying on the countryside will bring flower beds and flower beds. After studying the possible options for making color compositions, pick up interesting option For the landscape design of its own sector with a bath will be easier. The materials used in the arrangement and the location of the club are capable of transforming the most unbroken territory into a fragrant Eden. The following types of flower beds are popular with popularity:

The use of sweater materials during the design of the flower on the site is one of the most sought-after landscape design techniques. Bicycle, barrel, tires, trolley - list all options is not possible. Fantasy of the owner of the site can exceed all expectations.
Compact territory is not a limitation for breakdown by flower. The design in this case moves with a horizontal to the vertical plane. Various pendant porridges and boxes, multi-tiered flower beds and wall panels - ways to beautifully decorate space, without having free space, set.

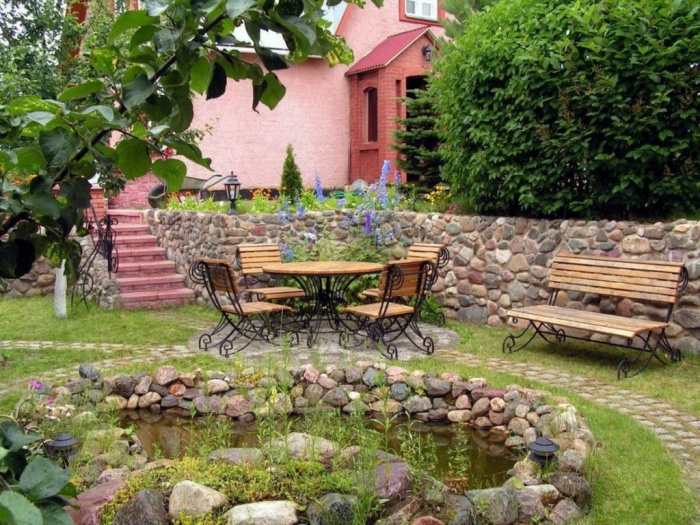
Registration of the recreation area
Landscape design covers all corners of country ownership, in addition to the bath, the territory is often equipped with a seating area. Recommendations for arrangement are as follows:
- For a comfortable pastime, take care of the flooring. Here, too, do not forget about the harmony of design. If the stone prevails in the design of the space, the site is also closed with similar material. The predominance of wooden structures involves to arrange a platform from deck boards.
- The presence of a canopy will allow you to be in the recreation area and on a hot day, and with a light rain.
- The most common way to arrange a recreation area in landscape design - Mangala installation. You can hit the guests to Tandan.
- The choice of furniture is extremely large. Budget I. practical option - Plastic kit. Rattan looks exquisite, lower in cost, but no less effectively in landscape design looks artificial Rattan.. Forged headsets or wooden instances - it all depends on the preferences of the owners.